Set Up the Oracle Analytics Extension Development Environment on Mac

This topic describes the tasks you need to perform to set up and use your Oracle Analytics extension development environment.

Install Oracle Analytics Desktop on Mac

Oracle Analytics Desktop provides the scripts needed to create your development environment and extension skeletons, and a local test environment.

Install or upgrade to the latest version of Oracle Analytics Desktop.
  1. Go to Oracle Analytics Desktop Installation Download, click Download and log into your Oracle Cloud account.
  2. In the Oracle Software Delivery Cloud page, click Platforms and select Apple Mac OS X.
  3. Review and accept the license agreement. Click the Oracle Analytics Desktop ZIP file to download it.
  4. Go to the download location on your computer, click the ZIP file, and click Oracle_Analytics_Desktop_<version>_Mac.pkg and perform the installation.
  5. Navigate to the Applications folder and confirm the installation created these applications:
    • Oracle Data Visualization for Desktop
    • Oracle Data Visualization for Desktop Configure Python

Install Java JDK on Mac

Use a Java JDK version that's compatible with your macOS and processor. All examples in this chapter were developed with Java JDK 8u201.

  1. Open Terminal and enter this command to check if you have Java JDK installed.
    java -version
  2. If one or more Java JDK is installed, confirm that one is compatible with your macOS and processor.
  3. If you need to install Java JDK, go to Java SE 8 Archive Downloads.
  4. In the table, click the macOS tab. Locate and download the install file compatible with your macOS and processor.
  5. Locate and run the downloaded installation file.
  6. After the installation completes, in Terminal enter this command to check that the Java JDK version you picked installed successfully:
    java -version

Update Bash Profile or ZSHRC File and Create the Development Directory on Mac

Modify your bash profile or ZSHRC file to include the variables required by the Oracle Analytics Desktop scripts. Then create the development directory to contain your development environment.

  1. To modify your Bash Profile, go to the home directory and check if bash_profile is visible. If not, press Command + Shift + . to make bash_profile visible.
    To modify your ZSHRC file, open Terminal and run this command: .
    open ~/.zshrc
  2. Add these lines to bash_profile or ZSHRC.
    In PLUGIN_DEV_DIR specify the location of the development directory, for example /Users/<username>/Documents/dv-custom-plugins.
    export DVDESKTOP_SDK_HOME=/Applications/dvdesktop.app/Contents/Resources/app.nw 
    
    export PLUGIN_DEV_DIR=/Users/<username>/Documents/dv-custom-plugins 
    
    export PATH=${DVDESKTOP_SDK_HOME}/tools/bin:$PATH 
    
    export JAVA_HOME=/Library/Java/JavaVirtualMachines/jdk-1.8.jdk/Contents/Home/
  3. For bash_profile, open Terminal and run this command to apply the changes:
    source ~/.bash_profile
    For the ZSHRC file, open Terminal and run this command to apply the changes:
    source ~/.zshrc
  4. To create the extension development directory, open Terminal and run this command:
    mkdir $PLUGIN_DEV_DIR

Create the Extension Development Environment on Mac

After you configure bash profile, you run the bicreateenv script to create the development environment that contains the resources you need to create extensions.

For information about the options available for running this script, see the script's command-line help, for example:
cd $PLUGIN_DEV_DIR
bicreateenv -help
  1. In Finder, navigate to the extension directory and run the bicreateenv script to create the environment:
    cd $PLUGIN_DEV_DIR
    bicreateenv
  2. Navigate to the directory that you created and confirm that its contents look like this:

  3. Open build.gradle and search for -pluginDevDir. If the -pluginDevDir argument contains capital letters, change them to lowercase letters. The modified argument should look like this:

  4. Optional: If you’re working behind a web proxy, open gradle.properties and add system properties that point to your proxy.
    Use the following example to set your system properties:
    systemProp.https.proxyHost=www-proxy.somecompany.com
    systemProp.https.proxyPort=80
    systemProp.https.nonProxyHosts=*.somecompany.com|*.companyaltname.com

Create a Skeleton Extension on Mac

Use the bicreateplugin script to create an Oracle Analytics extension skeleton.

For information about the extensions you can create when you run the bicreateplugin script, see Types of Oracle Analytics Extensions.
Running the script creates a folder in your PLUGIN_DEV_DIRECTORY environment. This folder contains the files that you use to develop the extension. The <extension_name>.js render method is the entry point where you can start writing code.
The bicreateplugin script uses the following syntax:
bicreateplugin viz -subType <subtypename> -id <com.company.yourVizName>

Where:

subType is the type of visualization extension you want to create. Valid values are basic, dataviz, and embeddableDataviz. Don't include subType when you create a workbook extension.

id is the name of the extension. The name you specify must be in this format: <com.company.yourVizName>.

  1. In Terminal, navigate to your extension development directory, run the bicreateplugin script.
    This example shows how to create a dataviz skeleton extension:
    bicreateplugin viz -subType dataviz -id com.companyabc.helloviz 
    This example shows how to create a workbook skeleton extension:
    bicreateplugin workbook -id com.companyabc.helloworkbook
  2. In Finder, navigate to the src/customviz folder and confirm that a new folder was created and that its name matches the extension name you specified when you ran the script.
    This example shows a dataviz extension's directory:

    This example shows a workbook extension's directory:

Test Your Visualization and Workbook Extensions on Mac

Use Terminal to run Oracle Analytics Desktop in SDK mode to test your Oracle Analytics visualization and workbook extensions. Running Oracle Analytics Desktop in SDK mode opens Oracle Analytics Desktop in the browser.

For information about creating workbooks and adding visualizations to workbooks, see the Oracle Analytics product documentation section in Oracle Analytics Extension Development Resources.
You must build and package a workbook extension before you can upload it to Oracle Analytics Desktop to test it. See Build and Package an Extension.
  1. In Terminal run this command to invoke Oracle Analytics Desktop in the browser:
    ./gradlew run
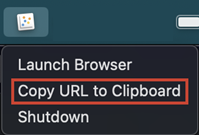
  2. If after you run the command Oracle Analytics Desktop opens and then closes, you can use the Mac menu bar to manually open Oracle Analytics Desktop in a browser.
    1. Go to the Mac menu bar and locate and click the Oracle Analytics Desktop icon.
    2. Select Copy URL to Clipboard.

    3. In a browser, paste the copied URL and press Enter.
  3. To test a visualization extension:
    1. In Oracle Analytics Desktop, open or create a workbook.
    2. In the workbook's Data Panel, click Visualizations and scroll to the bottom of the Visualizations list to locate the Custom Visualizations section containing the custom visualizations you created.

  4. To test a workbook extension:
    1. In Oracle Analytics Desktop, click Navigator and then click Console. Go to the Extensions and Enrichments section and click Extensions.
    2. Click Upload Extensions and browse for and select the workbook extension ZIP file. Click Open.
    3. In Oracle Analytics Desktop, open or create a workbook.
    4. In the Toolbar click Custom Workbook Extension to view a list of the workbook extensions that you uploaded to your instance.