- Retail Onboarding User Guide
- Retail Onboarding
- Onboarding Initiation
- Onboarding Initiation - Relationship
1.2.2 Onboarding Initiation - Relationship
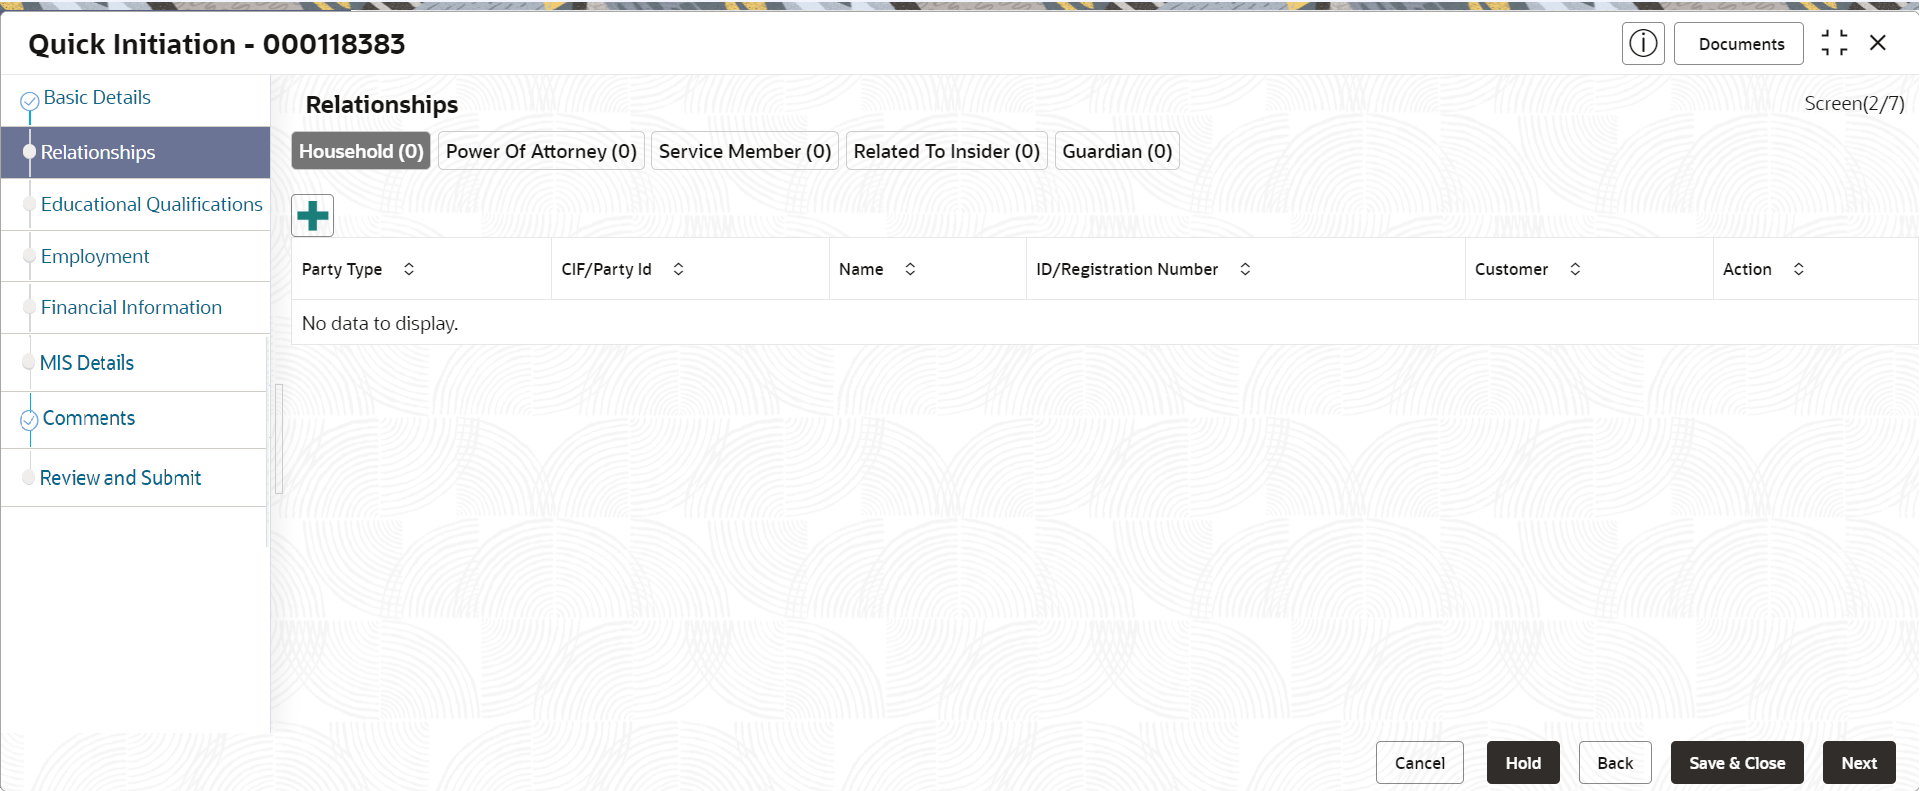
This topic provides the information to add the details about the relationships of the customer to be onboarded in the Relationships screen.
Adding relationship details is beneficial to both the customer and the bank during critical events Relationships types available are:
- Household -If a related party has a household relation such as Father, Mother, Son, daughter, Spouse, or Guardian.
- Power of Attorney - If the related party is who holds power attorney.
- Service Member -If the related party is served in military services.
- Related to Insider -If the related party is an insider.
- Guardian – If the related party is a guardian of minor customer who is getting onboarded.
Note:
The fields marked as Required are mandatory.The following Data Segments can be captured in Relationship Segment.
Table 1-21 Data Segment - Relationships
Sl.No
Data Segment Name
Mandatory / Optional / Conditional
Description
1
Household
Optional
Data Segment to capture household relationships of the party such as Father, Mother, Son Daughter etc.
2
Power of Attorney
Optional
Data Segment to capture related power of attorney holders of the party.
3
Service Member
Optional
Data Segment to capture related service members of the party.
4
Related to Insider
Optional
Data Segment to capture related insiders of the party.
5
Guardian
Conditional
Data Segment to capture related guardian of the party. Guardian is mandatory for a Minor Party.
- Click Next in the Basic info screen to add the
relationships details.The Initiation – Relationships screen displays.
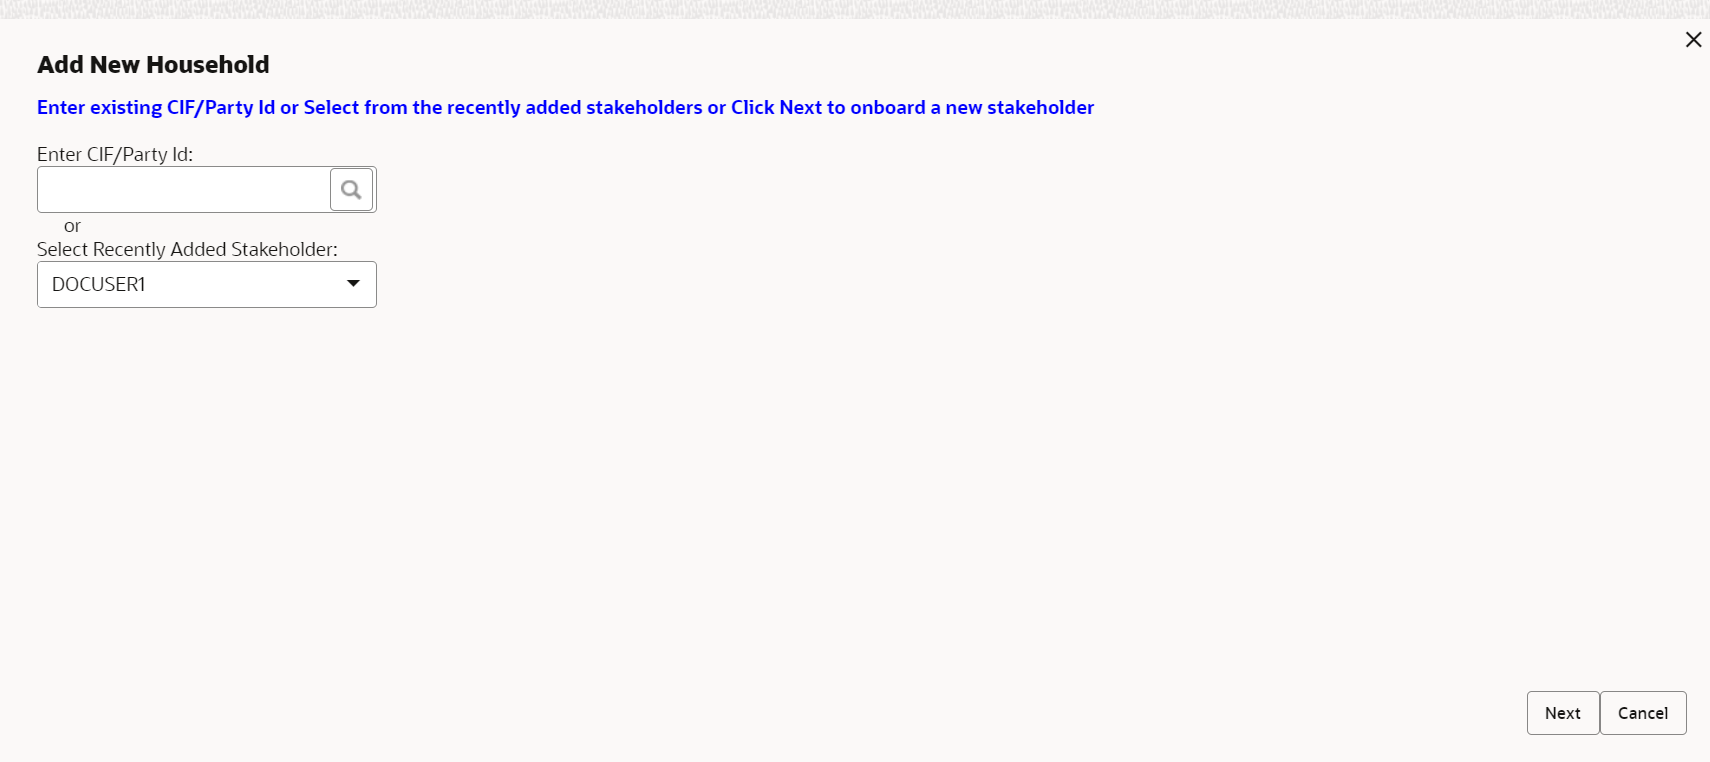
- Click
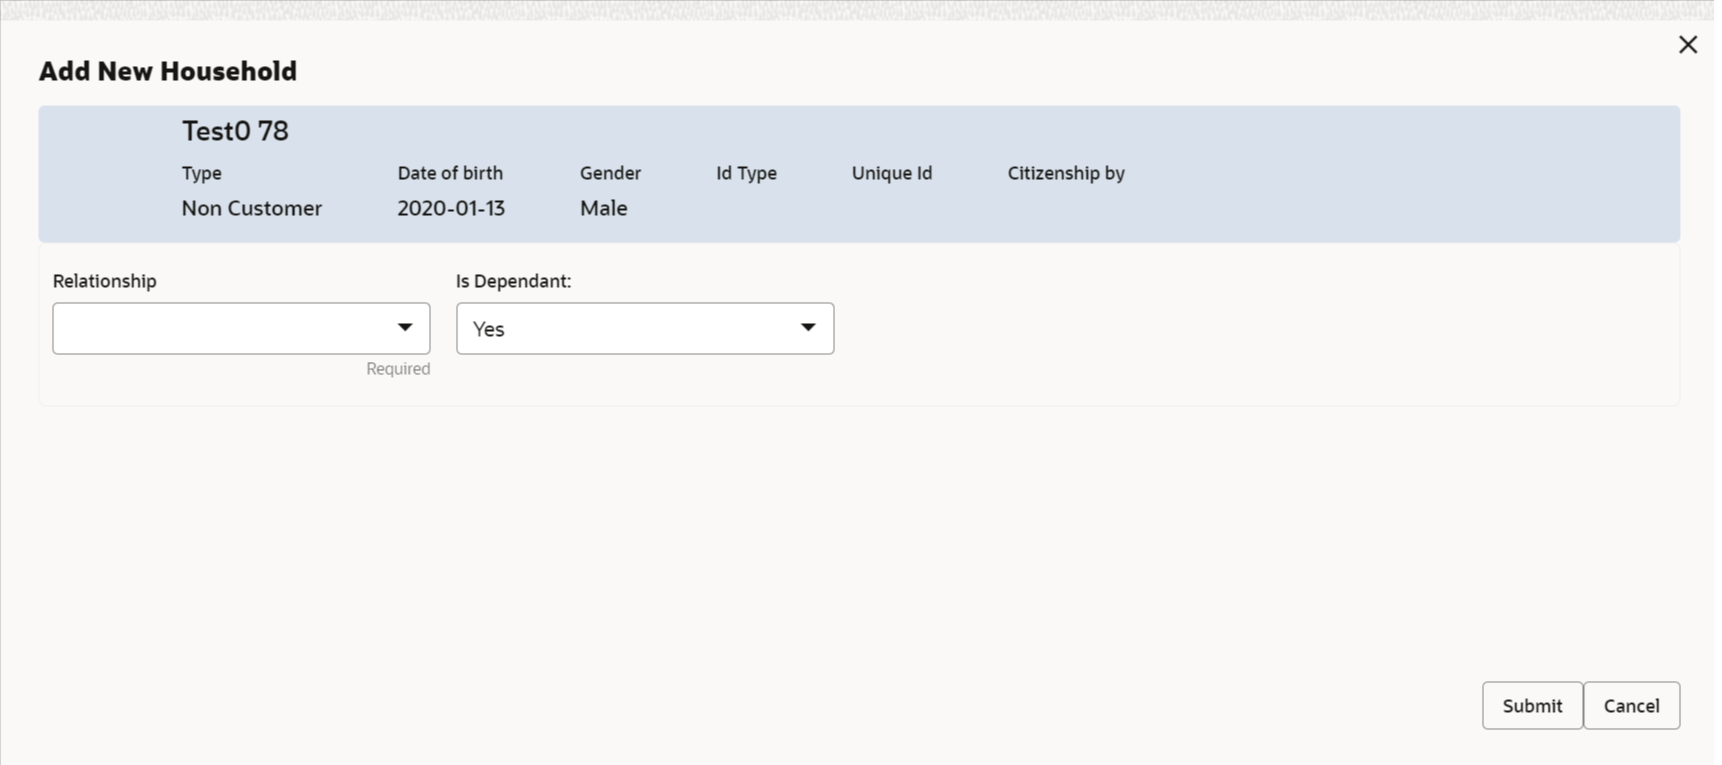
 to select desired relationship.The Add New Household screen displays.
Note:
Relationships with a customer can be either of the following:- An existing party that is a customer of the bank
- An existing party that is non-customer
- A new party, which is neither a customer nor an existing party
Existing Customer or Non-Customer
- Specify the existing CIF (if the relationship is an existing customer) or the existing Party Id (if the relationship is non-customer).
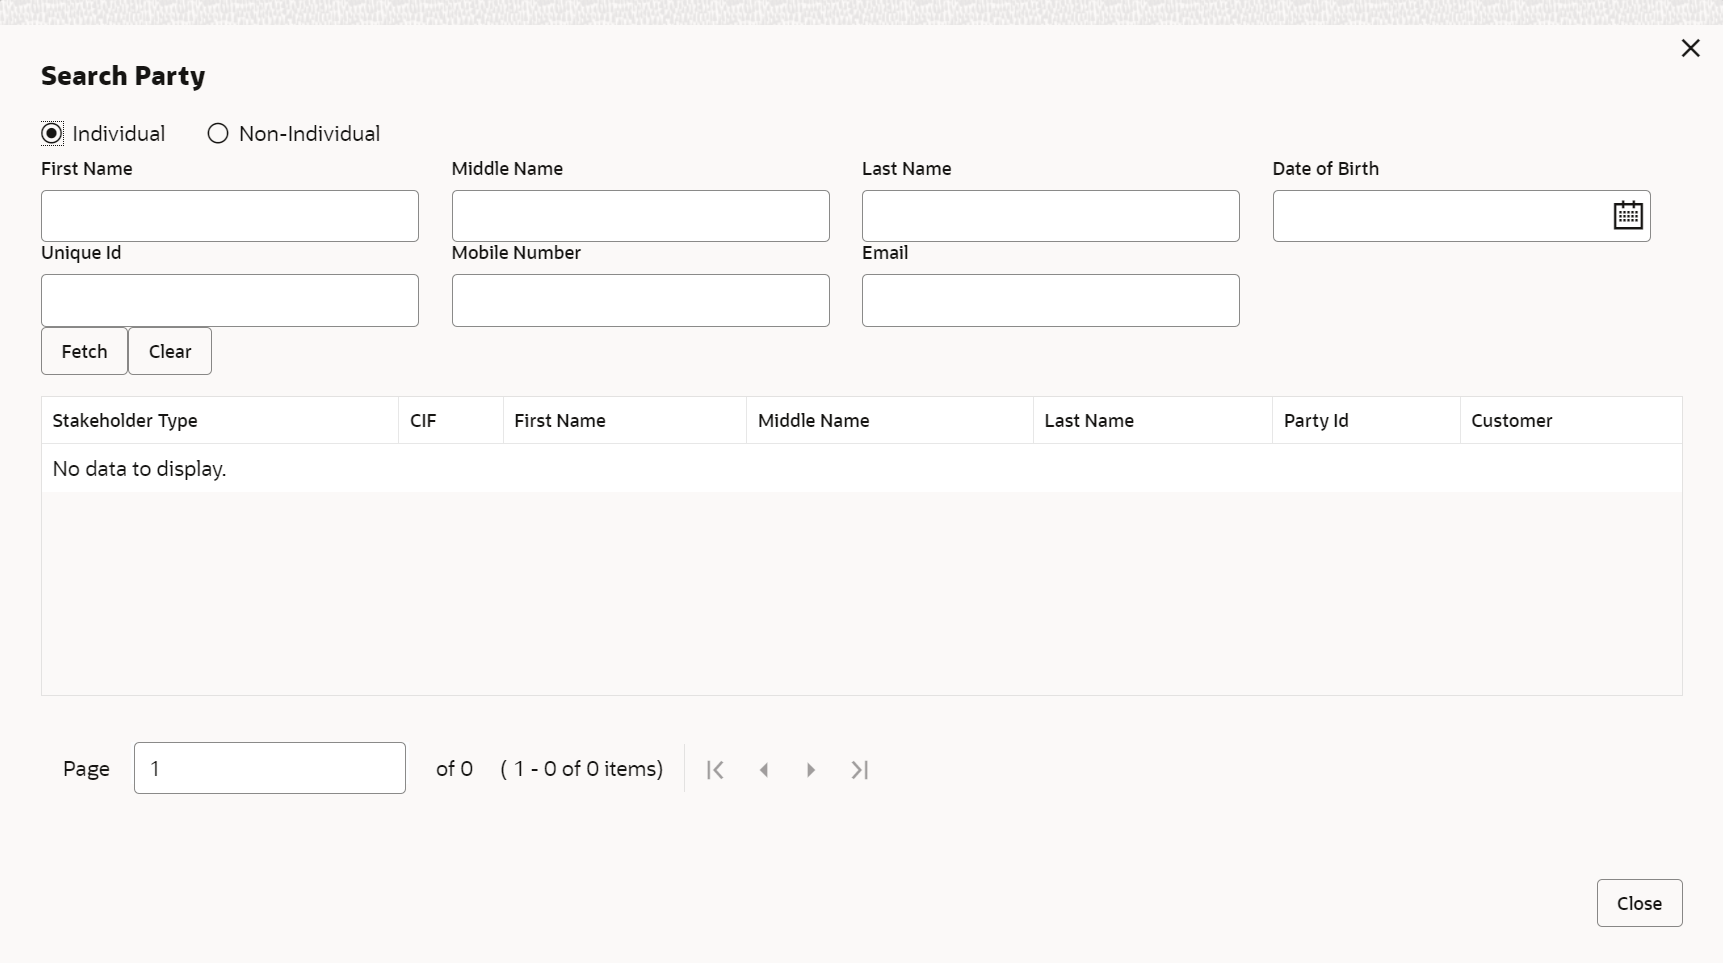
- Click the Search icon select the CIF/Party
Id from the listThe Search Party – Individual screen is displayed.
Note:
The user should have the required access to add a party within a customer access group as relationship. For more details, refer Oracle Banking Party Configuration User Guide. - Click Next after CIF/Party Id is
specified.The Add relationship screen displays.
- Specify the Relationship specific attribute.For more information on fields, refer to the field description table.
Table 1-22 New Service Member - Field Description
Field Description Relationship Family member type of the party. Select from the list of values. The available options are: - Spouse
- Mother
- Son
- Daughter
- Guardian
- Father
Note:
The list of values can be configured through entity maintenance. For more information on Entity Maintenance, refer to the Oracle Banking Party Configurations User Guide.MLA Covered Is service member covered under Military Lending act. Note:
Refer to the Oracle Banking Party Configurations User Guide for entity maintenance.Table 1-23 Household - Field Description
Field Description Relationship Family member type of the party. Select from the list of values. The available options are: - Spouse
- Mother
- Son
- Daughter
- Guardian
- Father
Note:
The list of values can be configured through entity maintenance. For more information on Entity Maintenance, refer to the Oracle Banking Party Configurations User Guide.Is Dependent Is household party dependent on primary party. Table 1-24 Power of Attorney - Field Description
Field Description Associated Since Association start date of power of attorney with primary party. Preferred Is record the preferred POA. Note:
Refer to the Oracle Banking Party Configurations User Guide for entity maintenance.Table 1-25 Related to Insider - Field Description
Field Description Relationship Family member type of the party. Select from the list of values. The available options are: - Spouse
- Mother
- Son
- Daughter
- Guardian
- Father
Note:
The list of values can be configured through entity maintenance. For more information on Entity Maintenance, refer to the Oracle Banking Party Configurations User Guide.Note:
Refer to the Oracle Banking Party Configurations User Guide for entity maintenance.Table 1-26 Guardian - Field Description
Field Description Relationship Family member type of the party. Select from the list of values. The available options are: - Spouse
- Mother
- Son
- Daughter
- Guardian
- Father
Note:
The list of values can be configured through entity maintenance. For more information on Entity Maintenance, refer to the Oracle Banking Party Configurations User Guide.Note:
Refer to the Oracle Banking Party Configurations User Guide for entity maintenance.
New Party
A new party will be onboarded as a non-customer to be added as a relationship during the party onboarding process.
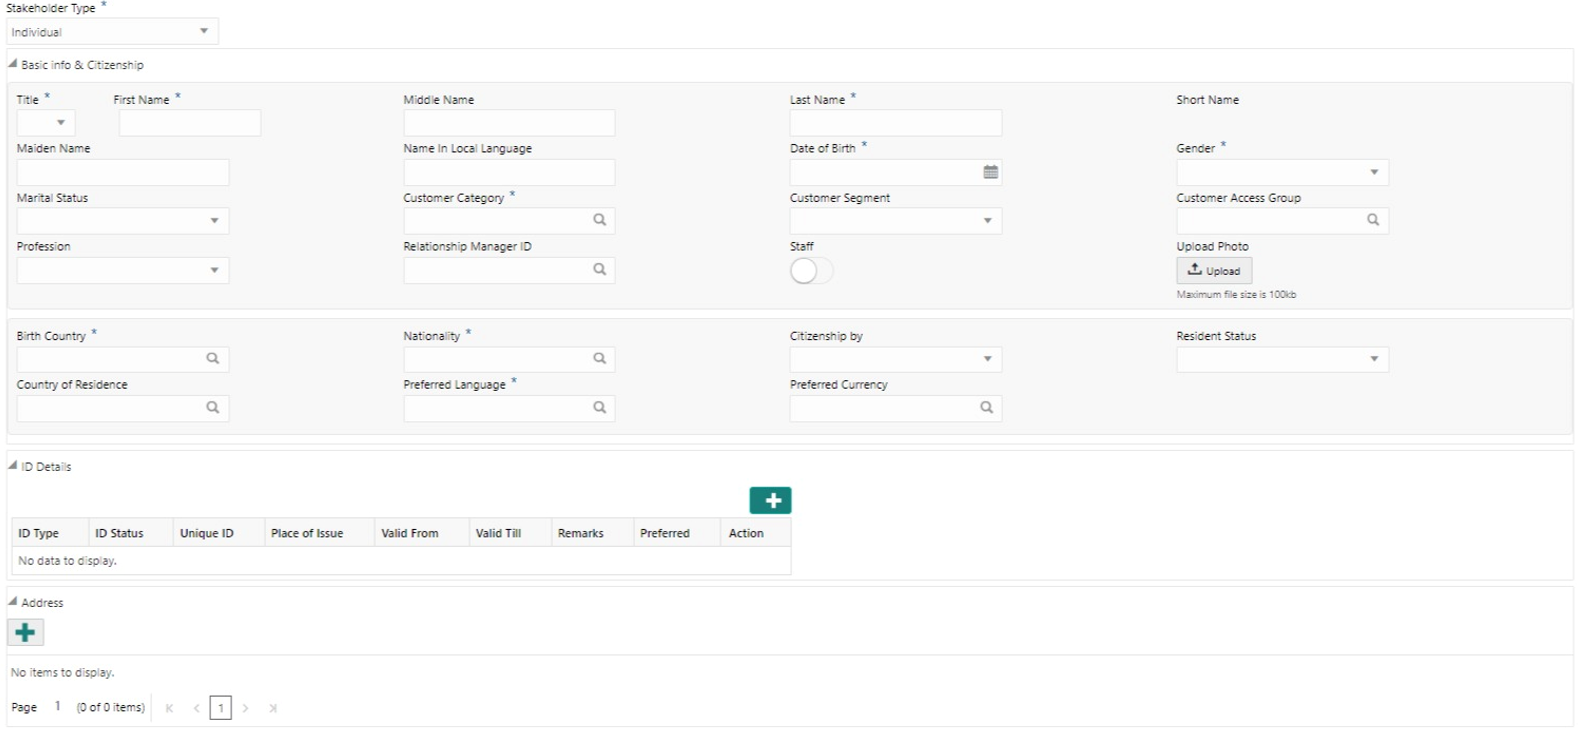
- If the related party is new to the Bank, click Next without entering CIF/Party Id.The Add New Owner screen is displayed to capture details for the new relationship.
Note:
To create a new party the screen appears based on the selected relationship type. The Household relationship type is elaborated below. - Specify the details of Add New Owner for new stakeholder.For more information on fields, refer to the field description table.
Table 1-27 Add New Owners – Field Description
Field Description Stakeholder Type Select the type of stakeholder from the drop-down list. Title Select the title from the drop-down list. The available options are: - Mr.
- Mrs.
- Ms.
- Miss.
- Dr.
Note:
The list of values can be configured through entity maintenance. For more information, refer to the Oracle Banking Party Configurations User Guide.First Name Specify the first name of the new stakeholder. Middle Name Specify the middle name of the new stakeholder. Last Name Specify the last name of the new stakeholder. Short Name Displays the short name. Maiden Name Specify the maiden name of the new stakeholder. Name In Local Language Specify party name in local language. Date of Birth Select the date of birth of the new stakeholder. Minor Displays, if the customer is a minor customer. Minor customer is determined based on the date of birth of customer and a minor age configured in the properties. Note:
The list of values can be configured through entity maintenance. For more information on minor age configuration, refer to the Oracle Banking Party Configuration User Guide.Gender Select the gender from the drop-down list. The available options are: - Male
- Other
- Do Not Wish to Disclose
- Female
Note:
The list of values can be configured through Entity Maintenance.Marital Status Select the marital status from the drop-down list. The available options are: - Married
- Unmarried
- Widow
- Legally Separated
Note:
The list of values can be configured through Entity Maintenance.Profession Select the profession from the drop-down list. Occupation Select occupation of the party from the list of values. The available options are: - Own Business
- Employed
Note:
The list of values can be configured through entity maintenance. For more information, refer to the Oracle Banking Party Configurations User Guide.Staff Enable toggle if the party is a staff member. Country of Residence Click Search icon and select the country from the list. Note:
List of values can be configured through Common Core Maintenance for Country Code.Resident Status Select the residential status from the drop-down list. The available options are: - Resident
- Non Resident
Note:
The list of values can be configured through Entity Maintenance.Birth Place Provide the place of birth. Birth Country Click Search icon and select the birth country from the list. Note:
The list of values can be configured through Common Core Maintenance for Country Code.Nationality Click Search icon and select the nationality of the stakeholder from the list. Note:
The list of values can be configured through Common Core Maintenance for Country Code.Citizenship By Select the ‘Citizenship By’ from the drop-down list. The available options are: - Birth
- Acquire
- Others
- Residence
Note:
The list of values can be configured through Entity Maintenance.Upload Photo Upload the photo of the new stakeholder. Customer Category Click the search icon and select the customer category from the list. Note:
The list of values can be configured through Common Core Maintenance for Customer Category.Customer Segment Select the customer segment from the drop-down list. Note:
The list of values can be configured through Common Core Maintenance for Customer Segment.Customer Access Group Click the search icon and select the customer access group for the party. Note:
- The list of values can be configured through Common Core Maintenance for Customer Access Group.
- User should have required access to onboarding a party within a customer access group. For more details, refer to the Oracle Banking Party Configurations User Guide.
Risk Level Select the risk level from the drop-down values. The available options are: - Level1
- Level2
- Level3
Note:
The list of values can be configured through Entity Maintenance.Preferred Language Click Search icon, and select the language code from the list. Note:
List of values can be configured through Common Core Maintenance for the Language Code.Preferred Currency Click Search icon and select a preferred currency from the list. Note:
List of values can be configured through Common Core Maintenance for the Currency Code.Purpose Select the purpose of the party onboarding from the list of values. The available options are: - Loan Repayment
- Salary Transfer
- Savings
- Transactional
- Investment
Note:
The list of values can be configured through entity maintenance. For more information, refer to the Oracle Banking Party Configurations User Guide.Relationship Manager ID Select the relationship manager ID. Note:
List of values will be as per User Configuration in Security Management.Note:
Refer to the Oracle Banking Party Configurations User Guide for entity maintenance. - Click and expand the ID Details section.The ID Details screen is displayed.
- Click on the + button to specify the details.The Add ID Details pop-up screen is displayed.
- On the Add ID Details pop-up screen, specify the fields. For more information on fields, refer to the field description table.
Table 1-28 ID Details - Field Description
Field Description ID Type
Select type of identification from the drop-down list.- Driving License
- Passport
Note:
The list of values can be configured through Entity Maintenance.ID Status
Select Status of Identification from drop down list. - Validation Pending
- Available
- Applied For
Note:
The list of values can be configured through Entity Maintenance.Unique ID Specify unique ID number as per the ID type. Place of issue Specify place of issue of ID. Valid From Specify valid from date of ID. Valid Till Specify validity end date of ID. Remarks Specify remarks for ID. Preferred Select, if ID type is preferred. Note:
At-least one ID record should be marked as preferred.Note:
Refer to the Oracle Banking Party Configurations User Guide for entity maintenance. - Click and expand the Address section.
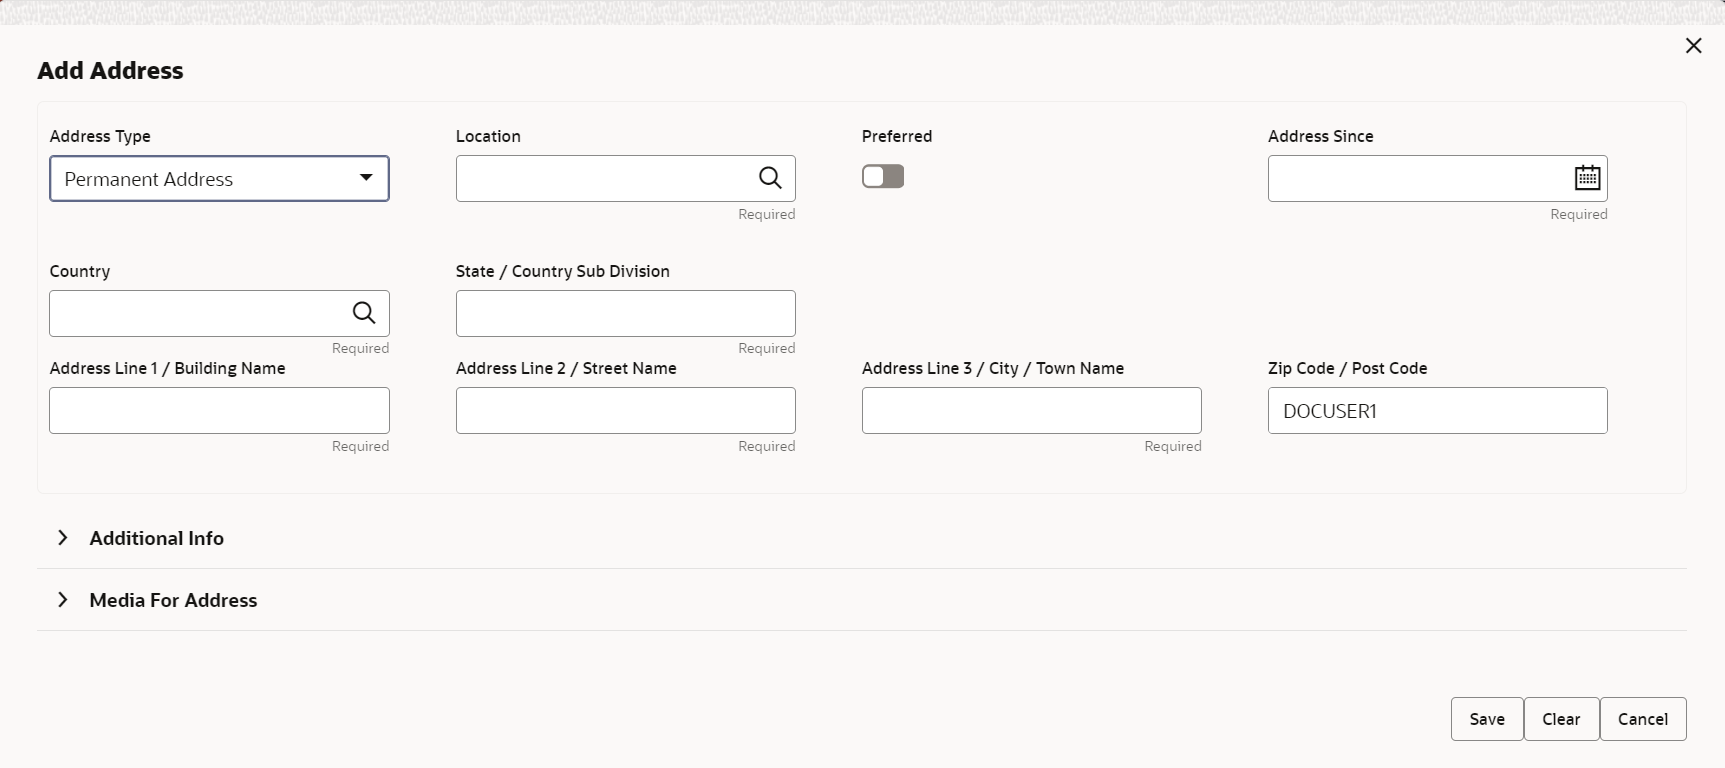
- Click on the + button to add the address details.The Add Address screen displays.
- On the Add Address segment, specify the fields. For more information on fields, refer to the field description table.
Table 1-29 Add Address – Field Description
Field Description Address Type Select the address type from the drop-down list. The available options are: - Permanent Address
- Residential Address
- Communication Address
- Office Address
Note:
The address type can be configured as mandatory using Address Management. Refer to the Oracle Banking Party Configurations User Guide for more details.Location Click Search and select the preferred location from the list of values. Note:
The list of values can be configured through Common Core Maintenance for Location Code.Preferred Click the toggle to specify the preferred to be used for communication. Note:
If more than one address is captured for the same address type, at-least one address should be marked as preferred.Address Since Specify address start date. Country Click Search icon and select the country from the list of values. Note:
The list of values can be configured through Common Core Maintenance for Country CodeState / Country Sub-division Specify State or Country Sub-division. Address Line 1 / Building Name Specify Address Line 1 or Building Name. Address Line 2 / Street Name Specify Address Line 2 or Street Name. Address Line 3 / City / Town Name Specify Address Line 3 or City Name or Town Name. Zip Code / Post Code Specify Zip Code or Post Code. - Expand the Additional Info section on the Add Address segment.The Additional Info data segment is displayed.
- Specify the details in the Additional Info segment. For more information on fields, refer to the field description table.
Table 1-30 Additional Info – Field Description
Field Description Department Specify the name of the department for the customer. Sub Department Specify the sub-department for the customer. Building Number Specify the building number. Floor Specify the floor for the given address. Post Box Specify the post box. Room Specify the room for the given address. Town Location Name / Locality Specify Town Location or Locality Name. District Name Specify the district name. Landmark Specify the near Landmark to address. Contact Name / Narrative Specify Contact Name or Narrative for the address Note:
Refer to the Oracle Banking Party Configurations User Guide for entity maintenance. - On the Add Address screen, in the Media For Address segment, specify the details under the Mobile tab.
- On the Mobile tab, click + icon.The Add Mobile Number pop-up screen is displayed.
- Specify the details in the Add Mobile Number pop-up screen. For more information on the fields, refer to the field description table.
Table 1-31 Media (Mobile) – Field Description
Field Description ISD Code Specify the ISD code for the mobile number of the customer. Mobile Number Specify the mobile number of the customer. Preferred Specify the preferred mobile number, in case more than one mobile number is captured. - On the Add Address screen, in the Media For Address segment, specify the details under the Phone tab.
- On the Phone tab, click + icon.The Add Phone Number pop-up screen is displayed.
- Specify the details in the Add Phone Number pop-up screen. For more information on the fields, refer to the field description table.
Table 1-32 Media (Phone Number) – Field Description
Field Description ISD Code Specify the ISD code for the phone number of the customer. Area Code Specify the area code for the phone number of the customer. Phone Number Specify the phone number of the customer. Preferred Specify the preferred phone number, in case more than one phone number is captured. - On the Add Address screen, in the Media segment, specify the details under the Email tab.
- On the Email tab, click + icon.The Add Email pop-up screen is displayed.
- Specify the details in the Add Email pop-up screen. For more information on the fields, refer to the field description table.
Table 1-33 Media (Email) – Field Description
Field Description Email Id Specify the email id of the customer. Preferred Specify the preferred email id, in case more than one email id is captured. - On the Add Address screen, in the Media segment, specify the details under the FAX tab.
- On the Fax tab, click + icon.The Add Fax Number pop-up screen is displayed.
- Specify the fields under Add Fax Number pop-up screen. For more information on fields, refer to the field description table.
Table 1-34 Media (Fax) – Field Description
Field Description ISD Code Specify the ISD code for the FAX number of the customer. Area Code Specify the area code for the FAX number of the customer. Fax Number Specify the FAX number of the customer. Preferred Specify the preferred FAX number, in case more than one FAX number is captured. - On the Add Address screen, in the Media for Address segment, specify the details under the SWIFT tab.
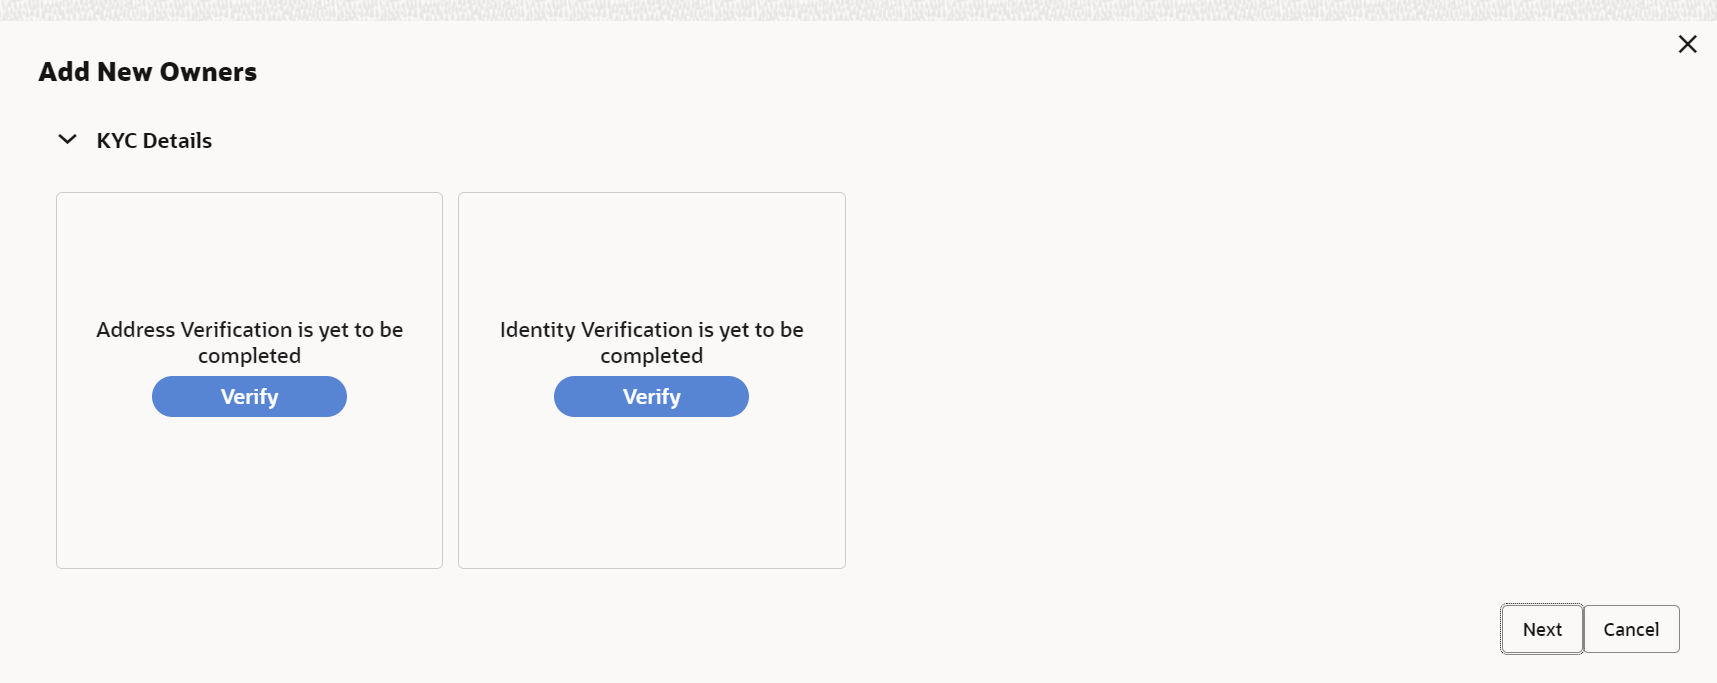
- Click Next to capture the KYC details for the new
relationship.The Add New Household - KYC Details screen displays.
Note:
This step is optional.Figure 1-28 Add New Household - KYC details
- Click Verify to update the KYC details for the new related party.
- Specify the required KYC details.
- Click Next.The Add New Household screen is displayed to add relationship-specific attributes.
- On the Add New Household screen, specify the KYC
details.
For more information on the fields, refer to the Table 1-22.
- Click Submit.The Relationships screen displays the added relationship details.
- Click Next to move to the Educational Qualifications segment.
Parent topic: Onboarding Initiation
