5.5.2 View/Edit Netting Structure
This topic describes about the View/Edit Netting Structure in Oracle Banking Digital Experience.
- Perform following navigation to access the View/Edit Netting Structure
screen:From the Dashboard, click Toggle Menu. Under Toggle Menu, click Cash Management . Under Cash Management, click Netting. Under Netting, click View/Edit Netting Structure.The View/Edit Netting Structure screen displays.
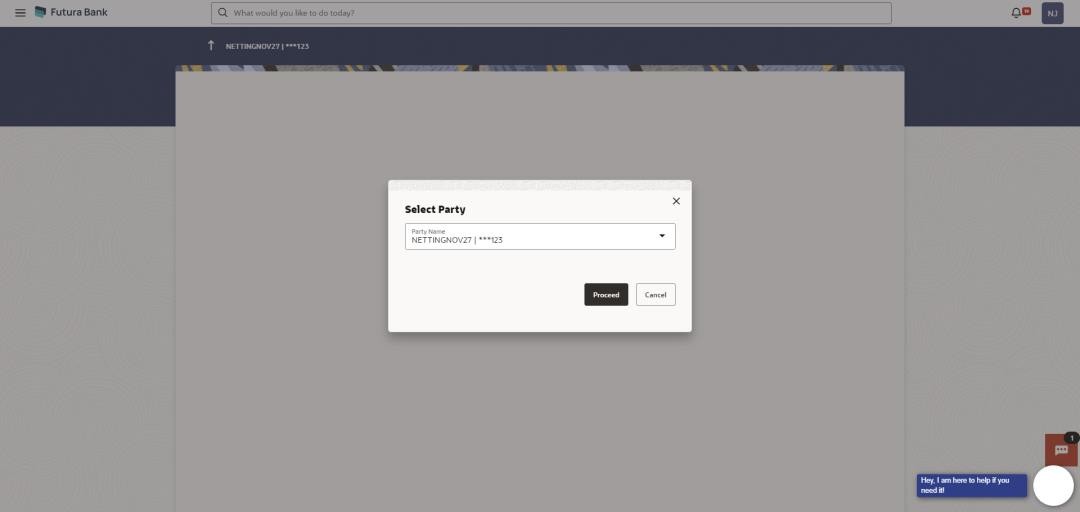
Figure 5-50 View/Edit Netting Structure - Select Party Name
For more information on fields, refer to the field description table:Table 5-26 View/Edit Netting Structure - Field and Description
Field Description Party Name Select the party name from the dropdown list to view the netting structure associated with that logged in party. By default, the primary party/gcifs of the logged-in user is selected.
Note:
Only accessible parties are displayed to the user. Based on the party/gcif selection, the list of netting transaction is displayed.
- Click Proceed, based on the party name selected the
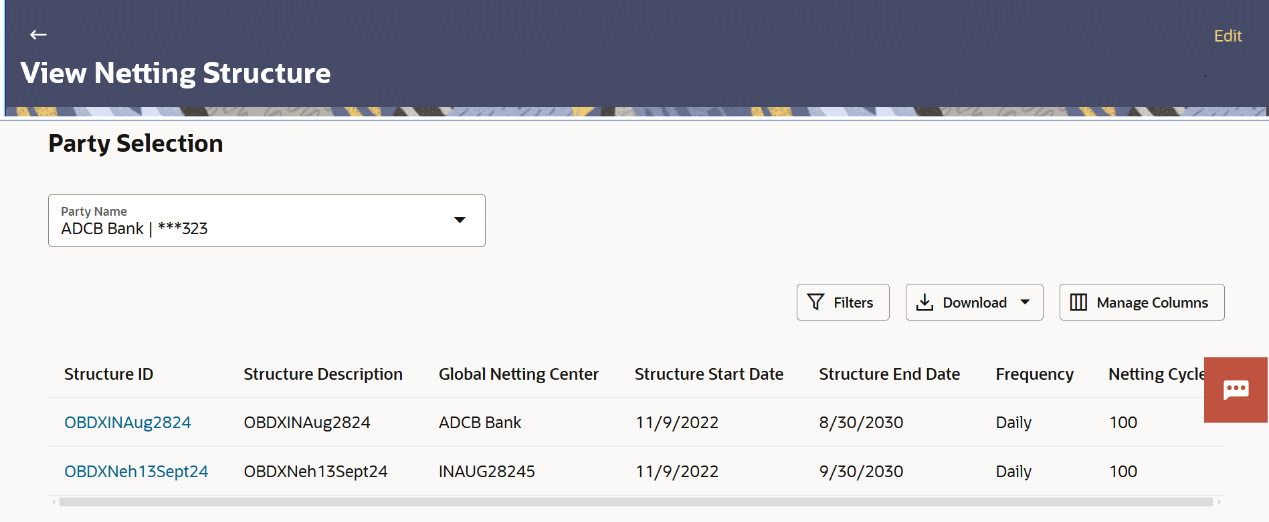
netting structures are displayed.The View Netting Structure screen displays.
Figure 5-51 View Netting Structure_ Party Selection
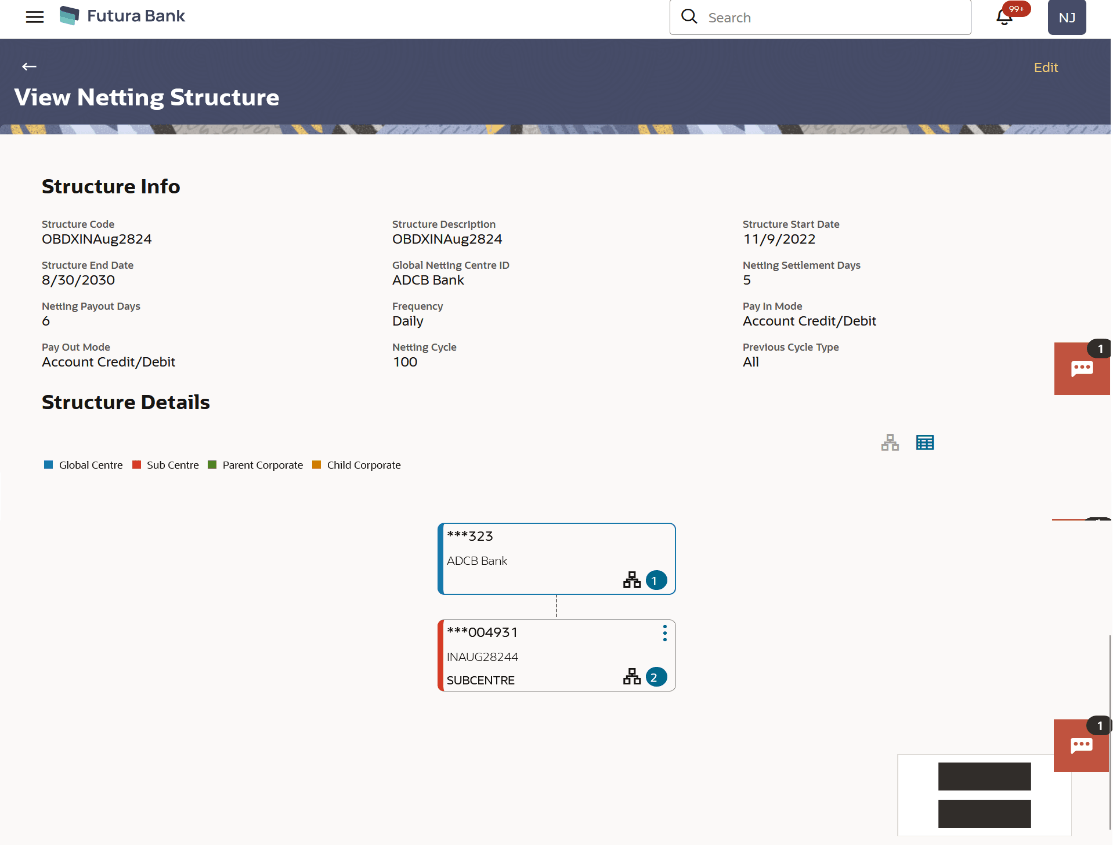
The View Netting Structure - Tree View screen displays.
Figure 5-52 View Netting Structure - Tree View
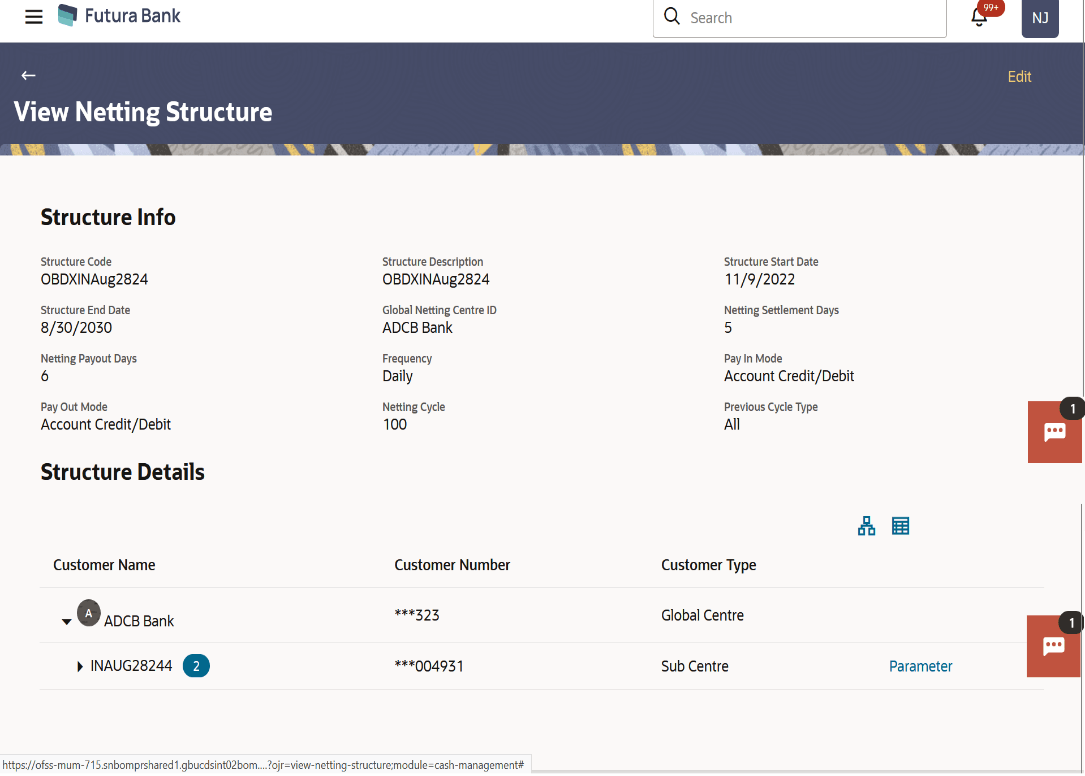
The View Netting Structure - Table View screen displays.
Figure 5-53 View Netting Structure - Table View
For more information on fields, refer to the field description table:
Table 5-27 Common for both Tree View and Table View - Field and Description
Field Description Structure code Displays the code of netting structure. Structure Description Displays the description of netting structure. Structure Start Date Displays the start date of netting structure. Structure End Date Displays the end date of netting structure. Global Netting Center ID Displays the ID of global netting center. Netting Settlement Days Displaysthe netting settlement days (settlement date gets calculated basis this parameter). Netting Payout Days Displaysthe number of days for netting payout(payin/payout date gets calculated basis this parameter). Frequency Displaysthe frequency of that Netting transaction. Pay In Mode Displays the Pay In mode of Netting transaction. Pay Out Mode Displays the Pay Out mode of Netting transaction. Netting Cycle Displays the nettingcycle to be taken into consideration for inclusion of associated receivables and payables for netting transaction. Previous Cycle Type Displays the Previous netting cycle type. Customer Name Displaysthe name of customer associated with the structure. Customer Number Displaysthe customer number of the customer name associated with the structure. Customer Type Displays the type of the customer added to structure. Figure 5-54 Number of Subsidiary account

Displays the number of subsidiary account linked to the netting structure. - Click Parameters to view the parameters information of subsidiary.
- On View Netting Structure screen, click
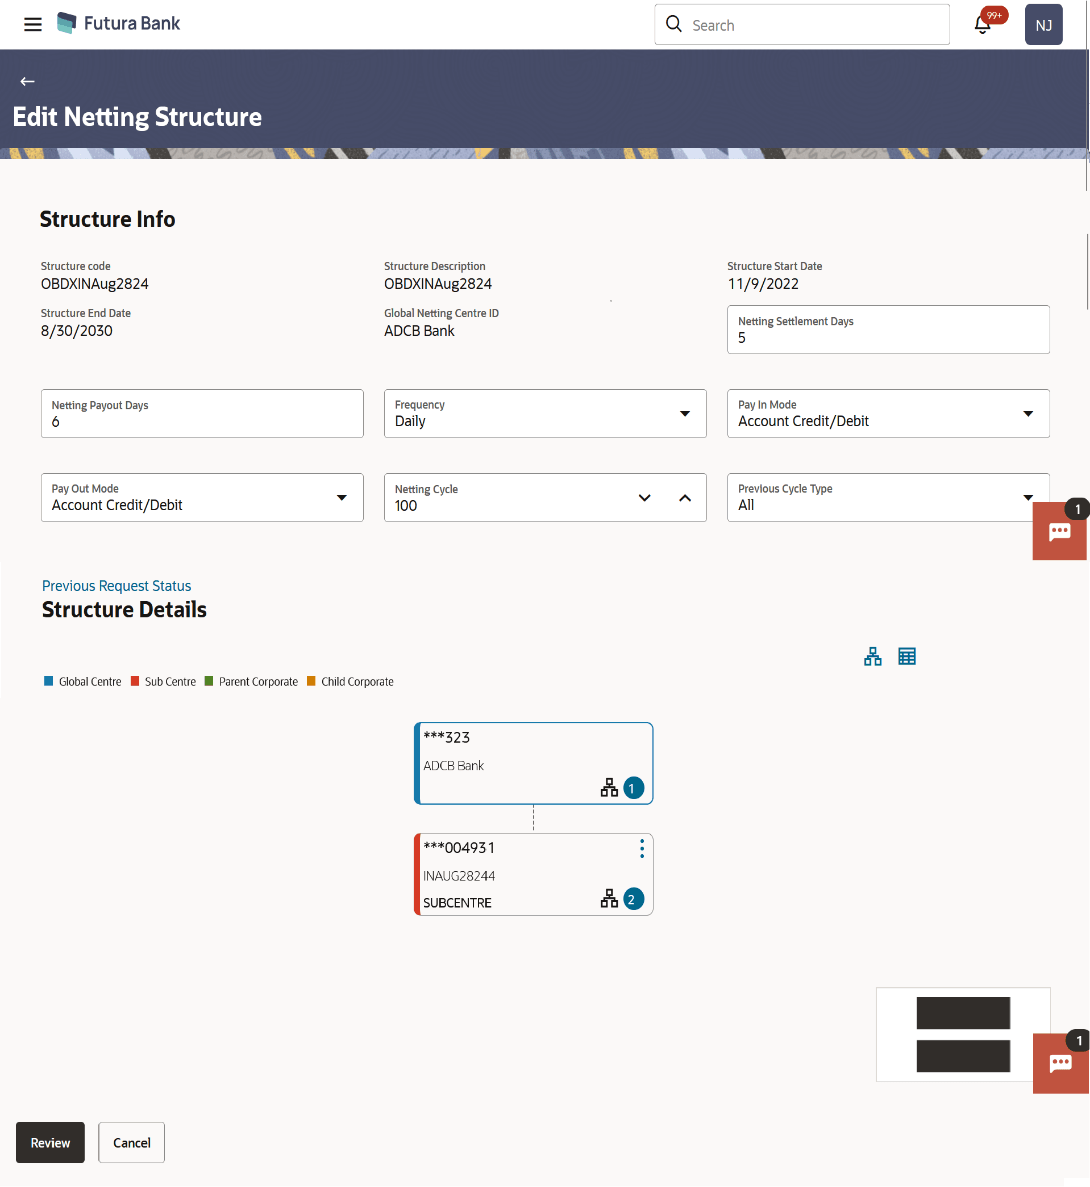
Edit button.The Edit Netting Structure screen displays.
For more information on fields, refer to the field description table:
Table 5-28 Edit Netting Structure - Field and description
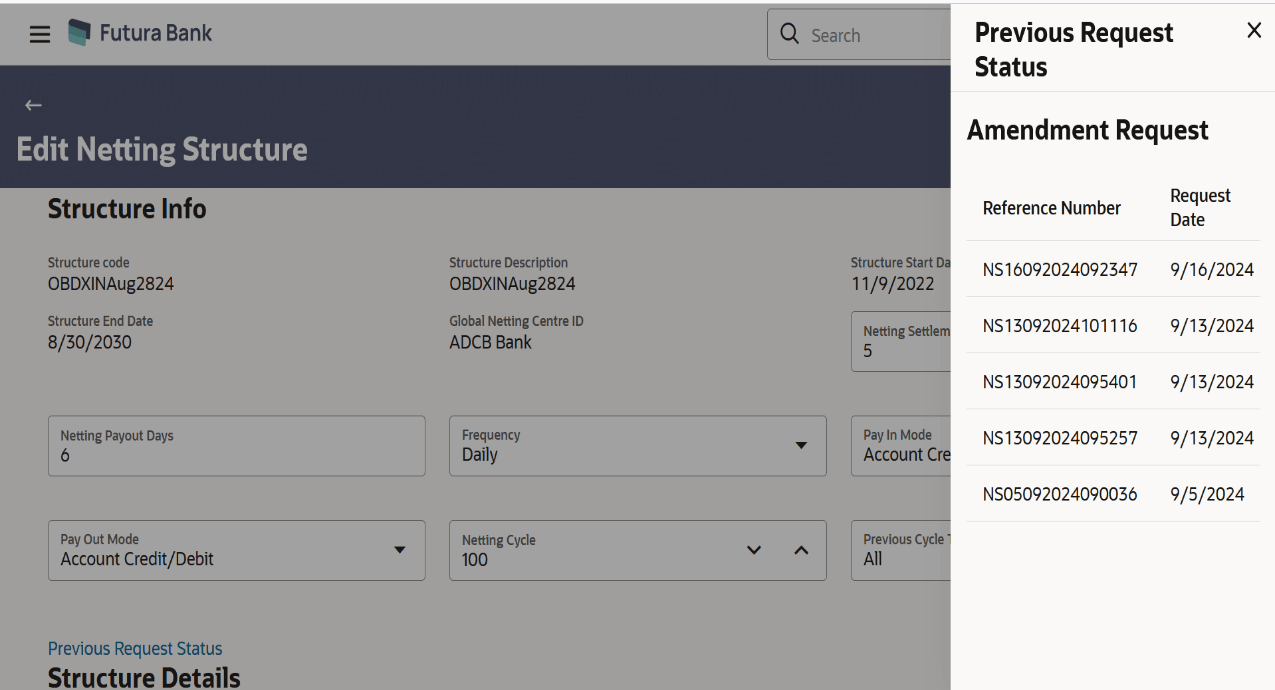
Field Description Structure code Displays the code of netting structure. Structure Description Displays the description of netting structure. Structure Start Date Displays the start date of netting structure. Structure End Date Displays the end date of netting structure. Global Netting Center ID Displays the ID of global netting center. Netting Settlement Days Displays the netting settlement days (settlement date gets calculated basis this parameter). Netting Payout Days Displays the number of days for netting payout (payin/payout date gets calculated basis this parameter). Frequency Displaysthe frequency of that netting transaction. Pay In Mode Displays the Pay mode of Netting transaction. Pay Out Mode Displays the Pay Out mode of Netting transaction. Netting Cycle Displays the netting cycle to be taken into consideration for inclusionof associated receivables and payables for netting transaction. Previous Cycle Type Displays the Previous netting cycle type. - Click on Previous Request Status to view the request
status.The Previous Request Status screen displays. For more information on fields, refer to the field description table:
Table 5-29 Previous Request Status
Field Description Reference Number Displaysthe reference number of receivables invoice. Request Date Displaysthe date of netting structure. - Click
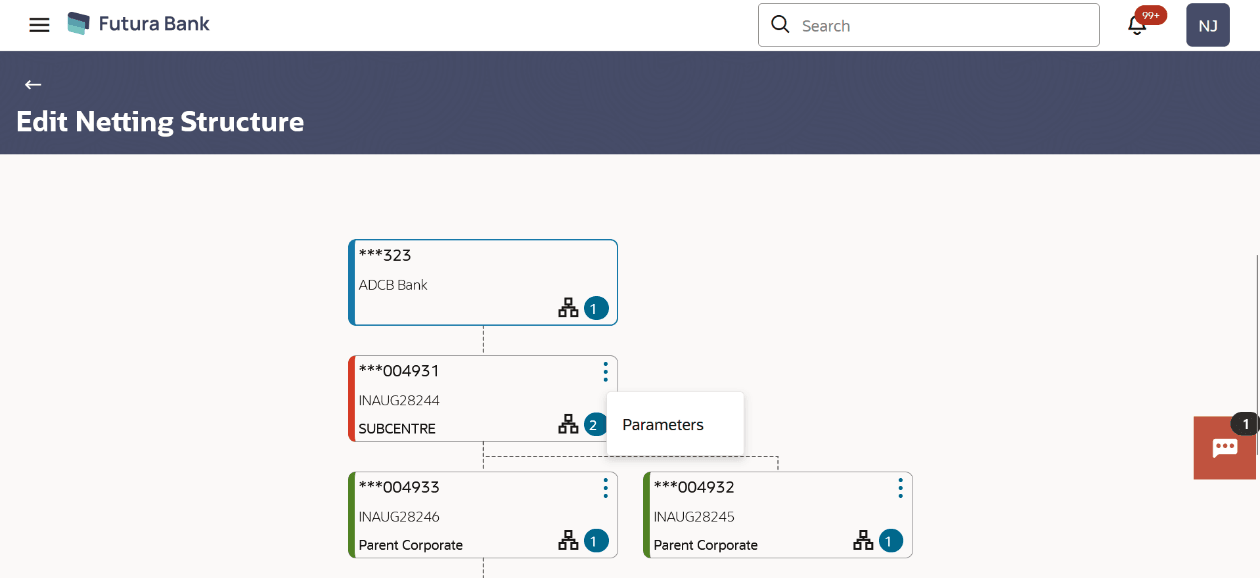
 icon on Subcentre node and then click
Parameters to edit the parameter details.
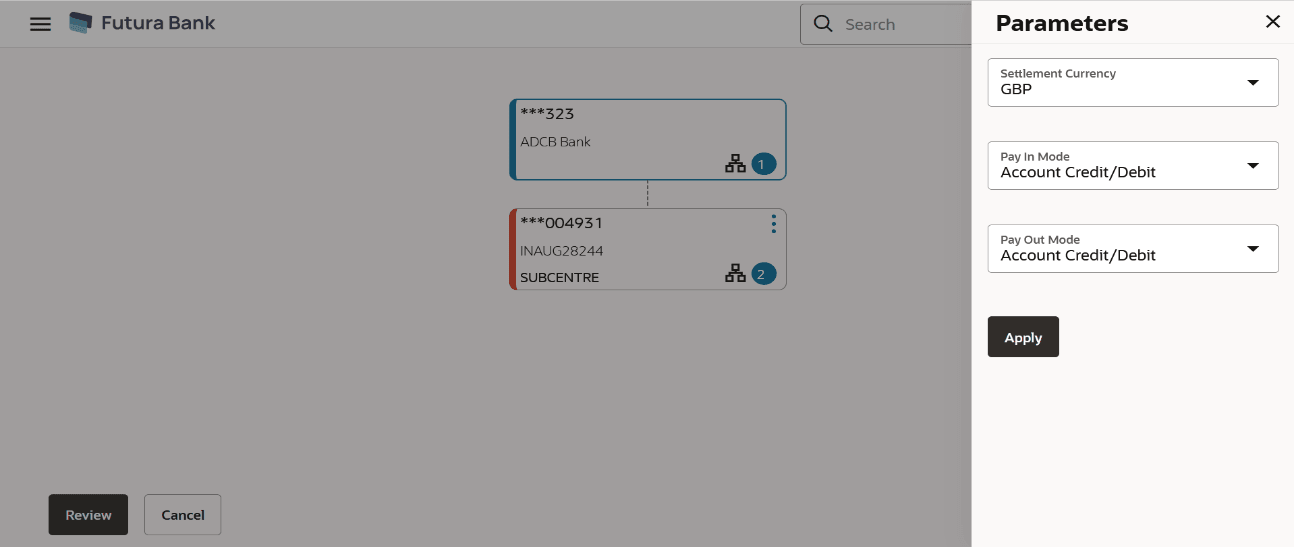
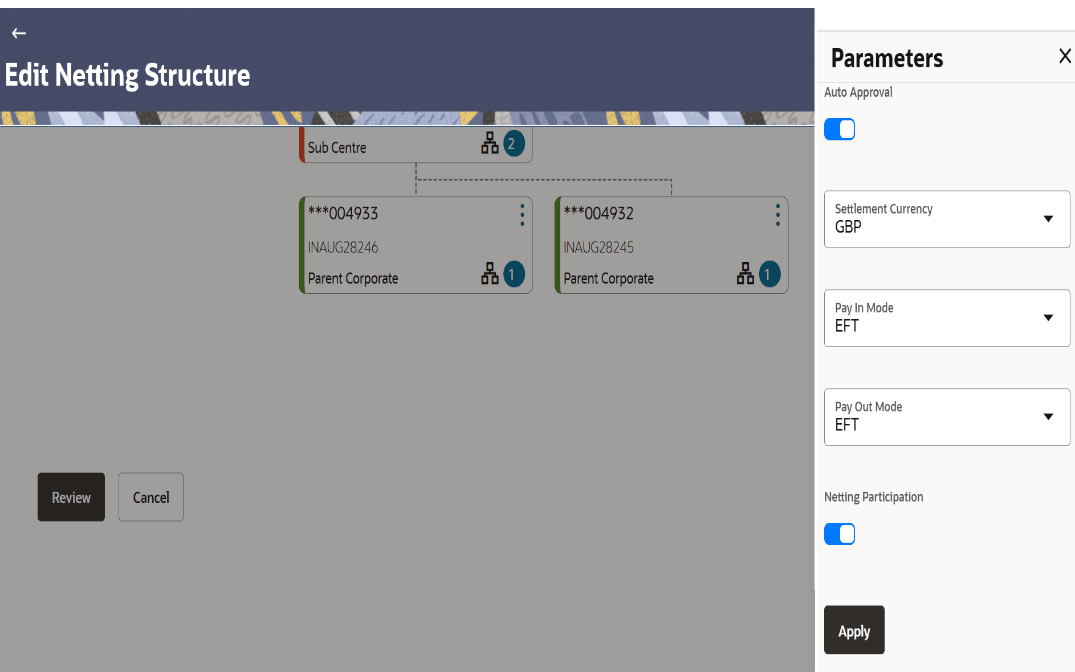
 - The Edit Netting Structure – Subcentre Parameter overlay
screen is displayed.
Figure 5-58 Edit Netting Structure - Parameter
For more information on fields, refer to the field description table.
Table 5-30 Edit Netting Structure – Parameter - Field and Description
Field Description Settlement Currency Selectthe currency from the dropdown list. Pay In Mode Select the pay In mode for subcenter (to receive funds from global netting center/parent corporate). Pay Out Mode Select the Pay Out mode for subcenter payout to beneficiary. - Click Apply to apply the changes made to the parameters of subsidiary
- Click on
 to expand the parent subsidiary of the netting structure.The Edit Netting Structure – Parent Corporate screen displays.
Figure 5-59 Edit Netting Structure – Parent Corporate
For more information on fields, refer to the field description table.
Table 5-31 Edit Netting Structure – Parent Corporate - Field and Description
Field Description Auto Approval Switch tofor netting transaction to get auto approved/auto accepted. In case corporate user does not manually accept or reject netting transaction.Figure 5-60 Auto Approval
 Switch tofor netting transaction to get manually accept or reject netting transaction.
Figure 5-61 Switch Off

Settlement Currency Selectthe currency from the dropdown list. Pay In Mode Select the pay In mode for subcenter (to receive funds from global netting center/parent corporate). Pay Out Mode Select the Pay Out mode for subcenter payout to beneficiary. Netting Participation Switch tofor parent corporate to participate in next netting cycle.Figure 5-62 Auto Approval
 Switch tofor parent corporate does not participate in next netting cycle.
Figure 5-63 Switch Off

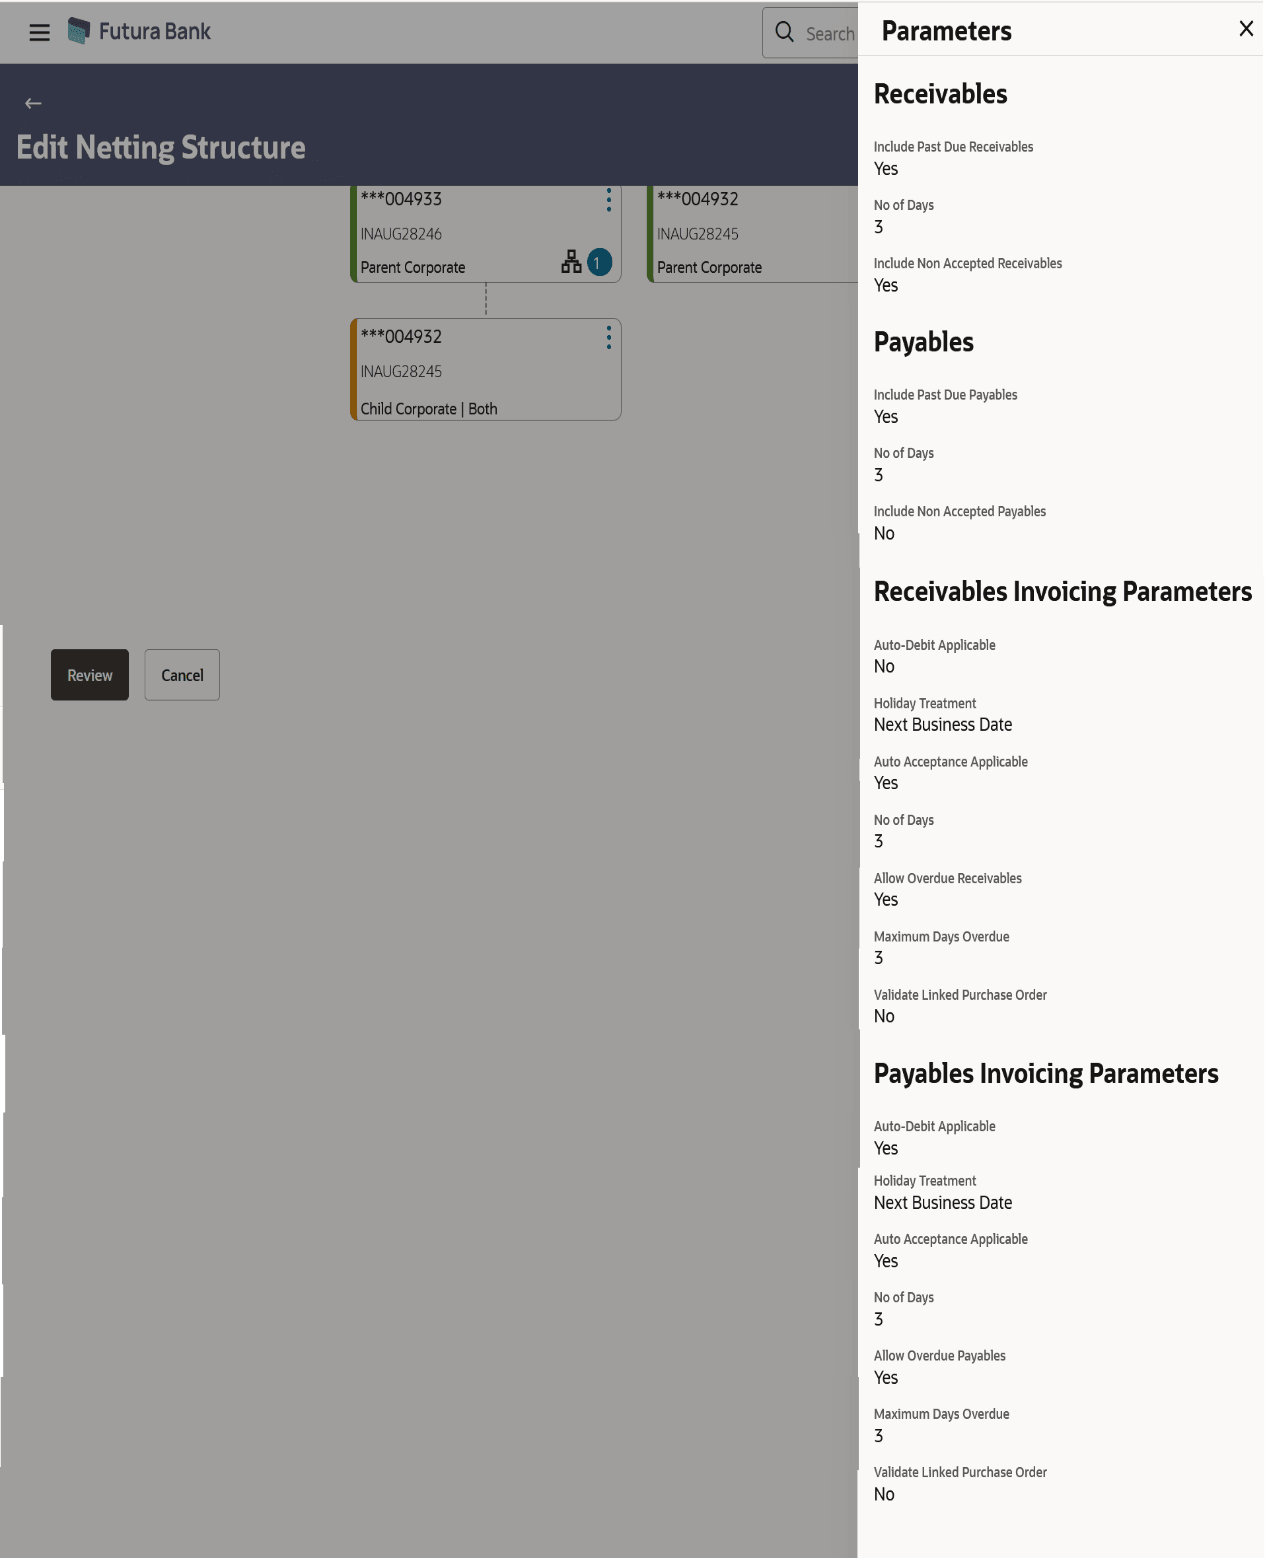
- Click
 on child corporate and then click parametersto view the child subsidiary
receivables and payables parameters.
on child corporate and then click parametersto view the child subsidiary
receivables and payables parameters.The Edit Netting Structure – Child Corporate screen displays.
Figure 5-64 Edit Netting Structure – Child Corporate
For more information on fields, refer to the field description table:
Table 5-32 Edit Netting Structure – Child Corporate - Field and Description
Field Description Include Past Due Receivables Displays whether the overdue receivable for netting is applicable or not. No of Days Displays the maximum aging days of overdue invoices to be considered for netting. Include Non Accepted Receivables Displays whether the non accepted invoices should be considered for netting. Include Past Due Payables Displays whether the overdue receivable for netting is applicable or not. No of Days Displays the maximum aging days of overdue invoices to be considered for netting. Include Non Accepted Payables Displays whether the non accepted invoices should be considered for netting. Auto-Debit Applicable Displays whether the automatic debit facility is applicable for receivables at the relationship level. Holiday Treatment Displays the value to specify how to treat auto-debit transactions falling on holidays. The options are:- Previous Business Date
- Next Business Date
Auto Acceptance Applicable Displays whether the auto acceptance should be enabled for the payables. No of Days Displays the number of day(s) post which the auto-acceptance is triggered for the receivables, if the invoices are not manually accepted.
Note:
This field displays only if the Auto Acceptance Applicable toggle is enabled.
Allow Overdue Receivables Displays whether creation of overdue invoices and debit notes is allowed for the relationship. Maximum Days Overdue Displays the maximum number of days post the payment due date (if maintained), until when the creation of the payable is allowed. Note:
This field displays only if the Allow Overdue Receivables toggle is enabled.
Validate Linked PO Displays whether the validation of the purchase orders linked with invoice during creation or upload. Auto-Debit Applicable Displays whether the automatic debit facility is applicable for payables at the relationship level. Holiday Treatment Displays the value to specify how to treat auto-debit transactions falling on holidays.
The options are:- Previous Business Date
- Next Business Date
Auto Acceptance Applicable Displays whether the auto acceptance should be enabled for the payables. No of Days Displays the number of day(s) post which the auto-acceptance is triggered for the payables, if the invoices are not manually accepted.
Note:
This field displays only if the Auto Acceptance Applicable toggle is enabled.
Allow Overdue Receivables Displays whether creation of overdue invoices and debit notes is allowed for the relationship. Maximum Days Overdue Displays the maximum number of days post the payment due date (if maintained), until when the creation of the payable is allowed.
Note:
This field displays only if the Allow Overdue Receivables toggle is enabled.
Validate Linked PO Displays whether the validation of the purchase orders linked with invoice during creation or upload. - Click Review to review the netting structure.
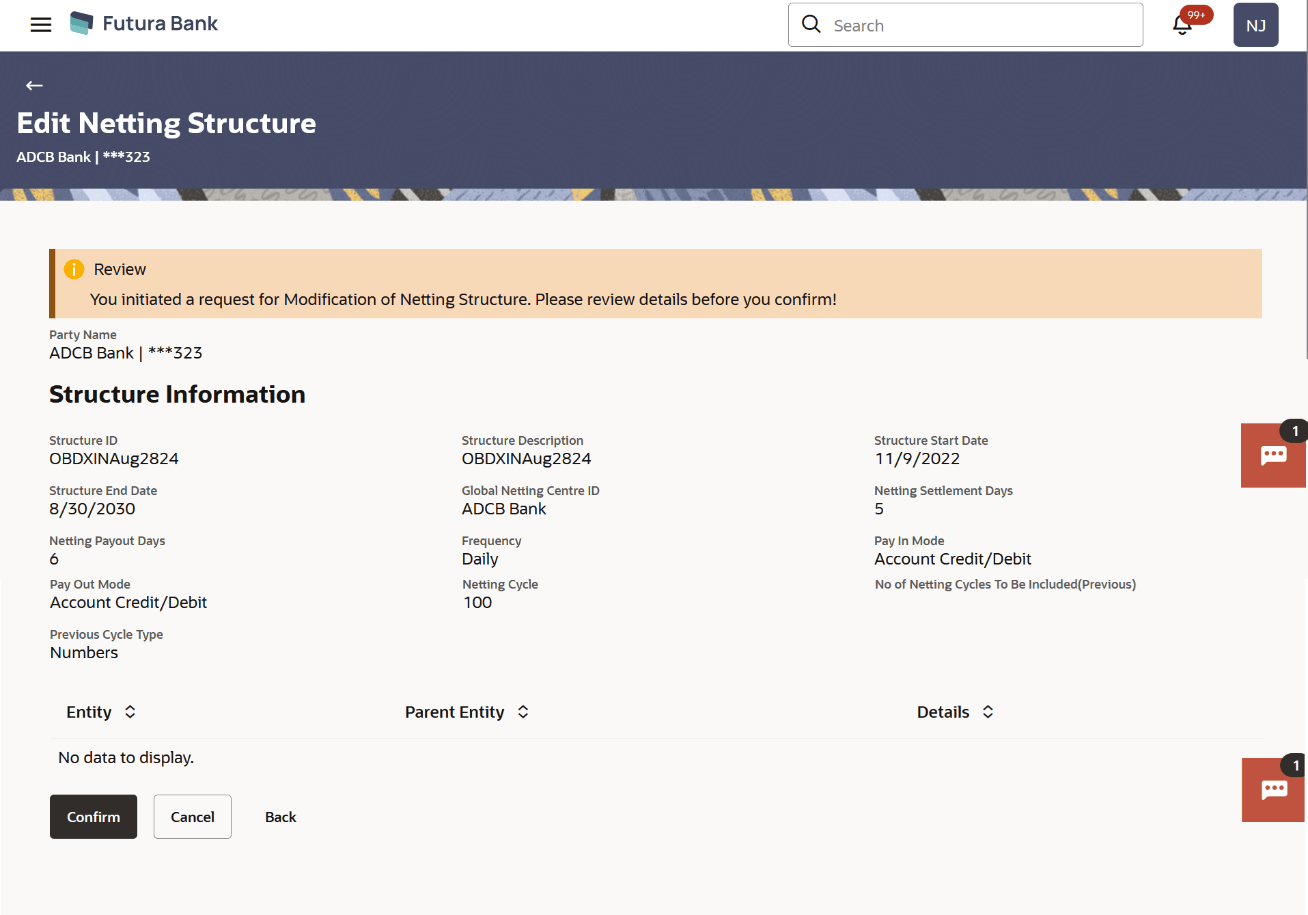
The Edit Netting Structure – Review screen displays.
Figure 5-65 Edit Netting Structure – Review
- Click Parametersto view the modified parameters of netting structure.
- Perform one of the following actions:
- Click Confirm to edit the netting structure
The Confirmation screen appears
- Click Submit to get the changes in any of the subcentre or parent corporate.
- Click Cancel to cancel the operation and navigate back to Dashboard.
- Click Back to navigate back to the previous screen.
- Click Confirm to edit the netting structure
Parent topic: Netting
