13.1 User Resource Access - Mapping (Create)
This topic describes the systematic instruction to User Resource Access - Mapping (Create) option.
To provide the user with account and transaction access:
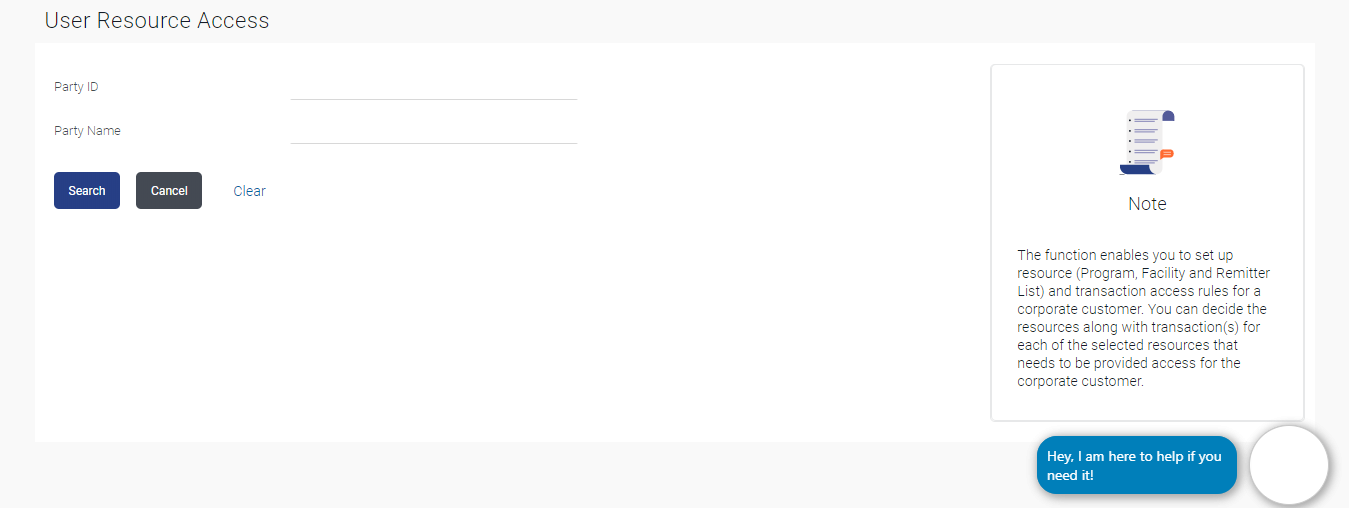
- Navigate to one of the above paths.The User Resource Access - Mapping screen appears.
- Perform anyone of the following actions:
- In the Party ID enter the party id of the user.
- In the Party Name field, enter the party name of the user.
- Perform anyone of the following actions:
- Click Search.
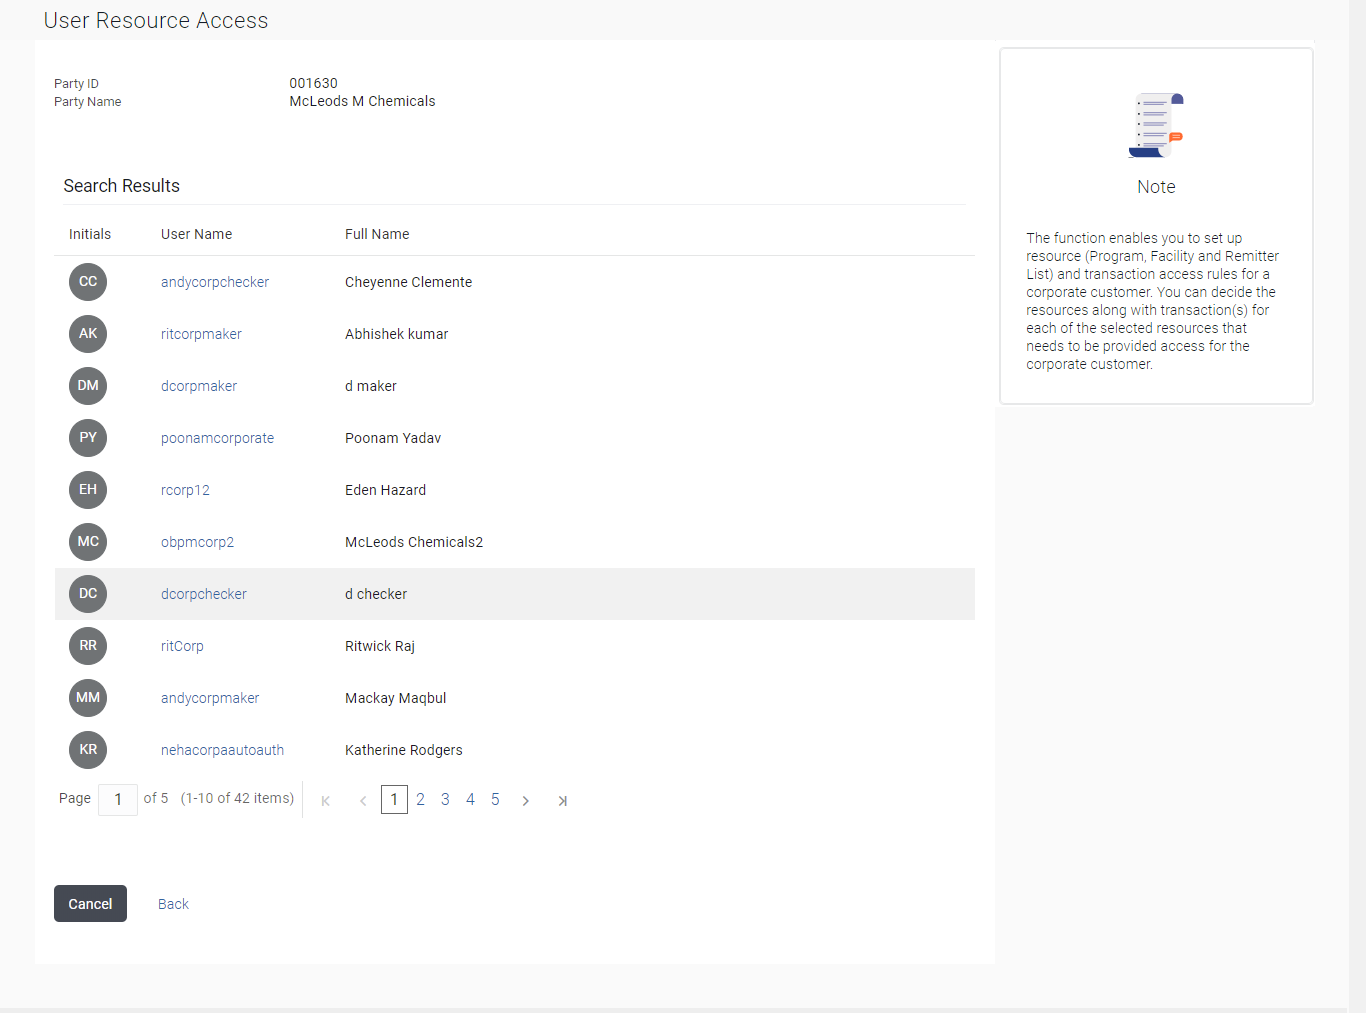
For a searched party, there will be a list of users displayed with information like user ID, full name of the user and initials of the user.
- Click Cancel to cancel the transaction.
- Click Clear to clear the search parameters.
Figure 13-3 User Resource Access - Search Result
Note:
The fields which are marked as Required are mandatory.For more information on fields, refer to the field description table.
Table 13-1 User Account Access - Search Result - Field Description
Field Name Description Party ID The party ID searched by the Bank Administrator. Party Name The name of the party. Search Result Information specified in below fields are related to Search Result. Initials Initials of the selected user. User Name User name of the selected user. Full Name Full name of the selected user. - Click Search.
- Perform anyone of the following actions:
- Click the User Name link against the user record for which you want to create the mapping.
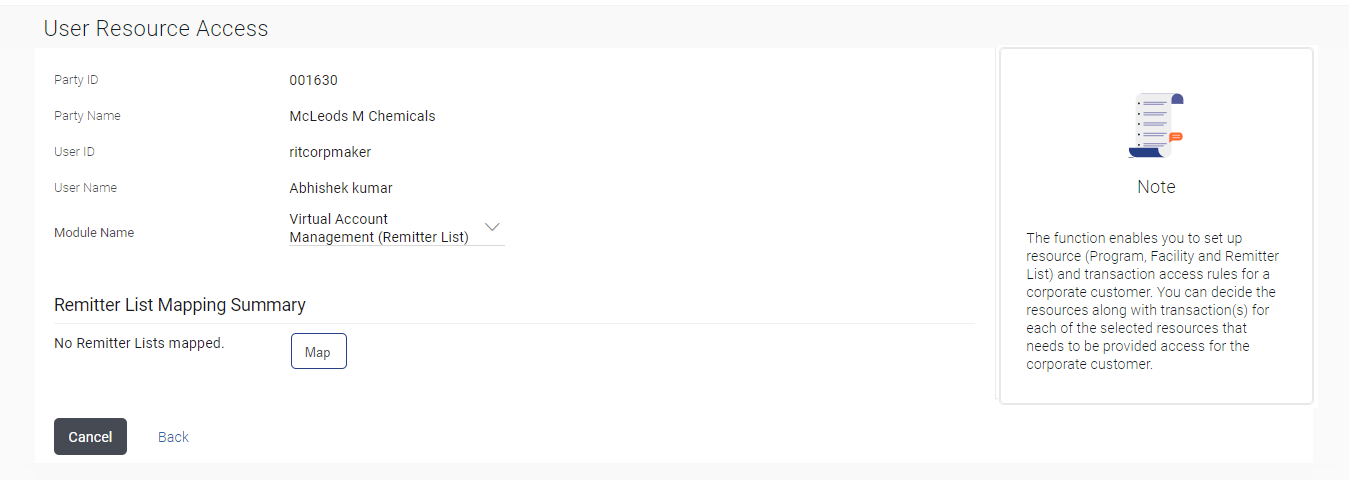
The User Resource Access – Mapping Summary screen appears.
- Click Cancel to cancel the transaction.
- Click Back to navigate to the previous screen.
- Click the User Name link against the user record for which you want to create the mapping.
- If there is no mapping done for the user for a party, there will be a message No Remitter List mapped with Map button.
- If the access for the party to which the user belongs to is not done, then
there will be no Map button
Figure 13-4 User Resource Access – Summary Page
Note:
The fields which are marked as Required are mandatory.For more information on fields, refer to the field description table.
Table 13-2 User Resource Access – Summary Page - Field Description
Field Name Description Party ID The party ID searched by the Bank Administrator. Party Name The name of the party. User ID User ID of the selected user. User Name User name of the selected user Module Name The name of the module. Only Virtual Account Management (Remitter List) is available. Remitter List Mapping Summary - Perform anyone of the following actions:
- Click Map.
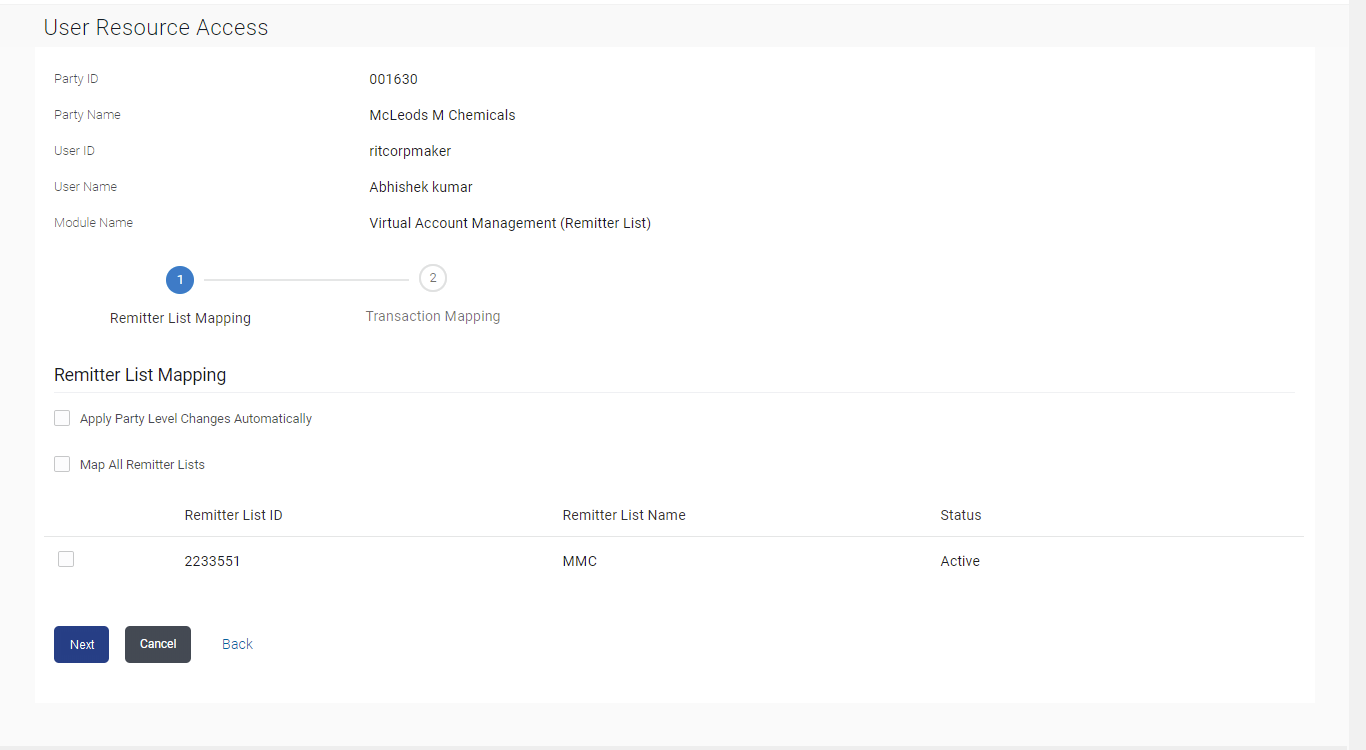
The User Resource Access - Create screen appears.
- Click Cancel to cancel the transaction.
- Click Back to navigate to the previous screen.
Note:
The fields which are marked as Required are mandatory.For more information on fields, refer to the field description table.
Table 13-3 User Resource Access - Create - Field Description
Field Name Description Party ID The party ID searched by the Bank Administrator. Party Name The name of the party. User ID User ID of the selected user. User Name User name of the selected user Module Name The name of the module. Remitter List Mapping Information specified in below fields are related to Remitter List Mapping. Apply Party Level Changes Automatically User will get access to remitters that are allowed/ disallowed at the party level. Map All Remitter List Mapping all the remitters of the VAM module to the existing resource. Remitter List ID List of remitter IDs present in a particular resource type. Remitter List Name Name of the remitter list available under the party. Status Status of the remitter access for the party - Click Map.
- All the remitters held by the selected party as a relationship with the bank as available in the core banking system will be fetched and displayed.
- Perform anyone of the following actions:
- Select a global check box of Map All Remitter List to enable all the existing remitters for channel banking (on screen, it will serve as a Select All function).
- If specific remitter is required to be given access to the user, then the bank administrator needs to select the respective check boxes preceding the remitter ID.
- Select Apply Party Level Changes Automatically to automatically apply the party changes.
- Perform anyone of the following actions:
- Click Next.
The User Resource Access - Create (Transaction Mapping) screen appears.
- Click Back to navigate to the previous screen.
- Click Cancel to cancel the transaction.
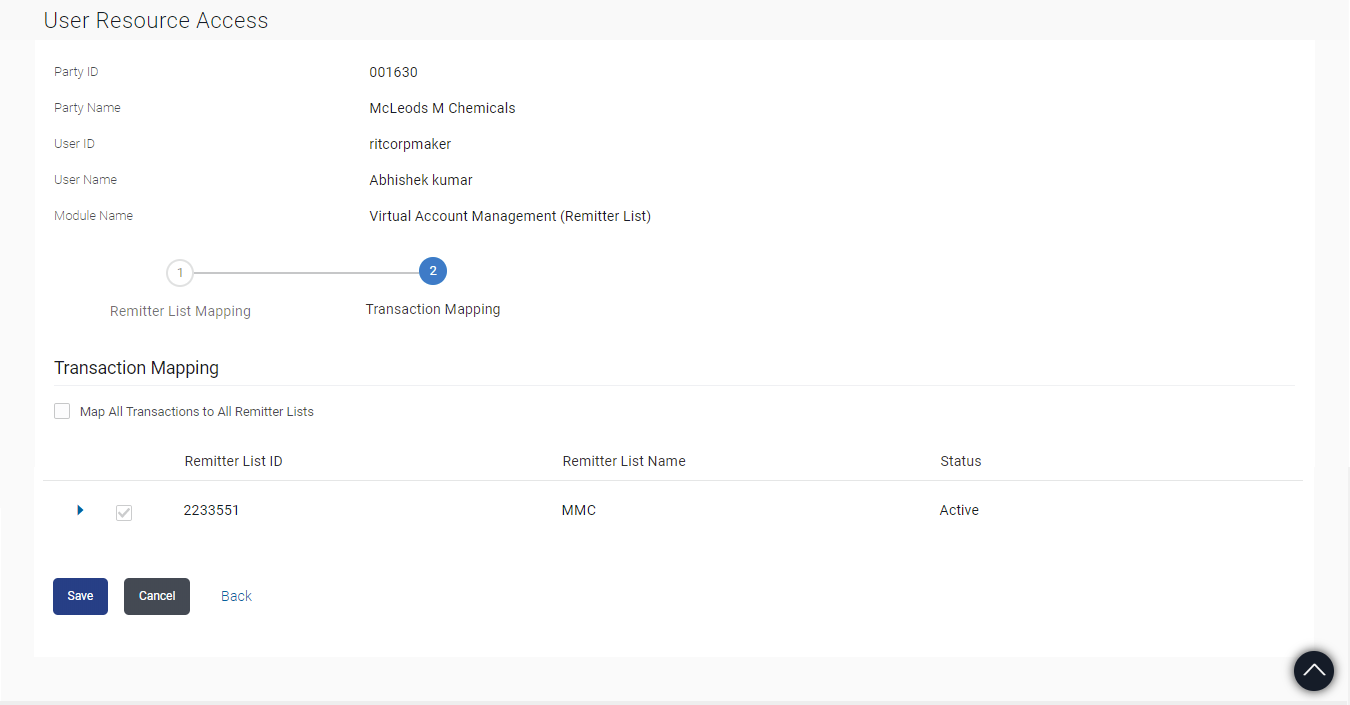
Figure 13-6 User Resource Access - Transaction Mapping - Create
Note:
The fields which are marked as Required are mandatory.For more information on fields, refer to the field description table.
Table 13-4 User Resource Access - Transaction Mapping - Field Description
Field Name Description Party ID The party ID searched by the Bank Administrator. Party Name The name of the party. User ID User ID of the selected user. User Name User name of the selected user Module Name The name of the module. Transaction Mapping Information specified in below fields are related to Transaction Mapping. Map All Transactions to All Remitter List Mapping all the transactions to all the remitter list. Remitter List ID List of remitter IDs present in a particular resource type. Remitter List Name Name of the remitter list available under the party. Status Status of the remitter access for the party - Click Next.
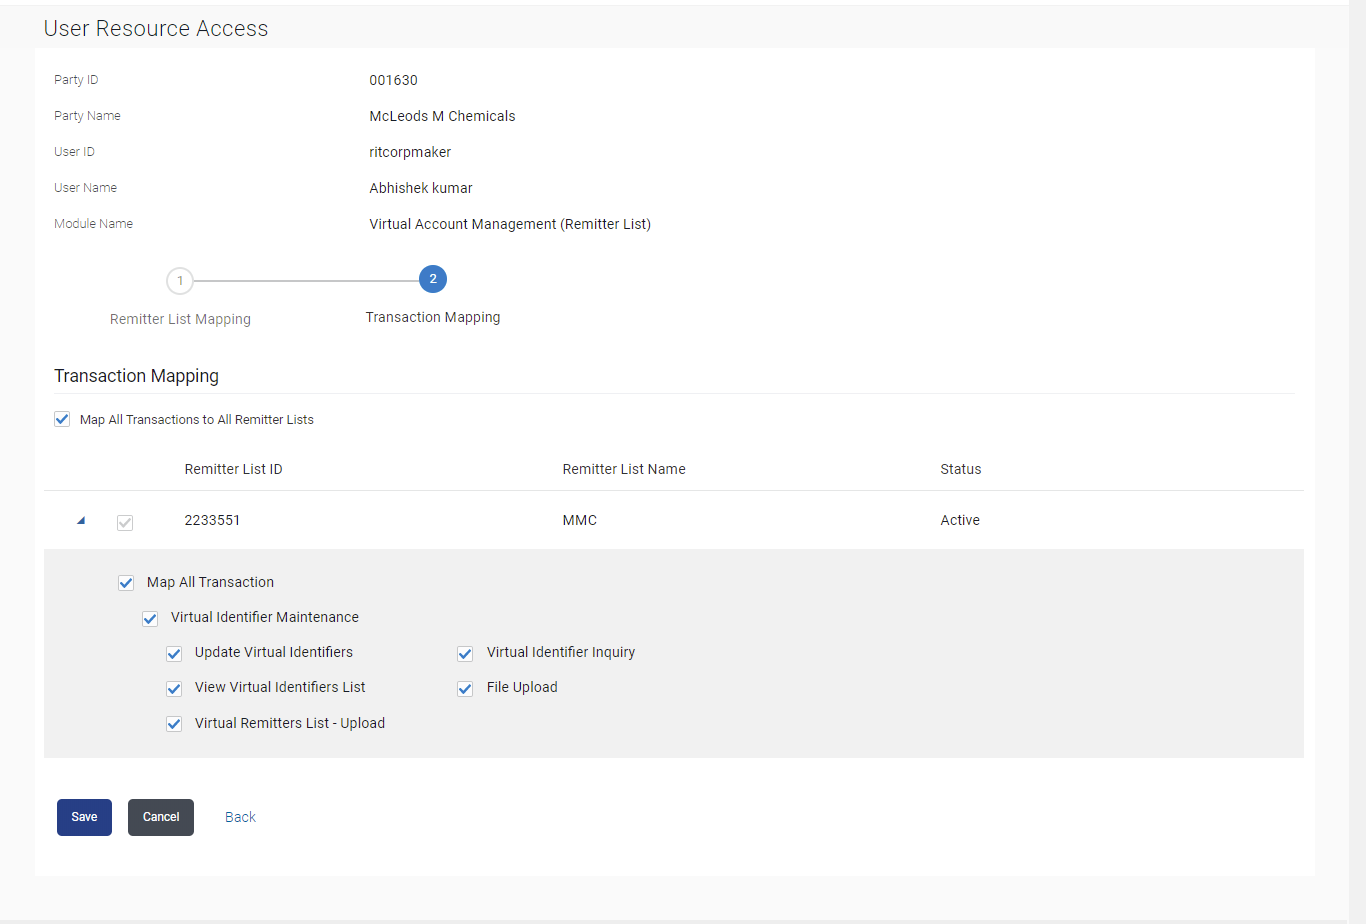
- To map the transactions to the account.click
 icon against the particular remitter ID to view the transaction
mapping.
Figure 13-7 User Resource Access - Transaction Mapping (Map Transaction) - Create
- Perform anyone of the following actions:
- Select the respective check boxes preceding the transaction to be mapped.
- Select Map All Transactions, if you want to map all the transactions to all accounts.
- Select Apply Party Level Changes Automatically to automatically apply the party changes.
- Perform anyone of the following actions:
- Click
Save.
The User Resource Access - Review screen appears.
- Click Cancel to cancel the transaction.
- Click Back to navigate to the previous screen.
- Click
Save.
- Perform anyone of the following actions:
- Verify the details, and click
Confirm.
The screen with success message appears along with the reference number and status of the transaction.
- Click Cancel to cancel the transaction.
- Click Back to navigate to the previous screen.
- Verify the details, and click
Confirm.
- Click OK to complete the transaction.
Parent topic: User Resource Access
