- Exadata Server X10M Service Manual
- Servicing the Disk Backplane
- Install the 4-Drive Backplane
Install the 4-Drive Backplane
To install the 4-Drive disk backplane (DBP) and storage drive cage:
- Install the 4-Drive disk backplane on to the storage drive cage.
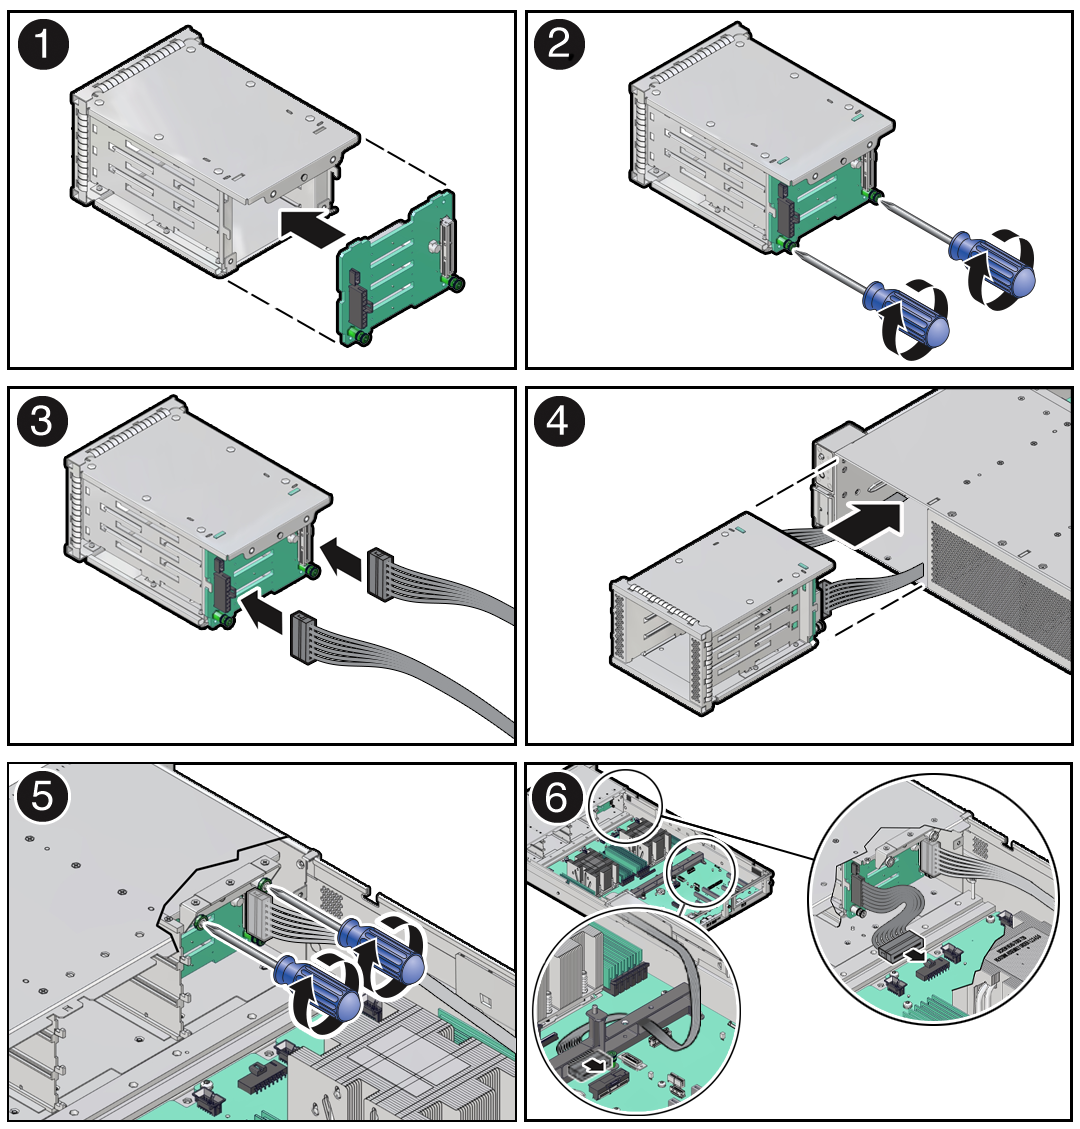
- Align the replacement disk backplane with the rear of the storage drive cage. Using a Torx T15 screwdriver, tighten the two spring-mounted screws to secure the disk backplane to the storage drive cage [1, 2].

- Reconnect the DBP power cable and the DBP auxiliary signal cable to the disk backplane [3].
- Align the replacement disk backplane with the rear of the storage drive cage. Using a Torx T15 screwdriver, tighten the two spring-mounted screws to secure the disk backplane to the storage drive cage [1, 2].
- Install the storage drive cage in to the chassis.
- Align the storage drive cage with the opening in the front panel of the server. Pull the attached DBP power cable and DBP auxiliary signal cable through the opening while gently pushing the storage drive cage in to the chassis until it is fully seated in the chassis [4].
- Using a Torx T15 screwdriver, tighten the two spring-mounted screws to secure the storage drive cage to the chassis [5].
- Gently insert the DBP auxiliary signal cable in to the left-side cable trough. Reconnect the DBP auxiliary signal cable and DBP power cable to the motherboard connectors [6].
See also Install the Disk Backplane Signal Cable.
- Reinstall the storage drives in to the front
- Reinstall all NVMe storage drives into the server front panel storage drive cage.
- Return the server to operation.
- Install the fan tray.
See Install the Fan Tray.
- Install the fan modules.
See Install a Fan Module.
- Install the air baffle.
- Install the server top cover.
- Return the server to the normal rack position.
- Reconnect the power cords to the power supplies, and power on the server.
- Verify that the power supply AC OK LED is lit.
Note:
IMPORTANT: When the disk backplane is replaced, the key identity properties (KIP) of the backplane is programmed by Oracle ILOM to contain the same KIP as the other quorum member components. If you removed other quorum member components, you might need to manually program the product serial number (PSN) into the new backplane. For more information, see FRU Key Identity Properties (KIP) Automated Update. - Install the fan tray.