4 Servicing CRUs That Require System Power Off
Perform tasks for servicing customer-replaceable units (CRUs) for the Oracle Database Appliance that require you to power off system components.
Note:
The servicing of hot-plug components such as the HDDs, SDDs, power supplies, and fans is described in Servicing CRUs That Do Not Require System Power Off.
- Servicing Internal M.2 Flash SSDs (CRU)
Perform the task of servicing M.2 flash solid-state drives (SSDs). - Servicing DIMMs (CRU)
Perform this task to service dual in-line memory modules (DIMMs). - Servicing PCIe Cards (CRU)
Perform tasks to service PCIe cards in the system. - Servicing the Battery (CRU)
This section describes how to service the system battery.
Servicing Internal M.2 Flash SSDs (CRU)
Perform the task of servicing M.2 flash solid-state drives (SSDs).
M.2 flash SSDs are replaceable components that require you to power off the server before servicing.
Note:
The Oracle Database Appliance does not support M.2 Flash SSD hot plug.Caution:
These procedures require that you handle components that are sensitive to electrostatic discharge. This sensitivity can cause the component to fail. To avoid damage, ensure that you follow antistatic practices, as described in Electrostatic Discharge Safety.Caution:
Ensure that all power is removed from the server before removing or installing M.2 SSDs or flash risers. You must disconnect all power cables from the system before performing these procedures.- Identify and Remove an M.2 Flash SSD
- Install an M.2 Flash SSD
- Remove a Flash Riser Board
- Install a Flash Riser Board
Parent topic: Servicing CRUs That Require System Power Off
Identify and Remove an M.2 Flash SSD
The server can contain up to two flash riser boards (SSDR0, SSDR1). Each flash riser board can contain one M.2 flash SSD.
- If you have a failed M.2 SSD, determine which SSD has failed.
- Prepare the server for service.
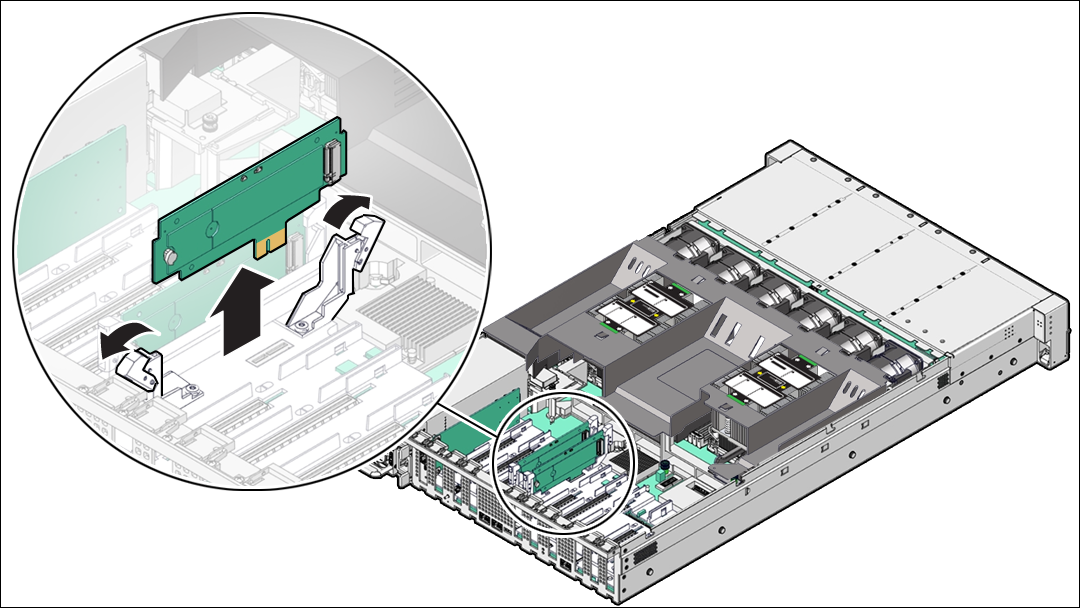
- To remove the flash riser board, do the following:
- Place the riser board on an antistatic mat.
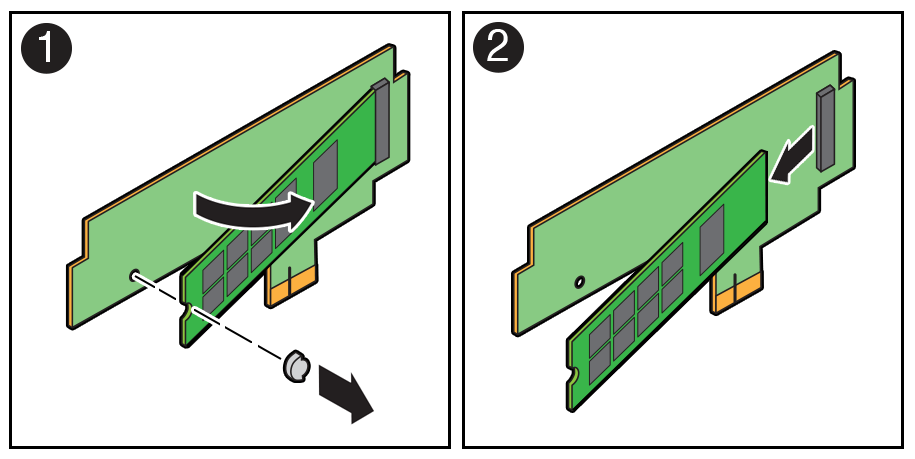
- Remove the M.2 flash SSD from the riser board.
Parent topic: Servicing Internal M.2 Flash SSDs (CRU)
Install an M.2 Flash SSD
The flash riser board should have already been removed as described in Identify and Remove an M.2 Flash SSD.
- Unpack the replacement M.2 flash SSD and place it on an antistatic mat.
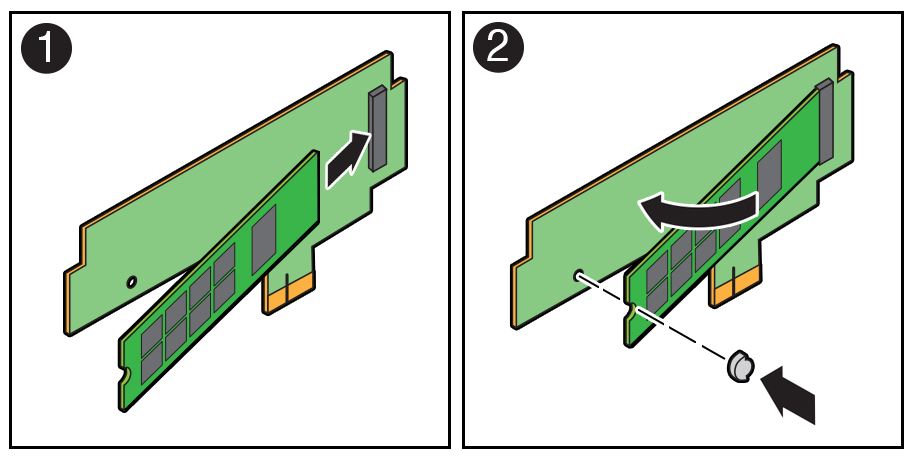
- Install the M.2 flash SSD onto the riser board.
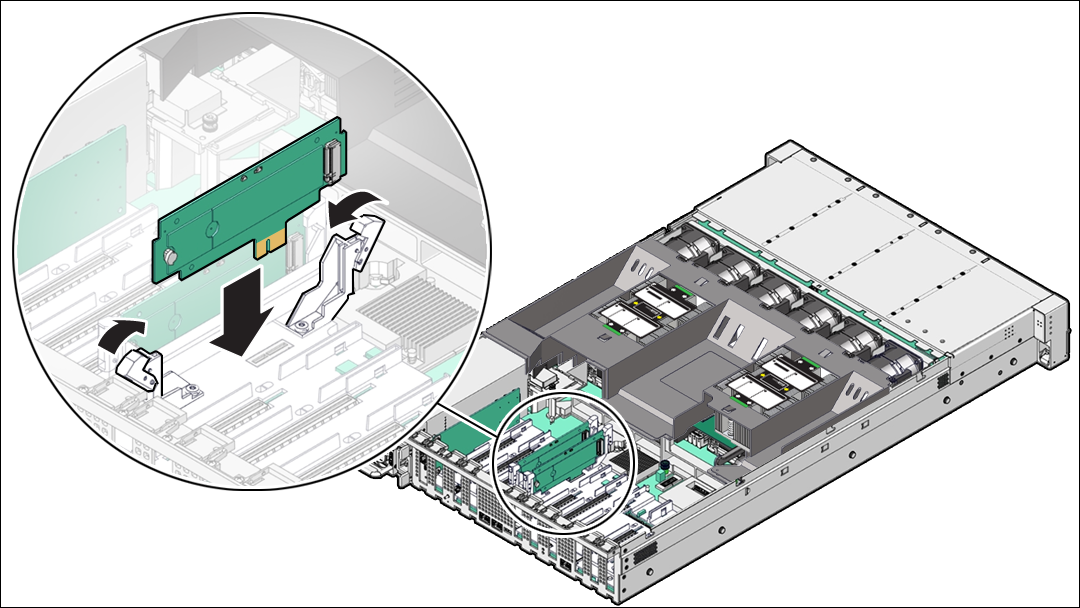
- Install the flash riser board.
- Return the server to operation.
Parent topic: Servicing Internal M.2 Flash SSDs (CRU)
Remove a Flash Riser Board
Follow the instructions in this section if you need to replace a flash riser board.
The server includes two flash riser boards (SSDR0, SSDR1). Each flash riser board can contain one M.2 flash SSD.
-
Prepare the server for service.
-
To remove the flash riser board, do the following:
- Place the riser board on an antistatic mat.
- Remove the M.2 flash SSD from the riser board.
Parent topic: Servicing Internal M.2 Flash SSDs (CRU)
Install a Flash Riser Board
The system motherboard provides two slots (labeled SSDR 0 and SSDR 1) for flash riser boards. When installing flash riser boards, install the first riser board into slot SSDR 0 and the second into SSDR 1.
- Unpack the replacement flash riser board and place it on an antistatic mat.
- Install the M.2 flash SSD onto the riser board.
-
Install the flash riser board.
-
Return the server to operation.
Parent topic: Servicing Internal M.2 Flash SSDs (CRU)
Servicing DIMMs (CRU)
Perform this task to service dual in-line memory modules (DIMMs).
DIMMs are replaceable components that require you to power off the server before servicing.
Caution:
These procedures require that you handle components that are sensitive to electrostatic discharge. This sensitivity can cause the components to fail. To avoid damage, ensure that you follow antistatic practices as described in Electrostatic Discharge Safety.Caution:
Ensure that all power is removed from the server before removing or installing DIMMs, or damage to the DIMMs might occur. You must disconnect all power cables from the system before performing these procedures.The topics and procedures in this section provide information to assist you when replacing a DIMM or upgrading DIMMs.
- DIMM and Processor Physical Layout
- DIMM Population Scenarios
- DIMM Population Rules
- Populating DIMMs for Optimal System Performance
- Using the Server Fault Remind Button
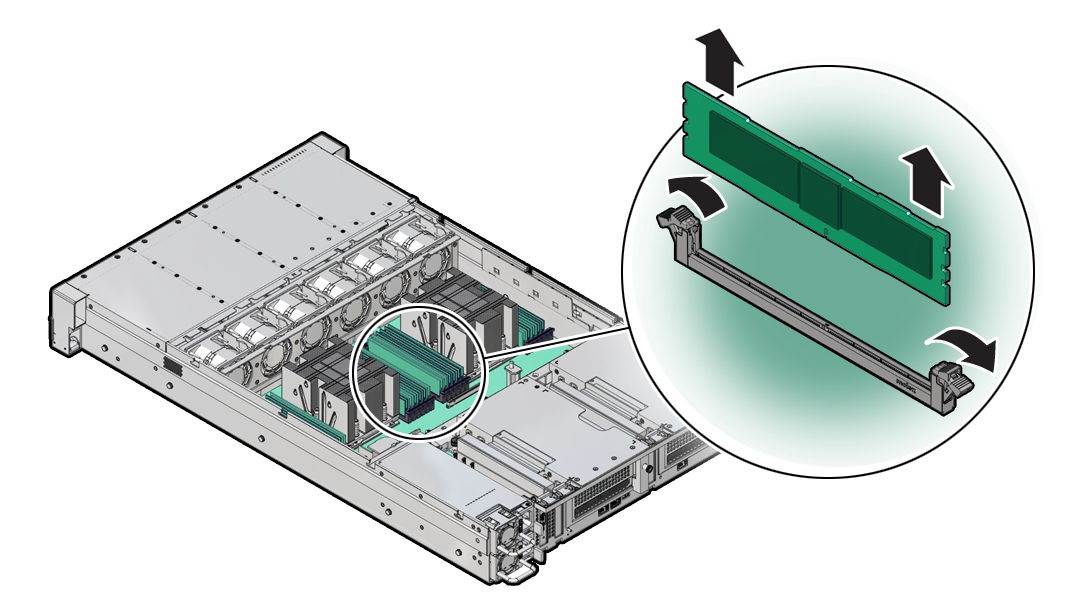
- Identify and Remove a DIMM
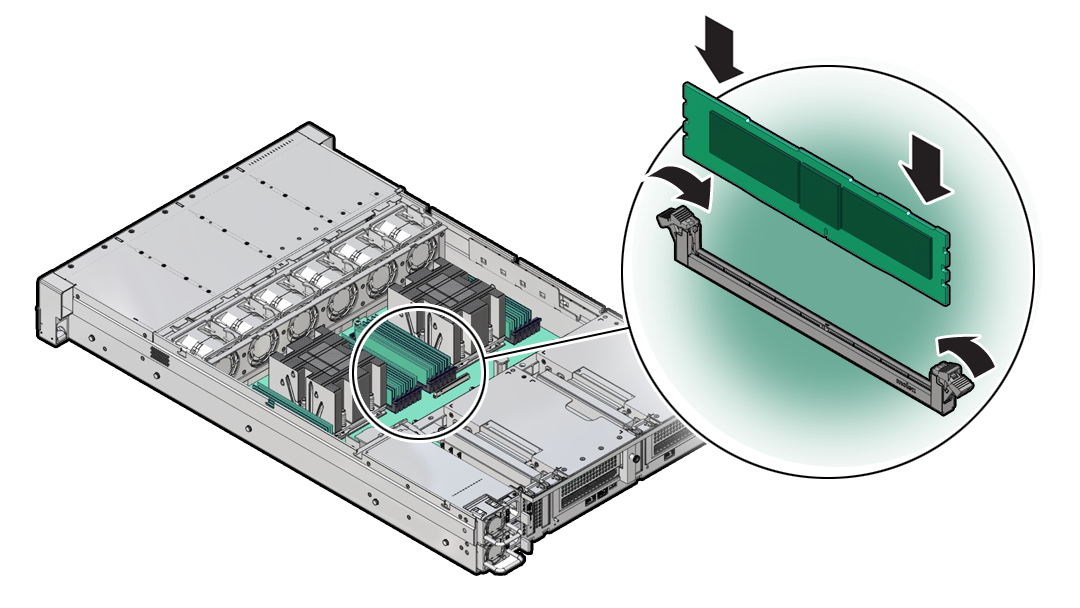
- Install a DIMM
Parent topic: Servicing CRUs That Require System Power Off
DIMM and Processor Physical Layout
The physical layout of the DIMMs and processor(s) is shown in the following figure. When viewing the server from the front, processor 0 (P0) is on the left.
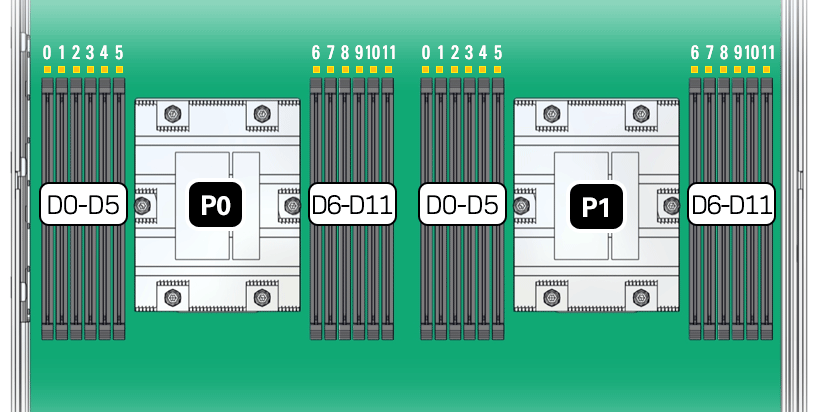
Each processor, P0 and P1, has twelve DIMM slots (D0-D11), six on each processor side. Each DIMM slot supports a single memory channel, for total of twelve DDR5 memory channels per processor (0-11).
Table 4-1 Memory Channels and DIMM Slots for P0 and P1
| Memory Channel | DIMM Slot |
|---|---|
|
0 |
D3 |
|
1 |
D1 |
|
2 |
D0 |
|
3 |
D5 |
|
4 |
D4 |
|
5 |
D2 |
|
6 |
D8 |
|
7 |
D10 |
|
8 |
D11 |
|
9 |
D6 |
|
10 |
D7 |
|
11 |
D9 |
Note:
In single-processor systems, the DIMM slots associated with processor 1 (P1) are nonfunctional and should not be populated with DIMMs.Parent topic: Servicing DIMMs (CRU)
DIMM Population Scenarios
There are two scenarios in which you are required to populate DIMMs:
-
A DIMM fails and needs to be replaced.
In this scenario, you can use the Fault Remind button to determine the failed DIMM, and then remove the failed DIMM and replace it. To ensure that system performance is maintained, you must replace the failed DIMM with a DIMM of the same size (in gigabytes) and type (quad-rank or dual-rank). In this scenario, do not change the DIMM configuration.
-
You purchased new DIMMs and want to use them to upgrade the server memory.
In this scenario, you must adhere to the DIMM population rules and follow the recommended DIMM population order for optimal system performance.
Parent topic: Servicing DIMMs (CRU)
DIMM Population Rules
The population rules for adding DIMMs to the server are as follows:
-
The server supports:
-
Up to 24 DDR5 DIMMs, 12 per processor socket.
-
64 GB dual-rank (DR) Registered DIMMs (RDIMMS).
-
A maximum supported memory speed of 4800 MT/s.
However, the maximum attainable memory speed could be limited by the maximum speed supported by a specific processor or DIMM. All memory installed in the system operates at the same speed, or frequency.
-
- Populate all 12 memory DIMMs per processor to achive the highest system performance. If populating 12 memory DIMMs per processor is not feasible, populate each processor with 1, 2, 4, 6, 8, or 10 DIMMs.
-
Populate each memory channel with the same capacity and number of banks.
-
Populate processor 0 (P0) and processor 1 (P1) using the same DIMM configuration. Failure to do so will result in lower system performance.
-
The server operates properly with a minimum of one DIMM installed per processor. Install one DIMM in slot D5 on each processor.
-
Each DIMM is shipped with a label identifying its rank classification (dual or quad). The following identifies the label corresponding to the supported DIMM rank classification: Dual-rank RDIMM 2Rx4
-
Do not mix DIMM types in a server. Load-Reduced (LRDIMMs) are not supported.
-
The server does not support lockstep memory mode, which is also known as double device data correction, or Extended ECC.
-
Populate the DIMM slots in the order described in the following sections, which provide an example of how to populate the DIMM slots to achieve optimal system performance.
-
DIMM fillers must be installed in any unpopulated DIMM slots. This is a requirement for proper server cooling.
Parent topic: Servicing DIMMs (CRU)
Populating DIMMs for Optimal System Performance
Supported per-processor configurations for optimal performance are listed below. DIMM slots must be populated identically for both processors. For an illustration, see DIMM and Processor Physical Layout.
-
Populate DIMMs of the same size in multiples of four (for a single processor system) or eight (for a dual processor system).
-
The DIMM population for each processor (P0 and P1) must be identical.
-
The DIMM population for each server node must be identical.
| ODA X10-S DIMM Populations (Single Processor) | ODA X10-L DIMM Populations (Dual Processor) | ODA X10-HA DIMM Populations (Dual Processor, Dual Server Node) |
|---|---|---|
|
|
|
Parent topic: Servicing DIMMs (CRU)
Using the Server Fault Remind Button
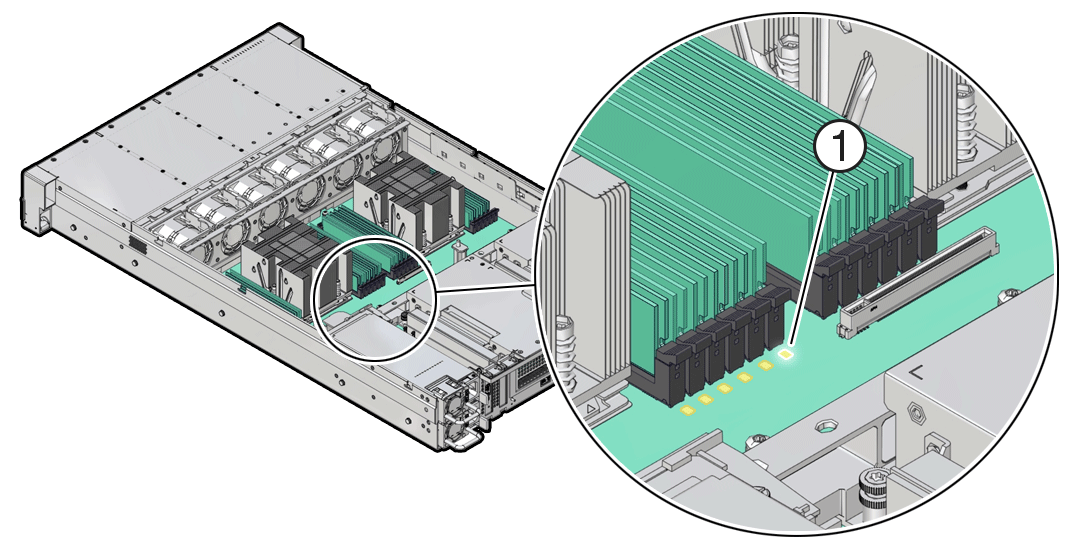
When you press the server Fault Remind button [1], an LED located next to the Fault Remind button lights green which indicates that there is sufficient voltage present in the fault remind circuit to light any fault LEDs that were lit due to a component failure. If this LED does not light when you press the Fault Remind button, it is likely that the capacitor powering the fault remind circuit has lost its charge. This can happen if the Fault Remind button is pressed for several minutes with fault LEDs lit, or if power is removed from the server for more than 15 minutes.
The following figure shows the location of the Fault Remind button on the motherboard.
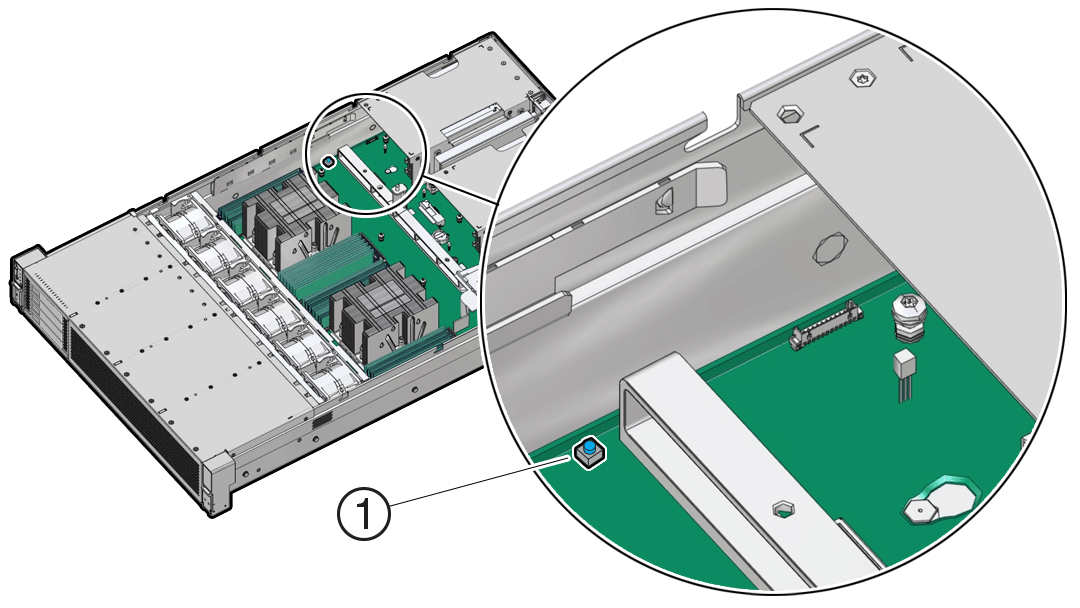
Parent topic: Servicing DIMMs (CRU)
Servicing PCIe Cards (CRU)
Perform tasks to service PCIe cards in the system.
PCIe cards are replaceable components that require you to power off the server before servicing.
Note:
The Oracle Database Appliance does not support PCIe card hot plug.Caution:
These procedures require that you handle components that are sensitive to electrostatic discharge. This sensitivity can cause the components to fail. To avoid damage, ensure that you follow antistatic practices as described in Electrostatic Discharge Safety.Caution:
Ensure that all power is removed from the server before removing or installing PCIe cards. You must disconnect all power cables from the system before performing these procedures.- PCIe Slot Locations
- Adding Optional PCIe Cards (CRU)
Describes installation sequence for adding optional PCIe cards to an Oracle Database Appliance. - Remove a Half Height PCIe Card
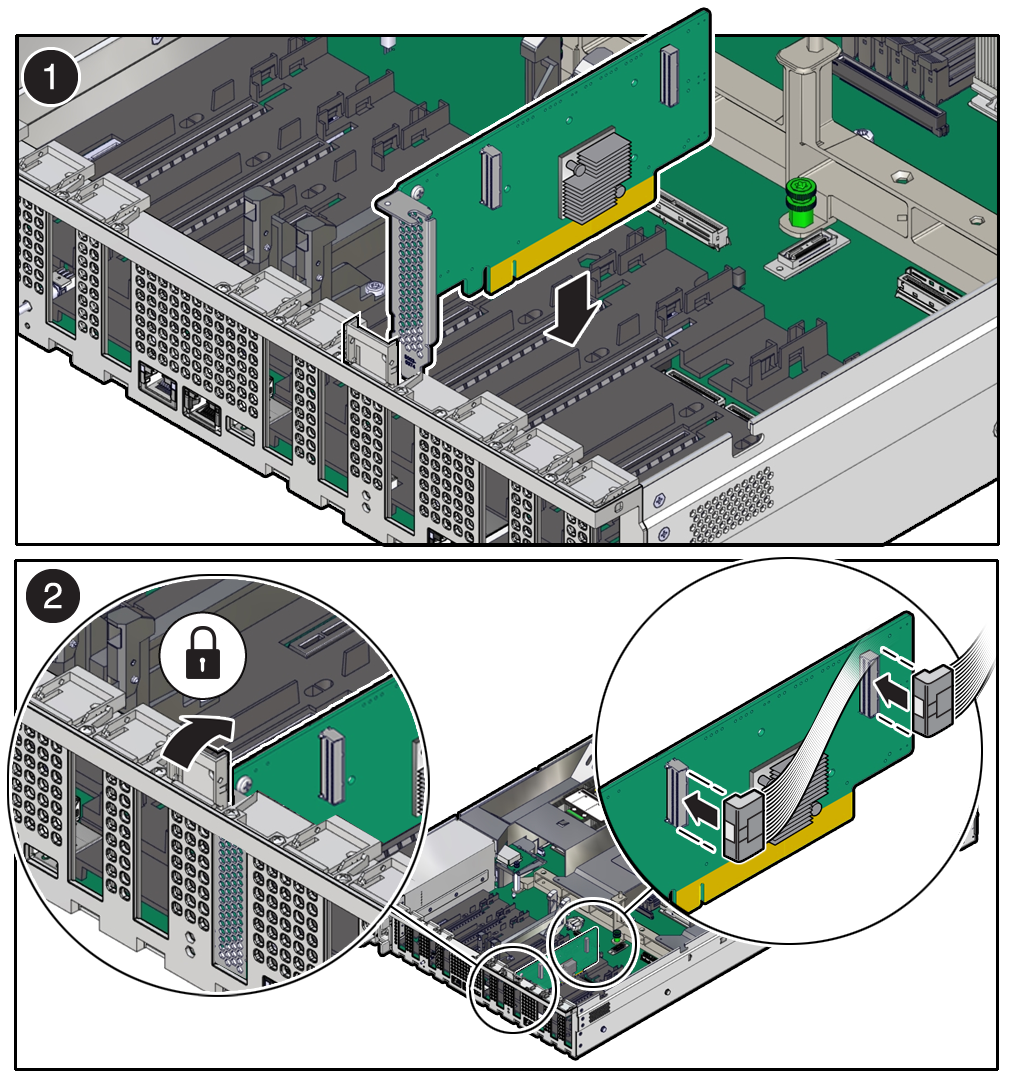
- Install a Half Height PCIe Card
Parent topic: Servicing CRUs That Require System Power Off
PCIe Slot Locations
Depending on the number of processors installed, the server is designed to support up to 9 half height PCIe cards.
- All card slots support Half Height, Half Length (HHHL) PCIe cards (Low profile short) at PCIe Gen4 or Gen5.
- All PCIe card slots are 75W capable slots. All of the PCIe slots comply with the PCI Express 5.0 specification and can accommodate 75 Watt PCIe cards.
- For the Oracle Database Appliance X10-S, a single processor system, PCIe card slots 1 through 4 are nonfunctional.
- For the Oracle Database Appliance X10-S and X10-L, a special Oracle Retimer card is installed in PCIe slot 6 and is required for front panel NVMe storage drives to work. PCIe slot 7 is non-functional.
Parent topic: Servicing PCIe Cards (CRU)
Adding Optional PCIe Cards (CRU)
Describes installation sequence for adding optional PCIe cards to an Oracle Database Appliance.
The Oracle Database Appliance X10 series systems support up to three optional public network cards (or three network cards per node if you have an X10-HA). The Oracle Database Appliance X10-L supports up to four Oracle Flash Accelerator 680 PCIe Cards.
-
If possible, order any optional PCIe cards when you initially buy the system and have the cards factory installed.
-
If you want to add or replace PCIe cards after your appliance has been delivered from the factory, the following rules apply:
-
You can install any of the supported PCIe cards listed in the table below.
Note:
Before you add Oracle Flash Accelerator 680 PCIe cards to the Oracle Database Appliance X10-L, you must first ensure that all four front-mounted NVMe drives have been installed. If you only have two of the four front drive slots populated, you need to add two more. See Adding NVMe Expansion Storage. -
You must install optional PCIe cards in the proper order and slots (refer to the table below).
-
If you want to replace an existing network card, you must first delete the network card and its network interface using the appliance software. Then replace the physical network card with the new one. When the appliance is restarted the new network card will be used. For specific instructions on software removal or configuration of a public network card, refer to the Deployment and User's Guide.
Note:
You cannot replace the factory installed public network card installed in PCIe slot 5. In addition, for the Oracle Database Appliance X10-HA, you cannot replace the factory installed cluster interconnect network card installed in PCIe slot 1.
-
The following table describes the supported PCIe cards and the order in which they can be installed in the system.
| Description | Oracle Database Appliance X10-S | Oracle Database Appliance X10-L | Oracle Database Appliance X10-HA (per node) |
|---|---|---|---|
|
Supported PCIe cards |
|
|
|
|
Installation order |
Optional network cards:
|
Optional network cards:
Optional Oracle Flash Accelerator 680 PCIe Cards:
|
Optional network cards:
|
|
Installation intructions: |
Parent topic: Servicing PCIe Cards (CRU)
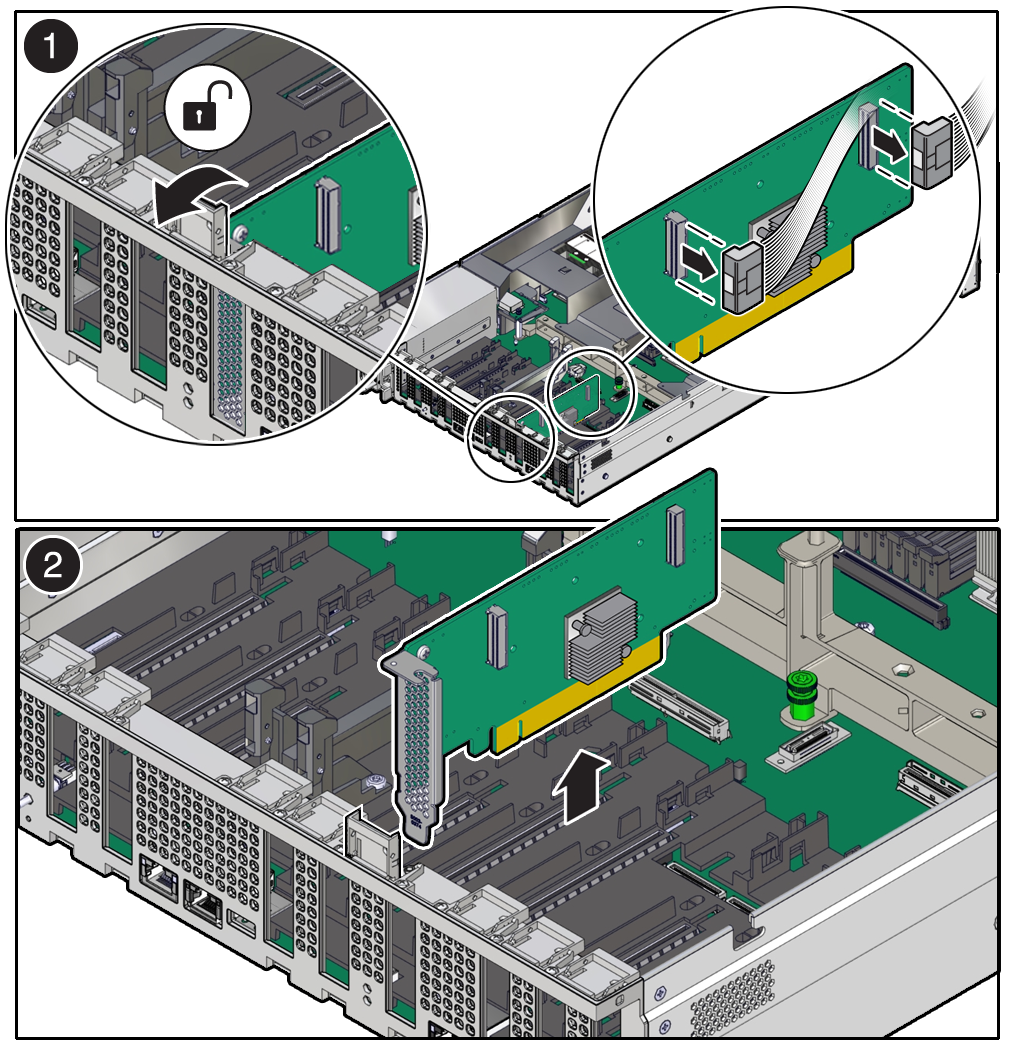
Remove a Half Height PCIe Card
Parent topic: Servicing PCIe Cards (CRU)
Servicing the Battery (CRU)
This section describes how to service the system battery.
The system battery is a replaceable component that requires you to power off the server before servicing.
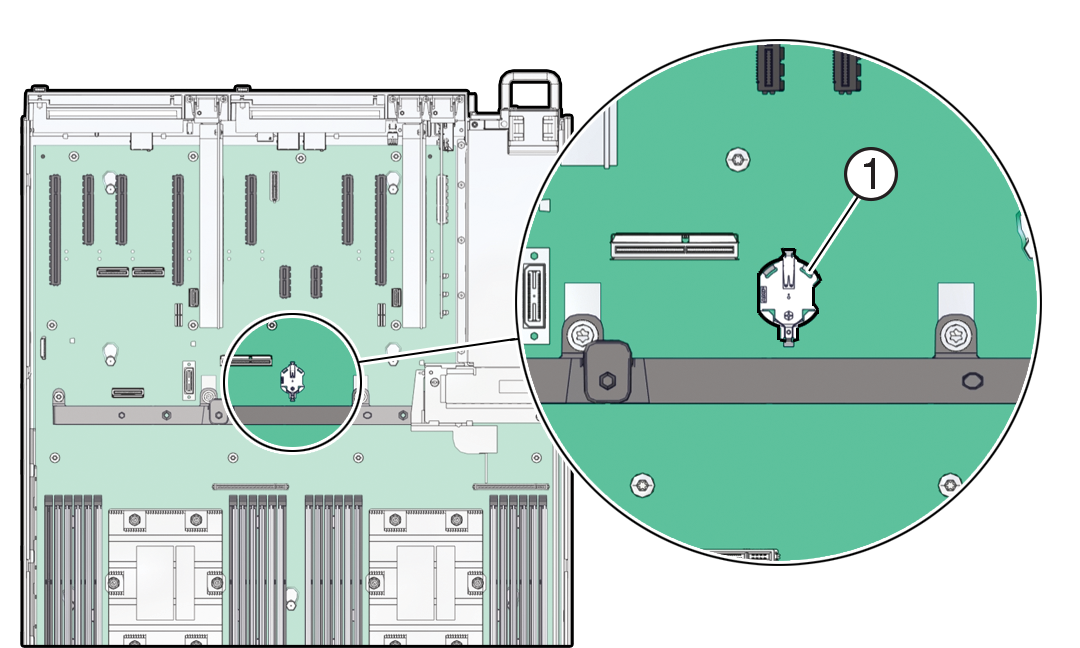
The real-time clock (RTC) battery maintains system time when the server is powered off and a time server is unavailable. If the server does not maintain the correct time when the system is powered off and not connected to a network, replace the battery.
Caution:
These procedures require that you handle components that are sensitive to electrostatic discharge. This sensitivity can cause the components to fail. To avoid damage, ensure that you follow antistatic practices, as described in Electrostatic Discharge Safety.Caution:
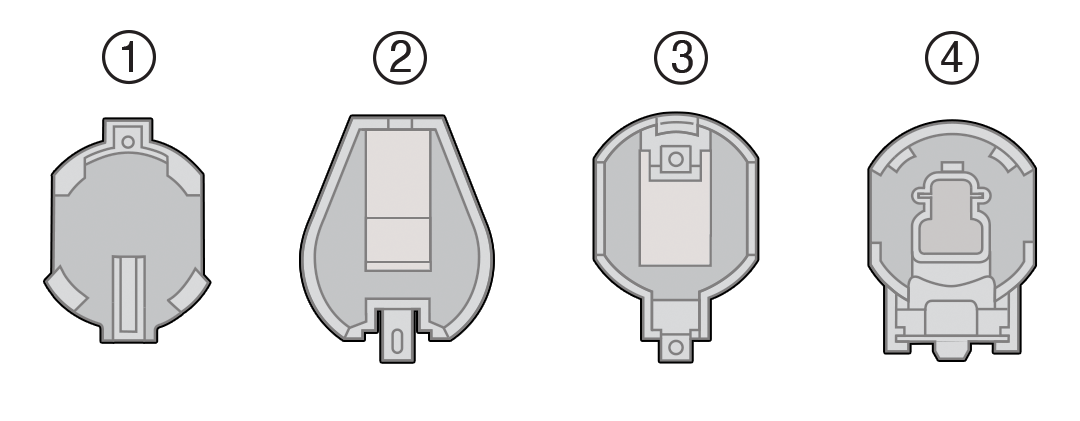
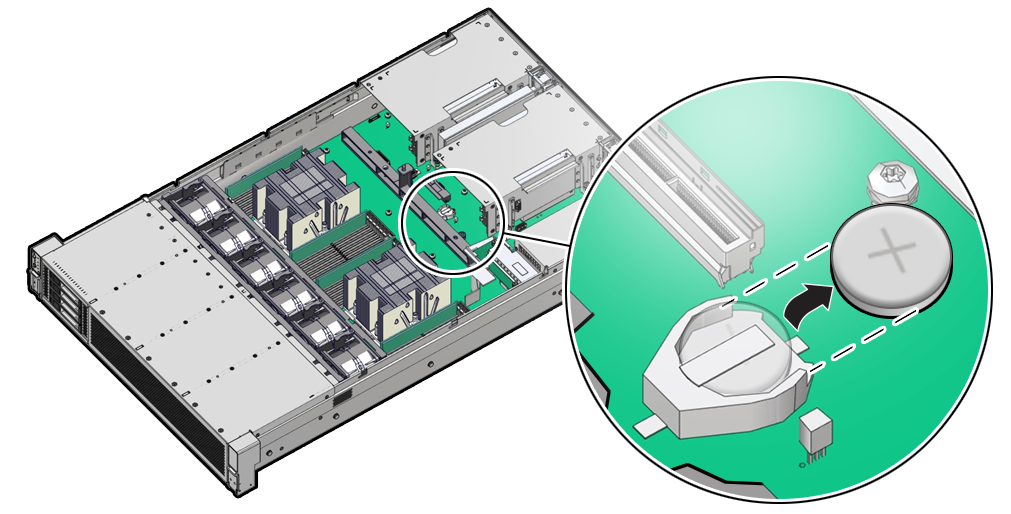
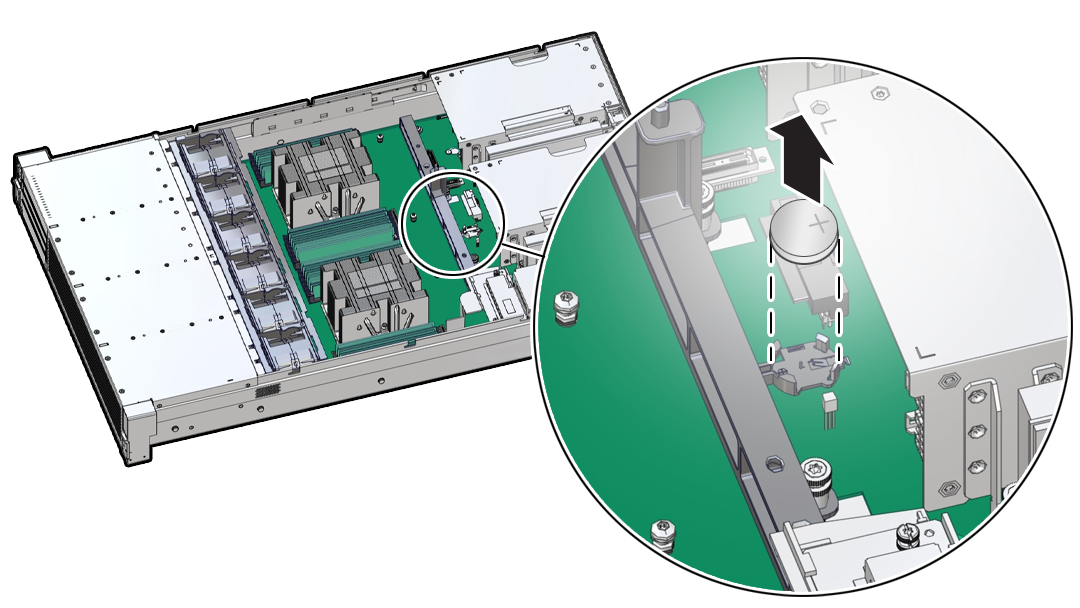
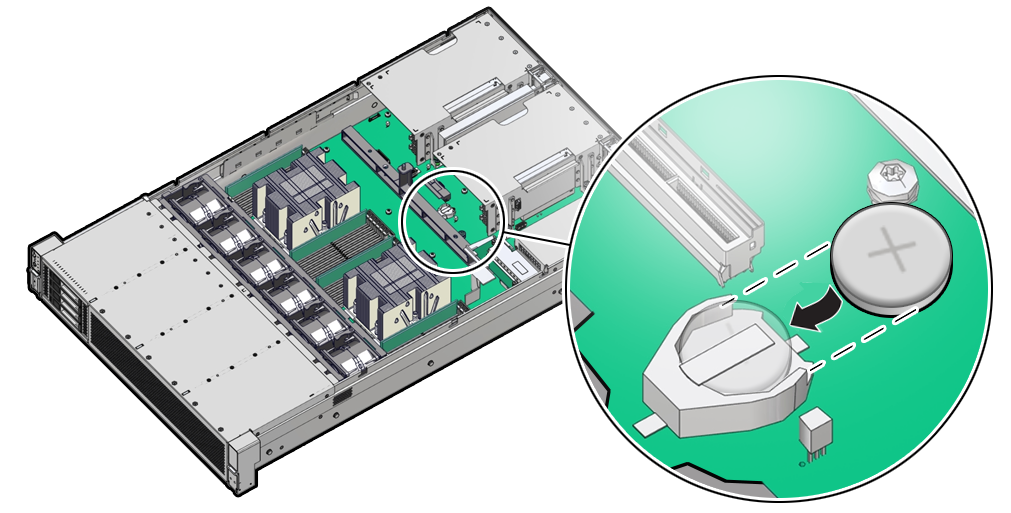
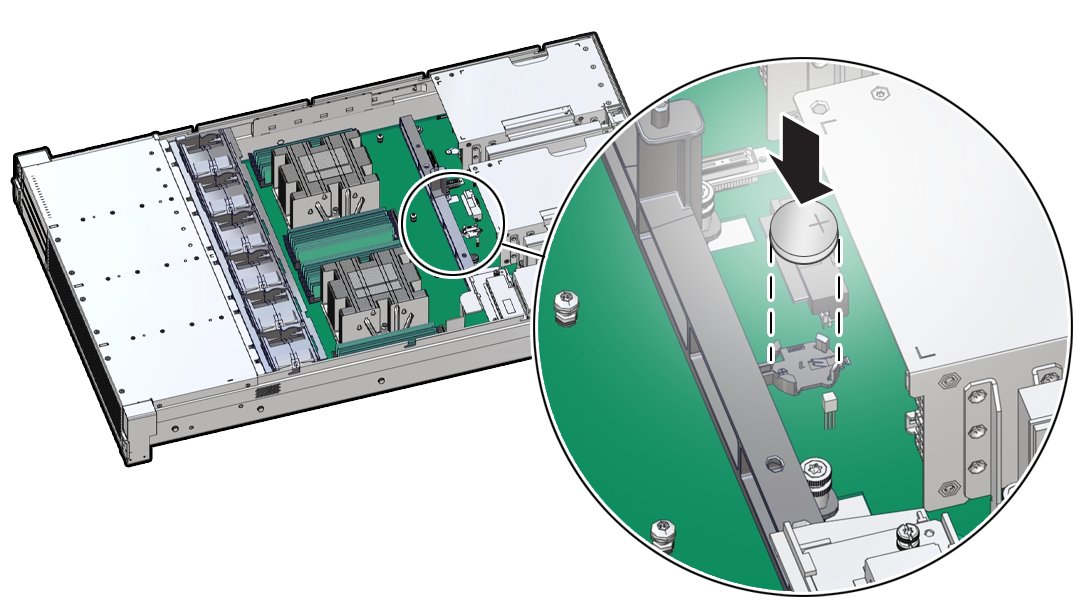
Ensure that all power is removed from the server before removing or installing the battery. You must disconnect the power cables from the system before performing this procedure.Remove the Battery
Parent topic: Servicing the Battery (CRU)
