Perform Operations on Fields
To customize how Essbase builds dimensions or loads data, design the rule to perform operations on fields in the source data. You can use the rule to add, join, split, copy, rename, and move fields, ignore fields or strings, and map data fields to member names.
Ignore Fields
To have Essbase skip one or more fields of the source data when building dimensions or loading data, use the load rule to ignore those fields.
Ignored fields from the source will not be loaded into the Essbase cube. For example, the Sample.Basic cube has five standard dimensions: Year, Product, Market, Measures, and Scenario. If the source has an extra field that is not a member of any dimension, such as Salesperson, you can tell Essbase to ignore the Salesperson field.
To ignore a column during an Essbase data load or dimension build,
-
Open your load rule in the Essbase web interface.
-
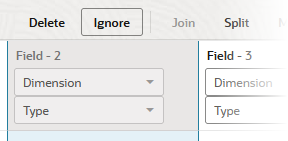
Select the unwanted field and click Ignore.
-
Verify and save the rule.
Ignore Strings
To have Essbase ignore certain source data fields during a dimension build or data load, such as those with certain characters, use the source properties of the rule to specify the matching string/token criteria.
For your data load and dimension build rules, you can ignore any field in the source that matches a string (called a token). When you ignore fields based on string values, the fields are ignored everywhere they appear in the source data, not just in a particular column. For example, in a source that is a computer-generated report in text format, special ASCII characters might be used to create horizontal lines between pages or boxes around headings. These special characters can be defined as tokens to be ignored.
To ignore strings/tokens in the source data during an Essbase dimension build,
-
Open your dimension build rule in the Essbase web interface.
-
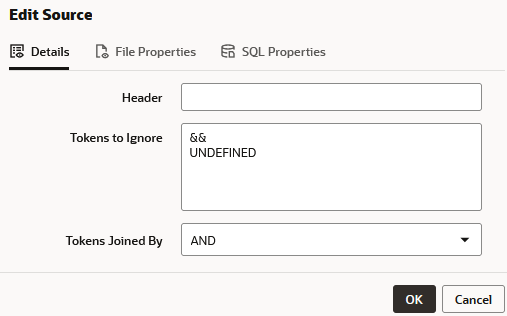
Click Source Properties.

-
On the Details tab, in Tokens to Ignore, enter one or more string(s) to ignore, separated by whitespace.
-
If you entered more than one string, select AND or OR in Tokens Joined By to control whether the string matching is done logically with AND or with OR. If you select AND, both strings must be present in the source to be ignored. If you select OR, either one or the other must be present.
-
Click OK. Verify and save the rule.
Move Fields
Use rules to have Essbase move one or more fields of the source data when building dimensions or loading data. Moving fields in the rule can help when source records need to be arranged to match the outline.
You can move fields to a different location using a rules file. For example, you can specify the first field in the source data to be the third field during the data load or dimension build.
Move operation is not available in Index-based dimension build rules, where fields can be in any order.
To move a field in an Essbase data load or dimension build rule,
-
Open your load rule in the Essbase web interface.
-
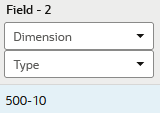
Select the field.
-
Click Move.
-
Indicate the position to move to, and click OK.

-
Verify and save the rule.
Add Fields
Adding fields to a rule can be useful for adding new members or data to the Essbase outline, to prepare for joins, to build qualified member names, or to perform other operations required for an Essbase dimension build or data load.
When adding a new field to a load rule,
-
If you select an existing field and then add a new field, the new column is added to the left of the existing column.
-
If you select no fields, the new field is added to the end (to the right of all existing fields).
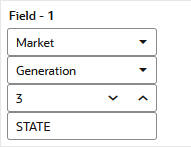
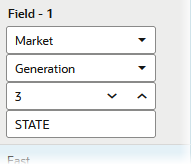
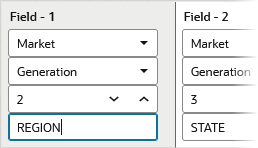
In the following dimension build rule example, assume you want to add a Generation 2 field prior to the existing Generation 3 field.
To add a field in an Essbase data load or dimension build rule,
-
Open your load rule in the Essbase web interface.
-
Select the field so that it is highlighted.
-
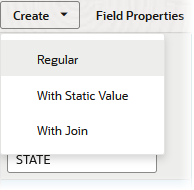
Click Create > Regular.
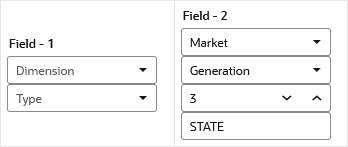
Field 1 moves to become Field 2, and a new Field 1 is added.
-
Enter the required information for the field you just added.
-
Verify and save the rule.
Join Fields
You can join multiple fields into one field in an Essbase dimension build or data load rule. The new field is given the name of the first field in the join.
For example, if the source data has separate fields for product number (100) and product family (-10), you must use the rule to join the fields (100-10) before loading them into the Sample.Basic cube.
Consider the following dimension build rule and preview:
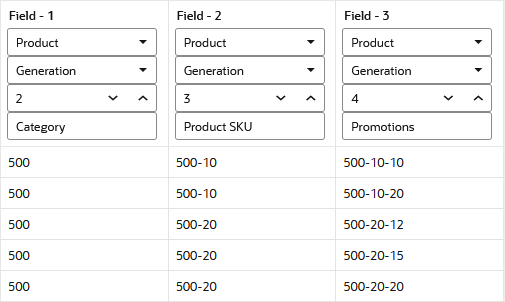
For the following exercise, assume your goal is to join the fields to create qualified member names of the following format:
[500].[500-10].[500-10-10]You can replace Field 3 / Generation 4 with the new qualified member name format.
To construct the required fields using joins and splits in your Essbase dimension build rule,
-
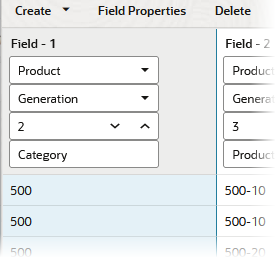
Select Field 1.
-
Click Create > With Static Value.
-
Enter [ and click OK.
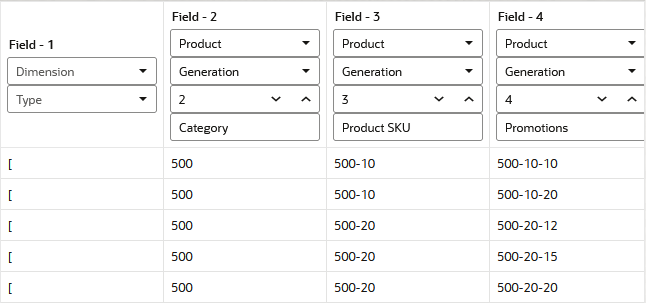
Field 1 is replaced with a new field containing the character you entered, and the other fields are shifted right.
-
Select Field 3 and click Create > With Static Value.
-
Enter ] and click OK.
Field 3 is replaced with a new field containing the character you entered, and fields 4 and 5 are shifted right.
![Field 1 contains [. Field 2 contains Product Generation 2 with preview values 500 in all rows. Field 3 contains ]. Field 4 contains Product Generation 3 with preview values like 500-10, 500-20, etc. Field 5 contains Product Generation 4 with preview values like 500-10-10, 500-10-20, etc. Field 1 contains [. Field 2 contains Product Generation 2 with preview values 500 in all rows. Field 3 contains ]. Field 4 contains Product Generation 3 with preview values like 500-10, 500-20, etc. Field 5 contains Product Generation 4 with preview values like 500-10-10, 500-10-20, etc.](img/joinflow2.png)
-
Select Field 1.
![Field 1, selected, contains [. Field 2, unselected, contains 500. Field 3, unselected, contains ]. Field 1, selected, contains [. Field 2, unselected, contains 500. Field 3, unselected, contains ].](img/joinflow3.png)
-
Hold Shift while clicking fields 2 and 3, to add fields 2 and 3 to the current selection.
![Fields 1, 2, and 3 all selected concurrently, with values [, 500, and ], respectively. Fields 1, 2, and 3 all selected concurrently, with values [, 500, and ], respectively.](img/joinflow4.png)
-
Click Join.
Fields 1, 2, and 3 are joined into a new Field 1 containing
[500].![Fields 1, 2, and 3 are joined into a new Field 1 containing [500]. Fields 1, 2, and 3 are joined into a new Field 1 containing [500].](img/joinflow5.png)
If your joined Field contains the brackets going the wrong directions, such as
]500[, then you probably selected in order of Fields 3, 2, 1 instead of Fields 1, 2, and 3. The order of your selections impacts how the Join behaves. To fix this, select the incorrectly joined field and click Split (using position 1, and then position 3), and try again, reversing your selection order before clicking Join. -
Copy the remaining generation fields (Generations 3 and 4) using Create > With Join, and, add more static values for periods and brackets, until you have built a field containing a qualified member name of the desired format:
[500].[500-10].[500-10-10] -
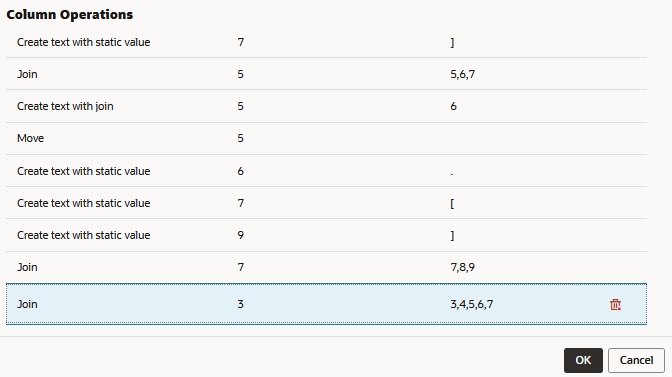
If you need to review your history of column operations including joins, splits, moves, and static value creation, click Column Operations to view a list of recent operations. You can undo the last operation.
-
Finish editing the rule, then verify and save it. The final goal for this exercise is to replace the Generation 4 field to use qualified member names. In this example, the original Generation 4 field (in Field 4) is now ignored, as it's been replaced with Field 3.
![Field 1 contains Product Generation 2 with preview values 500 in all rows. Field 2 contains Product Generation 3 with preview values like 500-10, 500-20, etc. Field 3 contains Product Generation 4 with preview values using qualified member names like [500].[500-10].[500-10-10], [500].[500-10].[500-10-20], etc. Field 4 is ignored. Field 1 contains Product Generation 2 with preview values 500 in all rows. Field 2 contains Product Generation 3 with preview values like 500-10, 500-20, etc. Field 3 contains Product Generation 4 with preview values using qualified member names like [500].[500-10].[500-10-10], [500].[500-10].[500-10-20], etc. Field 4 is ignored.](img/joinflow_fin.png)
Field Expressions (Available for Index-Based Dimension Build Rules)
Although Index-based rules do not have split, join, and move column operations, you can join fields and perform other operations using a field expression.
-
Select a field and click Expression to add an operational expression to a field.
-
To join two columns, click a function and provide the column indices as arguments. For example,

Create Field with Join
In the previous topic, Join Fields, the join replaced existing fields in the Essbase dimension build rule.
For example, if a source of data has separate fields for product number (Example: 100) and product family (Example: -10), you may need to join the fields (Example: 100-10) before you load them into the Sample.Basic cube. If, however, you want to preserve the two existing fields in the source, you can create a new field (100-10) using a join, while preserving the original fields (100 and -10).
Consider the following dimension build rule and preview:
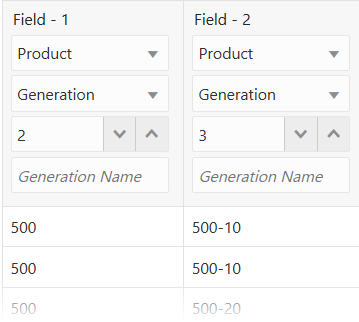
Assume your goal is to add a generation 4 field of the following format:
500-500-10To get started,
-
Select Field 2 and click Create > With Static Value.
-
Enter a hyphen - and click OK.
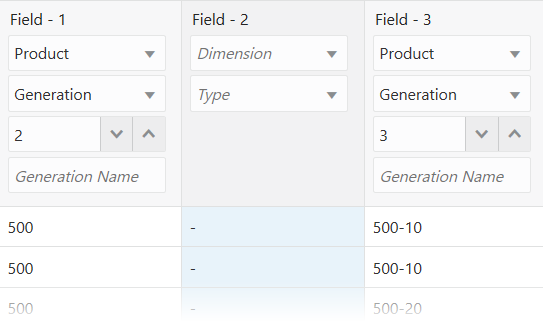
-
Select Fields 1, 2, and 3 (in that order), and click Create > With Join, using join position 4.
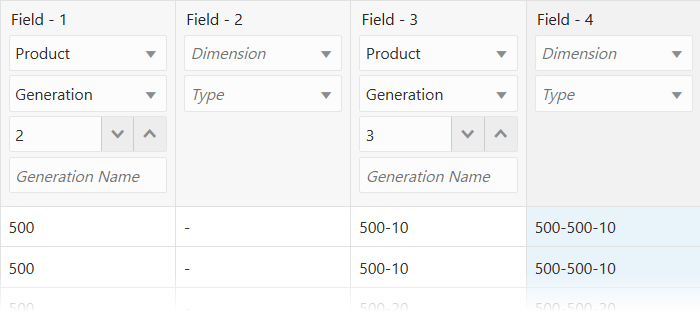
-
If you need to review your history of column operations including joins, splits, moves, and static value creation, click Column Operations to see an ordered list of recent operations.
-
You can move Field 2 out of the way to reuse later. Select it and click Ignore if you do not want it to affect the rule functionality.
Field Expressions (Available for Dimension Build Rules)
Although Index-based rules do not have split, join, and move column operations, you can join fields and perform other operations using a field expression.
-
Click Create > With Expression to add a field that you will define using an expression.
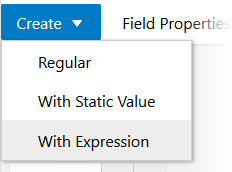
-
To join two columns, click a function and provide the column indices as arguments. For example,

Split Fields
You can split a field into two fields in an Essbase dimension build or data load rule.
This operation is the opposite of a join, and is available only in Regular rules. For example, if a data source for the Sample.Basic database has a field containing UPC100-10-1, you can split “UPC” out of the field and ignore it. Then, only 100-10-1, the product number, is loaded.
To split a field during an Essbase data load or dimension build,
-
Open your load rule in the Essbase web interface.
-
Select the field.

-
Click Split.
-
Indicate the split position and direction, in terms of characters. For example, to separate
10away from500-, indicate split position 4, Left to Right.
-
Click OK. Verify and save the rule.
Copy Fields
You can create a copy of a field in an Essbase dimension build or data load rule, leaving the original field intact.
For example, if, during a single dimension build, you want to define a multilevel attribute dimension and associate attributes with members of a base dimension, you must copy some of the fields.
To copy a field during an Essbase data load,
-
Open your load rule in the Essbase web interface.
-
Select a field to copy.
-
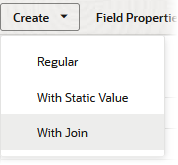
Click Create > With Join.
-
Enter the number of the field you want to duplicate.
-
Click OK. Verify and save the rule.
If Create >With Join is unavailable, refer to Create Field with Join to learn how to use an expression.
Map Fields
Sometimes you need to map source data fields to Essbase member names so you can load data. You can make the fields using the data load rule.
This section applies to data load only. If you are performing a dimension build, skip this section.
Map fields in the source directly to fields in the Essbase cube during a data load by specifying which field in the source maps to which member or member combination in the Essbase cube. The source data is not changed.
Note:
When you open a SQL data source, the fields default to the SQL data source column names. If the SQL column names and the Essbase dimension names are the same, you need not map the column names.
To map a field during an Essbase data load,
-
Open your load rule in the Essbase web interface.
-
Select the unmapped field.

-
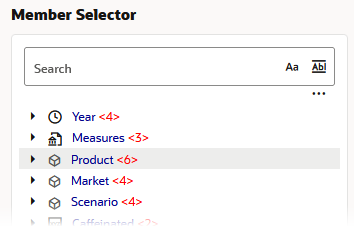
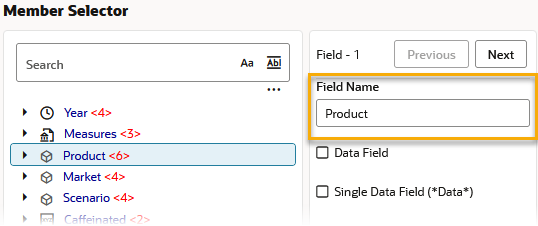
Either type a member name, or click the edit field/member selection tool next to the field.

-
If you are using the member selection tool, search for (or navigate to) the member you want to associate with this field.
-
Double click the member so that it is added to the Field Name.
-
Click OK. Verify and save the rule.
Change Field Names
Often, fields or columns in the source data don't match the names in the Essbase cube, but this will not prevent you from loading data or building dimensions. You can use the load rule to name the fields to match the outline's dimension names.
To load a source of data, you must specify how the fields of the source map to the dimensions and members of the cube. Rules can translate fields of the source so that the fields match member names each time the source is loaded. This process does not change the source.
The rules file:
-
Maps member fields of the source file to dimensions and members of the cube
-
Maps data fields of the source file to member names or member combinations (such as Jan, Actual) of the cube
Naming Fields
To name a field during an Essbase data load or dimension build,
-
Open your load rule in the Essbase web interface.
-
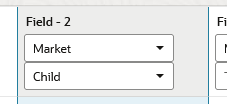
Select the field.
-
Click Field Properties.

-
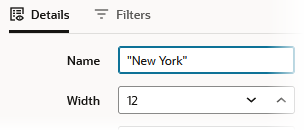
Enter a name in the Name field. If the name has a space in it, enclose it in quotation marks.
-
Click OK. Verify and save the rule.
Replace Text Strings
You can replace text strings so that the fields map to Essbase member names during a data load or dimension build. The data source is not changed. For example, if the data source abbreviates New York to NY, you can have the rules file replace each NY with New York.
To replace strings during an Essbase data load or dimension build,
-
Open your load rule in the Essbase web interface.
-
Select the field.

-
Click Field Properties.
-
Click the Filters tab.
-
Click Replacements.
-
Click the + icon to add string replacement criteria.
-
Complete the Find and Replace values. For example, replace
CAwithCalif.
-
Specify if the replacement operation should:
- Be case-sensitive
- Make the replacement only if the whole word matches.
- Replace all occurrences of the string.
-
Click OK. Verify and save the rule.
Change the Case of Fields
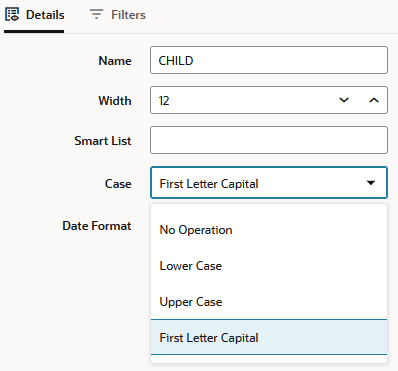
You can change the case of a field so that the field maps to Essbase member names during a data load or dimension build. The data source is not changed. For example, if the source data capitalizes a field (for example, JAN) that is in init capped in the cube outline (Jan), you can have the rules file change the field to First Letter Capital.
To change field case during an Essbase data load or dimension build,
-
Open your load rule in the Essbase web interface.
-
Select the field.

-
Click Field Properties.
-
For Case, select an operation to perform on incoming data.
-
Click OK. Verify and save the rule.
Drop Leading and Trailing Spaces
You can trim leading and trailing spaces from around fields of the source data. A field value containing leading or trailing spaces does not map to a member name, even if the name within the spaces is an exact match.
To remove spaces during an Essbase data load or dimension build,
-
Open your load rule in the Essbase web interface.
-
Select the field.

-
Click Field Properties.
-
On the Details tab, select Trim.
-
Click OK. Verify and save the rule.
By default, Essbase drops leading and trailing spaces.
Convert Spaces to Underscores
You can convert spaces in fields of the data source to underscores to make the field values match the member names of the database.
To convert spaces to underscores during an Essbase data load or dimension build,
-
Open your load rule in the Essbase web interface.
-
Select the field.

-
Click Field Properties.
-
On the Details tab, click Convert Spaces to Underscore.
-
Click OK. Verify and save the rule.
Add Prefixes or Suffixes to Field Values
You can add prefixes and suffixes to each field value of the data source. For example, you can add 2024 as the prefix to all member names in the Year dimension.
To add a prefix or suffix during an Essbase data load or dimension build,
-
Open your load rule in the Essbase web interface.
-
Select the field.

-
Click Field Properties.
-
On the Details tab, enter the prefix or suffix to add.

-
Click OK. Verify and save the rule.