Perform Operations on Data
Use Essbase data load rule options to define a field as a data field, add to or substract from existing values, extract summarized data from the source, clear or replace data, scale data values, or flip signs.
This section applies to data load only. If you are performing a dimension build, skip this section.
You can perform operations on the data in a field; for example, moving a field to a new position in the record.
Data Fields in the Load Rule
Records in the source data often contain dimension columns and data columns. Data columns must be marked as data fields in the Essbase data load rule. If there is only one data field in each record, it must be marked as a single data field.
This section applies to data load only. If you are performing a dimension build, skip this section.
If each record in the source data contains a column for every dimension followed by one or more data columns (as in the following example from the Sample Basic data load file), the rules editor in Essbase web interface detects the data fields automatically.

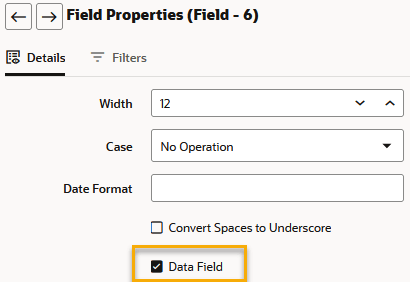
When you create or edit a data load rule in the Essbase web interface, if Essbase detects that a field is a data field, it marks it as a data field in the field properties, as shown in the following example.
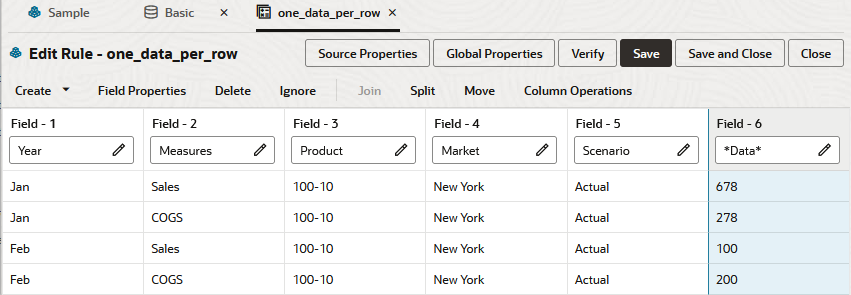
Sometimes, all fields are dimensions followed by only a single data field, as in the following example:

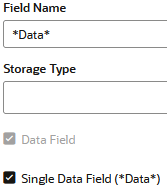
In the case when there is only data field to load per record, you must also ensure in the load rule that the data field is marked as a single data field, and that the field name is *Data*.

To set a given field as a single data field in a data load rule,
-
Open your data load rule in the Essbase web interface.
-
Click the edit field/member selection tool in the single data field.

-
Select Single Data Field (*Data*) if it is not already selected.
-
Click OK. Verify and save the rule.
Add to or Subtract from Existing Values
If you want an Essbase data load to add to or subtract from existing cube values, use global properties in the Essbase load rule to specify how newly loaded data values should affect existing values. For example, if you load weekly values, you can add them to create monthly values.
This section is for data load only. If you are performing a dimension build, skip this section.
By default, Essbase overwrites the existing values of the cube with the values of the source data, but you can set up the load rule to instead use incoming data values to add to or subtract from existing cube values.
To set up the data load rule to use the Add or Subtract load options,
-
Open your data load rule in the Essbase web interface.
-
Click Global Properties.
-
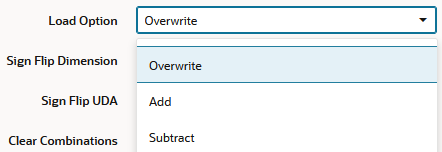
Select a load option: Overwrite (the default), Add, or Subtract.
-
Click OK. Verify and save the rule.
You can use these load options to perform Add, Subtract, or Overwrite operations in data-load rules when you want to make broad changes to all the values you are loading into the Essbase cube. You can only select one of these load options per data load, and the values are treated the same way for all data fields (all are either added, subtracted or overwritten).
Using this option makes recovery more difficult if the a problem occurs during data load, although Essbase lists the number of the last row committed in the application log.
For block storage cubes, in the settings, set the Commit Rows transaction option to 0 to prevent difficult recoveries. This setting causes Essbase to view the entire load as a single transaction and to commit the data only when the data load is complete.
Using the import data MaxL statement, you can only add to and substract from existing values in aggregate storage cubes.
Extract Source Data Using Column Store Options
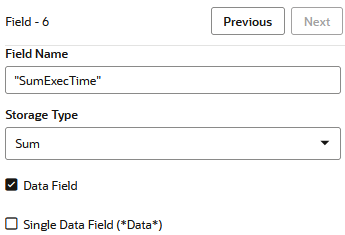
You can load data to the Essbase cube using column-level data extraction options in the data load rule, to extract the source data the way you want it. The options include storage types Minimum, Maximum, Sum, and Count.
As described in Add to or Subtract from Existing Values, you can use load options to perform Add, Subtract, or Overwrite operations in data-load rules when you want to make broad changes to all the values you are loading into the cube. You can only select one of these load options per data load, and the values are treated the same way for all data fields (all are either added, subtracted or overwritten).
If you are loading to a large Essbase cube with many upper level members, you may need to perform more specific rule operations at the level of data columns, using SUM/MIN/MAX/COUNT. These operations help you drill through to the source data (from the load rule) to extract the source data in a more specific way.
As an example use for these operations, consider a retail business with credit card transactions stored in a relational system. You don’t want to load all transactional data into Essbase, but you want to load the sum of all transactions at the end of each day.
To select a column level data extraction option in a data load rule,
-
Open your data load rule in the Essbase web interface.
-
Click the edit field/member selection tool next to the rule field for the data column you want to customize.

-
Ensure the field is marked as a data field.

-
Select a Storage Type option.
Available options:
-
Minimum - stores the minimum value of the incoming data, including a comparison with existing cube data.
-
Maximum - stores the maximum value of the incoming data, including a comparison with existing cube data.
-
Sum - behaves the same as the Add global option. Adds the incoming data to existing cube data.
-
Count - stores the count of values present in the incoming data.
-
-
Click OK. Verify and save the rule.
Clear Existing Data Values During Data Load
When records in the source data will be added to or subtracted from existing Essbase data values during a data load, you may need to use to clear some regions of data first to ensure accuracy. You can use the global properties of the data load rule clear selected values.
This section is for data load only. If you are performing a dimension build, skip this section.
You can clear selected existing data values from the cube before you load new values. By default, Essbase overwrites the existing values of the cube with the new values of the source data. If you are adding and subtracting data values, however, Essbase adds or subtracts the new data values to and from the existing values.
Before adding or subtracting new values, make sure that the existing values are correct. Before loading the first set of values into the cube, make sure that there is no existing value.
For example, assume that the Sales figures for January are calculated by adding the values for each week in January:
January Sales = Week 1 Sales + Week 2 Sales + Week 3 Sales + Week 4 SalesWhen you load Week 1 Sales, clear the cube value for January Monthly Sales. If there is an existing value, Essbase performs the following calculation:
January Sales = Existing Value + Week 1 Sales + Week 2 Sales + Week 3 Sales + Week 4 SalesYou can also clear data from fields that are not part of the data load. For example, if a source contains data for January, February, and March, and you want to load only the March data, you can clear January and February data.
Note:
If you are using transparent partitions, clear the values using the steps that you use to clear data from a local cube.
To clear some of the data during a data load when using Add, Subtract, or Overwrite,
-
In your data load rule, click Global Properties.
-
In the Clear Combinations box, enter the member combinations to clear. For example,
"Jan","New York".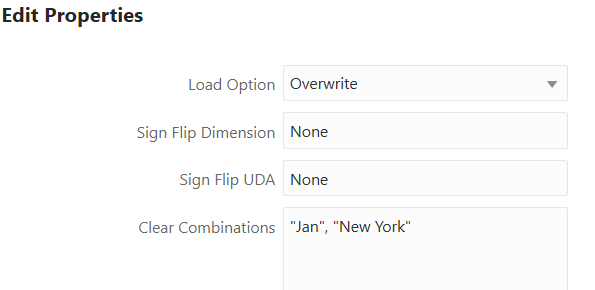
-
Click OK. Verify and save the rule.
Replace All Data
For data slices in aggregate storage (ASO) cubes that can be reloaded in their entirety while maintaining low latency, Essbase can replace values using the contents of an incremental data load buffer.
This topic applies to loading data into an aggregate storage cube only. If you are loading data into a block storage cube or performing a dimension build, skip this topic.
In an aggregate storage cube, Essbase can remove all of the data in the cube or all of the data in each incremental data slice in a cube, and replace the data with the contents of a specified data load buffer. This functionality is useful when working with data sets that are small enough to reload completely, or when working with data that can be separated into large, static data sets that are never updated and small, volatile data sets in which you need to track changes.
To replace all data, see Replace Data Using Incremental Data Slice Contents.
Scale Data Values
When data values in the source data are not of the same decimal scale as data values in the Essbase cube, use field properties in the data load rule to set a scaling factor for the incoming data values.
This section is for data load only. If you are performing a dimension build, skip this section.
For example, assume the real value of sales is $5,460. If the Sales source data tracks the values in hundreds, the value is 54.6. If the Essbase cube tracks the real value, you must multiply the value coming in from the Sales source data (54.6) by 100 to have the value display correctly in the Essbase cube (as 5460).
To scale the source data values using a data load rule,
-
Open your data load rule in the Essbase web interface.
-
Select a data field.

-
Click Field Properties.
-
Click Scale, and select a scaling factor.

-
Click OK. Verify and save the rule.
Flip Field Signs
When records in source data contain negative values that need to be positive in the Essbase cube, or positive values that need to be negative, you can invert the signs. One case where sign flip can be useful is when loading data from double-entry accounting systems.
This section is for data load only. If you are performing a dimension build, skip this section.
You can reverse, or flip, the value of a data field by flipping its sign. Sign flips are based on the UDAs of the outline. When loading data into the accounts dimension, for example, you can specify that any record whose accounts member has a UDA of Expense change from a plus sign to a minus sign.
To change the sign for data values you load into an Essbase dimension,
-
Open your data load rule in the Essbase web interface.
-
Click Global Properties.
-
In Sign Flip Dimension, enter the dimension for which you want to flip signs.
-
In Sign Flip UDA, enter the name of the user defined attribute.

-
Click OK. Verify and save the rule.
See Also