Placing JoltBeans onto the Form Designer
- Choose File→New Project, and choose JFC Applet.
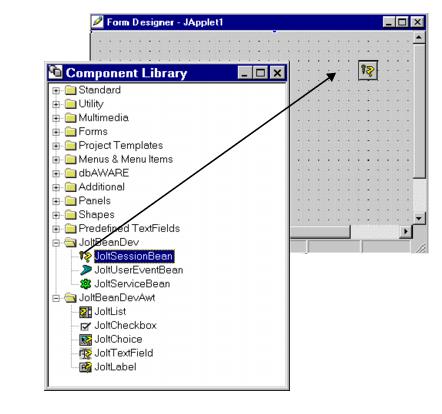
- Drag and drop the beans from the Component Library (shown in the following figure) onto the palette of the form designer.
Figure 5-5 JoltBeans and the Form Designer in Visual Café
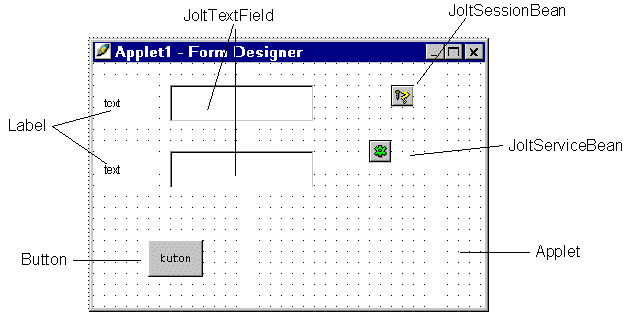
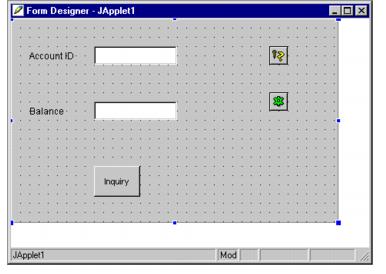
The following figure “Visual Café 3.0 Form Designer” illustrates how JoltBeans appear when they are placed on the palette of the Form Designer.
Figure 5-6 Visual Café 3.0 Form Designer
- Set the properties of each bean. To modify or customize the buttons, labels or fields, use the property list. Some JoltBeans use a Custom Property Editor.
The following figure,“Example of JoltTextField Property List and Custom Property Editor,” shows how selecting the JoltFieldName of the button property list displays the Custom Property Editor.
- Set the properties of the beans (for example, set the JoltFieldName property of the JoltTextField to ACCOUNT_ID).
Note:
For complete information on setting and modifying the properties of the JoltBeans, refer to “Using the Oracle Tuxedo Service Metadata Repository and Setting the Property Values”.The following table specifies the property values that should be set. Values specified in bold and italic text are required, and those in plain text are recommended.
Table 5-5 Required and Recommended Property Values
Bean Property Value label1 Text Account ID label2 Text Balance JoltTextField1 Name accountId JoltTextField1 JoltFieldName ACCOUNT_ID JoltTextField2 Name balance JoltTextField2 JoltFieldName SBALANCE JoltSessionBean1 AppAddress //tuxserv:2010 JoltServiceBean1 Name inquiry JoltServiceBean1 ServiceName INQUIRY button1 Label Inquiry Note:
In this walkthrough, the default occurrenceIndex of 0 works for both JoltTextFields.Refer to the following figure “Example of JoltTextField Property List and Custom Property Editor”and “Using the Oracle Tuxedo Service Metadata Repository and Setting the Property Values” for general guidelines about JoltBean properties.
Figure 5-7 Example of JoltTextField Property List and Custom Property Editor
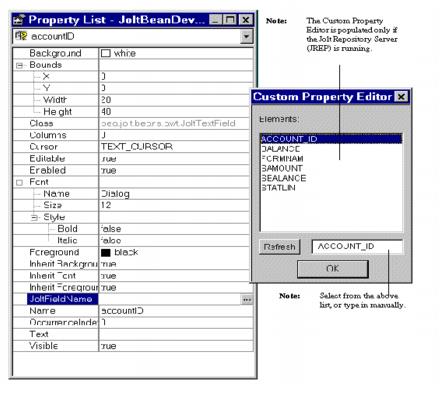
- To change the value of the JoltFieldName property, click on the ellipsis button of the JoltFieldName in the Property List.
The Custom Property Editor is displayed.
- Select or type the new field name (in this example, “ACCOUNT_ID”) and click OK.
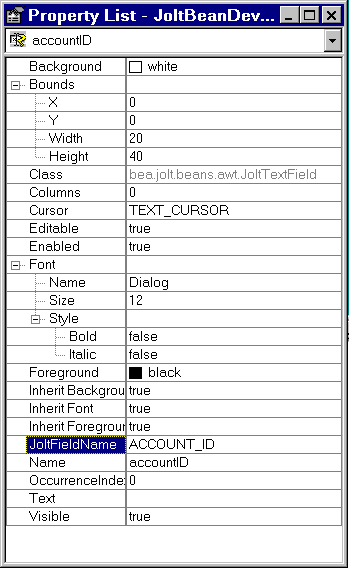
The change is reflected in the Property List shown in the following figure “Revised JoltFieldName in the JoltTextField Property List”and on the text field shown on the figure “Figure 5-5”.
Note:
The properties that are visible in the Custom Property Editor are cached locally; therefore, if the source database is modified you must use the Refresh button to see the current, available properties.Figure 5-8 Revised JoltFieldName in the JoltTextField Property List
The following figure “Example of JoltBeans on the Form Designer with Property Changes” illustrates how the text on the button and the textfield changes after the text is added to the property list fields for these beans.
Figure 5-9 Example of JoltBeans on the Form Designer with Property Changes
- After you set the properties to the right values (refer to the table “Required and Recommended Property Values” for additional information), define how the beans will interact by wiring them together using the Visual Café Interaction Wizard. Refer to “Wiring the JoltBeans Together” for details.
Parent topic: Building the Sample Form