18.3.2 Managing JSON Sources

Create a JSON Source to retrieve data from a JSON Collection Table or table with JSON columns in a local or a remote database.

18.3.2.1 About JSON Sources

Learn about creating and using JSON Sources in Oracle APEX.

JSON Sources in APEX consist of information about the owner and name of a database table which can be a plain table with columns containing JSON data or a JSON collection table. Each JSON Source also includes Data Profile which maps JSON attributes to columns, to be consumed by APEX components.

Plain tables with JSON columns are supported in Oracle Database 19c and 21c. JSON collection tables are only available in Oracle Database 23ai or higher.

Note:

To learn more, see Tables With JSON Columns and JSON Collections in Oracle Database JSON Developer’s Guide.

You can define a JSON Source using a local database or a remote database by using a REST Enabled SQL service. After picking the table and column to use, APEX either determines the data profile from the actual data, or from an uploaded JSON Schema file.

Once created, the JSON Source is available to page components, such as reports, charts, forms, and so on, and shared components, such as list of values and automations. Developers can also use the APEX_EXEC package to access the JSON Source programmatically.

See Also:

APEX_EXEC in Oracle APEX API Reference

18.3.2.2 Creating a JSON Source

Create a JSON Source from Shared Components.

To create a JSON Source:

  1. Navigate to the JSON Sources page:
    1. On the Workspace home page, click App Builder.
    2. Select an application.
    3. On the Application home page, click Shared Components in the center of the page.
    4. Under Data Sources, select JSON Sources.
  2. On the JSON Sources page, click Create.
  3. On General, specify:
    1. Name - Enter a name for the new JSON Source.
    2. JSON Source Type - Select the JSON Source type. Options include:
      • JSON Collection Table - Denotes JSON collection tables created using the CREATE JSON COLLECTION TABLE SQL syntax.
      • Table with JSON columns - Denotes normal tables with one or more columns containing JSON documents. After choosing the table, Oracle APEX will ask for up to three columns which contain JSON documents.
    3. Location - Specify whether data is to be sourced from the Local Database or from a REST Enabled SQL Service.
    4. Owner - Select the owner of the Table or View.
    5. Table with JSON Columns - Select a table with JSON columns.
    6. Click Next.
  4. JSON Columns - Select up to three columns from the selected table. Selected columns must contain valid JSON documents.
    1. JSON Column 1 - Select a column containing JSON documents, to use for this JSON Source. Columns can be of VARCHAR2, CLOB, BLOB, or JSON data type.
    2. JSON Schema for Column 1 - Provide a JSON Schema file to generate the Data Profile from.

      If no JSON Schema is provided, Oracle APEX generates the data profile by sampling existing data in the table. Providing a JSON schema is particularly useful when the table contains no or no representative data.

      Oracle APEX currently only supports the full definition being in one self-contained JSON Schema. Multiple JSON schemas, using imports or being bundled in one file, are not supported; the $id attribute is ignored. Also, Oracle APEX only extracts information from the JSON Schema which is relevant for the Data Profile, which is attribute names, data types and the JSON hierarchy.

    3. Click Next.
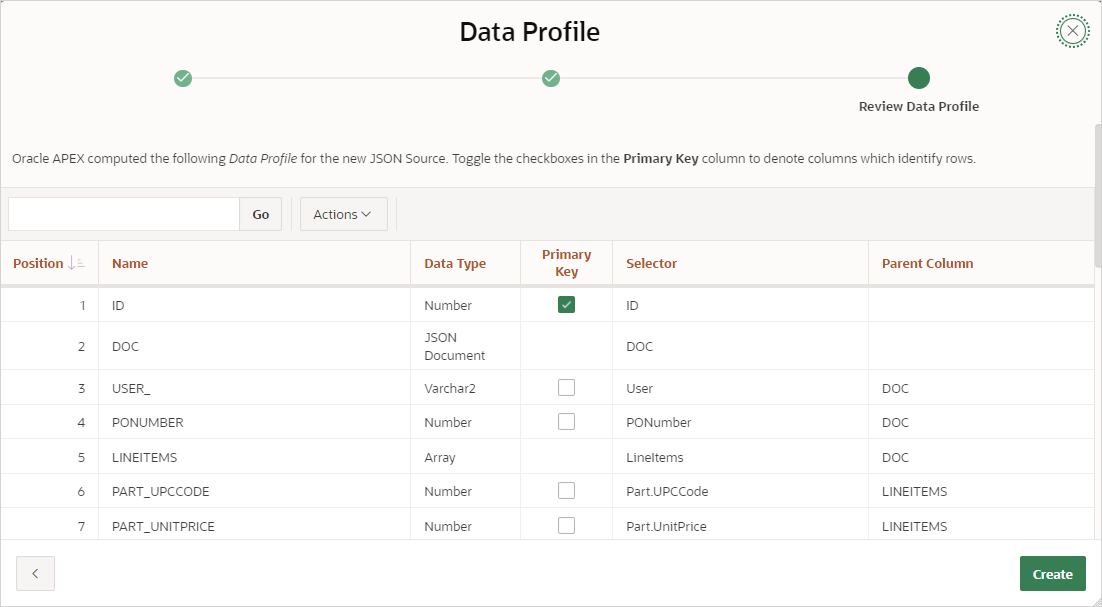
      The Data Profile appears. Oracle APEX computes the Data Profile for the new JSON Source.

  5. Data Profile - Review the data profile and check the Primary Key columns for each hierarchy level.
  6. Click Create.

18.3.2.3 Editing and Deleting a JSON Source

Edit or delete a JSON Source on the Edit JSON Source page.

To edit or delete a JSON Source:

  1. Navigate to the JSON Sources page:
    1. On the Workspace home page, click App Builder.
    2. Select an application.
    3. On the Application home page, click Shared Components in the center of the page.
    4. Under Data Sources, select JSON Sources.
  2. On the JSON Source page, click the JSON Source Name.

    The Edit JSON Source page appears. Use this page to edit the JSON Source or delete it.

  3. To delete the JSON Source, click Delete. When prompted, confirm your request and click Delete again.
  4. Under Identification:
    1. Name - Name of the JSON Source.
    2. Static ID - Static ID of the JSON Source. The static ID is used to programmatically access the JSON Source in PL/SQL code.
    3. JSON Source Type - Select JSON Source type:
      • JSON Collection Table - Denotes JSON collection tables created using the CREATE JSON COLLECTION TABLE SQL syntax.
      • Table with JSON columns - Denotes normal tables with one or more columns containing JSON documents.
  5. Under Source:
    1. Location - Specify whether data is sourced from a Local Database or from a REST Enabled SQL Service.
    2. Table with JSON Columns - Select a table with JSON columns to use.
    3. Where Clause - Provide a WHERE clause to restrict rows from the data source.
  6. Under Data Profile:
    1. Click Edit Data Profile to change how the Data Source format is being parsed and converted to rows and columns.
    2. Under Settings:
      • Name - Enter a name for the data profile.
      • Format - Choose the data format.
      • Row Selector - For a data profile returning a table, enter the expression to select the collection of rows within the Data Source.

        To learn more and view examples, see item Help.

    3. Under Columns - Determines how one row is parsed and converted to multiple columns. Use the Edit icon or the available buttons to add or edit the columns.
    4. Rediscovery:
      • Click Rediscover Data Profile to refresh the Data Profile.
      • JSON Schema - Provide a JSON Schema file fromwhich to generate the Data Profile. If no JSON Schema is provided, Oracle APEX generates the data profile by sampling existing data in the table. To learn more, see item Help.
    5. Under Advanced:
      • Use Raw Selectors - If enabled, Oracle APEX will not sanitize row and column selectors when generating the SQL query for JSON parsing. All selectors will be used exactly as specified.
      • Profile Comment - Enter any developer comments or notes.
    6. Click Apply Changes to save your changes.
  7. Advanced - In Comment, enter any developer comments or notes.
  8. Click Apply Changes to save your changes.

18.3.2.4 Copying or Subscribing to a JSON Source

Copy a JSON Source from the current application or from another application. When copying a JSON Source from another application, you can also subscribe to it.

To copy a JSON Source:

  1. Navigate to the JSON Sources page:
    1. On the Workspace home page, click App Builder.
    2. Select an application.
    3. On the Application home page, click Shared Components in the center of the page.
    4. Under Data Sources, select JSON Sources.
  2. On the JSON Sources page, click Copy.
  3. Copy From - Choose where to copy the JSON Source from. Options include:
    • This Application
    • Other Application
  4. To copy from the current application:
    1. Copy From - Select This Application.
    2. Copy JSON Source - Select the JSON Source to copy.
    3. New JSON Source Name - Enter the name of the JSON Source you would like to create.
    4. Click Copy.
  5. To copy from another application:
    1. Copy From - Select Other Application.
    2. Application - Select the application from which you want to copy.
    3. Copy JSON Source - Select the JSON Source to copy.
    4. Subscribe - Enable Subscribe to subscribe to the JSON Source.
    5. New JSON Source Name - Enter the name of the JSON Source you would like to create.
    6. Click Copy.

18.3.2.5 Viewing JSON Sources Utilization

View the JSON Sources Utilization report.

To view JSON Sources Utilization report:

  1. Navigate to the JSON Sources page:
    1. On the Workspace home page, click App Builder.
    2. Select an application.
    3. On the Application home page, click Shared Components in the center of the page.
    4. Under Data Sources, select JSON Sources.
  2. On the JSON Sources page, click Utilization.
    The Utilization page displays where a JSON Sources are used within the current application.

18.3.2.6 Viewing JSON Sources History

View the JSON Sources History report.

To view JSON Sources History report:

  1. Navigate to the JSON Sources page:
    1. On the Workspace home page, click App Builder.
    2. Select an application.
    3. On the Application home page, click Shared Components in the center of the page.
    4. Under Data Sources, select JSON Sources.
  2. On the JSON Sources page, click History.
    The History page isplays recent modifications made to JSON Sources in the current application.