Smart Actions to launch AI Agents in Service Center
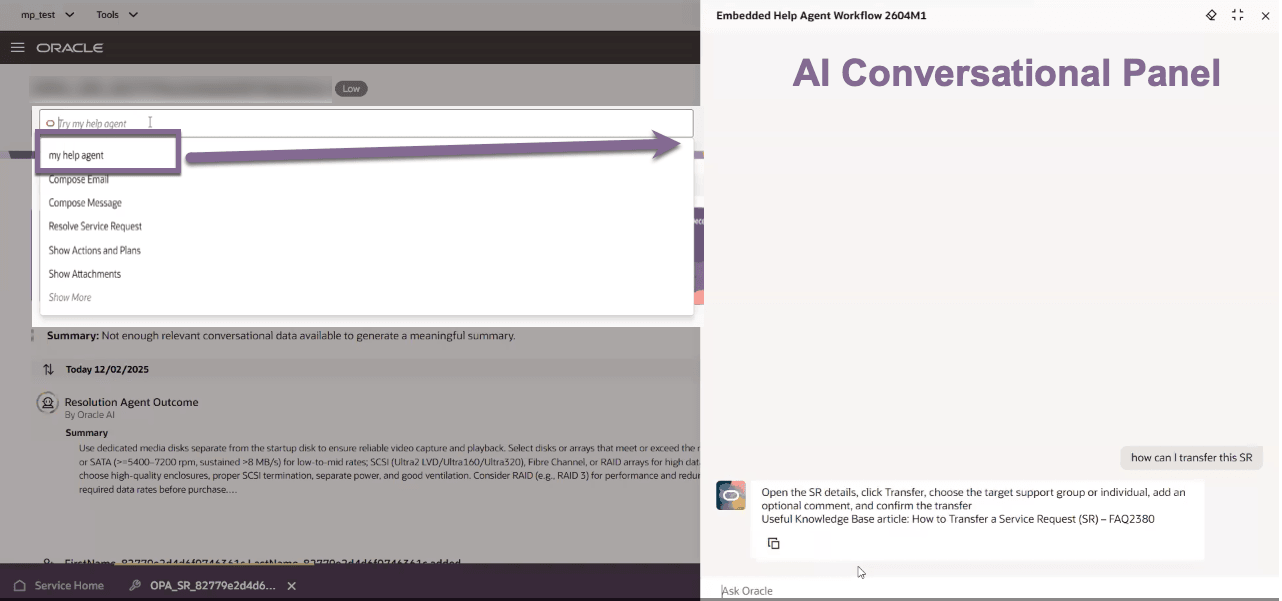
System Implementors can now configure Smart Actions to launch AI agents (Agent Teams) directly from the Action Bar inside the Service Request details page. Agents are built and published in AI Studio, then linked to Service Request objects through Application Composer — no custom development required. When triggered, the agent opens in a conversational AI panel with the Service Request context (SrNumber, SrId) passed automatically.
This integration keeps service reps focused in one workspace while AI handles summarization, guidance, or automated support in the background.
Popular Use Cases
- SR and Related Objects Summarization — Trigger an agent to summarize the last N interactions on an open Service Request, saving service reps time during handoffs or escalations.
- Guided Troubleshooting — Launch a step-by-step AI agent that walks the service rep through a resolution path based on the SR category or issue type.
- Customer Communication Drafting — Use an agent to generate a draft response or update for the customer, grounded in the current SR context.
- Faster resolution: Service reps get AI-powered help without switching screens or losing context.
- Flexible setup: Admins can configure out-of-the-box agents or build custom ones tailored to specific workflows.
- Less manual work: Reusable Smart Actions standardize repetitive tasks across the team.
- Context-aware by default: SR data is passed automatically — no extra mapping needed for most use cases.
Steps to enable and configure
Leverage Application Composer to expose and adjust page layout and attributes. To learn more about extending your application using Application Composer, visit Oracle Help Center > your apps service area of interest > Books > Configuration and Extension.
Step to Enable
- Create and Publish an Agent in AI Studio
- Navigate to Tools > AI Agents Studio.
- Create and publish your desired AI agent (Agent Team).
- Make note of the agent’s published name.
- Enter a Sandbox and Open Application Composer
- Ensure you are working in a sandbox environment.
- Open Application Composer from the sandbox.
- Configure a New Smart Action
- In Application Composer, access the Smart Actions admin UI.
- Click Create and select the UI-based action type.
- Provide a name (e.g., "Help Agent").
- Set the object to Service Request.
- For Application, select Service Center.
- For Action Type, select Agent Team and choose your agent from the list of published AI agents.
- Define Optional Starter Questions
- You can add up to three starter questions for user guidance.
- Save, Exit Sandbox, and Test the Smart Action
- Submit the Smart Action configuration.
- Exit the sandbox and open a Service Request in Service Center.
- The new Smart Action appears in the Action Bar—select it to open the agent drawer and start interacting.
Tips and considerations
- If the Smart Action doesn't appear in the Action Bar after setup, log out and back in to clear backend cache. (Only while you are implementing it should this behavior occur; users shouldn’t see it once it’s published.)
- SR context (SrNumber, SrId) is passed automatically — use a beforeInvoke listener + CX Service Action Launch AI Agent in VB Studio only if you need to inject additional custom data.
- Each time the Conversational AI Panel is closed and reopened, a new conversation starts and context is re-passed fresh.
- Always validate in a sandbox first before promoting to production.
- Make sure to grant access to Fusion AI so that the agent can run when invoked by the Global Function.