Reviewing the Preview Bundle Install Page
After you finish Choosing a Bundle to Install and click the Install button for a bundle, the Preview Bundle Install page displays.
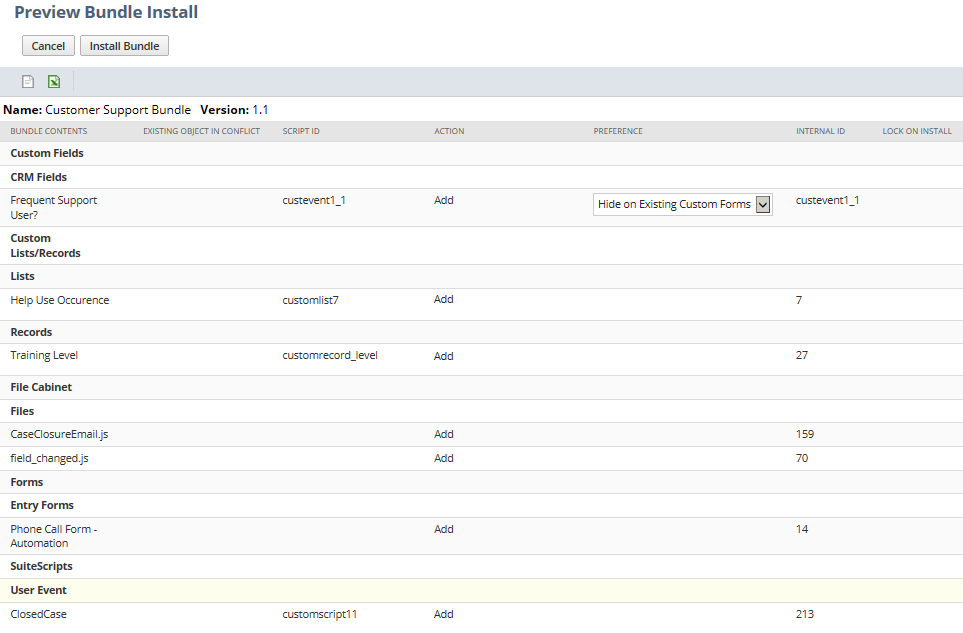
On this page, you can review the list of bundle objects that'll be installed. For customization bundles, you also can do the following:
When you're done reviewing the Preview Bundle Install page, you can click Install Bundle. See Starting the Bundle Installation Process.
Choose Actions for Conflicting Objects
The Preview Bundle Install page shows any customization bundle objects that conflict with existing custom objects in your account. A conflict happens when a bundle object has the same script ID, or sometimes the same name and type, as an existing object in your account. For more information, see Resolving Conflicting Objects.
NetSuite shows conflicting objects in red in the Existing Object in Conflict and Script ID columns. For each conflict, pick one of these options from the Action dropdown:
-
Add and Rename - NetSuite appends a number to the bundle object's name or script ID, to differentiate it from the preexisting custom object. The bundle object is added to account, and the preexisting object remains intact.
-
Replace Existing Object - The bundle object keeps the same name or script ID. The bundle object is added to the account and the preexisting custom object no longer exists in the account.
If you choose this option for a conflicting object during bundle installation, the preexisting custom object is PERMANENTLY replaced by the bundle's object. Even if you choose to uninstall the bundle later, changes to the replaced object remain and the original object is not restored.
For each custom record with data or custom list, you'll see a dropdown where you can choose to replace, preserve, or merge data in the object being replaced. See Set Bundle Installation Preferences.
Set Bundle Installation Preferences
The following preferences may be available on the Preview Bundle Install page:
-
Show or Hide Custom Fields
For each custom field in a bundle to be installed, you can set a preference indicating whether the field should be shown or hidden on existing custom forms in target accounts. The setting chosen by the bundle author is displayed by default.
Note that this setting does not affect bundled forms, because all custom fields in a bundle are always shown on all custom forms included in that bundle.
-
Replace Data, Preserve Data, or Merge Data for Conflicting Custom Records and Custom Lists
For each custom record with data or custom list, when you pick Replace Existing Object, you can choose to Replace Data or Preserve Data. The Replace Data option overwrites existing target account object data with bundle object data. The Preserve Data option preserves existing data in the target account object. The Merge Data option retains any data added to target account objects after bundle installation and at the same time updating data that was previously installed with the bundle. The setting chosen by the bundle author is displayed by default.
Review Locked Bundle Objects
When a bundle contains locked objects, the Preview Bundle Install page displays a lock icon in the Lock on Install column.
A few important points to notice about the Lock on Install column on the Preview Bundle Install page:
-
A lock icon appears on the row of a locked object in the bundle.
-
If no lock icon appears on the row, then the object is not locked. An object may not be locked because:
-
The bundle author chose not to lock the object.
-
Or, because the object is not lockable.
-
Pages for locked objects do not have buttons that allow changes to the object, such as Edit, Delete, Change ID. Also all list and view pages for these objects display a lock icon. For more information, see Effects of Locking Different Object Types.