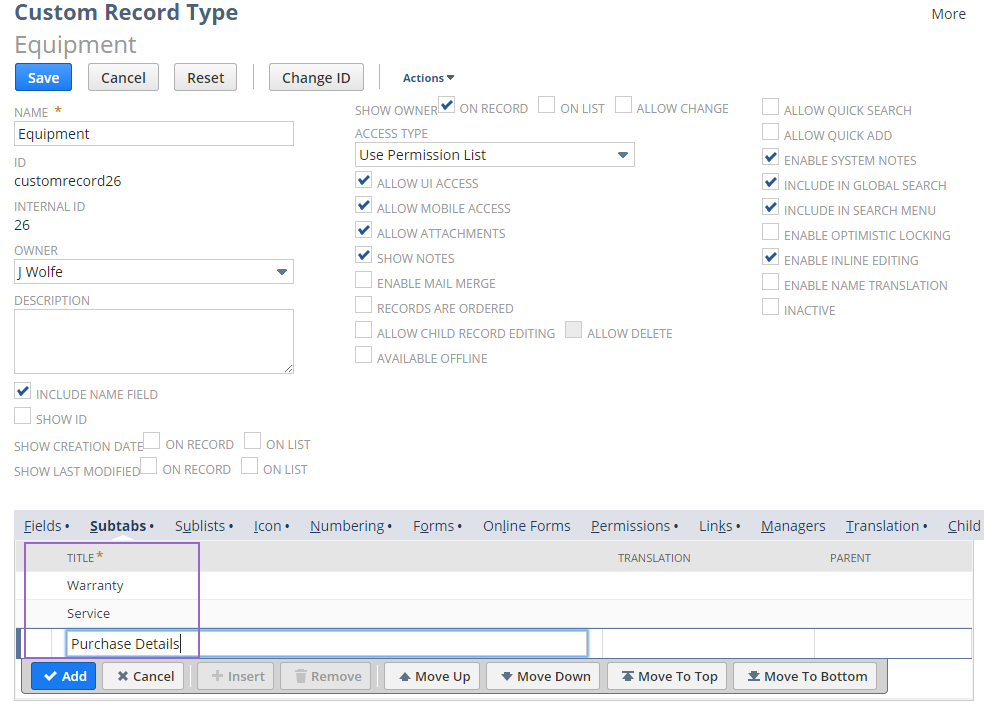
Adding Subtabs to a Custom Record
The Subtabs subtab of a custom record form lets you add custom subtabs to your record to better organize fields. To save time when creating custom fields, create any required custom subtabs first.
To add subtabs:
-
In the Title column of the Subtabs subtab, enter the name of your new subtab for this record type.

-
If needed, designate this subtab as a child of an existing subtab.
In the Parent column, select an existing subtab from the list. This list includes any custom subtabs already saved for the current custom record type and any custom subtabs that you've defined for that record type.
Note:Because the parent field is populated with subtabs created for the current custom record type, you can define the subtab as a child only if the custom record has already been saved with predefined subtabs.
-
Click Add.
-
Repeat this process for each subtab you want to add.
-
Click Save.
Important:For the subtabs to be available to place fields on, you must first create the subtabs and save the record. You can place fields on the new subtabs by editing the field record from the Fields subtab.
-
Rearrange the fields as needed. If you haven't yet created fields for your custom record, you must define them first. You can assign a subtab on the Display subtab when you create custom fields. For more information, see Adding Fields to Custom Record Types.
Select a line and drag it to the required position, or use the Move buttons.
-
To edit the name of a subtab, click the line for that subtab and change the name in the Title column.
-
Click Save.
Related Topics
- Creating Custom Record Types
- Creating a New Custom Record Type
- Entering Name and Display Settings
- Specifying Permission and UI Settings
- Configuring File and Child Record Settings
- Defining Search and Edit Settings
- Adding Fields to Custom Record Types
- Limiting Search Access to Custom Records
- Applying Role-Based Restrictions to Custom Records
- Choosing an Icon for a Custom Record
- Numbering Custom Record Types
- Adding Custom Forms for a Record
- Online Custom Record Forms
- Setting Up a Permissions List for a Custom Record Type
- Creating Links to Custom Records
- Adding Translations for Custom Records