Creating and Approving a New PI Removal Request
Use the Personal Information Removal feature to create and approve requests to remove personal information from NetSuite fields, records, and audit logs.
The Personal Information Removal feature doesn't support removing details on sublist fields. For information about how to remove sublist field details, see Removing Personal Information on a Sublist Field.
To avoid possible performance issues, consider splitting large numbers of requests into batches of up to 1,000.
When you remove personal information, it is removed from all transaction records. In the following example, a company name was removed from a sales order.

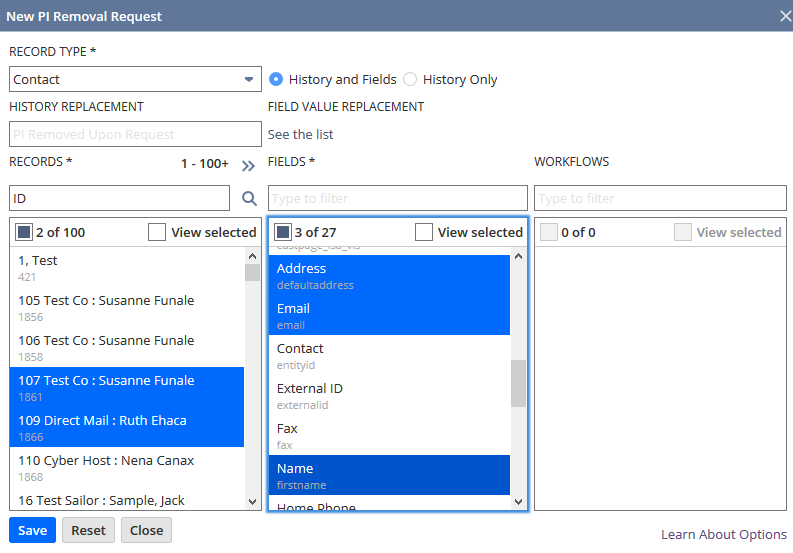
To create a new PI removal request:
-
Go to Lists > Mass Update > Remove Personal Information.
-
On the Personal Information Removal Request page, click New.
-
In the Record Type field, choose the record type for the records you want to process.
-
In the Records list, choose the records you want to process.
You can use the search field to find specific records using a search word or ID number. Do one of the following:
-
Enter a search word, such as a contact name, and then click the Search icon or press Enter.
-
Enter ID: XX (where XX is the ID number). To search for multiple IDs, separate the ID numbers with commas, for example, ID: XX, YY, ZZ. Then click the Search icon or press Enter
The Records column displays limited information about the records. If there are more than 100 records, the range of records that have been loaded appears. Records load in groups of 100 and the first 100 load automatically. To load the next 100 records, click the double arrows beside the number range. The plus sign (+) indicates that more records are available. The record range updates as more records are loaded.
When you enter a term into the Records filter field, results appear as they are found. The record range adjusts to show the number of filtered results. If all records were loaded before you applied the filter, the range of numbers doesn't change.
-
-
(Optional) To view only the selected records, check the View selected box. Note that View selected option isn't available for ID-based filters.
-
In the Fields list, select the fields you want to replace with a new value. Use the Fields filter to filter the list.
Note:You can't remove personal information from address fields that are needed for tax and shipping calculations, such as Country, Subdivision, Postal Code, and City.
-
(Optional) To view only the selected fields, check the View selected box.
-
In the Workflows list, choose the workflows for which you want to remove personal information from the workflow history. Use the Workflows filter field to filter the list.
-
(Optional) To view only the selected workflows, check the View selected box.
-
Choose whether you want to process History Only (system notes and workflow logs) or History and Fields (history plus record fields).
-
(Optional) In the History Replacement field, enter the text to use in history (system notes and workflow logs) to replace the original values. If you don't enter custom text, NetSuite uses PI Removed Upon Request by default. The replacement values appear in gray.
-
When personal information is removed from fields, the field value is replaced with a default replacement value. To see the list of replacement values, click See the list in the Field Value Replacement field. These values are:
-
PI_removed for text fields
Note:Record names must be unique. Therefore, for records, the default value includes a sequence number.
-
000000000 for phone numbers
-
PI_removed@example.com for email addresses
-
http://example.com for web addresses
-
1/1/1900 for date fields.
Note:Due to constraints and validations, record updates for the field types in the preceding list may fail, and only system notes will be updated. If the record update fails, you must manually update the value on the record. For example, to remove an address from a customer record, go to Lists > Relationships > Customers, edit the customer record, and remove the address information, as needed.
-
-
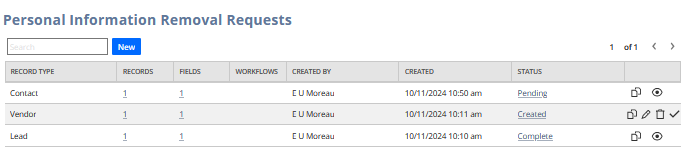
To create the removal request, click Save. The removal request is generated and appears with the Created status.
-
To approve the removal, click the Approve icon.

A confirmation message warns you that the data will be permanently deleted. To proceed, click Yes, Proceed. Otherwise, click Cancel.
The request will have a Pending status until it's processed.
For more information about PI Removal Request icons, see Using PI Removal Request Icons.
If you have the NetSuite Analytics Warehouse feature enabled, to make sure personal information is removed from the Analytics Warehouse, click Transfer Data or wait until the next scheduled data refresh. For more information, see Reloading Your Data to NetSuite Analytics Warehouse.