Employment
On the employment page, you can terminate and re-hire employees, reassign their primary location, and add and remove locations they can work at.
Primary Location
The employee's primary location is sometimes referenced as their 'home location.' This location is automatically imported from the mapped field on their employee record in NetSuite. When employees request availability changes or submit leave requests (if using Leave in WFM), those requests go to the manager(s) of their primary location.
Can work at
This is a list of locations the employee can punch in or be scheduled to work.
To add or remove locations the employee can work at, click Edit.
When editing, the box on the right will list locations they can work at. The box on the left shows locations you can view and add to the employees. You'll only see locations you have access to. If you're trying to add a location you can't see here, you'll need to ask someone with higher access to add this to your account or add this to the employees on behalf of you.
Multi-add locations or groups
If you can see categories or groups, you're able to allocate all locations in these groups to an employee.
When editing the can work at, there's an option underneath the location boxes:
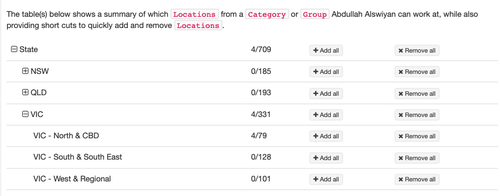
This lists the categories and groups you have access to view. In the screenshot, we have a group for each state. You can "Add all" locations from a group to an employee. This is useful if employees can work at any location in that group.
You can continue expanding the hierarchy to add all locations from a specific group:
Beside each group, the number of locations in the group appears, along with how many of those are allocated to the employees.
To add the locations to the selection boxes above, click "add all". You can fine-tune this selection and remove any if required before saving.
Terminating a WFM employee
You terminate employees from the Employees page. From the Workforce Management tab, go to Setup > Employees > List.
Employee terminations and rehires will sync automatically from the NetSuite employee record. If you believe you need the ability the add or terminate employees within WFM, please contact your Account Manager.
To terminate an employee:
-
From the Workforce Management tab, go to Setup > Employees > List.
-
Click the ID number of the employee you want to terminate.
-
Click Terminate employment.
-
When prompted, enter a Termination date and a Reason for termination. Click Terminate employment.
Ensure that the termination date is correct, as this can't be changed.
After the person is terminated, they'll appear in WFM until that date is reached.
You can also re-employ an employee if they leave and come back. Examples include seasonal employees or students.
Re-employing a Terminated Employee
Employee terminations and rehires will sync automatically from the NetSuite employee record. If you believe you need the ability the add or terminate employees within WFM, please contact your Account Manager.
To re-employee a terminated employee from the Workforce Management tab, go to Setup > Employees > List.
Select Only terminated staff from the dropdown list. Click on the person's name to open their details.
Click on the Employment tab.
On this page, you'll be able to re-employ the employee.
Employee terminations and rehires will sync automatically from the NetSuite employee record. If you believe you need the ability the add or terminate employees within WFM, please contact your Account Manager.
Updating an employee's primary location
An employee's primary location is the roster unit where they were employed, will receive the most shifts, and where their manager is possibly located.
To change or add a primary location:
-
On the employee's page, click Locations.
-
Beside Primary Location, click Edit.
-
In the Location dropdown list, select a location.
-
Select a date from the Effective from calendar.
-
To delete a location, click the Delete button beside it.
-
To add a location, click the Add new button.
-
To save these settings and continue working, click Save. To save the settings and close these settings, click Save & Close.