Setting Up Token-Based Authentication
You must set up token-based authentication (TBA) in the Account Reconciliation application to enable connection to NetSuite.
For general information, see the following help topics:
To set up Token-Based Authentication:
-
In NetSuite, go to Setup > Integration > Manage Integrations > New.
-
In the Name field, enter a name for this integration record that should represent your Account Reconciliation application.
-
In the Description field, enter a description to help you identify this integration record in NetSuite.
-
In the State field, leave the default Enabled option.
-
On the Authentication tab, ensure the Token-based Authentication box is checked.
-
Make any other changes needed, and then click Save.
NetSuite generates the consumer key and consumer secret on the integration record.
-
Save the consumer key and consumer secret.
Note:The consumer key and consumer secret show only one time. If you lose these credentials, you can regenerate new ones. For more information, see Regenerating a Consumer Key and Secret.
-
Go to Setup > Users/Roles > Access Tokens > New.
-
On the Access Token page:
-
From the Application Name list, select the created integration record.
-
From the User list, select the user that should be used for the integration with your Account Reconciliation application.
-
From the Role list, select your custom role that gives sufficient permissions to the integration user.
-
The Token Name field is populated with a concatenation of Application Name, User, and Role.
-
Click Save.
NetSuite generates the Token ID and Token Secret on the page.
-
Save the generated Token ID and Token Secret.
Note:The Token ID and Token Secret show only one time. If you lose these credentials, you must create a new token.
-
-
In the Account Reconciliation application, click the Navigator icon
 , and then click Data Exchange.
 -
Click Actions, and then select Applications from the list.
-
In the Applications popup window, click the Configure Connections icon
 .
. -
In the Connections popup window, click the Add icon
 , then select NetSuite from the list.
 -
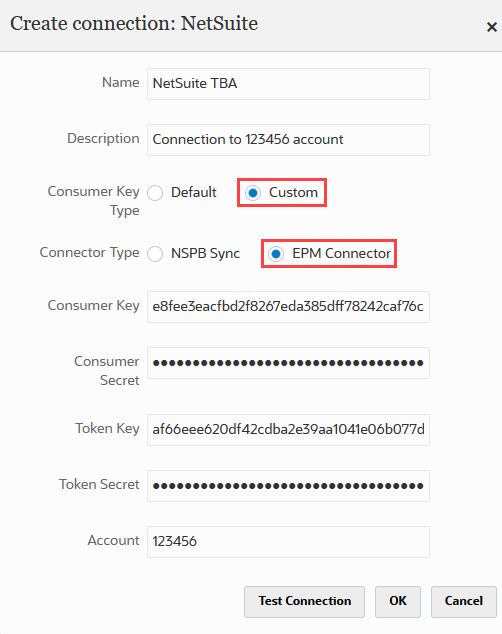
In the Create connection: NetSuite popup window, do the following:
-
In the Name field, enter a name for the connection.
-
In the Description field, enter a description to help you identify this connection.
-
For the Consumer Key Type, choose Custom.
-
For the Connector Type, choose EPM Connector.
-
In the Consumer Key and Consumer Secret fields, enter the generated consumer key and consumer secret.
-
In the Token Key and Token Secret fields, enter the generated Token ID and Token Secret.
-
In the Account field, enter the integration user's NetSuite Account ID. The value must match exactly, including upper-case and lower-case letters. You can find the account ID at Setup > Company > Company Information in the Account ID field.
The following screenshot shows the Custom and EPM Connector connection configurations for Account Reconciliation Sync:
-
Click Test Connection. When the connection testing is finished, the Information window pops up. Close the Information popup window.
-
Click OK.
-
Related Topics
- Account Reconciliation Sync SuiteApp Installation and Setup
- Required Features for Installing the Account Reconciliation Sync SuiteApp
- Installing the Account Reconciliation Sync SuiteApp
- Role Permissions for Account Reconciliation Sync
- Setting Up the Connection to Account Reconciliation
- Scheduling Script Deployments for Account Reconciliation Sync
- Loading Account Reconciliation Data into NetSuite
- Account Reconciliation Data Export and Import
- Managing the Account Reconciliation Jobs
- Saved Searches for Account Reconciliation Sync
- Accounts for Group Reconciliation
- Transaction Matching Accounts