Editor

Editor Features:
-
Auto List & Complete - Type '.' after 'NSOA' and the Auto List window appears showing all the available options, see Auto List & Complete.
-
Color coding - Keywords, variables, literals, comments, etc. are highlighted in different colors to aid correct coding.
-
Line numbers - Line numbers are listed in the left margin to assist in development and debugging.
-
Line highlighting - The line the cursor is on is highlighted to assist in editing the code.
-
Syntax checking - Errors and warning are displayed as you type into the editor.
 Note:
Note:Point to the error icon to display the error message.
-
Bracket completion - If you type an opening bracket the matching closing bracket is automatically created.
-
Matching brackets If you place your cursor next to a bracket then the matching brackets are highlighted

-
Full-screen - Click into the editor and press Ctrl + F11 to full-screen the script editor
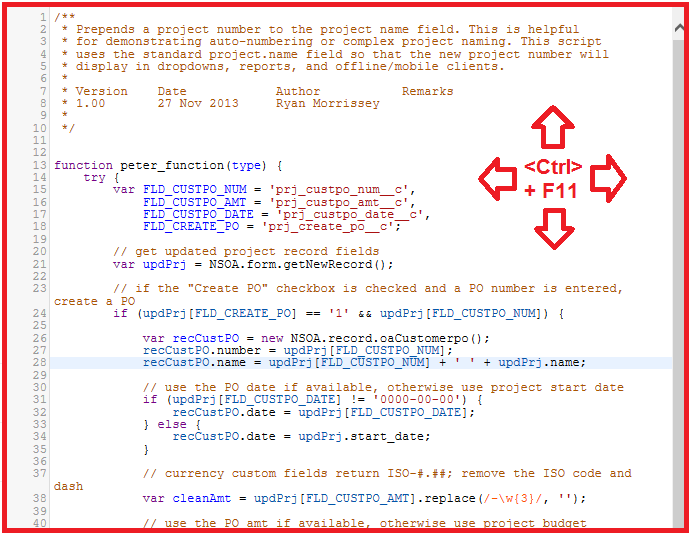
While working in full-screen mode you can still continue using the Auto List & Complete feature.
Press Esc to exit full-screen mode and save your changes in the usual way.
-
Search and Replace Functions - Search through scripts using simple or regexp search expressions. Use the following key shortcuts for searches within the Script Editor:
-
Start a Search - Ctrl+F / Cmd+F
-
Find Next - Ctrl+G / Cmd+G
-
Find Previous - Shift+Ctrl+G / Shift+Cmd+G
-
Replace - Shift+Ctrl+F / Cmd+Option+F
-
Replace All - Shift+Ctrl+R / Shift+Cmd+Option+F
These shortcuts can also be found in the Tips menu from within the Script editor.
You can use regexp to search for more complex strings. For example, entering /envelope|ticket/ in the search field searches for both 'envelope' and 'ticket'.
After a search dialog is opened, press Escape to exit it without searching.
-
-
Jump to Line Functions - You can move through your scripts quickly by entering Jump to Line functions. Press Alt+G to open the Jump to Line dialog. Then, enter the script line you want to move the cursor to. The following input formats are accepted:
-
Line - enter the line to move the cursor to. For example, entering 25 in the Jump to Line field moves the cursor to line 25
-
Line:column - enter both the line and column separated by a colon. For example, entering 25:9 moves the cursor to line 25, column 9.
-
+/-Line - enter how many lines forward or backward to move your cursor. For example, if the cursor is at line 5, and you enter +5 into the Jump to Line field, the cursor moves to line 10.
-
Scroll% - enter a percent of the document to move the cursor to. For example, entering 50% in the Jump to Line field moves the cursor 50%, to the middle of the script. Add + or _ to the percentage to move forward or backward. For example, if the cursor is at the end of the script, -50% moves the cursor backward to the middle of the script.
After the Jump to Line dialog is opened, press Esc to exit it without moving the cursor.
-
Auto List & Complete
When a user types the text 'NSOA' into the Scripting Studio editor and then hits the '.' character the Auto List window appears showing all the available options:
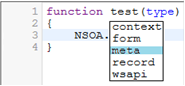
The user has the following options:
-
Click on the required item with the mouse and double-click to select it.
-
Use the up and down arrow keys to select the required item and then hit 'Enter' to select it.
-
Type the first character of the required item (for example 'm') to highlight it and then hit 'Enter' to select it. If more than one item starts with the same letter then the first item will be highlighted and the list of options filtered.
-
Hit 'Esc' to close the Auto List window and type as normal. Clicking outside of the editor window will also close the Auto List window.
Tip:Press <Ctrl> + <Space> to show the Auto List window at any point in the editor.
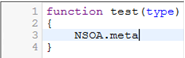
On selecting an item from the Auto List window, the value will be copied into the editor and typing continues after the inserted value.
Auto List & Complete is enabled by default. You can change your settings from User Menu > Personal settings.
