Publishing Lists
The functionality described in this topic requires the following features and role permissions. Contact your account administrator if you are not sure about the features enabled for your SuiteProjects Pro account or about your role permissions.
-
Features:
-
Business Intelligence Connector
-
Save list layouts
-
(Optional) Report Analytics
-
-
Role permission: Publish list view via BI Connector
The Business Intelligence (BI) Connector feature lets you publish lists and make the list data available for import into any BI tools supporting OData V4/JSON or for use within your form and scheduled scripts in SuiteProjects Pro.
Published list data is updated in real-time and available instantly to your connected BI tools. If your BI tools are configured to refresh automatically, the data you see in these tools will synchronize with the list data in SuiteProjects Pro during every refresh. For more information, see Connecting BI Tools to Your OData Feed.
There are two ways of publishing list data to BI Connector depending on your account configuration and your role.
-
You can edit the properties of a custom list layout you own to:
-
Publish the list data to BI Connector as a private resource - Only you can access your published list data.
-
Publish the list data to BI Connector as a public resource - All active employees in your company's SuiteProjects Pro account can access your published list data. Employees accessing public published lists have access to the same data they normally have access to in SuiteProjects Pro. Data access privileges are set by account administrators using filter sets and the same filter sets apply whether you view list data in the SuiteProjects Pro UI or view published list data in a connected BI tool.
See Publishing Lists by Editing Custom List Layout Properties.
-
-
If the Report Analytics feature is enabled for your account, and you're an account administrator or have the Enable report analytics role permission, you can go to Reports > Analytics > Lists to view the custom list layouts you can use to publish list data as public resources to BI Connector. See Publishing Lists to BI Connector as Public Resources Using Report Analytics.
After list data is published to BI Connector, you can delete published lists from BI Connector at any time. See Deleting Published Lists.
The BI Connector feature supports all major lists from the Expenses, Invoices, Projects, Purchases, Resources, Timesheets and Workspaces applications. The following lists are currently supported:
-
Expenses - Expense reports, Authorizations, Alerts
-
Invoices - Invoices, Charges
-
Projects - Bookings, Projects, Tasks, Issues, Alerts
-
Purchases - Purchase requests, Purchase orders, Fulfillment, Fulfillments
-
Resources - Resources, Bookings, Alerts
-
Timesheets - Timesheets, Time entries, Time off requests, Leave accrual, Alerts
-
Workspaces - Workspaces, Discussions, Documents, Alerts
-
Administration - Global Settings - Contacts, Customers, Job codes
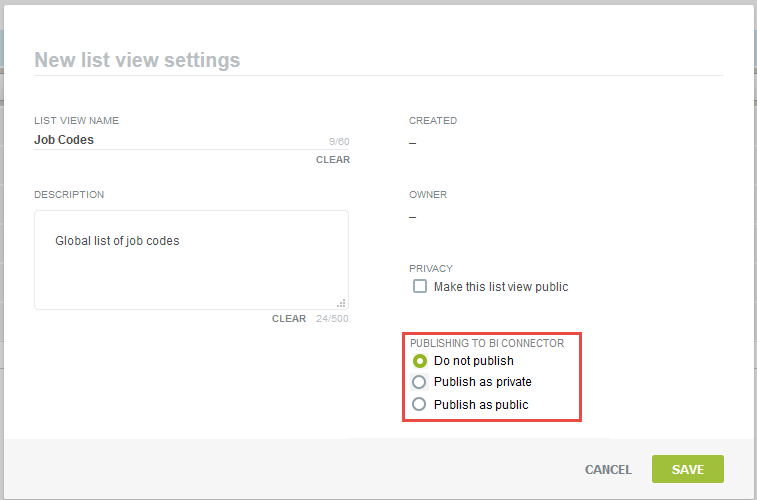
Publishing Lists by Editing Custom List Layout Properties
You can edit the properties of a custom list layout you own to publish the list to BI Connector as a private resource or a public resource.
You can only edit the properties of a custom list layout you own. If you are an account administrator or have the View and modify all saved list views role permission, change the ownership of the custom list layout to yourself first before you can edit its properties.
Although applied advanced filters aren't saved as part of custom list layouts, any advanced filter applied to the list in the UI impacts your published list data.
To publish a list by editing the custom list layout properties:
-
Go to the list you want to publish.
-
Select one of your list layouts or create a new one based on the active configuration. For more information about list layouts, see Personalized List Layouts and Custom List Layouts.
-
Click Edit properties in the List Layouts panel, or click Save as ... if you are creating a new list layout.
-
In the Edit list view settings (or New list view settings) form, select one of the available options under Publishing to BI Connector:
-
Do not publish - the list will not be published (this is the default setting).
-
Publish as private - the list will be published, but only the user publishing it can access the data.
-
Publish as public - the list will be published and available for any user to access. This option respects role permissions and rules for data access, so users can only see data which their role allows them to see.
-
-
Click Save.
-
You can connect your BI tools to your published list data and work with your list data from your BI tools. See Connecting BI Tools to Your OData Feed.
Publishing Lists to BI Connector as Public Resources Using Report Analytics
If the Report Analytics feature is enabled for your account, and you're an account administrator or have the Enable report analytics role permission, you can go to Reports > Analytics > Lists to view the custom list layouts you can use to publish list data as public resources to BI Connector. You can publish list directly from this list.
The Lists tab shows only the custom list layouts that you can publish to BI Connector as public resources or that are already published to BI Connector as public resources. It doesn't include custom list layouts that are already published to the BI Connector as private resources.
For more information about the Report Analytics feature, see Report Analytics.
To publish a list to BI Connector as public resource using Report Analytics:
-
Go to Reports > Analytics > Lists.
-
Locate the custom list layout corresponding you want to publish to BI Connector as a public resource. The list must have the status "Not published" or an empty status.
-
Click the publish icon
 .
.A confirmation dialog appears.
-
Click Confirm to publish the list to BI Connector.