Load Data from Oracle Enterprise Performance Management into NetSuite Analytics Warehouse (Preview)

As a service administrator, you can use the NetSuite Analytics Warehouse extract service to acquire data from the Enterprise Performance Management (EPM) SaaS instance and use it to create data augmentations for various Enterprise Resource Planning and Supply Chain Management use cases.

You can connect to these functional modules of EPM:
  • Financial Close and Consolidation (FCCS)
  • Planning and Budgeting (PBCS)
  • Profitability and Cost Management (PCMCS)
If you've pivot table in your source, then the metadata extract supports pivot table metadata extraction for the EPM connectors. You can only manually extract the incremental data because, for incremental extraction, you must update the results file in EPM before starting the next extraction for the updated data. Update the results file by running the integration using Data Exchange and then access the new results file from the EPM connector in NetSuite Analytics Warehouse. Ensure that you enter all the fields in accordance with your EPM nomenclature and specifics. For example, if you have defined Period in your EPM job as {June-23}, then include exactly the same in the Create Connection for the EPM source dialog.

Note:

The EPM connectors display the default datatype and size; you must edit these values as applicable while creating data augmentations.
Depending on the functional module you want to connect to, ensure that the applicable feature is enabled on the Enable Features page prior to creating this connection:
  • Oracle EPM - Financial Close and Consolidation
  • Oracle EPM - Planning and Budgeting
  • Oracle EPM - Profitability and Cost Management
See Make Preview Features Available.
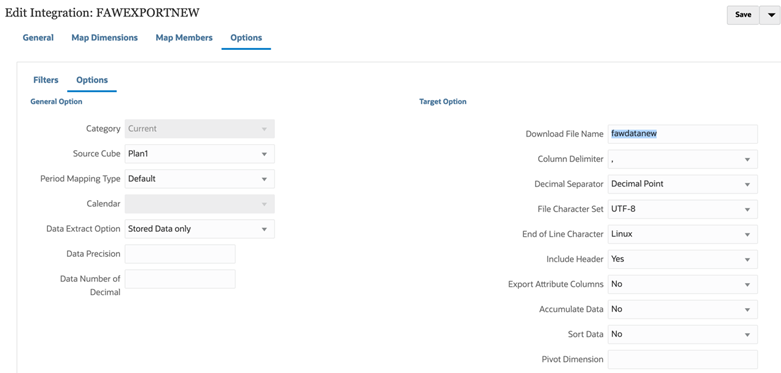
  1. In EPM, create an integration, write out the results into a file whose name you provide in Download File Name, and then specify that same file name in List of Data Files while creating the connection to EPM in NetSuite Analytics Warehouse to extract the data.
    Create an integration in EPM
  2. In EPM, when exporting data, use one of the following modes:
    • Standard mode: This built-in workflow process helps manage the data flow process in and out of EPM. For Standard mode, you specify the period when you run the integration.
    • Quick mode: This process by-passes most of the steps in the workflow and provides a significant improvement in the extract process. When using quick mode, you specify the period in the integration definition filter, and this may include a substitution variable.When using the API, the same rules apply, except that when you need to specify a period, you can’t use a substitution variable to pull from EssBase, but will need to include the period or year on extract.

    See Exporting Data.

  3. In NetSuite Analytics Warehouse, create the EPM data connection using these instructions:
    1. In NetSuite Analytics Warehouse Console, click Data Configuration under Application Administration.
    2. On the Data Configuration page, click Manage Connections.
    3. On the Manage Connections page, click Create and then click Connection.
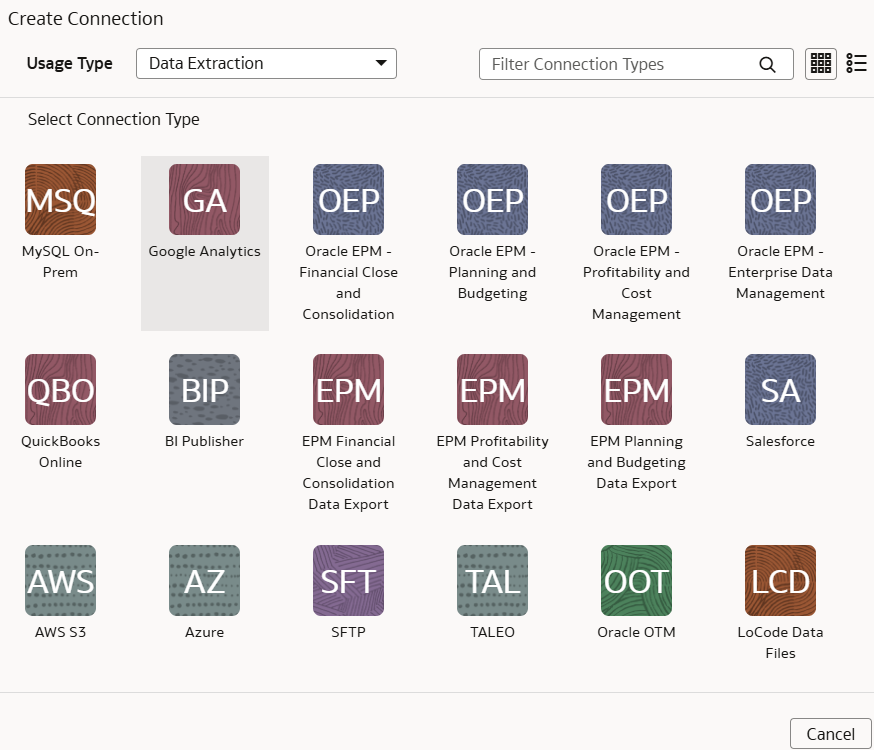
    4. In Create Connection, select Data Extraction in Usage Type and then select the connection type based on the functional module that you want to connect to. For example, to connect to the "Financial Close and Consolidation (FCCS)" module, select Oracle EPM - Financial Close and Consolidation as the connection type.

      Oracle EPM - Financial Close and Consolidation connection option

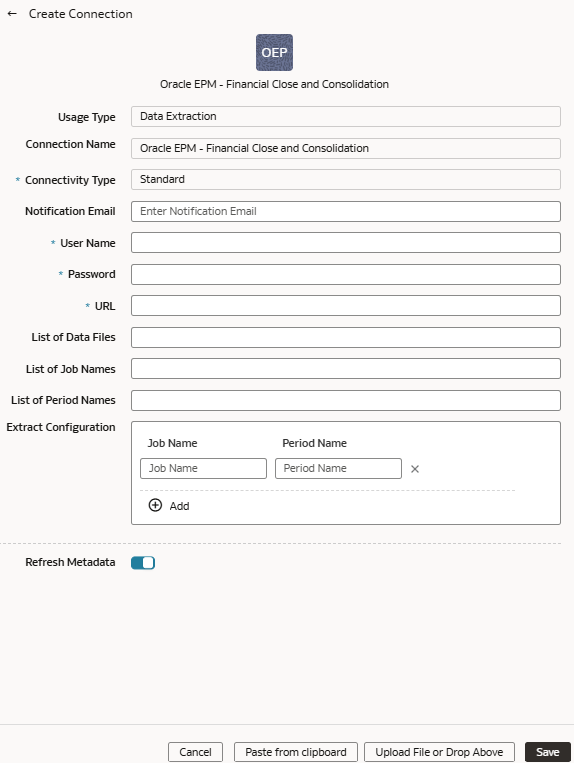
    5. In the dialog for the Oracle EPM connection, provide these details in Source Connection and then click Save and Next:

      Note:

      Some properties are defined on the Extract Configuration tab. These properties are visible, but read-only on the Source Connection tab.
      • Connectivity Type: Select Standard.
      • Notification Email: Enter an email address to receive notifications.
      • User Name and Password: Enter the credentials for your EPM source. Prefix the user name with the domain of your EPM source, such as domain.username.
      • URL: Enter the specific URL of your EPM source using the https://<DOMAIN_NAME>region.ocs.oraclecloud.com format. For example, https://epm7-test-a123456.epm.us6.oraclecloud.com. Ensure to use the https:// protocol to avoid a timeout error.

      Create EPM Connection

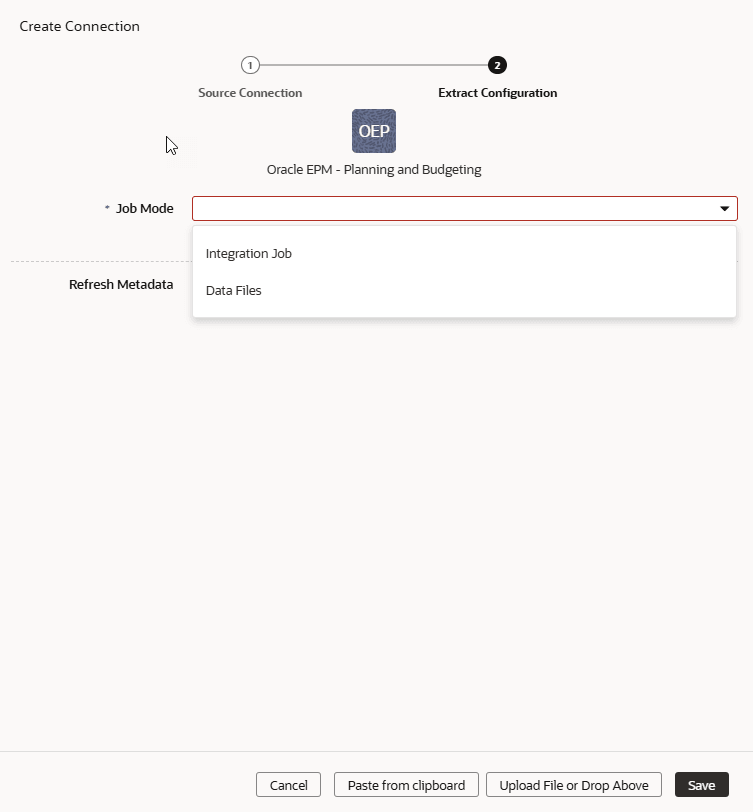
    6. In the Extract Configuration page of the Oracle EPM connection dialog, provide these details and click Save:
      • Select Integration Job from the Job Mode dropdown, then provide the Job Name and Period Name details in the Extract Configuration section.
        • Job Name: Provide the EPM job name such as "Job 1" and period name such as "Quarter 1" corresponding to the given job name to extract data for specific periods. This enables you to run multiple EPM jobs. To ensure a healthy connection, you should first run the desired EPM integration jobs in the EPM user interface. Then enter the successfully-run and valid EPM integration job names in this field. If you’ve multiple job names, ensure that they are comma separated. For example, FAWEPMTestingV2, FAWEXPORT,FAW Job Testing.
        • Period Name: Provide the period names for the corresponding job names. Ensure that multiple period names are comma separated. You may leave this blank, in which case the connector uses the global point of view. Few examples of period names are:
          • {Jan-22},{Oct-22}
          • {Nov-22}{Dec-22},{Jan-23}{Feb-23}
          • {Jan#FY20}{Mar#FY20},{Apr#FY20}{May#FY20}
      • Alternatively, select Data Files from the Job Mode dropdown, then provide the
        • List of Data Files: Specify the file name that you had entered in Download File Name while creating an integration in EPM.

      Create Extract Configuration EPM Connection

    7. Verify that the Refresh Metadata toggle is enabled to ensure that the metadata is refreshed when you save the connection.
      You can later refresh the metadata from the Actions menu on the Manage Connections page, if required.

      Note:

      You can’t create augmentations for EPM unless you perform a metadata extract.
    8. Click Save.
  4. On the Manage Connections page, select Actions for the EPM connection and then select Test Connection.
  5. To delete a connection, on the Manage Connections page, click Actions for the applicable connection and select Delete.

    Note:

    Ensure that you delete the functional areas, data augmentations, and custom data configurations related to the data connection before deleting it. You can't update or load data from deleted data connections to the warehouse.
  6. After the connections are successfully established, navigate to the Data Configuration page, select the connection in Data Source, then click the Data Augmentation tile, and create a data augmentation using the EPM data. Select the applicable EPM source tables. See Augment Your Data.