Load Data from Oracle Database Using JDBC into NetSuite Analytics Warehouse (Preview)

As a service administrator, you can use an extract service remote agent to connect to an Oracle database using JDBC and use the data to create data augmentations.

After connecting to an Oracle database using JDBC, the remote agent extracts the data and loads it into the autonomous data warehouse associated with your Oracle NetSuite Analytics Warehouse instance. The remote agent pulls the metadata through the public extract service REST API and pushes data into object storage using the object storage REST API. You can extract and load the data from an Oracle database into Oracle NetSuite Analytics Warehouse only once every 24 hours.

Ensure that Remote Agent and Oracle JDBC are enabled on the Enable Features page prior to creating this connection. See Make Preview Features Available.
  1. Set up the remote agent to load data from your SQL Server into Oracle NetSuite Analytics Warehouse.
  2. Configure the remote agent and Oracle database data source on the Data Configuration page in Oracle NetSuite Analytics Warehouse using these instructions:
    1. On the Console, click Data Configuration under Application Administration.
    2. On the Data Configuration page, click Manage Connections.
    3. On the Manage Connections page, click Create and then click Connection.
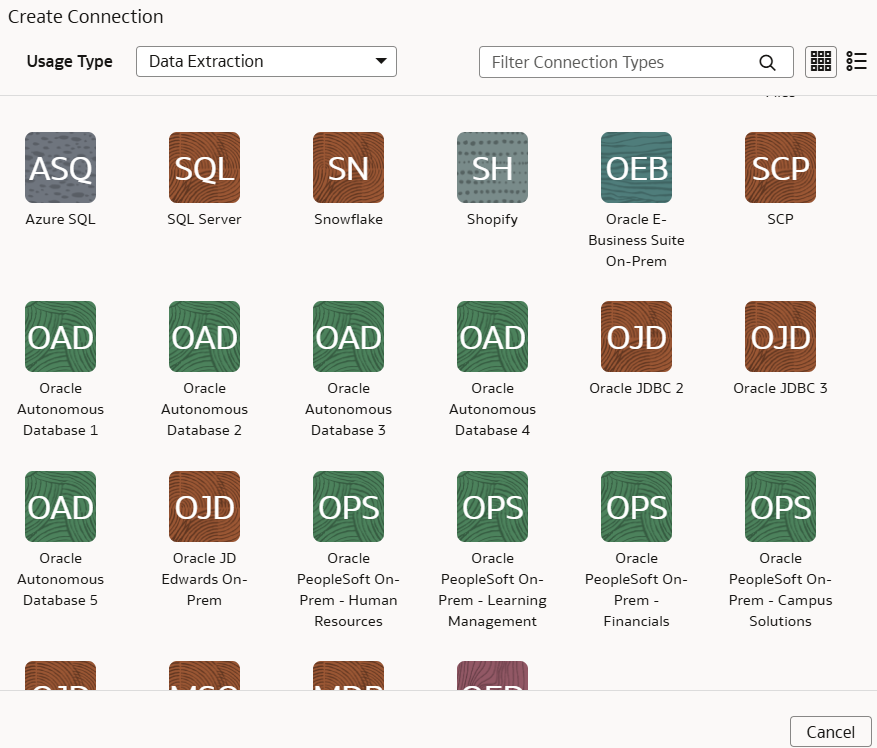
    4. In Create Connection, select Data Extraction in Usage Type, and then select Oracle JDBC as the connection type.
      Oracle JDBC connection option

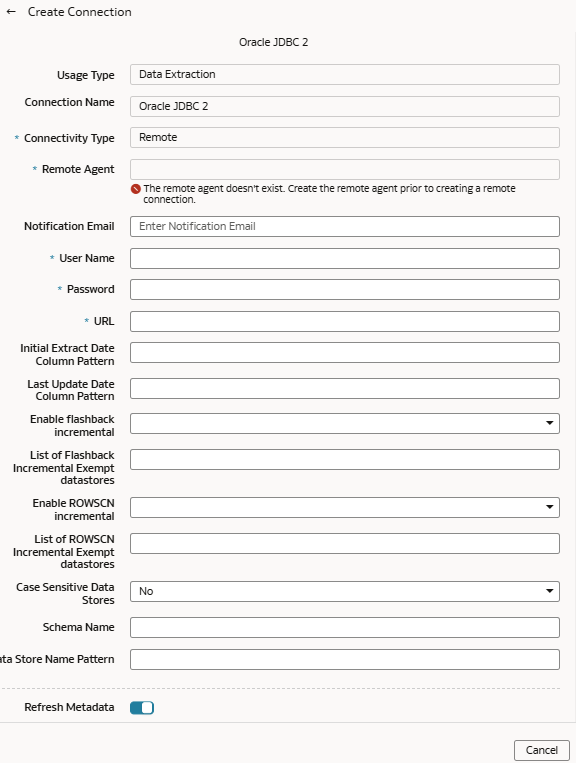
    5. In Create Connection for Oracle JDBC, in Connectivity Type, verify that Remote is selected automatically.
      Create Connection for Oracle JDBC

    6. In Remote Agent, select the remote agent connection that you created earlier, for example, Remote Agent.
    7. Enter an email address to receive notifications in Notification Email, provide credentials for the Oracle database source in User Name and Password, and the URL of the Oracle database source in URL.
    8. In Initial Extract Date Column Pattern, provide the initial extract date pattern that matches the pattern in your source.
    9. In Last Update Date Column Pattern, provide the last update date pattern that matches the pattern in your source.
    10. If your source has flashback support, then select Yes in Enable flashback incremental.
    11. In List of Flashback Incremental Exempt datastores, provide a comma separated list of datastores that you want to exempt from the flashback incremental queries.
    12. If your source has ROWSCN support, then select Yes in Enable ROWSCN incremental.
    13. In List of ROWSCN Incremental Exempt datastores, specify a comma-separated list of datastores that you want to exclude from the automatic tracking of row changes based on system change numbers.
    14. In Case Sensitive Data Stores, select Yes or No to specify whether the datastores have case sensitive data.
    15. In Schema Name, enter the schema name to extract data from.
    16. In Data Store Name Pattern, specify the name pattern of the datastores that you want extracted. If you provide this value, then the connector extracts only datastores matching the pattern.
    17. Verify that the Refresh Metadata toggle is enabled to ensure that the metadata is refreshed when you save the connection. You can later refresh the metadata from the Actions menu on the Manage Connections page, if required.

      Note:

      You can’t create augmentations for Oracle database unless you perform a metadata extract.
    18. Click Save.
  3. To delete a connection, on the Manage Connections page, click Actions for the applicable connection and select Delete.

    Note:

    Ensure that you delete the functional areas, data augmentations, and custom data configurations related to the data connection before deleting it. You can't update or load data from deleted data connections to the warehouse.
  4. After the connections are successfully established, navigate to the Data Configuration page, select the connection in Data Source, then click the Data Augmentation tile, and create a data augmentation using the Oracle database data. Select the applicable Oracle database source tables. See Augment Your Data.