Publish Your Changes Without CI/CD Pipelines

Follow these steps when your extension's CI/CD Pipeline setting is disabled for the remote branch you're merging to, or when a pipeline doesn't exist for the branch. With this setting, your changes are deployed immediately to your environment's Oracle Cloud Applications instance.

Note:

Configuration changes made when you click the Edit Page in Visual Builder Studio link in your Oracle Cloud Application are, by default, deployed directly to your target instance. This default takes effect when you create a new workspace in version 25.01.1 or later. Existing extensions continue to use the CI/CD Pipeline setting that was previously set in the extension's Settings editor, until you change it.
When publishing changes without CI/CD pipelines, your extension's sources are merged to the specified target branch of the workspace's Git repository, then built and deployed directly to the Oracle Cloud Applications instance within your Development environment. Because deployment happens immediately, you won't have a chance to create a merge request as part of the publishing process. So if you want to get your changes reviewed, create a merge request before publishing your changes.

When you're ready to publish your extension:

  1. Click Publish in the header:
    Description of designer-publish-changes-action.png follows
    Description of the illustration designer-publish-changes-action.png

    Note:

    If Publish isn't enabled, you're likely using a scratch repository instead of a real Git repo. See Push a Scratch Repository to a Remote Repository to create a remote repo.
  2. If changes exist, enter a comment in the Commit Message area to describe your changes and commit them. A commit groups the changed files and provides a description to identify the group.
  3. In the Target Branch field, select the branch in the remote repo to merge to.
    The first branch in this list is always the repository's default branch, main, conveniently followed by the last 10 branches you created merge requests for (if any). Any remaining branches follow in alphabetical order. This flexibility lets you more easily publish and test your new feature development work, if you're not yet ready to merge those changes into your repository's main branch.
  4. The New Working Branch Name field displays with an automatically populated new name for your working branch. You can accept the default, but it's recommended to change to a name that's more meaningful.
    Once you publish a branch, you can no longer use it (or your local copy of it). Instead, VB Studio automatically creates a new working branch using the value in this field, and switches your workspace to it for any future changes.
  5. Click Publish.

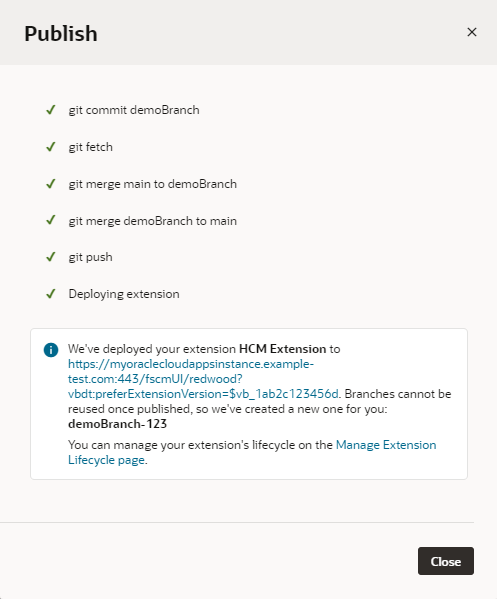
    Your changes are merged from your working branch to the selected target branch, then immediately deployed to the Development environment associated with your workspace.

    Click the link in the Publish dialog to see your published changes:
    Description of publish-pipelinedisabled.png follows
    Description of the illustration publish-pipelinedisabled.png

    Note:

    Make sure you copy and paste the deployment URL to your clipboard before you click Close. You won't have access to the URL after the Publish dialog is closed.

    Also, users of your Oracle Cloud Application will have to sign out of the app, then sign back in again to be sure they're seeing the latest.

After testing the changes deployed to your Development environment, you might want to deploy it to other Oracle Cloud Applications instances from the Manage Extension Lifecycle page.