Create or Switch a Branch

When you create an extension with a Git repository (instead of a scratch repo), VB Studio creates two branches in the repo: the default branch (usually, main) and a working branch.

The main branch contains the initial set of source files for the extension. The working branch contains the same set of source files initially, but as you work on your extension, this branch will contain the changes that you make. Using the Switch Branch/Sandbox option, you can commit your changes and then switch branches, or create a new branch from a parent branch that you select.

Note:

You don't have to switch to another workspace to configure another page in your App UI, as long as the target for your change is in your current Git repository. It's much faster to switch branches within a workspace than to switch workspaces. For example, suppose you're working in an extension (that is, a Git repo) for the Digital Sales App UI. Let's say you're configuring the Accounts page, but then get an urgent request to fix something on the Opportunity page and deploy it to your production instance. Rather than create a new workspace, you simply create a new branch, make the fix and publish it, then switch back to the Accounts page code line and resume your work.

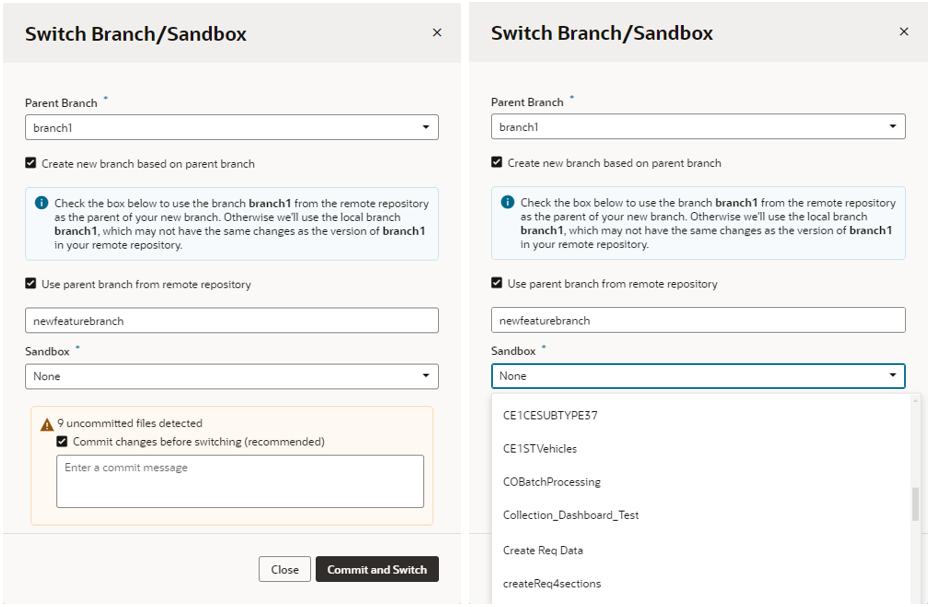
You use the Switch Branch/Sandbox dialog to switch branches or create a new branch from a parent branch that you select, or, optionally, switch from one sandbox to another.
  1. Click the Git menu in the header or in the Git panel.
  2. Select Switch Branch/Sandbox.

    The Switch Branch/Sandbox dialog displays the current branch in the Branch drop-down list and the number of uncommitted files, if any.

  3. Choose the appropriate option:
    • To switch branches, select the branch that you want to switch to and click Commit and Switch or Switch. The button’s label depends on whether you selected the Commit changes before switching (recommended) checkbox.
      Description of switchbranch.png follows
      Description of the illustration switchbranch.png
    • To create a new branch, select the Create new branch based on parent branch checkbox, enter the name for the new branch, and click Commit and Switch (or just Switch).

      If the selected parent branch exists both locally as well as in the remote repository, select Use parent branch from remote repository to use the remote branch as your new branch's parent. You'd typically want to do this if the remote branch is more current than the local branch. Otherwise, the local branch will be used.

    • To associate this branch with a new sandbox, choose one from the Sandbox drop-down. Some sandboxes might be marked "Unpublishable", which means they either have dependencies that haven't been resolved or were created without the ability to publish. Avoid choosing an unpublishable sandbox, as doing so is likely to break your extension.