Configure an Oracle Cloud Application
You can configure an Oracle Cloud Application to hide or rearrange fields in a dynamic form or table, introduce new behavior based on a variable’s value, add your own content to a page, and much, much more. The easiest way to start is by viewing your page in Oracle Cloud Applications:
- Enter the URL for your Visual Builder Studio instance. (If you don't have it, you
can navigate to VB Studio from your Oracle Cloud Application's Navigator. Select
Configuration, then Visual
Builder.)
Note:
Before continuing, make sure you or someone else in your organization has completed the steps in Essential Set-Up Tasks . In addition, if you have multiple VB Studio instances, make sure you're using the one that's associated with the correct Oracle Cloud Applications instance. That is, if you're on the DEV1 Oracle Cloud Applications instance, you must use the VB Studio associated with DEV1, and not, say, the VB Studio instance associated with TEST, or a VB Studio instance in a completely different Oracle Cloud Applications environment family. Of course, you can deploy extensions to any instance in any environment family, as long as you have a VB Studio environment defined to support that. -
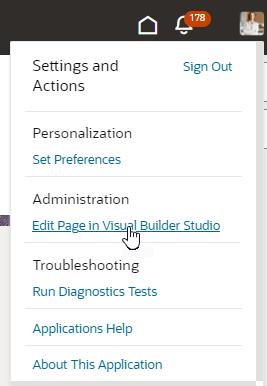
In your Oracle Cloud Application, navigate to the page you want to modify, click your user name at the top-right corner to open the Settings and Actions menu, then select Edit Page in Visual Builder Studio:

Description of the illustration fa-edit-page-link.pngIf you don’t see the Edit Page in Visual Builder Studio option in your Oracle Cloud Application, it could be because:- You don't have the right privileges to access VB Studio. Check with your Oracle Cloud Application administrator if you're not sure.
- You may not be working in an environment that has an instance of VB Studio associated with it, such as a TEST environment. Again, check with your Oracle Cloud Application administrator to see if this is the case.
- Your Oracle Cloud Application has not yet adopted Oracle’s new Redwood design pattern, so this page is not extensible using VB Studio. In that case, refer to Configuring and Extending Applications for instructions on how to customize your Oracle Cloud Applications with App Composer to meet your business needs.
-
Select a project and a workspace.
To edit a page in VB Studio, you need a project that has been set up to configure Oracle Cloud Applications in this environment. If you're a member of several projects, select one. If a project already has a workspace for the page you're editing, you'll want to pick one of those. These projects are badged as
 . If a project is recommended but you're not a member—you'll see these under Other Projects—select the project and click Request Membership to contact the project owner and get yourself added. You'll be notified by email when your request is approved, at which point you can try editing the page again.
If you're not a member of any projects, and you don't have any recommended projects, you'll need to create one. Click + Create, then enter a Project Name in the New App Extension Project dialog. If you know others may work with you in this project, optionally select their names in the Add Members list. (Make sure someone has enabled these users to access VB Studio by following the instructions in Set Up VB Studio Users.) Click Create.
. If a project is recommended but you're not a member—you'll see these under Other Projects—select the project and click Request Membership to contact the project owner and get yourself added. You'll be notified by email when your request is approved, at which point you can try editing the page again.
If you're not a member of any projects, and you don't have any recommended projects, you'll need to create one. Click + Create, then enter a Project Name in the New App Extension Project dialog. If you know others may work with you in this project, optionally select their names in the Add Members list. (Make sure someone has enabled these users to access VB Studio by following the instructions in Set Up VB Studio Users.) Click Create.Tip:
Projects created this way use default settings to get you started right away. Once the project is created, you can access its properties to explore all the options available to you (click Go to project page at the top left of the header, then look for Properties under Project Administration
 in the VB Studio left navigator). As someone who creates the project, you automatically become the project owner, with rights to manage it.
At this point, you can customize the left navigator to show or hide menu items, both for yourself as well as other project users. By default, you'll see Organization, Project Home, Workspaces, Git, Merge Requests, Builds, Environments, and Project Administration in the menu, but you can customize this view by clicking
 in the left navigator. See Configure the Left Navigator. You may also want to set merge restrictions on the
 mainbranch in the project's Git repository to control who pushes commits to it and how. See Set Merge Restrictions on the main Branch.Whether you create a new project or select an existing one, you'll need a workspace, which we'll create for you if you don't have one. For example, this is what you see when a workspace is created as part of the new project workflow:

Description of the illustration workflow.pngIf you're the first person to edit an Oracle Cloud Applications page in a given pillar, things are fairly straightforward: A new workspace is created for you as part of a new repository, which will be used to host changes for all extensions within this pillar. This means you'll have distinct repos and workspaces for extensions in different pillars, for example, one repo for all HCM changes and another repo for SCM changes. The exception here is if the page you're editing belongs to the CX pillar. In this case, when the Oracle CX extension's settings have the Pillar and Pillar Subcategory fields configured, a new Git repository and workspace are created to host changes for each module within this pillar, for example, one repo for CX Sales, another for CX Service, and yet another for CX Marketing.
If you're not the first person to edit a page in a given pillar, here's how workspaces behave based on your setup:- If you already have a workspace in the project for the page you're editing, VB Studio will automatically open that workspace for you.
- If you have more than one workspace for the same page in that project, you'll be prompted to select one.
- If you have a workspace for a different page, but it belongs to the same pillar, you must re-use that workspace, even though it wasn't originally created for the page you're currently editing. This avoids creating a surplus of workspaces—and Git repositories—every time you edit a page for the first time in a project.
- If someone else is already working on a page in the same pillar—whether it's the page you're trying to edit or not—a new workspace is created for you by cloning your teammate's existing repository.
If you're looking to edit a page that doesn't belong to any pillar, you can create a new repo with a workspace, or re-use an existing workspace that was created for some other page.
Note:
It's worth noting that if your environment's Oracle Cloud Applications instance is connected to VB Studio via Basic Auth or three-legged OAuth when both instances are in the same identity domain, VB Studio won't create a workspace or open an existing workspace associated with that environment. Instead, here's what happens:- If a workspace doesn't exist but the environment does, a new environment with the Oracle Cloud Applications instance added as an IDCS resource is created and a new workspace is associated with it.
- If a workspace tied to the environment exists, a new environment with the Oracle Cloud Applications instance added as an IDCS resource is created and the existing workspace is switched to use the new environment.
The default workspace name generated when you jump over to VB Studio typically uses the pillar of the page you're trying to extend, in the format
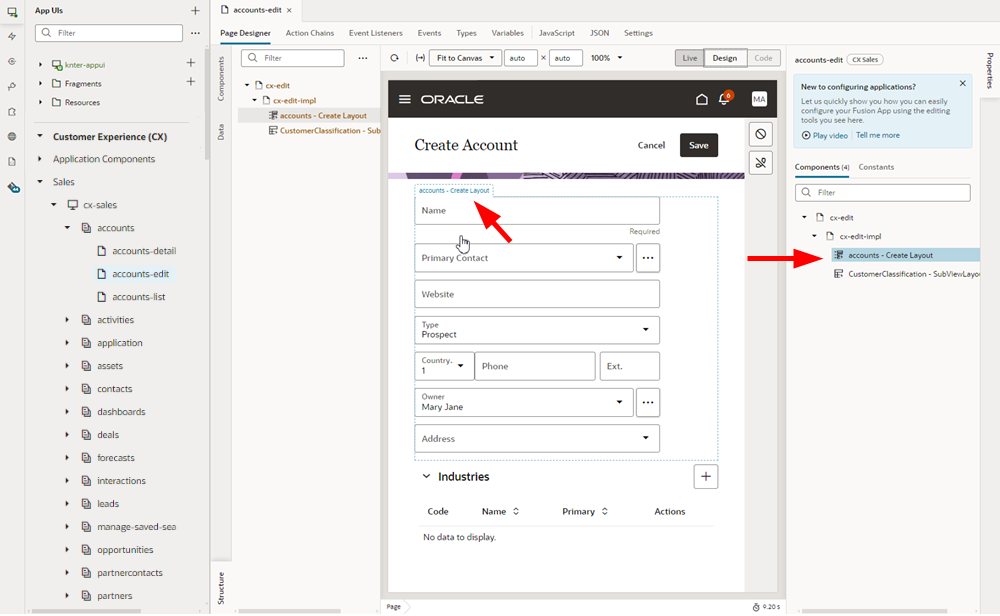
Workspace PILLAR, for example,Workspace CX. If that name already exists, a number is added to the name and incremented as needed, for example,Workspace CX 1,Workspace CX 2, and so on.Once you access a project, you'll see your page open in the Designer, with the extensible areas highlighted, like this dynamic form:

Description of the illustration extendableareasingreen.png - Select an extensible area by clicking it, then selecting a component or rule set in the Properties pane on the right. You’ll then be placed in one of VB Studio’s editors, where the real work begins.
- Use Configure an App UI to help you configure your Oracle Cloud Application to meet your organization’s requirements.
- When you're done making your changes, you can preview and share your extension to test and prepare your configurations for publication, then publish them.
Note:
If you're ready to work on another page, make sure you push your changes to the project's Git repository before you make the switch, so the code underlying your changes becomes available to your team members. If your changes haven't been pushed to the project repo, your teammates are likely to start with a version that does not include your updates when they click Edit Page in Visual Builder Studio.To publish your changes, you can individually commit and push your changes, or click Publish to combine multiple Git operations. Note that configuration changes you make by editing an Oracle Cloud Application page (through the Edit Page in Visual Builder Studio link) are deployed directly to your target instance during publish, unless the extension's CI/CD pipeline is enabled.