Use Auto Scaling
When you create an Autonomous AI Database instance, by default compute auto scaling is enabled and storage auto scaling is disabled. You can manage auto scaling from the Oracle Cloud Infrastructure Console to enable or disable compute auto scaling or storage auto scaling.
Compute Auto Scaling
With compute auto scaling enabled the database can use up to three times more CPU and IO resources than specified by the number of ECPUs (OCPUs if your database uses OCPUs) as shown in the ECPU count or OCPU count field on the Oracle Cloud Infrastructure Console.
When auto scaling is enabled, if your workload requires additional CPU and IO resources, the database automatically uses the resources without any manual intervention required. For example:
-
In the ECPU compute model, when the ECPU count is 512, this allows the database to use up to 512 x 3 ECPUs (1536 ECPUs) when auto scaling is enabled.
To see the average number of ECPUs used during an hour you can use the “Number of ECPUs allocated” graph on the Overview tab on the Database Dashboard card in Database Actions. See Database Dashboard Overview for more information.
-
In the OCPU compute model, when the OCPU count is 128, this allows the database to use up to 128 x 3 OCPUs (384 OCPUs) when auto scaling enabled.
To see the average number of OCPUs used during an hour you can use the “Number of OCPUs allocated” graph on the Overview tab on the Database Dashboard card in Database Actions. See Database Dashboard Overview for more information.
Enabling compute auto scaling changes the concurrency and parallelism settings for the predefined services. See Manage Concurrency and Priorities on Autonomous AI Database for more information.
Note: Your license type determines the ECPU count maximum. For example, if your license type is Bring your own license (BYOL) with Oracle AI Database Standard Edition (SE), the ECPU count maximum is 32.For this license type the maximum allowed value for ECPU count is 32. With compute auto scaling enabled you can use up to ECPU count x 3 ECPUs. This license restricts the number of ECPUs you can use to a maximum of 32 ECPUs, with or without compute auto scaling enabled.
When compute auto scaling is enabled your database may use and you may be billed for additional CPU consumption as needed by your workload, up to three times (3x) the number of base CPUs (as shown in the ECPU count or OCPU count field on the Oracle Cloud Infrastructure Console). See Oracle Autonomous AI Database Serverless Features Billing for details on compute auto scaling billing.
See Add CPU or Storage Resources or Enable Auto Scaling for the steps to enable compute auto scaling.
Storage Auto Scaling
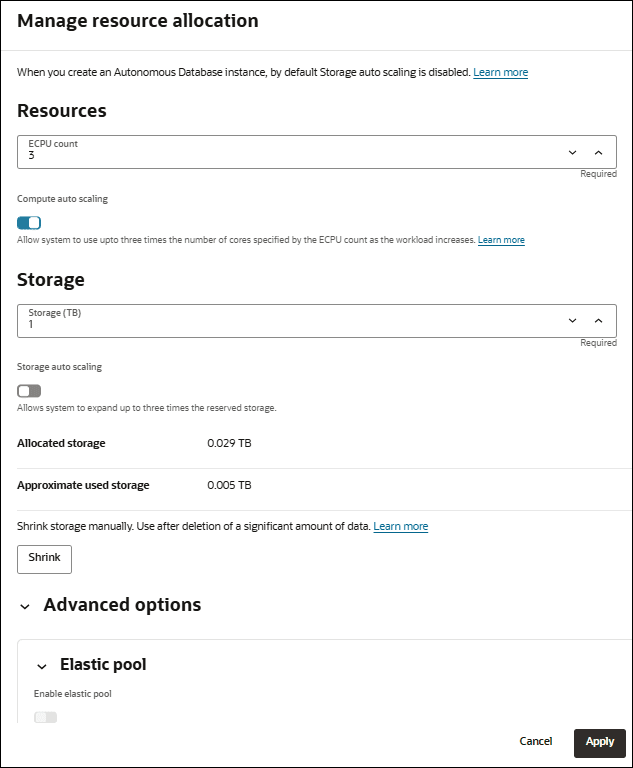
When you create an Autonomous AI Database instance, by default Storage auto scaling is disabled. You can manage scaling and enable storage auto scaling from the Oracle Cloud Infrastructure Console or using the API.
With Storage auto scaling enabled, the Autonomous AI Database can expand to use up to three times the reserved base storage, as specified by the storage shown in the Storage field on the Oracle Cloud Infrastructure Console. If you need additional storage, the database automatically uses the reserved storage without any manual intervention required.
You specify the base storage when you provision or clone your database, or you can change the storage at any time by clicking Manage resource allocation under More Actions in the OCI console and changing the storage size. Depending on your workload type and the compute model selection, you have these options to specify the reserved base storage units:
-
Lakehouse: Specify your storage in Terabytes (TB).
-
Transaction Processing: Specify your storage in Gigabytes (GB) or Terabytes (TB). GB units are only available when the Workload type is Transaction Processing and the Compute model is ECPU.
Using the Oracle Cloud Infrastructure Console or the APIs you can provision or auto scale an Autonomous AI Database instance’s storage up to 384 TB. For storage requirements larger than 384 TB, Oracle recommends that you file a Service Request at Oracle Cloud Support.For example, if your storage is 100 TB and storage auto scaling is enabled, you have access to a maximum of 300 TB of storage and if your storage is 200 TB, you have access to a maximum of 384 TB (if you requested a larger maximum by filing a service request, then the maximum would be your custom maximum size).
As data flows in, depending on your workload type, you are billed as follows:
-
For storage usage within your reserved base storage, you are billed based on your base storage.
-
After your allocated storage exceeds your reserved base storage, storage usage is billed based on your allocated storage rounded up to the nearest TB for workload type Lakehouse and to the nearest GB for workload types Transaction Processing, APEX, or JSON, in a given hour.
For example, when the Workload type is Lakehouse, if your reserved base storage is 4 TB, until your allocated storage exceeds 4TB of storage, you are billed based on your base storage (4 TB). After you exceed 4 TB, storage is billed based on the allocated storage rounded up to the nearest TB, in a given hour. In this example, if the allocated storage grows over 4 TB in a given hour, say to 4.9 TB, you are billed for 5 TB of storage from that hour onward.
If you then delete 1 TB of data, your allocated storage remains at 4.9 TB and you are billed for 5 TB until you perform a shrink operation. When you perform a shrink operation, Autonomous AI Database may be able to reduce your allocated storage back to 3.9TB (shrinking the data and undo tablespaces). After the shrink operation completes and your allocated storage (3.9TB) is once again within your reserved base storage (4 TB), you will once again be billed for your reserved base storage of 4 TB. See Shrink Storage for more information.
Note: Reducing temp tablespace requires a database restart.
If you disable Storage auto scaling and the used storage is greater than the reserved base storage, as specified by the storage shown in the Storage field on the Oracle Cloud Infrastructure Console, Autonomous AI Database shows a warning on the disable storage auto scaling confirmation dialog. The warning lets you know that the reserved base storage value will be increased to the nearest TB greater than the actual storage usage on a Lakehouse workload instance, or to the nearest GB greater than the actual storage usage on a Transaction Processing workload instance, and shows the new reserved base storage value.
To see the Autonomous AI Database instance storage usage, you can view the “Storage allocated” and “Storage used” graphs on the Overview tab by clicking the Database Dashboard card in Database Actions. See Database Dashboard Overview for more information.
See Add CPU or Storage Resources or Enable Auto Scaling for the steps to enable storage auto scaling.
Note the following when you enable Storage auto scaling:
-
Autonomous AI Database uses Exadata Smart Flash Cache to automatically cache frequently accessed data, delivering the high I/O rates and fast response times of flash. The amount of flash cache for your database depends on the amount of storage you provision, or the amount of allocated storage if you enable storage auto scaling.
With storage auto scaling disabled, the guaranteed minimum flash cache size is 10% of your database's provisioned storage size.
With storage auto scaling enabled, the guaranteed minimum flash cache size is 10% of your database's provisioned base storage size or its allocated storage size, whichever is higher.
Manage Recycle Bin
In Autonomous AI Database, the recycle bin is enabled by default. The recycle bin is a virtual container that stores dropped database objects, such as tables and indexes. Instead of permanently removing an object, the database renames the object so that you can restore it if it is accidentally deleted or needs to be recovered.
You can manually purge objects in the recycle bin. Objects in the recycle bin can also be automatically purged when space constraints occur. However, because Autonomous AI Database can auto scale storage, manually purge recycle bin objects as needed.
To view objects in the recycle bin as the current user:
SELECT * FROM USER_RECYCLEBIN;To view objects in the recycle bin as ADMIN:
SELECT * FROM DBA_RECYCLEBIN;To purge objects for the current user:
PURGE USER_RECYCLEBIN;To purge all objects as ADMIN:
PURGE DBA_RECYCLEBIN;The recycle bin can also be disabled by setting the RECYCLEBIN initialization parameter to OFF and restarting the database:
ALTER SYSTEM SET recyclebin = OFF SCOPE=spfile;Autonomous AI Database with Lakehouse workload bypasses the recycle bin for staging tables when the STAGING property is set. See Create Staging Tables for Lakehouse Workloads for more information.
For more information about managing the recycle bin, see What Is the Recycle Bin?.
Shrink Storage
When the storage used in the database is significantly lower than the allocated storage, the shrink operation reduces the allocated storage.
To understand storage allocation and the shrink operation, note the following:
-
Reserved base storage: is the base amount of storage you select for the database when you provision or scale the database, excluding any auto scaled value. The reserved base storage is shown in the Storage field on the Oracle Cloud Infrastructure Console.
-
Allocated storage: is the amount of storage physically reserved for all database tablespaces (excluding sample schema tablespaces). This number also includes the free space in these tablespaces.
-
Used storage: is the amount of storage actually used in all tablespaces (excluding the sample schema tablespaces). The used storage excludes the free space in these tablespaces. Used storage is the storage actually used by database objects, tables, indexes, and so on, including internally used temp space.
-
Maximum storage: is the maximum storage reserved. When storage auto scaling is disabled, the maximum storage equals the reserved base storage. When storage auto scaling is enabled, the maximum storage is three times the base storage (maximum = reserved base x 3).
Note: The Shrink operation is not available with Always Free Autonomous AI Database.
To shrink storage:
-
On the More Actions drop-down list of the OCI console, click Manage resource allocation.
-
In the Manage resource allocation area, select Shrink.
-
Click Confirm in the Shrink Database dialog.
Note: The Shrink operation is a long running operation.
The Shrink operation requires that all of the following apply:
-
Storage auto scaling must be enabled.
-
The allocated storage must be greater than the reserved base storage.
-
The allocated storage, rounded up to the nearest 1TB, can be reduced by 1TB or more.
-
The following must be true:
Allocated storage - Used storage > 100 GB
When you click Shrink and these conditions are not met, Autonomous AI Database shows the Action unavailable dialog.
Note the following for the Shrink operation:
-
The shrink operation runs an
alter table... move onlineoperation which uses the database's CPUs. In cases where the shrink operation is running slow or taking a very long time, Oracle recommends that you scale up the number of CPUs. See Add CPU or Storage Resources or Enable Auto Scaling for more information. -
The shrink operation is not allowed if the Autonomous AI Database instance contains the following:
-
Table with both domain index and
LONGdata type column -
Domain index in
FAILEDstate -
Vector indexes
-
Transactional Event Queues (previously called AQ Sharded Queues)
-
MEMOPTIMIZE FOR WRITEtables -
Table with
reservablecolumn (only available on Oracle AI Database release 26ai)
-
-
If you have columns with the
ROWIDdata type, theROWIDs that these column values point to may change during the shrink operation. -
Tables that contain the following may be moved offline during the shrink operation. DML operations on these tables may be blocked for the duration of the move and the table indexes for these tables may become unusable until the shrink operation completes:
-
Tables with bitmap join indexes
-
Nested tables
-
Object tables
-
Immutable tables
-
Blockchain tables
-
Partitioned tables with domain indexes
-
-
If you perform a Shrink operation very soon after a data deletion operation, the Shrink operation may fail. This can be due to the delay required for Autonomous AI Database to recalculate storage values. In this case, Oracle recommends that you retry the Shrink operation (that is, wait for several minutes for the storage deletion and any associated storage usage updates to complete and perform the Shrink operation again).