Work with Data Types

Create and update data types on the canvas.

To learn more about data types and other robot resources, see Alternatives to Hard Coding Data.

Create a Data Type

A data type defines how data should be classified. Oracle Integration provides several simple data types, including string, boolean, and number. You can create additional data types if needed.

You base variables and a trigger's input and output on data types. For example, consider a variable that must hold several related pieces of data, such as an invoice number, invoice amount, supplier name, and amount due. You can create a data type that contains one property for each piece of data, and then create a variable of the data type. For more information on this use case, see Use Case: Update a Set of Invoices.

  1. Open a robot.
    1. In the navigation pane, select Projects.
    2. Select the project name.
    3. In the left toolbar, select Robot Robot.
    4. In the Robots box, select the robot to open.

      The canvas appears.

  2. In the toolbar, select Data types Data types.

    The Data types panel appears.

  3. Select Create (if no data types have been created) or Create Create (if at least one data type exists).

    The Data type panel appears.

  4. Enter the name of the data type, such as InvoiceType.
  5. Define the data type using one of the following options:
    • Define the properties manually, one at a time.

      1. Make sure that the Property list tab is selected.

      2. Next to Properties, select Add +.

      3. Fill in the following fields:

        Field Description
        Name Enter the name of the property, such as InvoiceNumber.
        Type Select the data type of the property. You can base a property on the simple data types that Oracle Integration provides or on a data type that you create.
        Collection

        Select this checkbox if the property stores an array of values. If the checkbox is deselected, the data type can store only a single value.

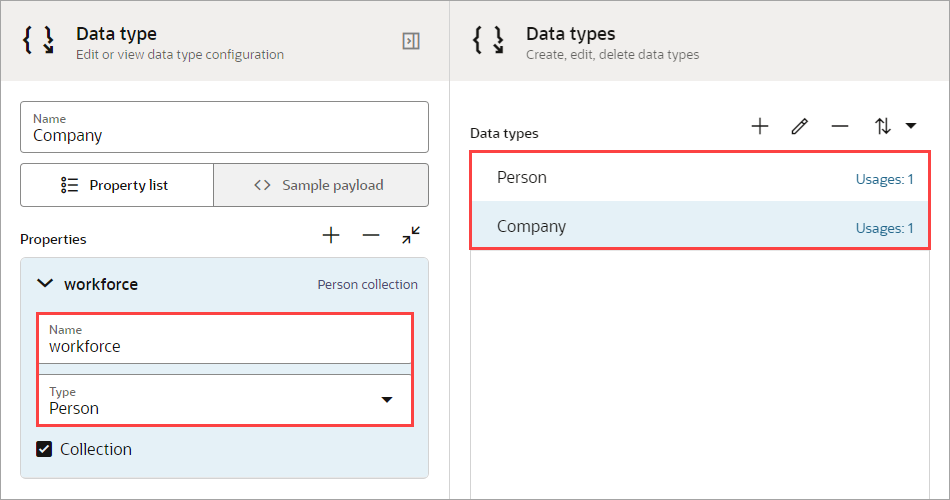
        For example, consider a data type of Company, which represents a company, and a data type of Person, which represents an employee.

        One of the properties of the Company data type is workforce, which is a collection of Person types.

        Two data types appear: Person and Company. The Company data type has a property of workforce, which is of the data type Person.

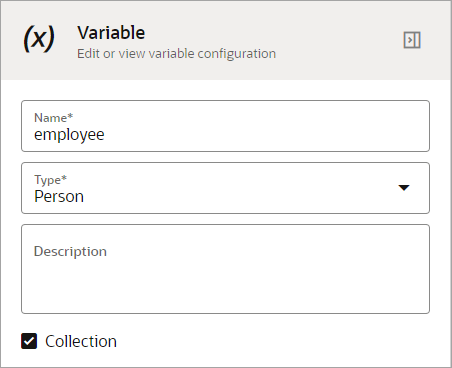
        You can create a employee variable that is of the data type Person. If you want this data type to be an array of persons, mark it as a collection.

        The employee variable is of type Person and is a collection

    • Upload a JSON file that defines the properties.

      1. Select the Sample payload tab.

      2. Select within the Drag and Drop area, navigate to the location of the JSON file, and double-click the file.

        or

        Paste the JSON text into the Enter a JSON sample payload area.

        For example, the following JSON text defines two properties, Green Corp. and employees. The employees property is of type string and is a collection.

        {
            "name": "Green Corp.",
            "employees": [
                "Horst", "Sandhya"
            ]
        }
  6. In the Data type panel, where you defined the properties, make sure that the tab where you defined the properties—either Property list or Sample payload—is selected.
  7. Click OK.
  8. Above the canvas, select Save.

Update a Data Type

You can update a data type at any time from the canvas. However, your update can affect a variable, input, or output that is of the data type.

Update How the update affects a robot

Deleting a property

or

Changing the name of a property

If an expression or field references the property, an error occurs the next time you validate the robot. You must correct the error before you can activate the robot.

Validation happens automatically when you save, and you can also validate a robot without saving. See Validate a Robot.

Adding a property

Adding a property doesn't impact any existing robot resources or expressions.

Before updating a data type, check where it's used. See See Where a Data Type Is Used.
  1. Open the robot whose data type needs to change.
    1. In the navigation pane, select Projects.
    2. Select the project name.
    3. In the left toolbar, select Robot Robot.
    4. In the Robots box, select the robot to open.

      The canvas appears.

  2. In the toolbar, select Data types Data types.

    The Data types panel appears.

  3. Update the data type.
    1. Above the list of data types, select Edit Edit icon.

      The Data type panel appears.

    2. Optional: Update the fields as needed.
  4. Click OK.
  5. Above the canvas, select Save.

See Where a Data Type Is Used

At any time, you can view the actions and logic that reference a data type.

  1. Open a robot.
    1. In the navigation pane, select Projects.
    2. Select the project name.
    3. In the left toolbar, select Robot Robot.
    4. In the Robots box, select the robot to open.

      The canvas appears.

  2. In the toolbar, select Data types Data types.

    The Data types panel appears.

  3. In the list, locate a data type.
  4. Select Usages link to its right.

    A variable named InvoiceType has 2 usages

    The Data type usages panel appears.

  5. Review the actions and logic that reference the data type.
  6. Click OK.