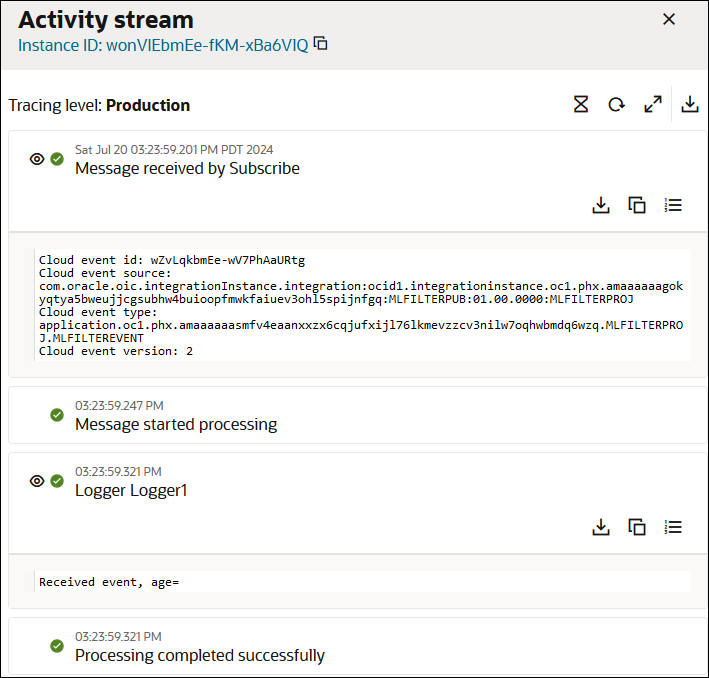
Define Custom Header Filters to Trigger Integrations
You can define custom headers in events, select those events and map request payload elements to the custom headers when creating a publishing integration, and then define filters on those headers when creating a subscribing integration. If the filter condition defined is satisfied at runtime, the subscribing integration is triggered. If the filter condition is not satisfied, the integration is not triggered.
- Capabilities
- Restrictions
- Use Case Overview
- Create an Event with a Custom Header in a Project
- Create an Integration to Publish the Event in a Project
- Create an Integration with No Filter to Subscribe to the Event in a Project
- Create an Integration with a Name Filter to Subscribe to the Event
- Create an Integration with an Age Filter to Subscribe to the Event
- Run the Publishing Integration and Track the Created Instances
- Run the Publishing Integration Again and Track the Created Instances
Capabilities
- You define custom headers when creating an event.
- You define custom header values in the mapping of a publish event action. You can define the mapping from payload data to a custom header to enable payload data to participate in filtering.
- You define filters on the custom headers when creating a subscribing integration. Subscribers can filter events based on fields within the payload if those fields are mapped to the custom headers. If the filter condition you define is satisfied during runtime, the subscribing integration is triggered.
- You define filters in two ways:
-
JQ expressions (through the Code tab):
For example:
"filter-def": ".customheader1==\"someValue\""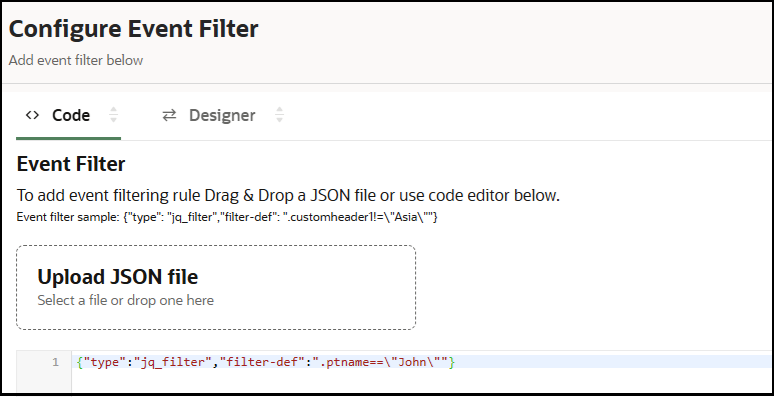
JQ is a lightweight and flexible command line JSON processor primarily used for extracting and manipulating JSON data. JQ takes an input and produces an output. See jq 1.7 Manual and JQ Expression Syntax for Creating Filters.
-
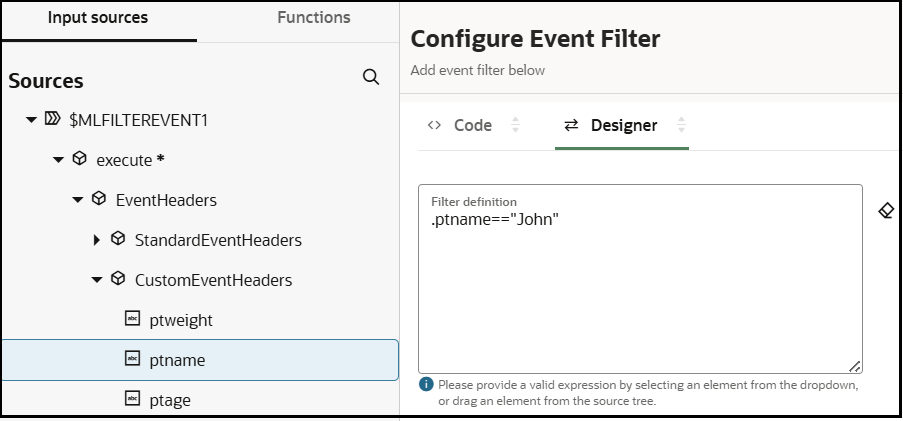
Expression builder (through the Designer tab):
This option enables you to build an expression by dragging an element or function from the source tree, then defining it further in the designer. For example:
-
Restrictions
- You can define 10 custom headers per event.
- If defining a filter in the code editor, enter all functions in lower case.
- Only JQ expression filters are supported.
- The following JQ function calls are supported:
anyallascii_downcaseascii_upcasetonumbertostringminmaxcontainsstartswithendswithltrimstrrtrimstrlengthnowsplitfromdateiso8601floorceil
- The following JQ keywords/filter expressions are
not supported:
- '
.' (A single dot alone is not supported for security reasons.) whileforrepeatinput/inputs/stderrdebuginput_filenameinput_line_numberrecurseforeachuntil
- '
-
The following date and time JQ filters are supported:
JQ provides a set of date helpers that make it simple to parse, compare, and format ISO-8601 timestamps inside a JSON-streaming pipeline. The most frequently used helpers are:fromdateiso8601: Parses an ISO-8601 string: Unix-epoch seconds.now: Shows the current epoch seconds at evaluation time.split: Extracts calendar pieces with pure string operations:- ISO-8601 stamp: split at
Tto drop the clock and split at–to accessY-M-Delements.
- ISO-8601 stamp: split at
Use Case Example Determine whether a date is in the past or future.
# Is the schedule date still ahead?
.data.scheduleDate | fromdateiso8601 >  now

# Has the schedule date already passed?
.data.scheduleDate | fromdateiso8601 <  now
Check the relative age (hours/days/weeks before now).
Seconds/constants:- 1 hour = 3600
- 1 day = 86,400
- 1 week = 604,800
# ≥ 1 hour ago
(now - (.data.eventTime | fromdateiso8601)) >= 1 * 3600

# < 1 hour ago
(now - (.data.eventTime | fromdateiso8601)) <  1 * 3600

# ≥ 3 days ago
(now - (.data.eventTime | fromdateiso8601)) >= 3 * 86400

# ≥ 2 weeks ago
(now - (.data.eventTime | fromdateiso8601)) >= 2 * 604800
Compare against a static date.
$staticDate = "2024-01-01T00:00:00Z";

# Is the event ≥ 10 days before the anchor?
( ($staticDate | fromdateiso8601) - (.data.eventTime | fromdateiso8601) ) >= 10*86400

# Is the event ≥ 10 days after the anchor?
( (.data.eventTime | fromdateiso8601) - ($staticDate | fromdateiso8601) ) >= 10*86400
Filter on a specific date.
Day-of-month (returns string"05")(.data.eventTime | split("T")[0] | split("-")[2]) == "05"Month-of-year (returns string"11")("2021-11-05T03:56:24Z" | split("T")[0] | split("-")[1]) == "11" Birthday check (string comparison, no date helpers) $mmdd ⇢ constant holding today’s month-day in “MM-DD” form.Example: Check birthday using a simple string comparison. Convert both the stored birthday and today’s date to anMM-DDfragment and compare.(.data.birthDate | split("T")[0] | split("-") | .[1] + "-" + .[2]) == $mmddFilter on age (given birth date).
Exact calendar age arithmetic without dedicated date functions. Break the anchor date (today) and the date-of-birth into numeric arrays, subtract the years, then subtract one more if the birthday for the current year has not yet occurred. This returns the completed number of years.(ageYears(.data.birthDate; "2025-10-30") >= 18) // Exact calendar age Helper converts two “YYYY-MM-DD” strings (DOB and anchor date) to numbers and applies the human calendar rule. def ageYears($dob; $today): ($today | split("-") | map(tonumber)) as $t # [$CY,$CM,$CD] | ($dob | split("T")[0] | split("-") | map(tonumber)) as $b # [$BY,$BM,$BD] | ($t[0] - $b[0]) - ((($t[1] < $b[1]) or ($t[1] == $b[1] and $t[2] < $b[2])) | if . then 1 else 0 end);Handle time zone
The client is required to pass time zones in the UTC / GMT time zone as the
fromdateiso8601defaults to local time if no time zone is passed. Highlight potential issues with local time and emphasize passing standardized UTC / GMT time zones by client rather than handing them by server. The client should convert the date time to the UTC time zone if they're dealing in a different time zone. - JQ-based Lambda function definitions and their executions as part of a filter definition are not supported.
Use Case Overview
The use case in this section walks you through creating an event with custom headers, selecting the event and mapping the custom headers in a publishing integration, and adding different JSON-based filter conditions to the headers in several subscribing integrations. In this use case:
- Event MLFilterEvent is created with the
following event and custom header content:
Event Structure Custom Headers { "patientIdentifier" : "12345679", "illness" : "1", "name": "min", "age":30, "weight":100 }ptname ptage ptweight - Publishing integration MLFilterPub is
designed to publish the event MLFilterEvent. This
integration consists of the following connection and
actions:
- A REST Adapter trigger is configured with the
following JSON-formatted request
payload:
{ "patientIdentifier" : "12345679", "illness" : "1", "name" : "min", "age" : 30, "weight" : 100 } - A mapper is configured to map patient details elements in the source request payload to target patient details elements, target standard header elements, and target custom header elements.
- A log action is configured to log standard and custom header details in the activity stream.
- A REST Adapter trigger is configured with the
following JSON-formatted request
payload:
- The following subscribing integrations are designed
to subscribe to the MLFilterEvent event:
- Subscribing integration MLFilterSubNoFilter is designed without adding any filters.
- Subscribing integration
MLFilterNameSub is designed to be triggered
only if the following custom header filter
condition is satisfied.
{ "type": "jq_filter", "filter-def": ".ptname==\"John\"" } - Subscribing integration
MLFilterAgeSub is designed to be triggered
only if the following custom header filter
condition is satisfied.
{
    "type": "jq_filter",
    "filter-def": ".ptage|length!=0 and tonumber >= 18"
}
- The three subscription integrations are activated: MLFilterSubNoFilter, MLFilterNameSub, and MLFilterAgeSub.
- When publishing integration MLFilterPub is
activated, the request payload body values are specified,
and the integration is run, the following occurs:
- Subscribing integration MLFilterSubNoFilter is always triggered and consumes the event. Because no custom header filters are defined on this subscribing integration, there are no restrictions on it being triggered.
- Subscribing integration
MLFilterNameSub is only triggered if
"name": "John"is set in the request payload body.{ "patientIdentifier" : "123456790", "illness" : "1", "name": "John", "age":30, "weight":100 } - Subscribing integration
MLFilterAgeSub is only triggered if
ageis greater than or equal to18. For this example,"age": "30"is set in the request payload body.{ "patientIdentifier" : "123456790", "illness" : "1", "name": "John", "age":30, "weight":100 }
Let's now design and run the use case.
Create an Event with a Custom Header in a Project
- In the navigation pane, click Projects.
- Create a project.
- Scroll down to the Events section.
- Click Add if no events currently exist or + if events already exist.
- Enter a name (for this example, named MLFilterEvent) and description, and click Continue.
- Define the event structure, and click
Continue. For this event, the
following JSON-formatted event is
defined:
{ "patientIdentifier" : "12345679", "illness" : "1", "name": "min", "age":10, "weight":100 } - Click + to add a custom header to the event.
- Click Edit
 to change the icon to a Check
Mark
 . This action enables the row to be edited.
- Enter a name and optional description, then click
the Check Mark
 when complete. Note the following custom header
naming conventions:
- Can be lower-case letters (a-z) and numbers (0-9).
- Cannot be longer than 20 characters.
- Cannot be a duplicate of another custom header.
- Must not be a reserved cloud events attribute (for example, data). If you use a reserved name, it does not pass validation.
For this example, the following custom headers are added.

Create an Integration to Publish the Event in a Project
- Return to the project details page.
- Go to the Integrations section and add an integration.
- Select an application integration.
- Add a trigger connection. For this example, a REST Adapter connection is
defined to include the following JSON-formatted request
payload:
{ "patientIdentifier" : "12345679", "illness" : "1", "name" : "min", "age" : 30, "weight" : 100 } - Click + below the REST Adapter and drag a Publish event action into the integration.
- Select the event in which you defined the custom
headers (MLFilterEvent), and click
Finish.

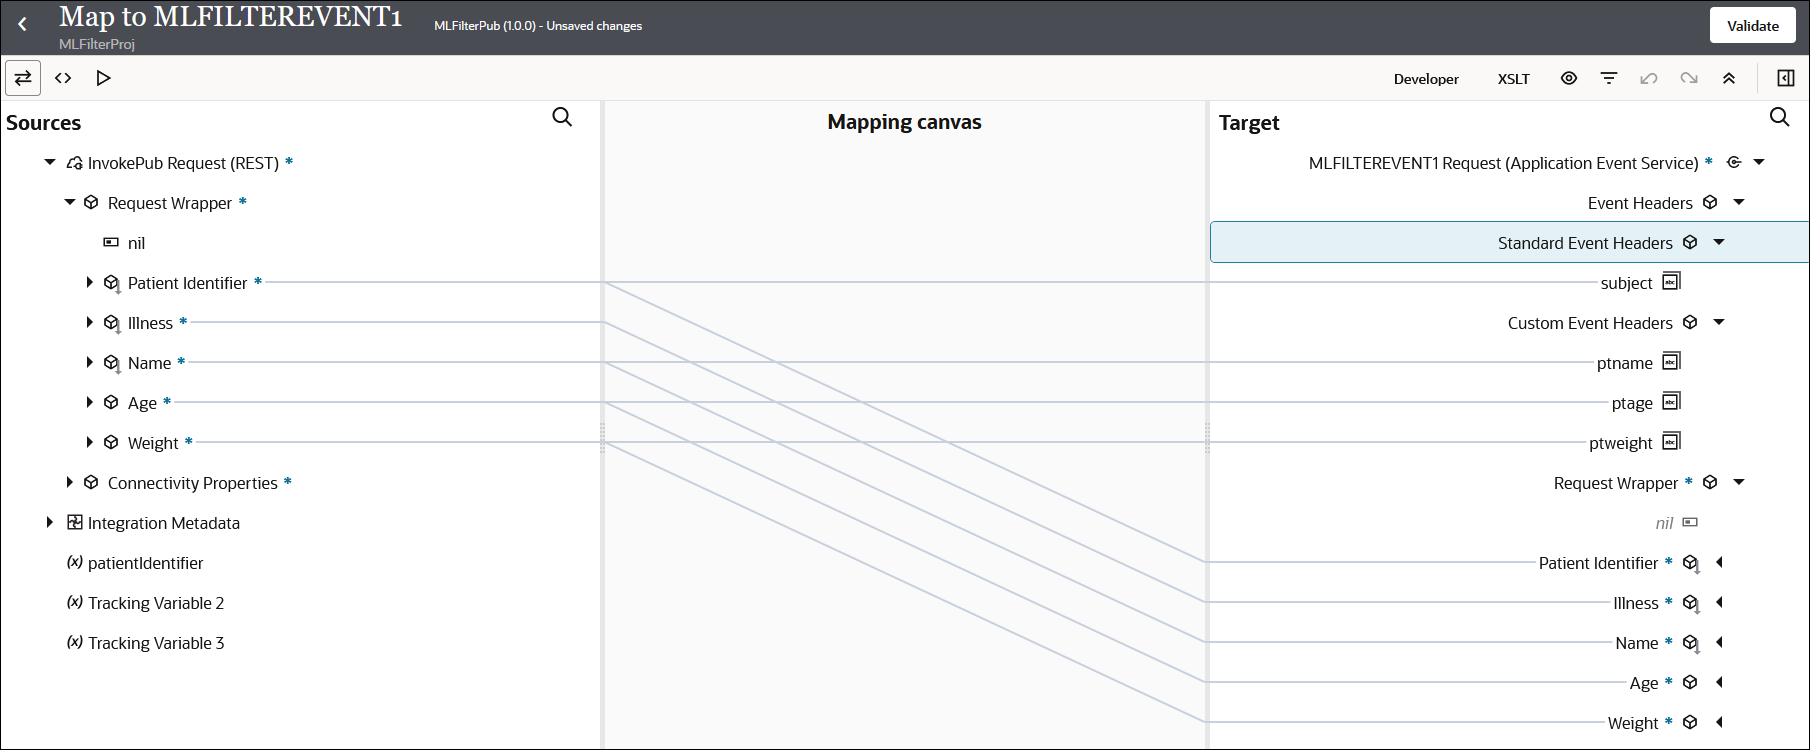
- Open the mapper for the Publish
event action and define the mappings:
- Map the Request
Wrapper source elements to the
Request Wrapper target
elements. For this example:
- Patient Identifier to Patient Identifier
- Illness to Illness
- Name to Name
- Age to Age
- Weight to Weight
- Expand the target Event Headers section to show Standard Event Headers and Custom Event Headers.
- Expand the target Standard Event Headers and map the source Patient Identifier to the target Subject.
- Expand the target Custom
Event Headers and map the following
request payload elements to the target custom
headers you created:
- Name to ptname
- Age to ptage
- Weight to ptweight
When complete, the mappings look as follows:
- Map the Request
Wrapper source elements to the
Request Wrapper target
elements. For this example:
- Validate the mapper and return to the integration canvas.
- Add a log action to log the standard and custom
headers.
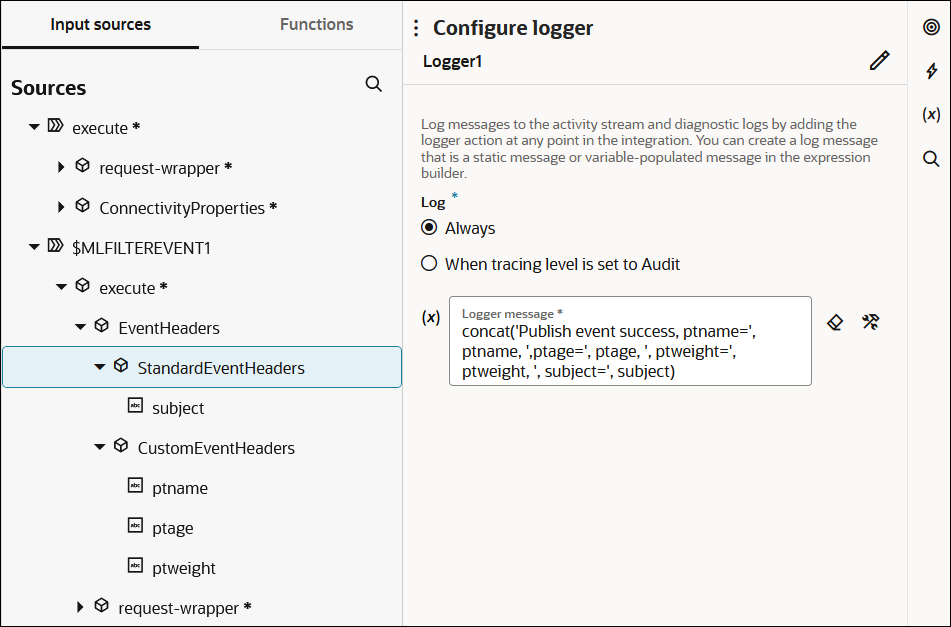
- Save the log action.
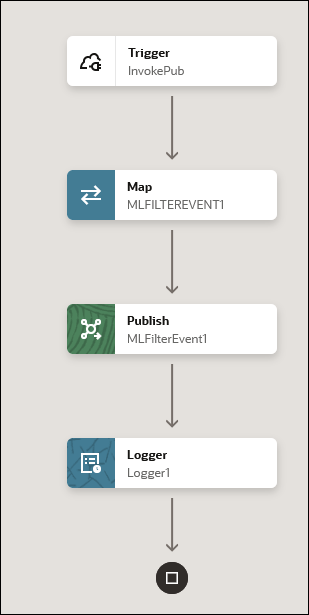
The completed integration looks as follows:
Let's now create integrations to subscribe to the event and demonstrate how filters work.
Create an Integration with No Filter to Subscribe to the Event in a Project
- Create an event integration (for this example, named MLFilterSubNoFilter).
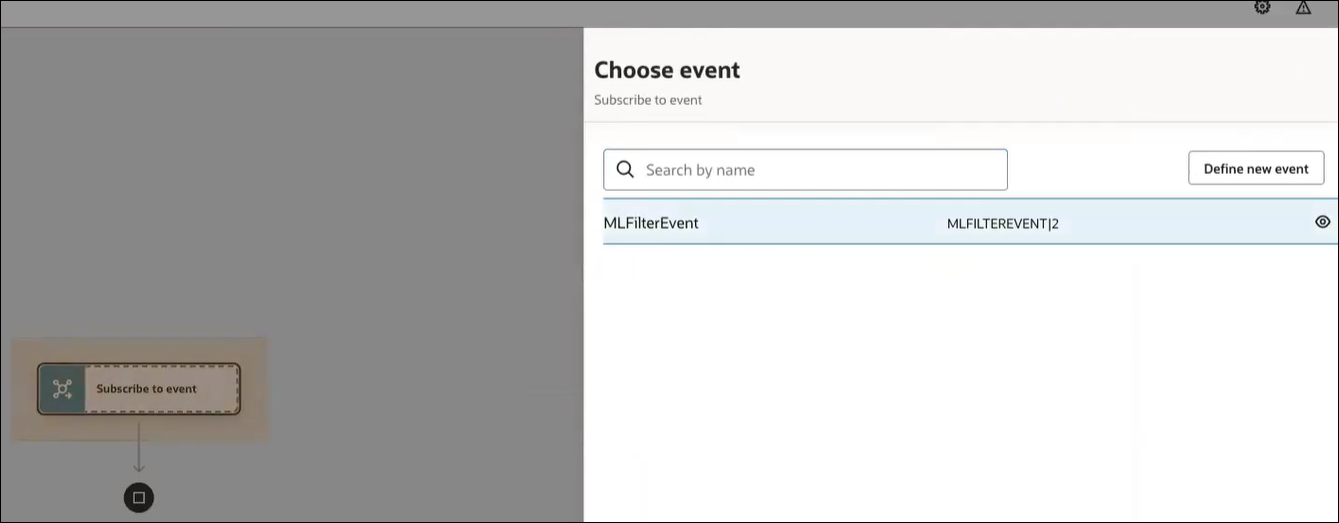
- Select the MLFilterEvent
event, and click Choose.
- Click Finish.
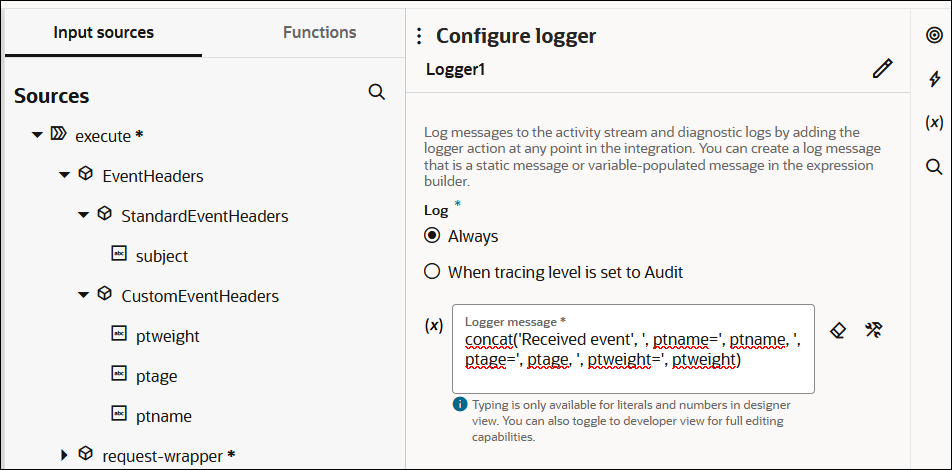
- Add a log action to log the standard and custom
header details.
The completed integration looks as follows:
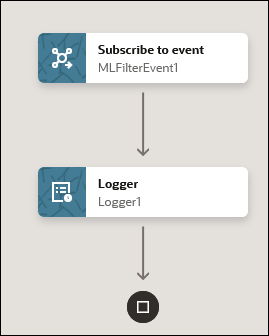
- Activate the integration.
Create an Integration with a Name Filter to Subscribe to the Event
- Create an event integration (for this example, named MLFilterNameSub).
- Select the MLFilterEvent
event, and click Choose.

- Click Add Filter.
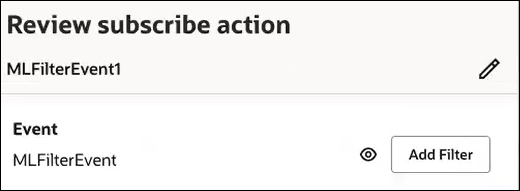
- Manually enter the filter condition in the code
editor. The only supported filter type is
jq_filter. For this example,ptname(patient name) is set toJohn. If this filter condition is satisfied at runtime, this integration is triggered.{ "type": "jq_filter", "filter-def": ".ptname==\"John\"" }
- Click Validate, then click Finish.
- Add a log action with a message.
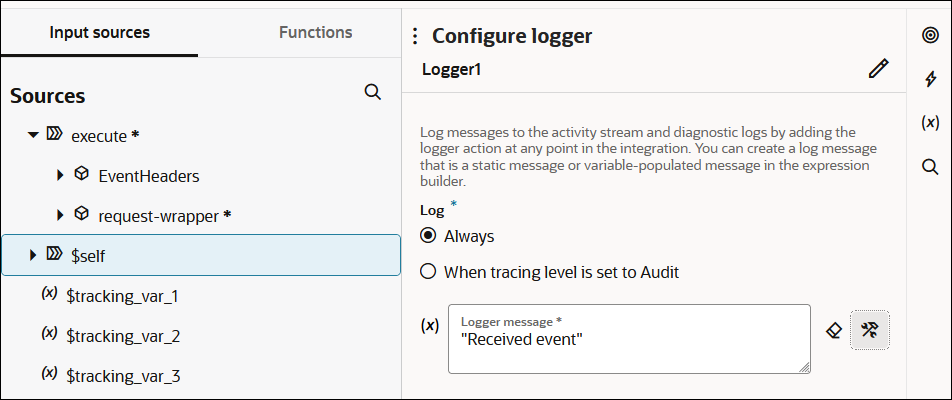
The completed integration looks as follows:

- Activate the integration.
Create an Integration with an Age Filter to Subscribe to the Event
- Create an event integration (for this example, named MLFilterAgeSub).
- Select the MLFilterEvent
event, and click Choose.

- Click Add Filter.

- Manually enter the filter in the code editor. For
this example,
ptage(patient age) is set to18or older. If this filter condition is satisfied at runtime, this integration is triggered.{ "type": "jq_filter", "filter-def": ".ptage|length!=0 and tonumber >= 18" }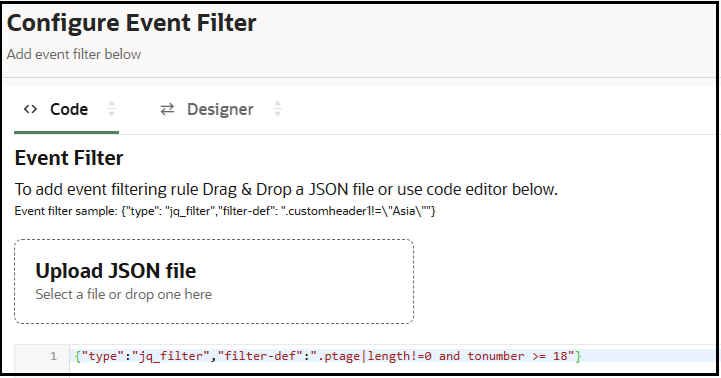
- Click Validate, then click Finish.
- Add a log action to log age details.
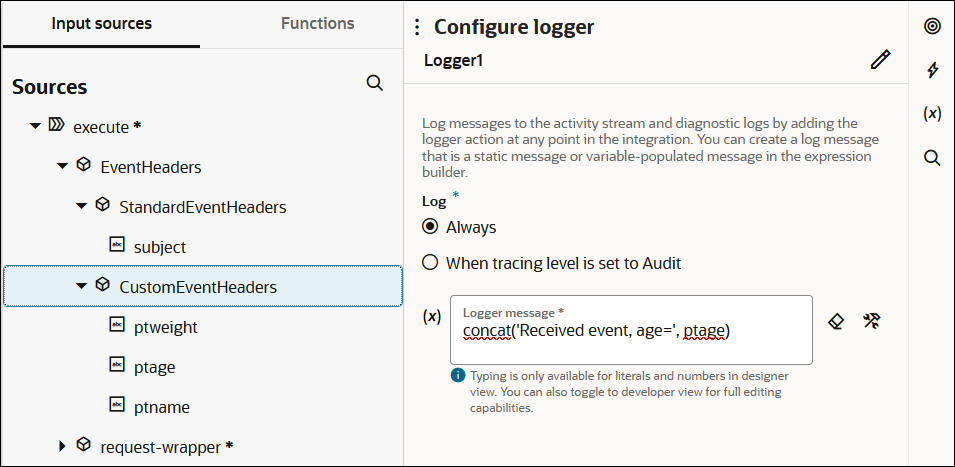
The completed integration looks as follows:

- Activate the integration.
Run the Publishing Integration and Track the Created Instances
- Activate the publishing integration.
- Hover over the publishing integration, then click
 and select Run.
Under Body, the request payload is displayed.
- Change
nametoJohnandageto10, then click Run.{ "patientIdentifier": "12345679", "name": "John", "weight": 100, "age": 10, "illness": "1" } - Expand key milestones in the activity stream for the
publishing integration instance to see details.
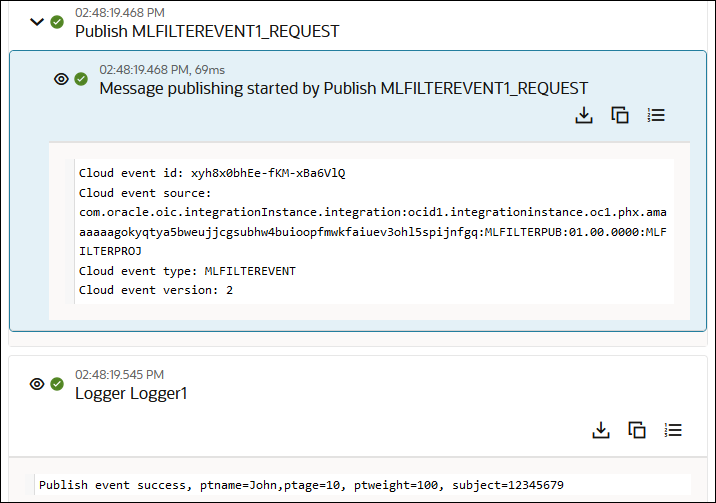
- Return to the project details page.
- Click Observe, then
Instances.
The following integration instances are displayed.
- MLFilterSubNoFilter: The subscribing integration with no filter. This integration is triggered because no filter is set.
- MLFilterNameSub: The
subscribing integration with the filter of
nameset toJohn. This integration was triggered because the filtering condition was satisfied. - MLFilterPub: The publishing integration for the event.

The subscribing integration MLFilterAgeSub was not triggered because the filtering condition was not satisfied.
- Open the activity stream and expand key milestones for
MLFilterSubNoFilter.
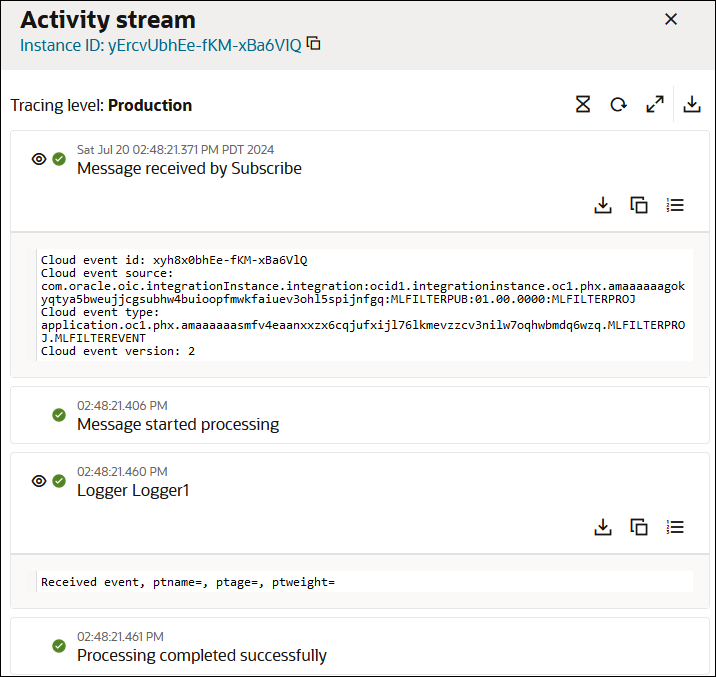
- Open the activity stream and expand key milestones for
MLFilterNameSub.
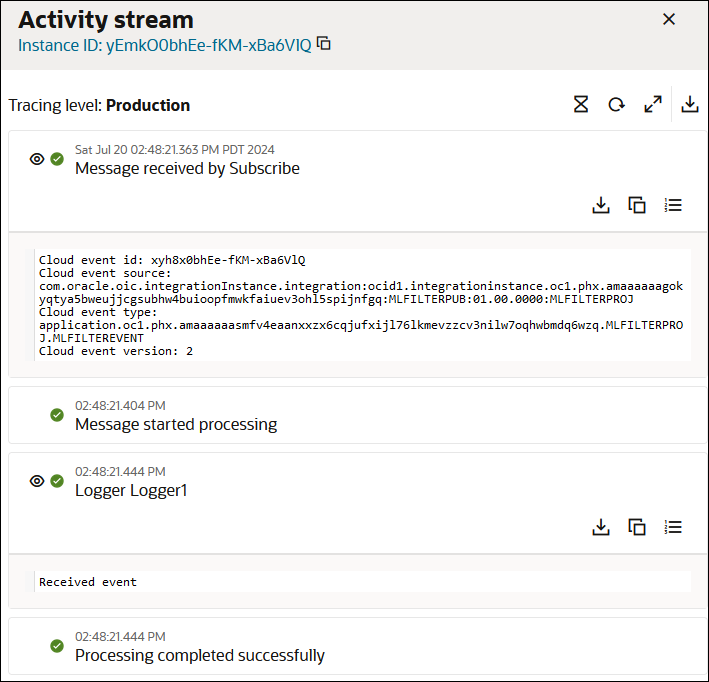
Run the Publishing Integration Again and Track the Created Instances
- Return to the project details page.
- Hover over the publishing integration, then click
 and select Run.
Under Body, the request payload is displayed:
- Leave
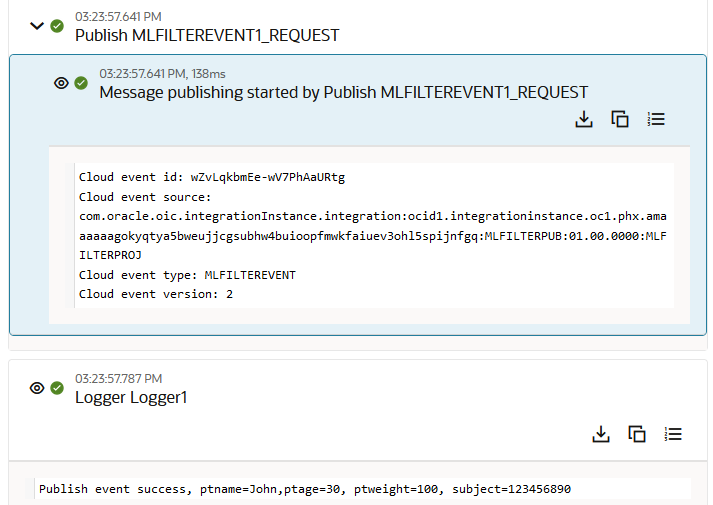
nameset toJohn, changeageto30, optionally change thepatientIdentifierto another value, and then click Run.{ "patientIdentifier": "123456890", "name": "John", "weight": 100, "age": 30, "illness": "1" } - Expand key milestones in the activity stream for
the publishing integration instance to see details.
- Return to the project details page.
- Click Observe, then
Instances.
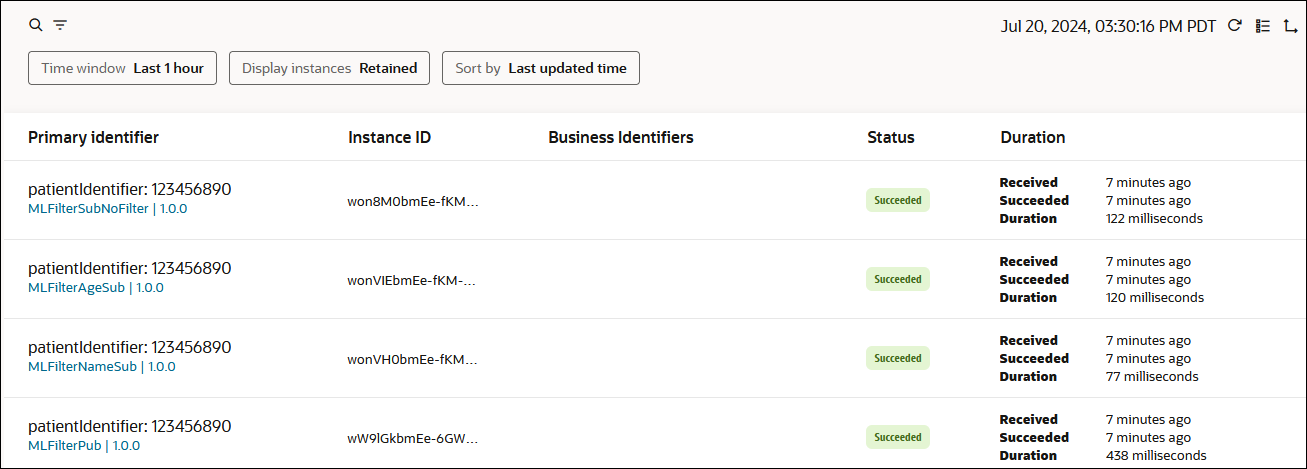
The following integration instances are displayed.
- MLFilterSubNoFilter: The subscribing integration with no filter. This integration is triggered because no filter is set.
- MLFilterAgeSub: The
subscribing integration with the filter of
ageset to30. This integration was triggered this time because the filtering condition was satisfied. - MLFilterNameSub: The
subscribing integration with the filter of
nameset toJohn. This integration was triggered again because the filtering condition was satisfied. - MLFilterPub: The publishing integration for the event.
- Open the activity stream and expand key milestones
for each instance. For this example,
MLFilterAgeSub is expanded.
