Collect RosettaNet Transport Details
You must collect RosettaNet transport details before you can define the RosettaNet transport in Oracle Integration.
Collect RosettaNet Transport Details
RosettaNet is an HTTP-based, point-to-point protocol typically used for real-time transactions. A bidirectional RosettaNet message exchange involves two RosettaNet endpoints, as shown below:
| For... | What You Need From Your Trading Partner | What You Need to Provide to Your Trading Partner |
|---|---|---|
| Basic connectivity |
|
|
| Two-way SSL for outbound connections (an optional feature) | If you select the Invoke role, you can create a certificate alias to use for establishing client identity during two-way SSL communication. | See Prerequisites for Creating a Connection in Using the RosettaNet Adapter with Oracle Integration 3. |
| Signed or encrypted RosettaNet messages (an optional feature) |
|
|
Signing and encryption are optional features in RosettaNet. You can start with only the basic connectivity first and add signing/encryption later. Signing/encryption provide nonrepudiation, message integrity, and security features and are recommended for production environments. However, there is a bit more complexity in setting those up.
| Message Configuration | Inbound Message | Outbound Message |
|---|---|---|
| Signed RosettaNet message | Partner's public key for signing is used to verify a signed message. | Your company's private key for signing is used to digitally sign the message. |
| Encrypted RosettaNet message | Your company's private key for encryption is used to decrypt the message. | Partner's public key for encryption is used to encrypt the message. |
| Step | Description |
|---|---|
| 1 | Upload each of the partner's certificates. Upload
SSL certificates as X.509 Trust, whereas upload signing and
encryption as X.509 Identity. For identity certificates, you
decide and enter a unique alias. Note the aliases.
In the navigation pane, click Settings, then Certificates. See Certificates. |
| 2 | If signing/encryption is a requirement, acquire
or generate a key-pair for signing and encryption (or two
separate key-pairs, if you want to use separate keys for signing
and encryption).
Upload the private key as X.509 Identity and note the alias and password you enter. Share the public key with your trading partner. However, never share the private key. In the navigation pane, click Settings, then Certificates. See Certificates. |
| 3 | Create a RosettaNet connection with the
Trigger or
Invokerole. In the Connections page,
enter:
If signing/encryption are a requirement, configure the RosettaNet connection further. If both your partner and your company use one certificate for signing and encryption, select RosettaNet Basic Policy. If either of you use different certificates, select RosettaNet Advanced Policy.
|
| 4 | Test the RosettaNet Adapter connection, to make sure it succeeds. If it fails, review the errors, verify that the RosettaNet URL entered is correct, and verify that the certificate aliases are correct. Save the RosettaNet Adapter connection. |
| 5 | Create a RosettaNet transport, selecting the RosettaNet connection created in step 3. Complete the configuration. See Define a RosettaNet Transport. |
| 6 | Deploy the RosettaNet transport. After the state changes to deployed, the transport is ready for use. |
| Step | Description |
|---|---|
| 1 | Same as Step 1 in the previous table. Skip this step for now, but you can perform it when the information becomes available from the trading partner |
| 2 | Same as Step 2 in the previous table. |
| 3 | Same as Step 3 in the previous table, but given that the partner's RosettaNet URL is not yet available, enter a temporary placeholder URL in the RosettaNet service URL field. This can be the URL of your Oracle Integration instance, copy and pasted from the browser URL address or any other valid URL. This placeholder is only needed to pass the connection test (which fails if the URL is invalid). Outbound RosettaNet messages do not work with this placeholder, but inbound messages can be received (since the RosettaNet service URL is not used when receiving inbound messages). |
| 4 | Same as Step 4 in the previous table. |
| 5 | Same as Step 5 in the previous table. |
| 6 | Same as Step 6 in the previous table. |
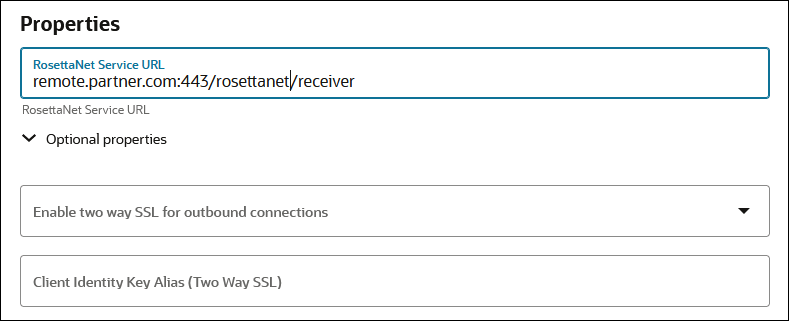
- Connection properties:

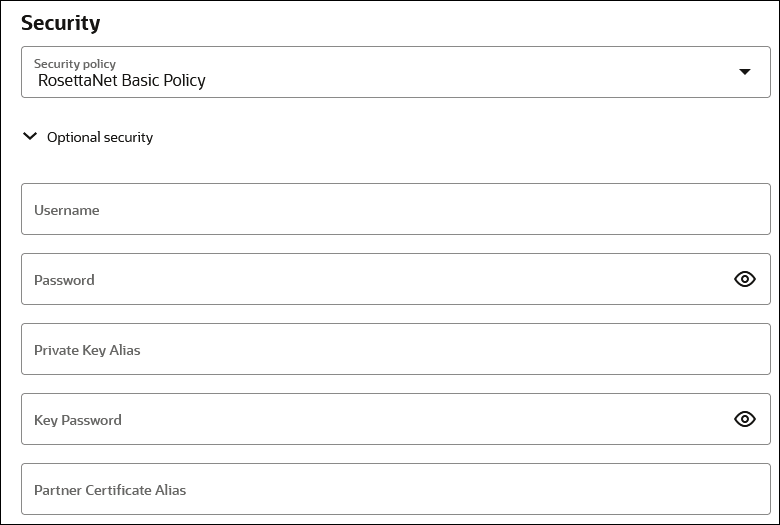
- Connection security:

Credentials
To receive messages over RosettaNet from an external trading partner, HTTP basic authentication is enforced. Your trading partner is required to send the Authorization HTTP header with username/password credentials you provide them in a RosettaNet message.
For internal testing you may use the same credentials that you use to log in to Oracle Integration to send test RosettaNet messages. However, it is not safe to share these credentials with an external trading partner because they can also log in to Oracle Integration with these credentials.
Instead, create a new user account in the Oracle Integration Identity Management application. Grant the Service Invoker role to this user account. This account is enough to send messages, but does not grant permissions to access any user interface pages in Oracle Integration. Share the username and password of this new user with the trading partner.
Certificates
If you want to enable encryption or signing for the RosettaNet communication, you must create a key pair and certificate following your company's process and generate a CA-signed certificate that you use for RosettaNet decryption and signing.
keytool:
- Generate public/private key pair using
keytool.- Specify any alias and a keystore file name, replacing
b2b-private-key-aliasandb2b.jkswith your values. - Enter a keystore password when prompted and note it.
- Enter your organization's information when prompted.
This generates a key pair (a public key and associated private key) and self-signed digital certificate in a keystore. If the keystore does not exist, it is created.keytool -genkey -keyalg RSA -alias b2b-private-key-alias -validity 1095 -keystore b2b.jks - Specify any alias and a keystore file name, replacing
- Upload the JKS into Oracle Integration as the X.509 type (SSL transport) and Identity category using the same alias and password as entered above (this is part of Step 3 from the table of steps above).
- Export the public key from this keystore as follows.
- Replace
b2b.jks,b2b-private-key-alias, andpublic.cerwith your keystore file name, alias that was used previously, and a file name to store the public certificate.keytool -export -keystore <b2b.jks> -alias <b2b-private-key-alias> -file <public.cer>
- Replace
- Convert it to any other industry-standard format using
keytoolas per your preference, if necessary. Share only the public certificatepublic.cerwith your trading partner (never share the private key with anyone). Your trading partner uses the public key certificate for signature verification and encryption.
RosettaNet URL for Receiving
You need the RosettaNet URL for your RosettaNet endpoint to share with your trading partner. Once the transport is deployed (indicating it is ready to receive and/or send messages), your RosettaNet endpoint URL is displayed in the RosettaNet endpoint URL for receiving transport field. Copy this RosettaNet URL to share with your trading partner. This RosettaNet URL is not common across all trading partners; it is specific to the current trading partner that you are viewing or editing. Only that specific trading partner may send RosettaNet messages to this URL.
The RosettaNet URL is the URL to invoke the RosettaNet integration for receiving messages for this transport. While you can also get the same from the Integrations page, this provides an easier way to access it.