Tutorial: Read Files and Write the Files to File Server
Learn how to use the File server action to read one or more files that are on an FTP server and then write the files to File Server in Oracle Integration.
Audience
This tutorial is most helpful if your organization already uses File Server or is considering using it. That's because the tutorial requires you to enable and set up File Server.
This tutorial is also helpful if you want hands-on practice using the File server action. If you just want step-by-step instructions for using the File server action, see Interact with Files in File Server in Using Integrations in Oracle Integration 3.
In This Tutorial
- Prerequisites
- Step 1. Create a schedule integration and define its trigger
- Step 2. Connect to an FTP server and list the files in a directory
- Step 3. Pass the folder from the integration's schedule to its invoke action
- Step 4. Loop through the files and process them one at a time
- Step 5. Write the file to File Server
- Step 6. Understand what you've done
- Learn More
Prerequisites
-
Set up an invoke FTP connection to your FTP server, and name it
Supplier_FTP. -
Enable File Server and complete all of the setup steps.
See Administer File Server in Using File Server in Oracle Integration 3.
-
Place a file on your organization's FTP server so that you can move the file to File Server. Note the file name and its directory.
Step 1. Create a schedule integration and define its trigger
Start by creating a schedule integration. You pass in two parameters for the integration's trigger.
-
In the navigation pane, click Design, then Integrations.
-
Select Create.
-
Select Schedule, and fill in the following field.
Field Value to use Name Poll_For_New_Files -
Select Create.
The integration canvas appears, and a menu of options appears.
-
Select anywhere on the canvas to close the menu.
-
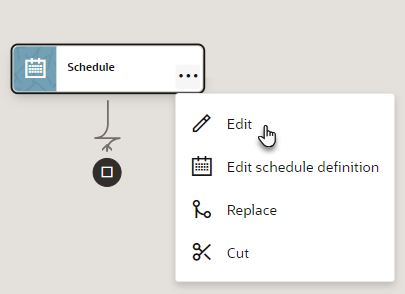
On the canvas, point to the Schedule action, select ..., and select Edit.

-
Define the parameters for the integration's trigger:
These parameters let you pass in the file pattern and path of the file you're picking up from your FTP server.
-
Select +, and fill in the following fields.
Field Value to use Parameter name file_patternDefault value "*.csv" -
Select +, and fill in the following fields.
Field Value to use Parameter name directoryDefault value "/" -
Select Save.
-
You've created a schedule integration that passes in two parameters.
Step 2. Connect to an FTP server and list the files in a directory
Now that you've created an integration, it's time to add an action to it. The invoke action calls your FTP server and lists all the files in a specific directory. You passed the directory into the integration's schedule when you defined its trigger.
-
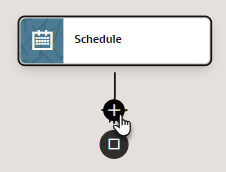
Point to the line that comes out of the Schedule box until a + appears, and select the +.

-
In the search field, type Supplier, and select the Supplier_FTP connection that you created as a prerequisite task.
An Invoke action appears on the canvas, and the Configure Basic Info panel appears.
-
Fill in the following fields.
Field Value to use What do you want to call the endpoint? listFilesB2B Trading Partner Mode Do not select this checkbox. -
Select Continue.
-
From the Select operation drop-down list, select List Files.
-
Fill in the following fields.
Field Value to use Input directory /This value is a placeholder. Later on, you'll map the scheduled parameter to it.
File name pattern *.csvMax files Leave the default value. Minimum age Leave the default value. List File Recursively Deselect this option. Ignore File Permissions Leave this option deselected. -
Select Continue.
-
Review the settings, and select Finish.
You finished creating the call to your remote FTP server. The call lists the files in a specific directory.
A Map action appears on the canvas before the Invoke action.

Tip:
To view the actions horizontally on the canvas, select HorizontalStep 3. Pass the folder from the integration's schedule to its invoke action
You've defined the invoke action, and now it's time to dynamically pass the directory into it using the Map action.
-
On the canvas, point to the Map action, select ..., and select Edit.
The mapper appears.
-
In the Sources list on the left, observe the two parameters that you configured: directory and file_pattern.
-
In the Target list on the right, expand List Request, then expand FTP List Header.
-
In the Sources list, select directory, and drag it to the Directory entry in the Target list.
-
In the Sources list, select file_pattern, and drag it to the File Name Pattern entry in the Target list.

-
Select Validate, and then select < to return to the canvas.
-
Save your changes.
Now you are passing the directory into the invoke action dynamically using the trigger of the integration.
Step 4. Loop through the files and process them one at a time
The integration must loop through all the files that the invoke action returns. The integration processes the files one at a time using a for each action.
-
Add the for each action to the integration:
-
Point to the arrow that comes out of the Invoke box, and select +.
-
In the pop-up, select the Actions tab.
-
Scroll to and select For each.
A For each action appears on the canvas, and the Configure for each panel appears.
-
In the panel, select Edit
 , and fill in the following field.
Field Value to use Name ForEachFileFound -
Select
 .
.
-
In the Input sources panel, expand $listFiles, then ListFileResponse, then ListResponse, then FileList, and then File.
File lists the properties of each file.
-
Drag the File entry to the Repeating element field.
File is the element that the for each loop repeats on.
-
In Current element name, enter
currentFileDetails.This is the name that the integration uses to refer to the File element in the loop.
-
Select anywhere in the canvas to close the panel.
-
-
Specify how the for each loop processes each file.
The first action downloads a file.
-
On the canvas, in the box for the For each action, select +.
-
In the search field, type Supplier, and select the Supplier_FTP connection that you created as a prerequisite task.
This connection allows you to make a connection to your FTP server.
-
Fill in the following fields.
Field Value to use What do you want to call the endpoint? downloadFileB2B Trading Partner Mode Leave this option deselected. -
Select Continue.
-
Fill in the following fields.
Field Value to use Select operation Select Download File. Select a Transfer Mode Leave Binary selected. Input directory Leave this field blank for now. Later on, you'll dynamically populate this field using the mapper. File name Leave this field blank for now. Later on, you'll dynamically populate this field using the mapper. Download directory /stage/filesThis is the location in Oracle Integration where you'll temporarily store the downloaded file.
Checkboxes on the page Leave all the checkboxes deselected.
-
Select Continue.
-
Review the settings, and select Finish.
You return to the canvas. The Invoke action that you configured appears within the For each action, and a Map action appears before it. The invoke action downloads a file and stores it in a temporary location.

-
-
Pass the relevant data to the Invoke action.
This action ensures that within the loop, for each file that the integration finds, the integration downloads the file to the local staging area.
-
Within the For each action, point to the Map action, select ..., and select Edit.
The mapper opens.
-
In the Sources list on the left, expand CurrentFileDetails, then expand File.
The containers hold information about the current file that has been returned from when you collected a list of files in a directory.
-
In the Target list on the right, expand Download Request.
This container holds information about the action you defined for downloading the file.
-
In the Sources list, select Directory, and drag it to the Directory entry in the Target list.
-
In the Sources list, select Filename, and drag it to the Filename entry in the Target list.

-
Select Validate, and then select < to return to the canvas.
-
Save your changes.
-
Step 5. Write the file to File Server
The for each loop processes the files one at a time. After processing a file, the integration writes the file to File Server.
-
In the vertical toolbar to the right of the canvas, select
 , and find the File server entry.
-
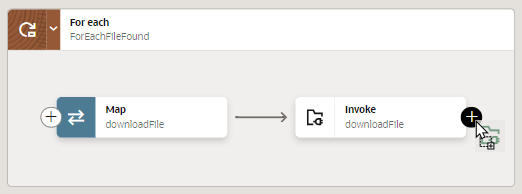
Drag the File server entry to the + that appears on the Invoke action that is within the For each action.
This panel offers an alternate way to add actions to an integration.

A File server action appears in the For each action, and the Configure FS Native Action panel appears.
-
Fill in the following fields.
Field Value to use What do you want to call your endpoint? writeFileToFileServerSelect resource Select File. Select operation Select Write File. Specify an Output Directory /inbound/supplier/invoicesThis is the directory that you want to write the file to in File Server.
File Name file.txtLater on, you'll overwrite this value in the mapper. You'll use the file name that you got when you listed the file names.
-
Select Continue.
-
Review the settings, and select Finish.
You return to the canvas. The File server action that you configured appears within the For each action, and a Map action appears before it. The File server action writes a file to File Server.

Now you need to pass in the name of the file to be written, as well as the file itself, to the File server action.
-
Pass the relevant data to the File server action.
-
Point to the Map action that is before the File server action, select ..., and select Edit.
The mapper opens.
-
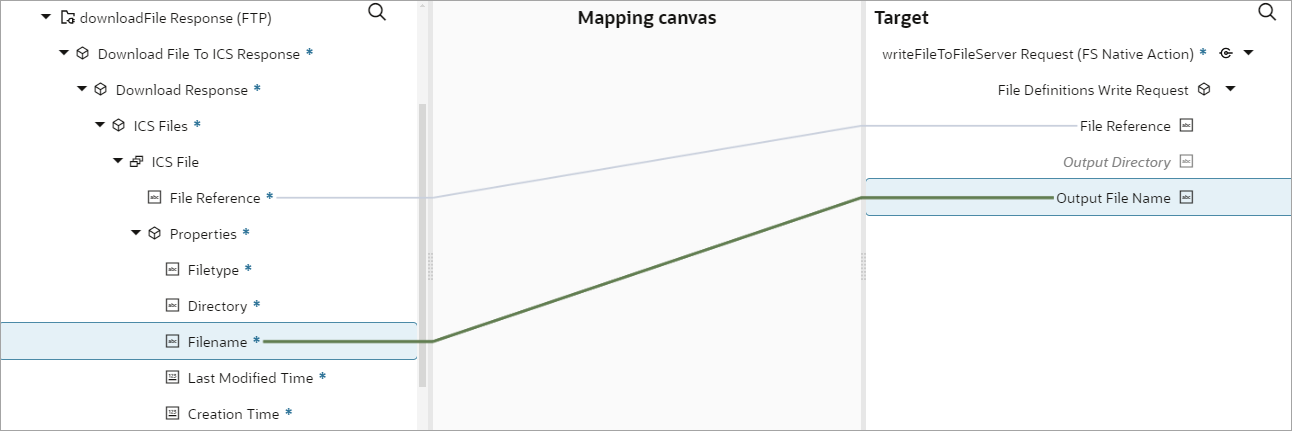
In the Source list on the left, expand downloadFile Response (FTP), then Download File to ICS Response, then Download Response, then ICS Files, then ICS File.
The elements are the output of the operation to download the file from the FTP server.
-
In the Target list on the right, expand File Definitions Write Request.
Its child elements are the properties that the file operation accepts.
-
In the Sources list, select File Reference, and drag it to the File Reference entry in the Target list.
You are passing the contents of the file that you downloaded to the staging area to the File server action in the integration.
-
In the Sources list, below File Reference, expand Properties.
-
In the Sources list, select Filename, and drag it to the Output File Name entry in the Target list.
You are passing the name of the file to the File server action.

-
Select Validate, then select < to return to the canvas.
-
The integration retrieves a list of files from an FTP server and writes the files to File Server in Oracle Integration using the File server action.
Step 6. Understand what you've done
Let's review a few key actions in the integration so that you understand the integration that you just designed.
| Action | Goal |
|---|---|
| Schedule action | You created a schedule integration, which runs on demand or by the clock. |
| Invoke action | The integration's first action is to make a call to your FTP server to list the files in a directory. You specify the directory using the Map action that is before the Invoke action. |
| For each action | The integration loops through the files that are in the list of
files that you just got. For each file in the list, the integration
performs several actions.
|
Learn More
To review all of your options for the File server action, including encrypting and decrypting files, see Interact with Files in File Server in Using Integrations in Oracle Integration 3.