Dispatch Center Dashboard: Built with Latest UX Technology
The Dispatch Center is a one-stop dashboard and workbench for dispatchers. It assists with planning, scheduling, committing, monitoring, and adjusting field service activities and schedules.
This dashboard has been rebuilt with a more modern, interactive interface using the Oracle JavaScript Extension Toolkit (OJET) technology. It replaces the existing dashboard, which was built using the Oracle Application Development Framework (ADF) technology.
The following sections are covered in the document:
- Schedule and Dispatch (Task Details)
- Planboard
- Gantt
- Map
- Setup
- Analytics
- Schedule Advise
1. Schedule and Dispatch (Task Details)
You can open the Dispatch Center in OJET by clicking the Schedule and Dispatch link from the Field Service Dispatcher menu.

Schedule and Dispatch Navigation
After clicking the Schedule and Dispatch link, the Schedule and Dispatch UI appears. It has two regions, the Task List region and the Task Details region. The Task Details region shows the details for the task that you select from the task list.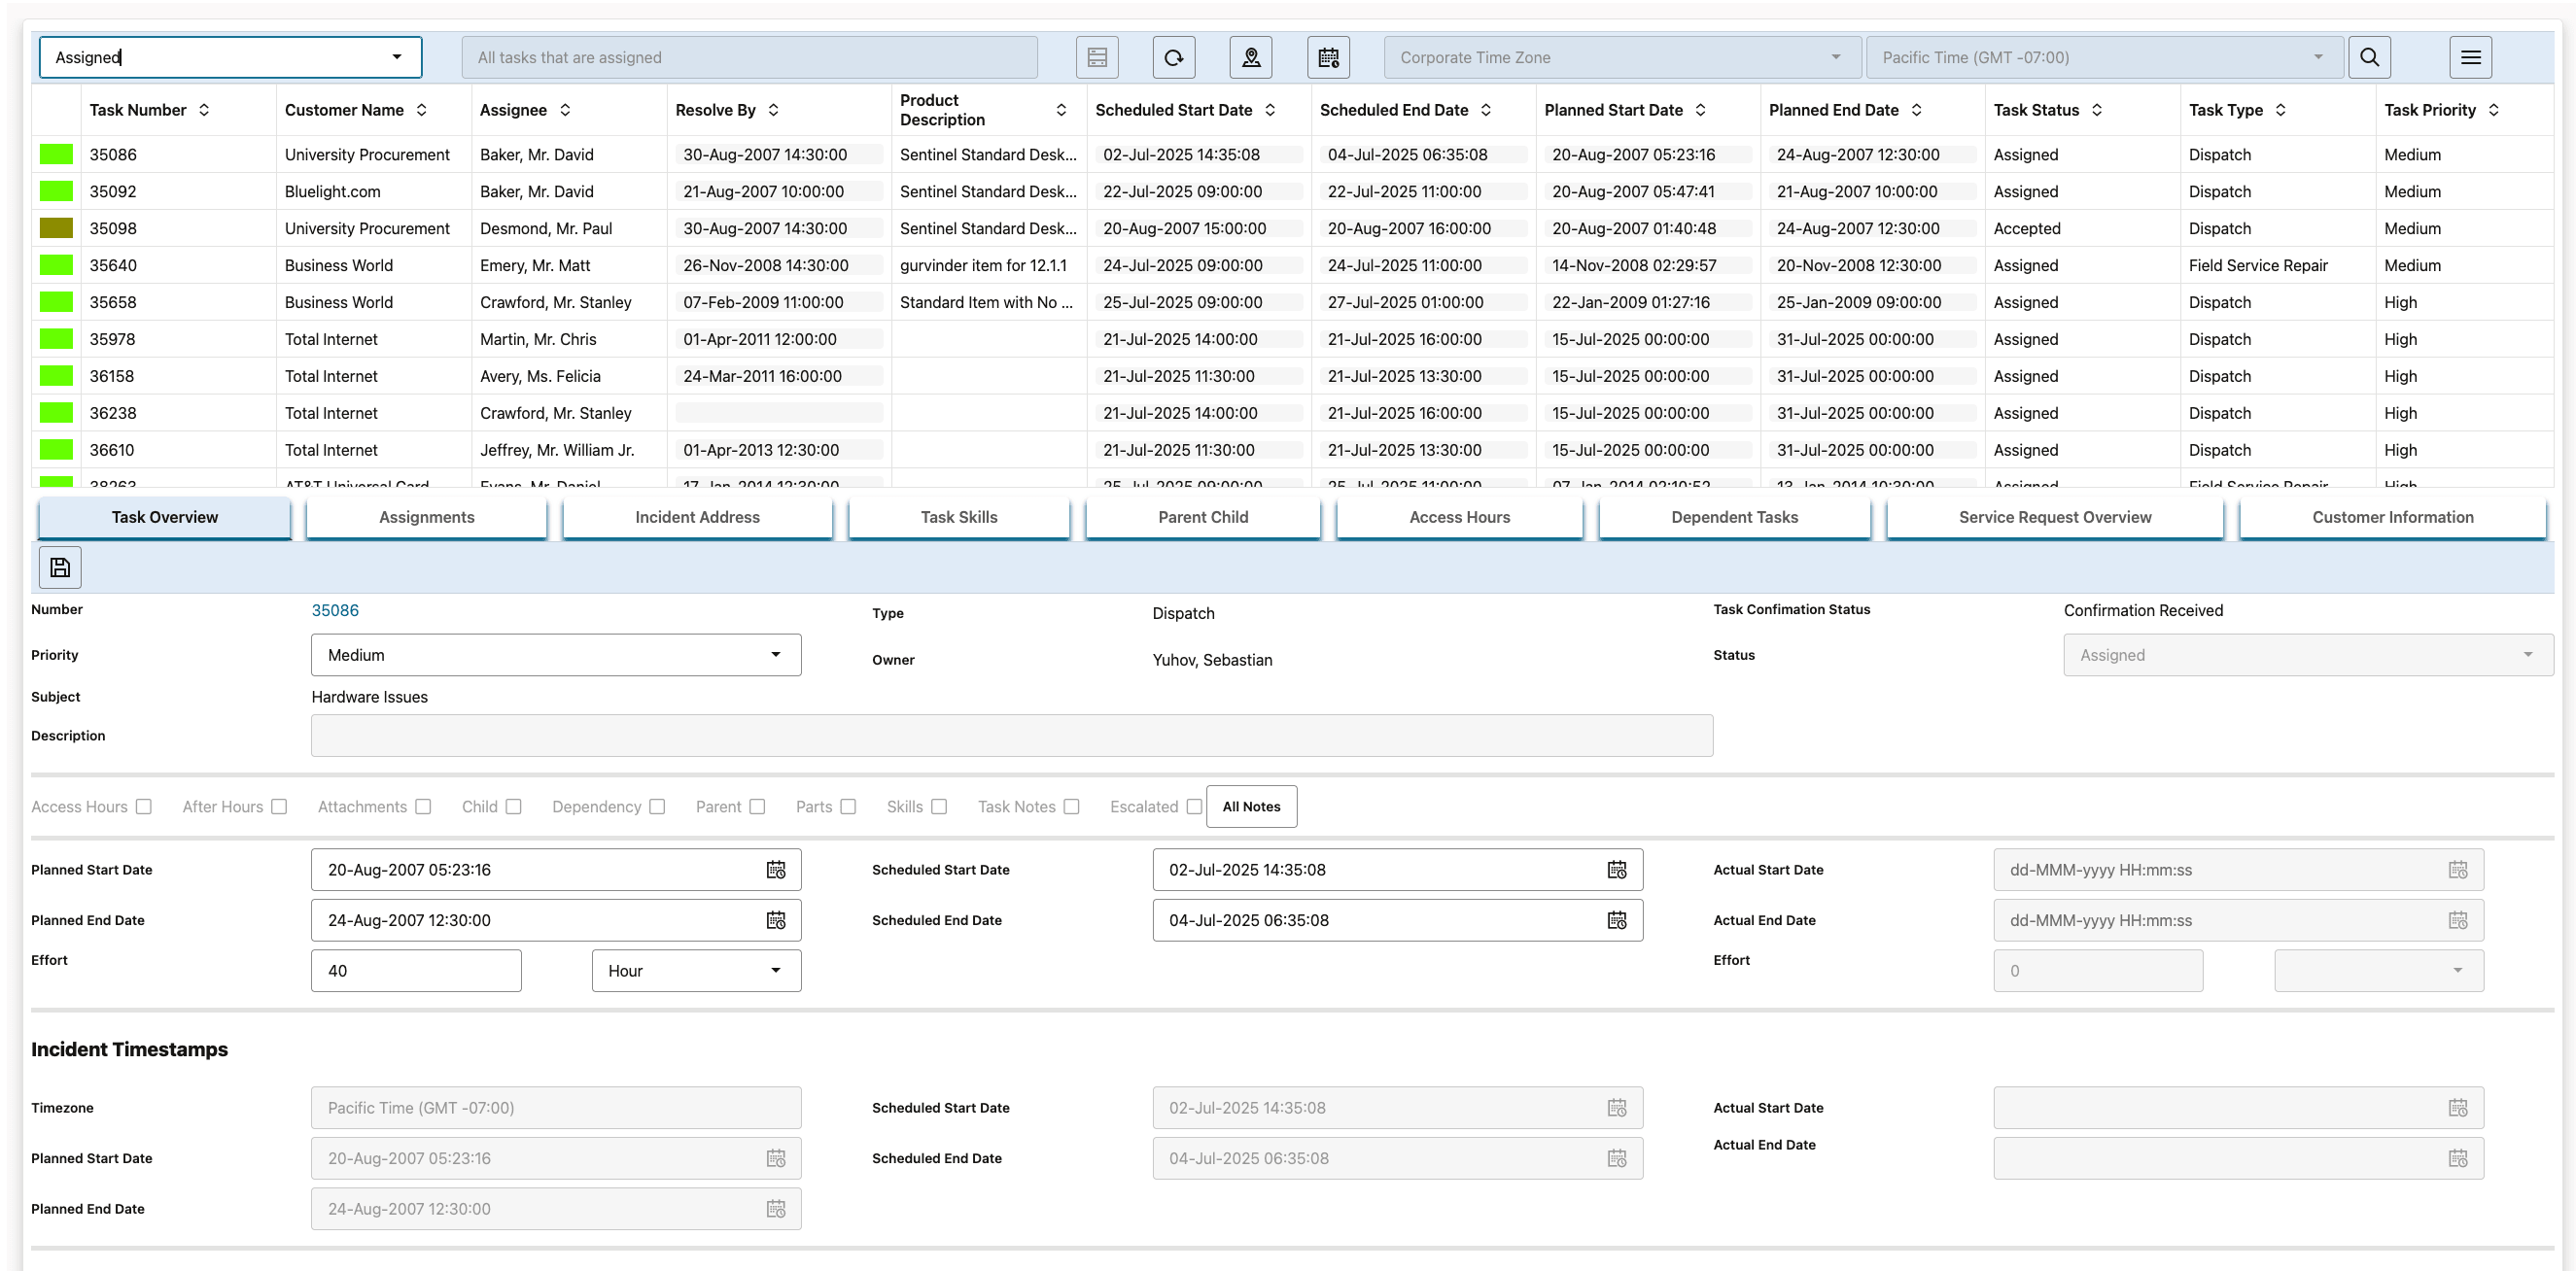
Schedule and Dispatch UI
The following screenshot shows the Task List region filtered by the All Open value that's selected from the drop-down list.
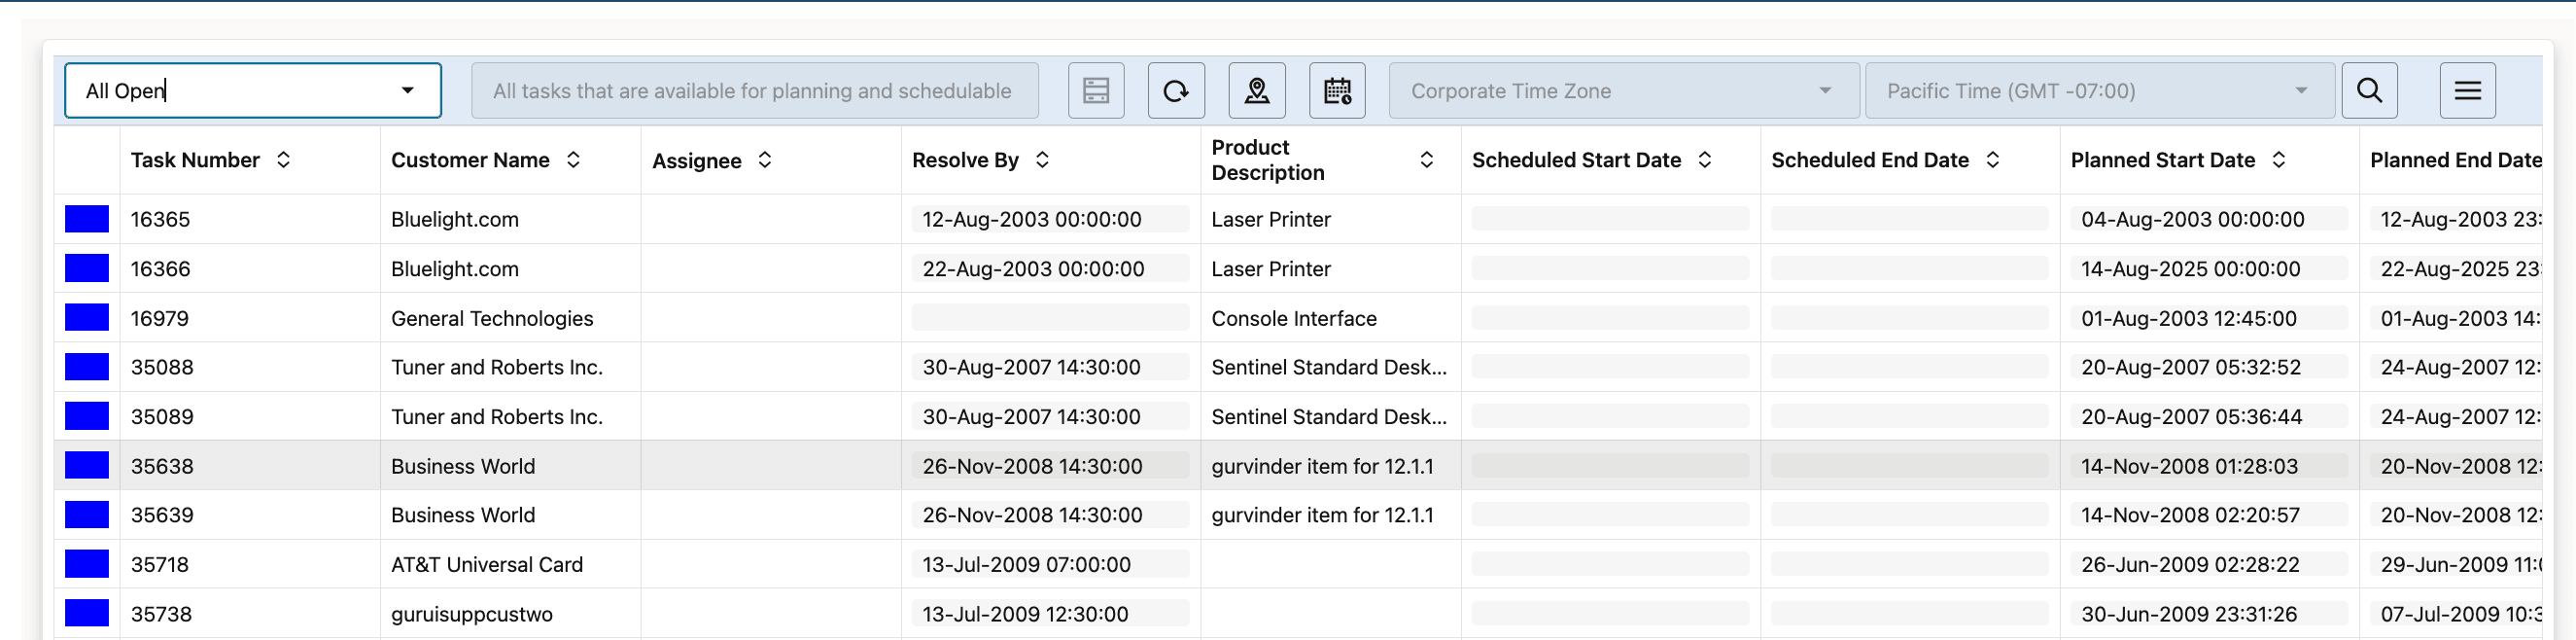
Task List Region
The following screenshot shows the Task List query region. This is the region, where you can select queries to filter your task list.

Task List Query Region
The following screenshot shows the Task List action bar. You can use the icons to
- Save the task query.
- Refresh the task list.
- Open the map for the task you've selected in the task list.
- Open the Schedule Advise UI for the task you've selected.
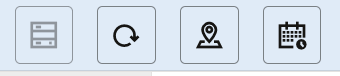
Task List Action Bar
The following screenshot shows the Schedule and Dispatch UI Time Zone information.

Schedule and Dispatch Time Zone Information
The following screenshot shows the Search Task button, which opens the Search UI.

Search Task Button
The following screenshot shows the Search UI, which allows you to search for tasks with different attributes.
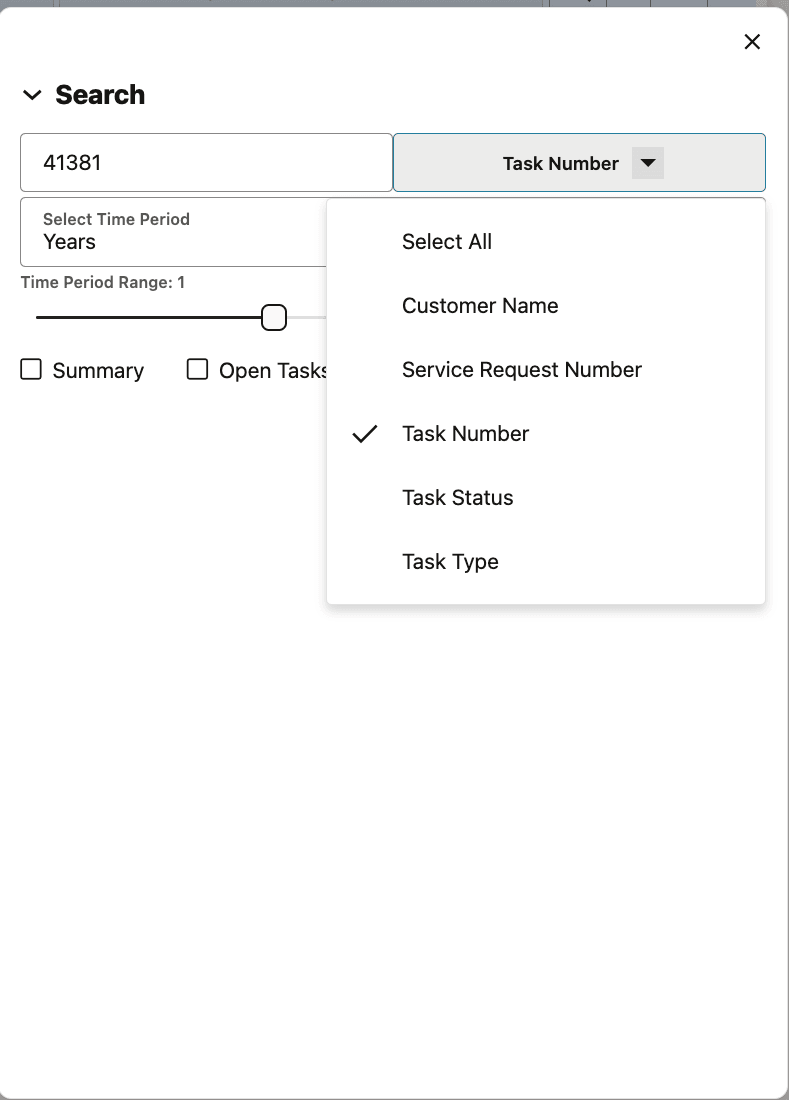
Search Region
The following screenshot shows the Search UI with the Summary option selected. This provides a task count.
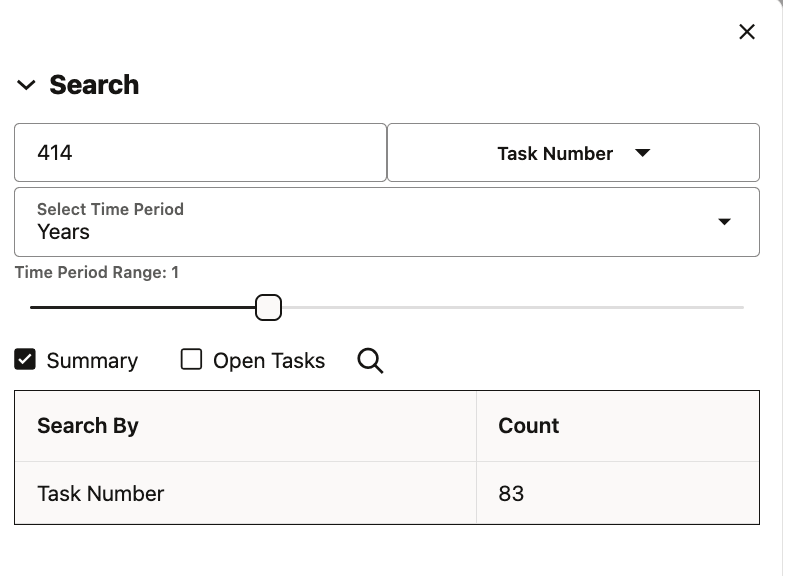
Search Region Summary Option
The following screenshot shows the navigation menu bar, which opens different UIs for the task that you select in the Task List region.

Task List Navigation Options
The following screenshot shows the tabs in the Task Details region.
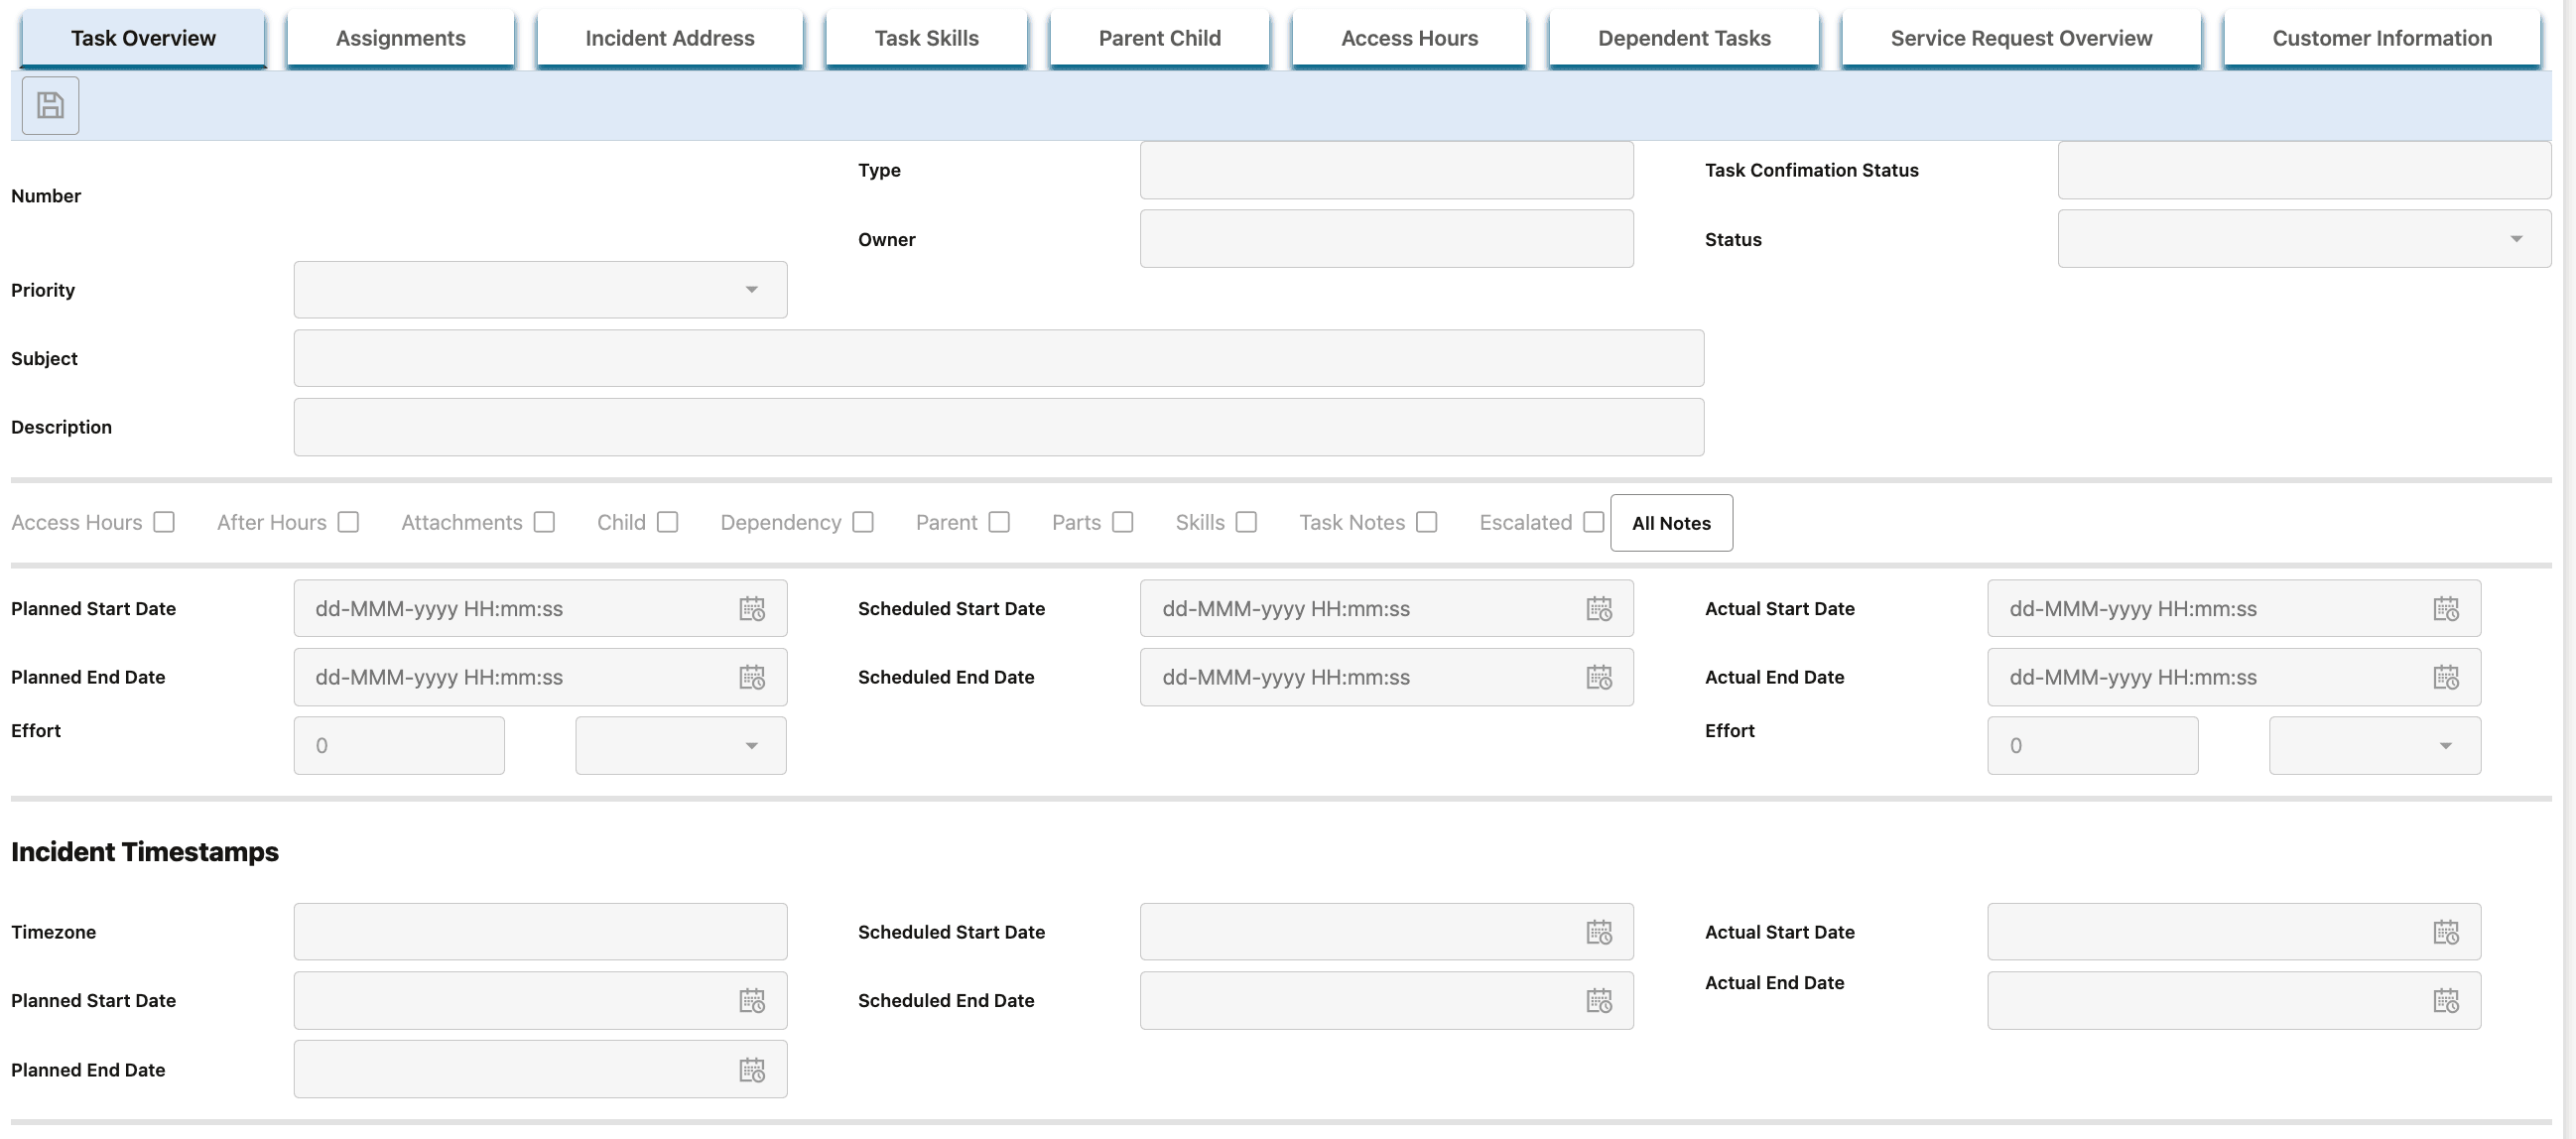
Task Details Overview Tab
The following screenshot shows the tab that lists the resources assigned to the task.

Task Details Assignment Tab
The following screenshot shows the tab that's associated with incident address for the task that you select from the Task List region.

Task Details Incident Tab
The following screenshot shows the tab that's associated with incident address for the task that you select from the Task List region.

Task Details Task Skills Tab
The following screenshot shows the tab that's associated with parent and child for the task that you select from the Task List region.

Task Details Parent Child Tab
The following screenshot shows the tab that's associated with access hours and after hours for the task that you select from the Task List region.

Task Details Access Hours
The following screenshot shows the tab that's associated with dependent tasks for the task that you select from the Task List region.

Task Details Dependent Task Tab
The following screenshot shows the tab that's associated with service request information for the task that you select from the Task List region.
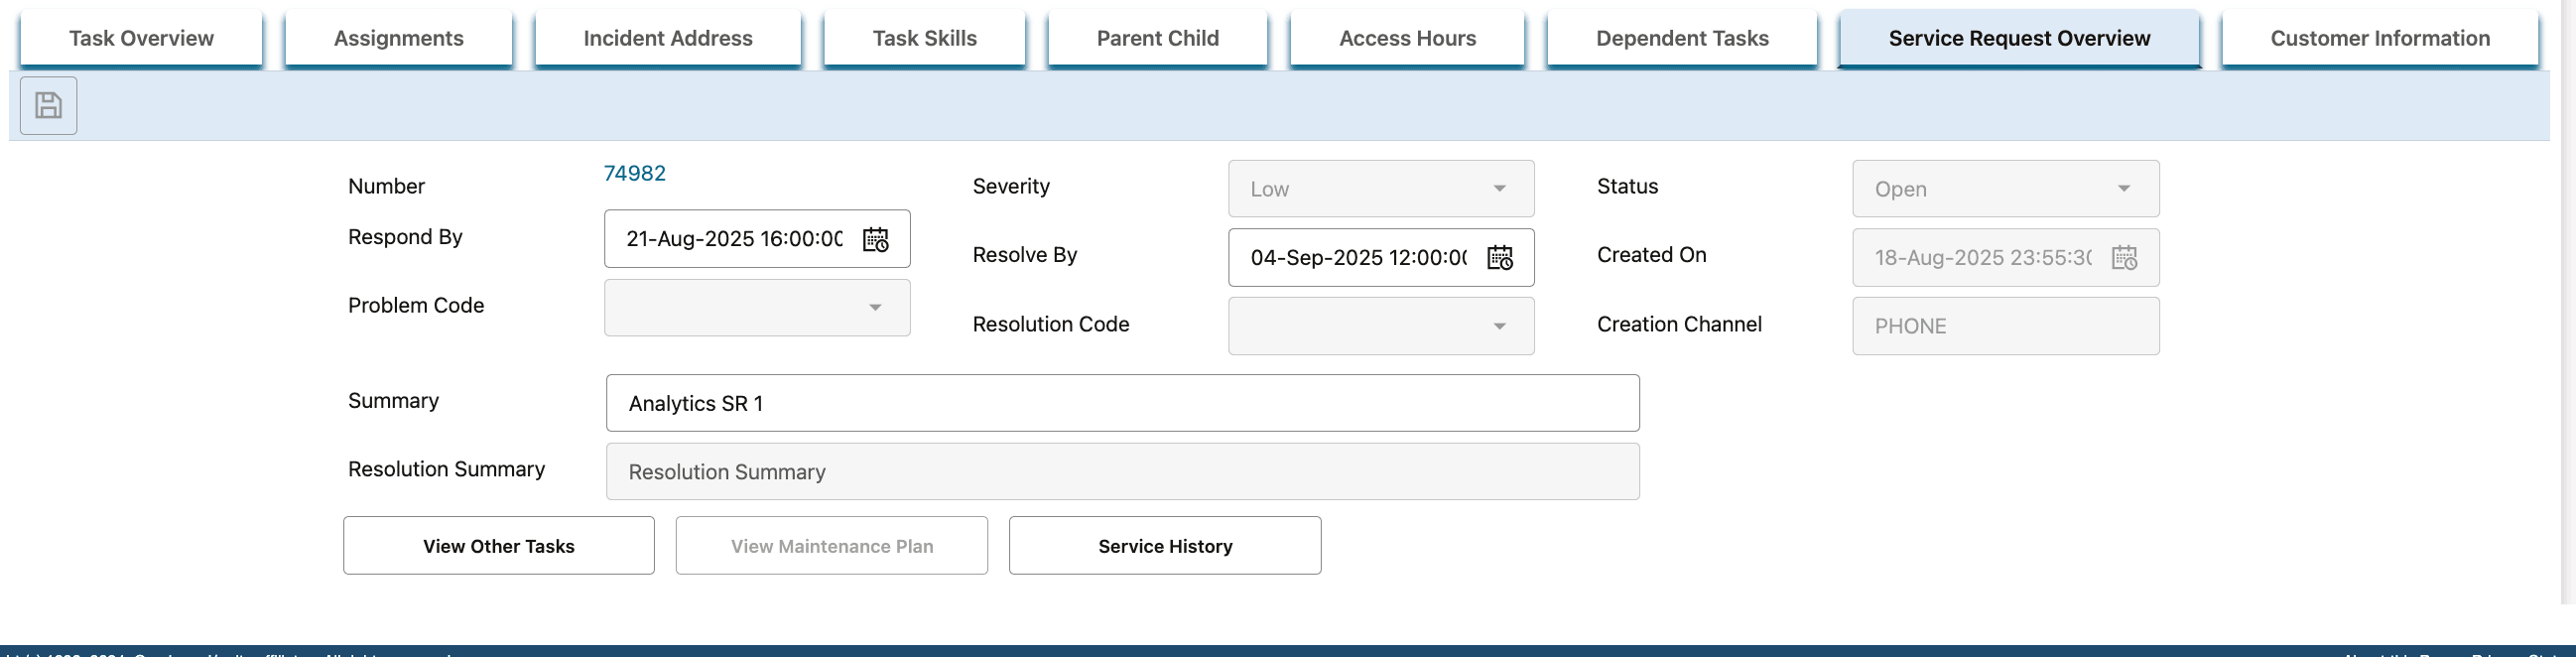
Task Details Service Request Overview Tab
The following screenshot shows the tab that's associated with customer information for the task that you select from the Task List region.
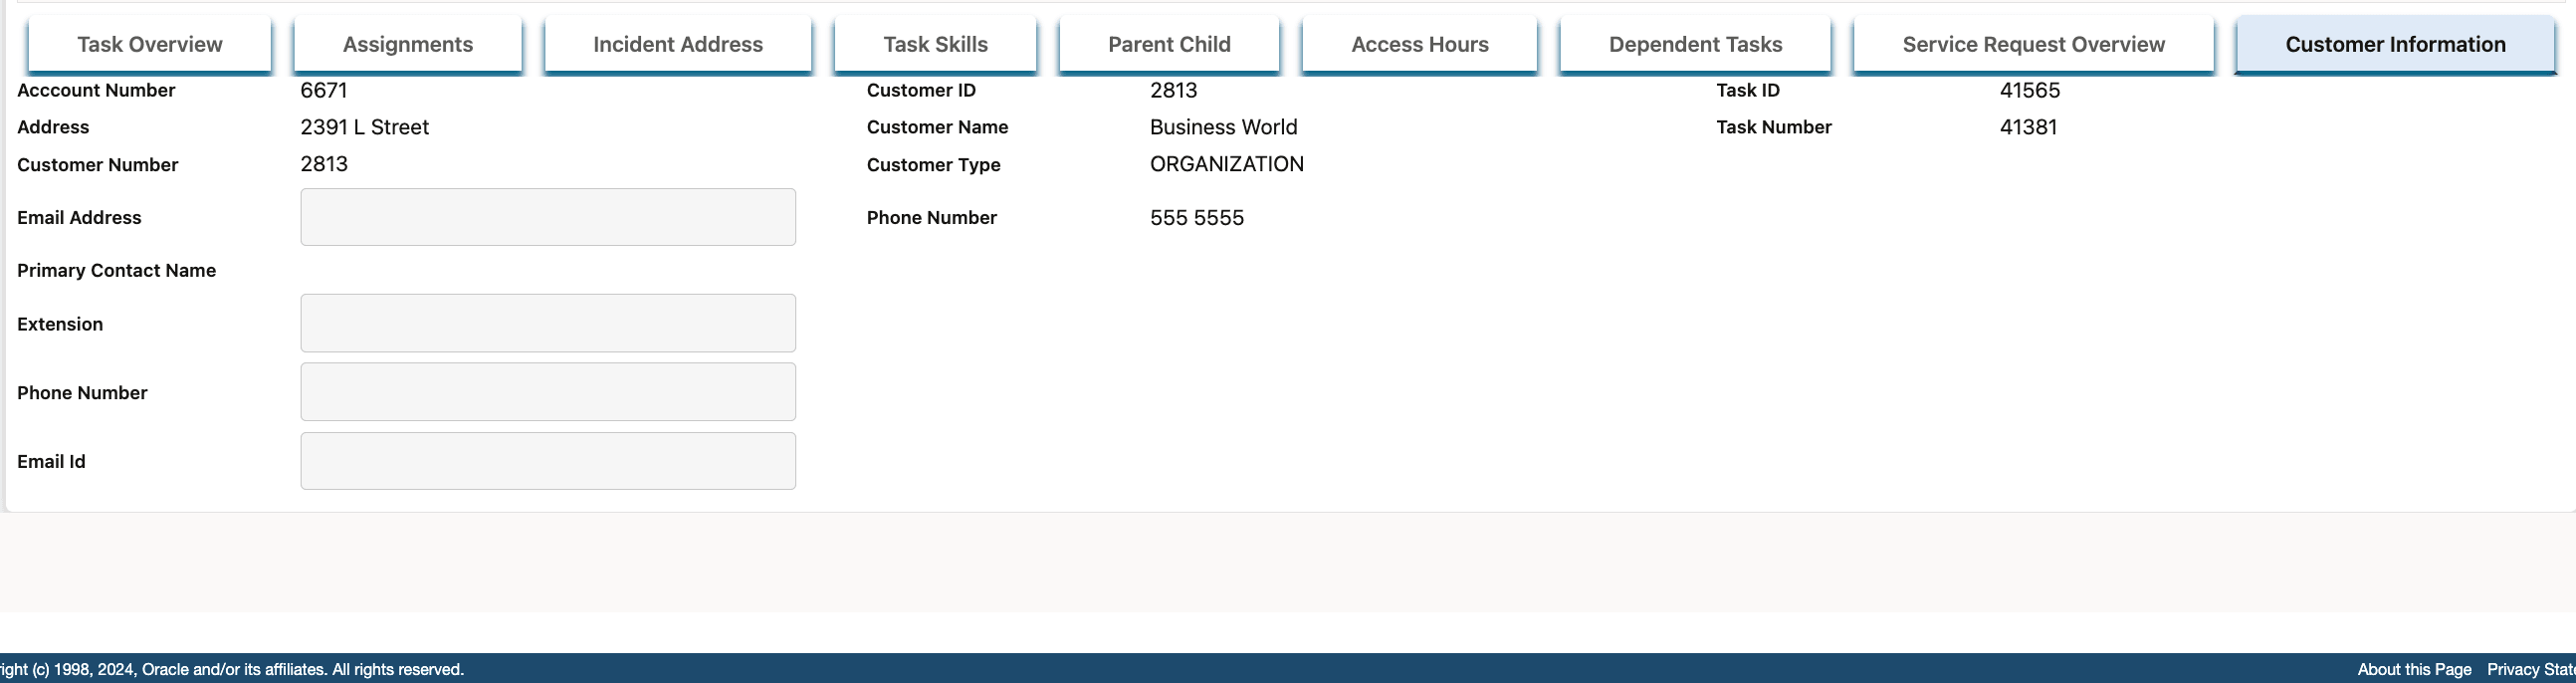
Task Details Customer Information Tab
2. Planboard
The following screenshot shows menu that's available in the Task List region. You can navigate to the menu as follows: From the Navigator, click the Field Service Manager responsibility, then click Field Service Dispatcher, then click Schedule and Dispatch, then click the Menu icon, and choose Planboard.
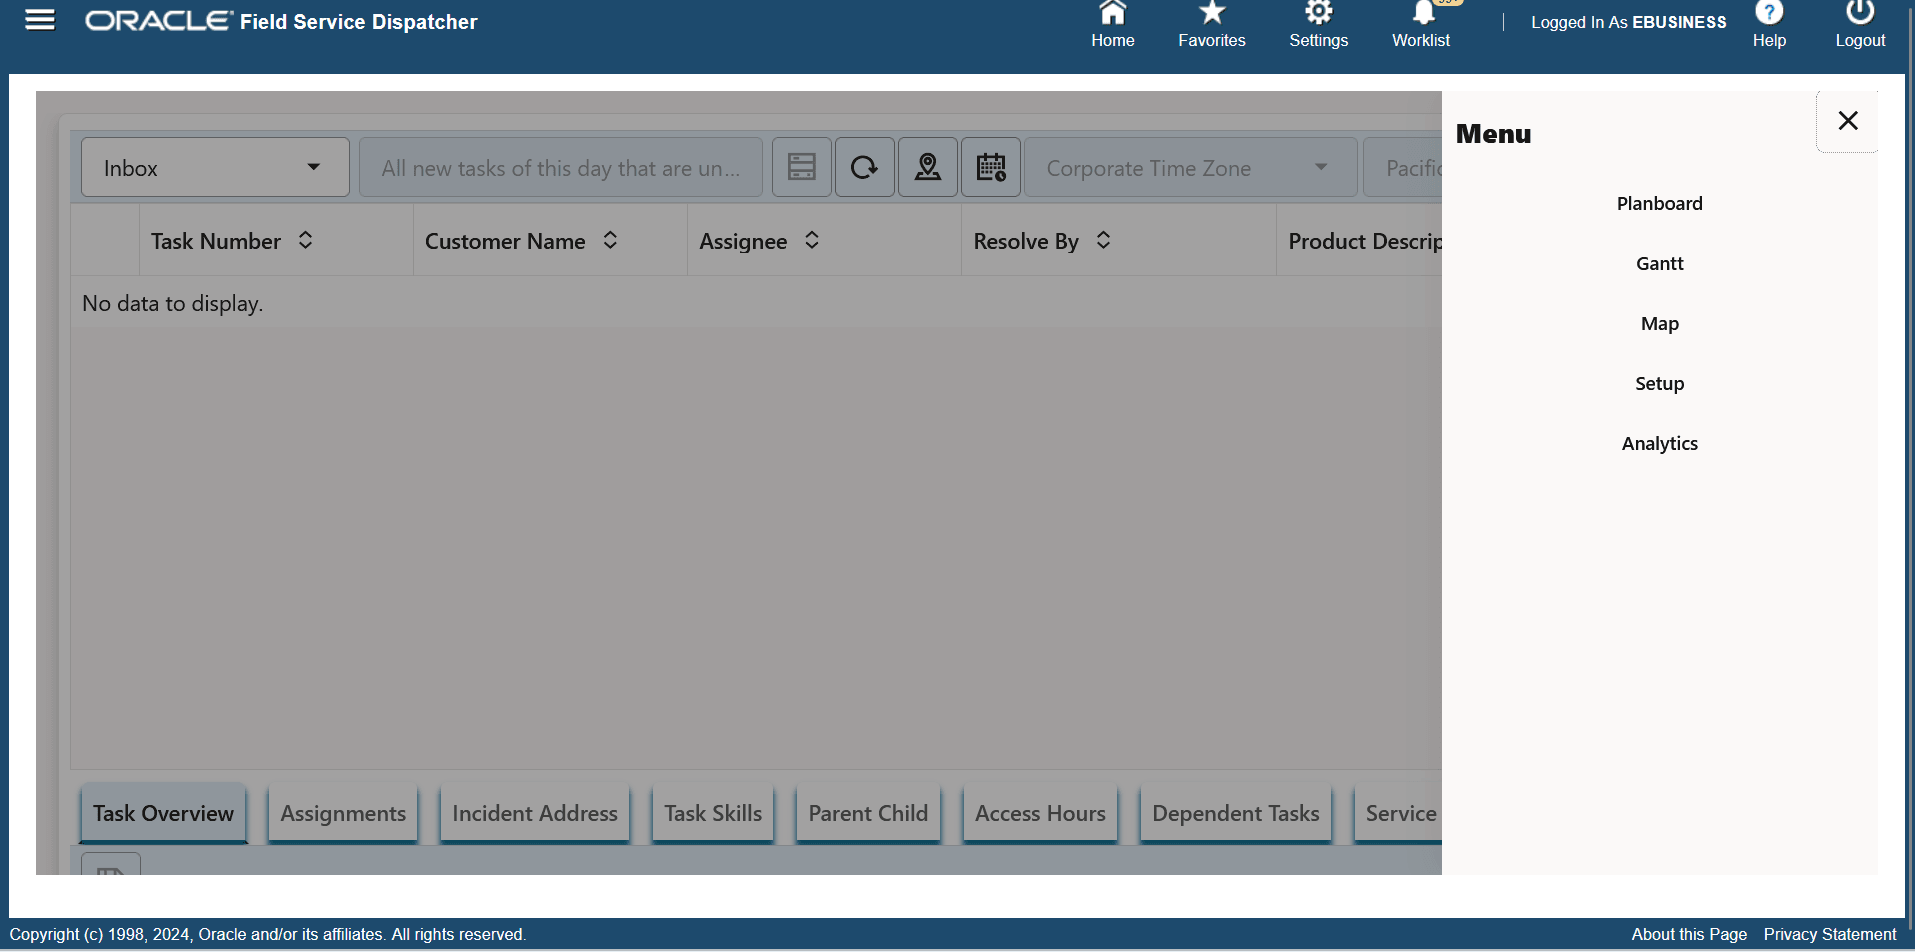
How to Navigate to the Planboard UI
The following screenshot shows the Planboard UI.
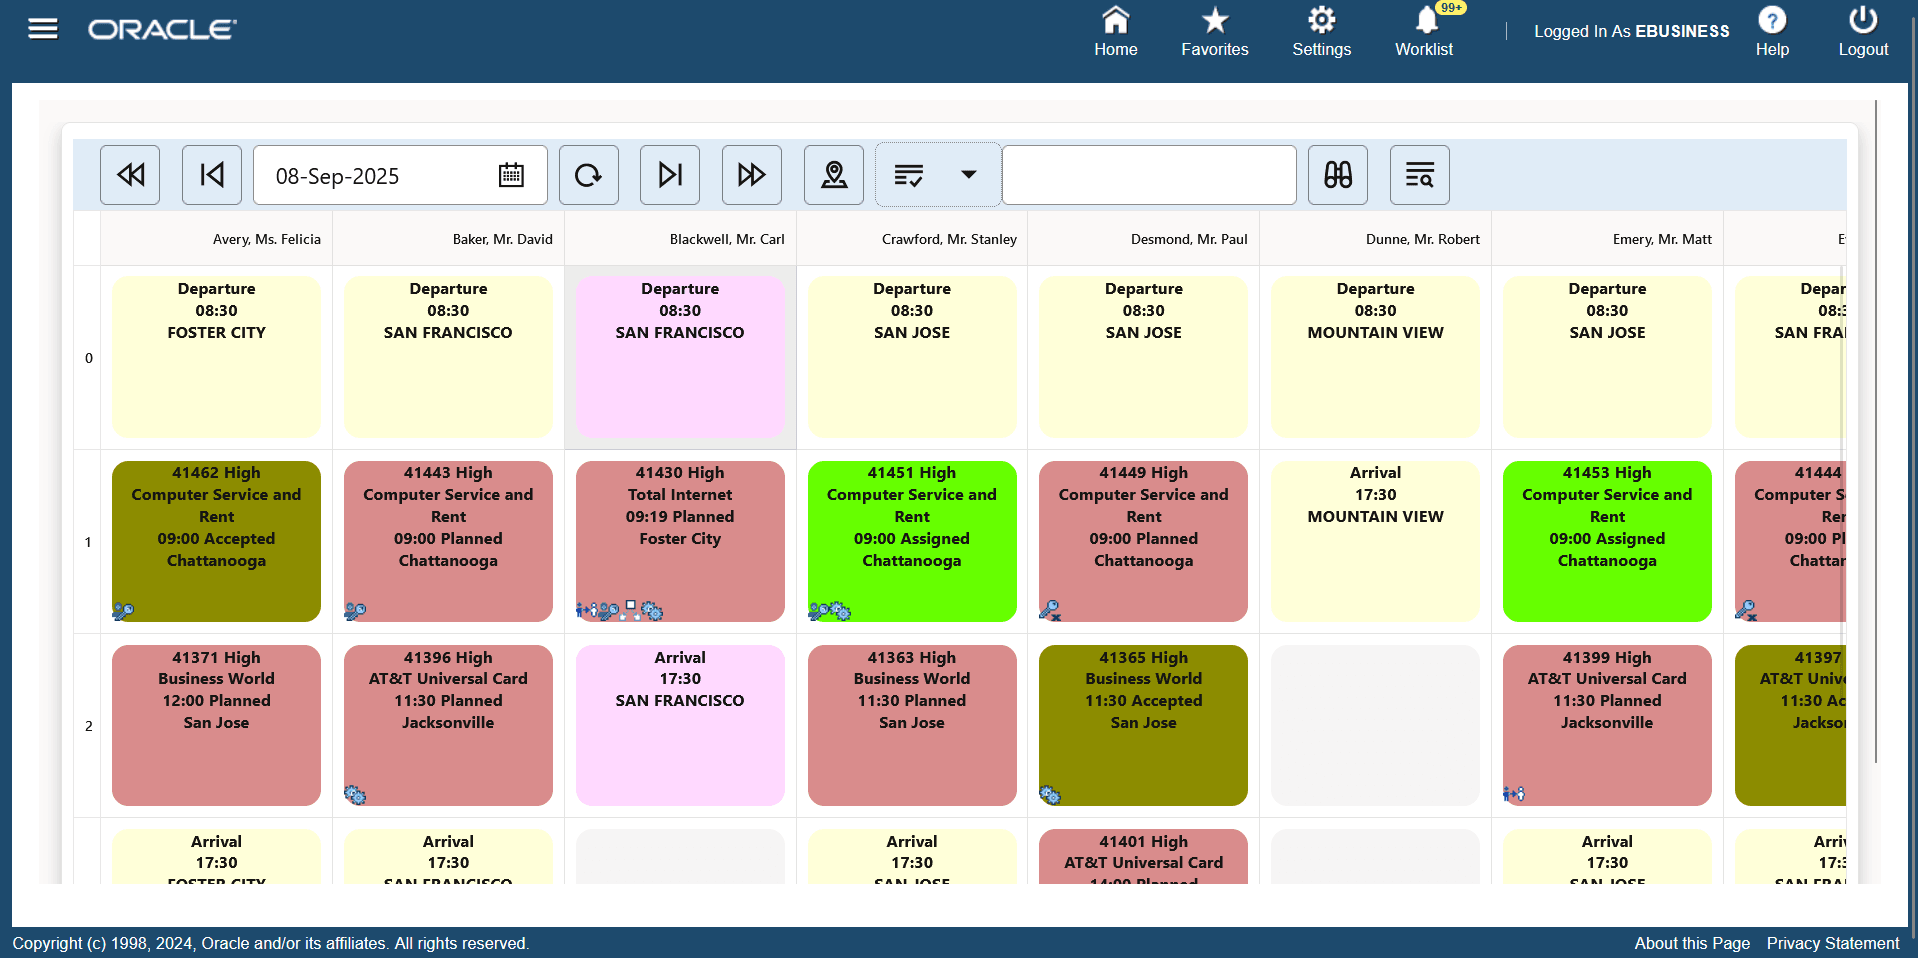
Planboard UI
The planboard displays data for the selected date. You can update the date manually, change the date using icons, such as One Week Back, One Day Back, One Day Ahead, and One Week ahead, and click the Refresh icon. The planboard displays the data for the selected date.

Planboard Date Region
The following screenshot shows the Map icon, click it to see all the tasks and resources on the Planboard UI.

Planboard Map Menu
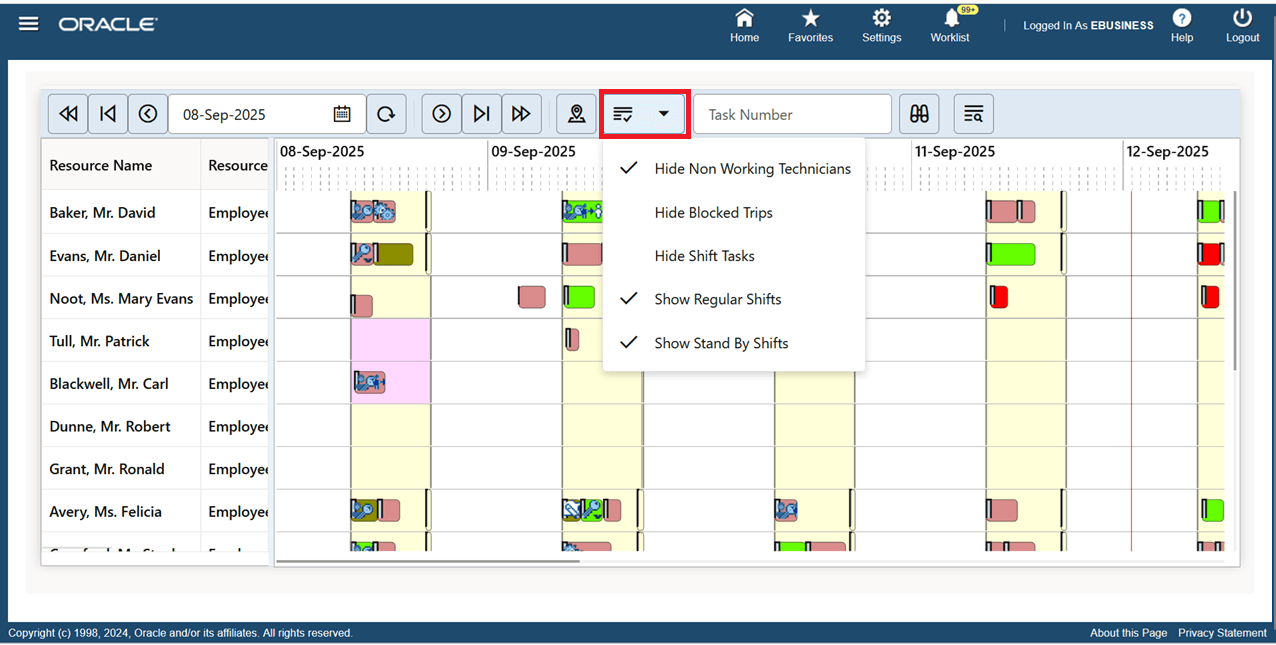
The following screenshot shows the Menu icon, click it to show and hide technicians, blocked trips, shifts, and shift tasks.
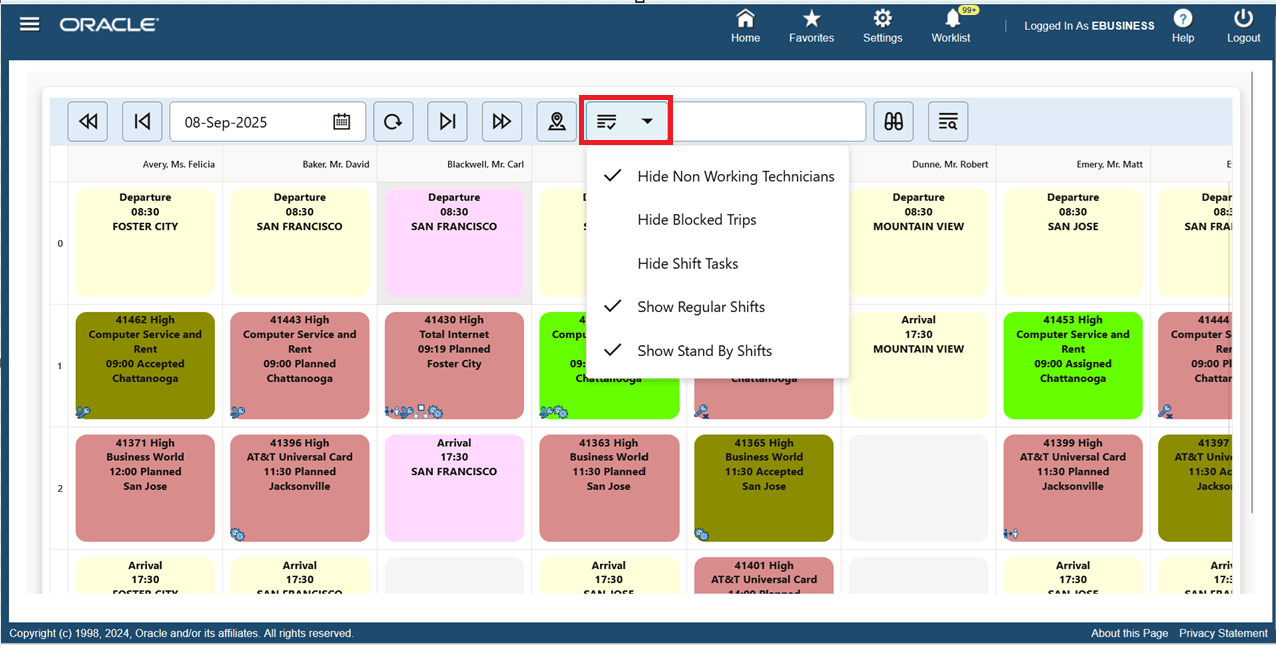
Planboard Shift Task Menu
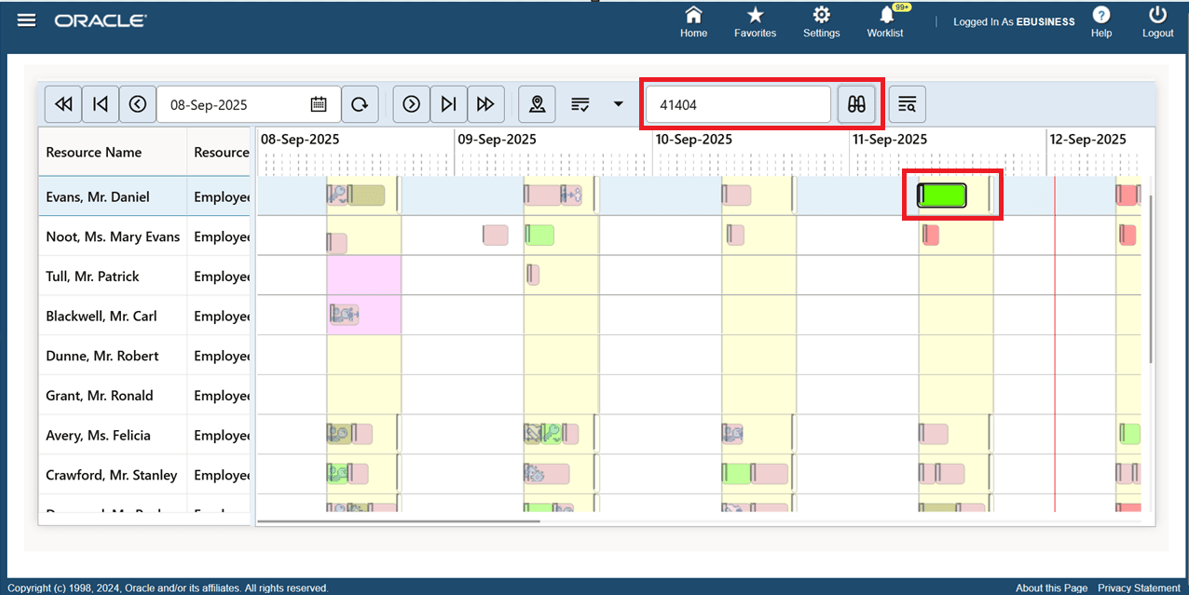
The following screenshot shows the Search Task text box. Enter a task number in text box, then click the Search icon. The task appears in first column of Planboard.
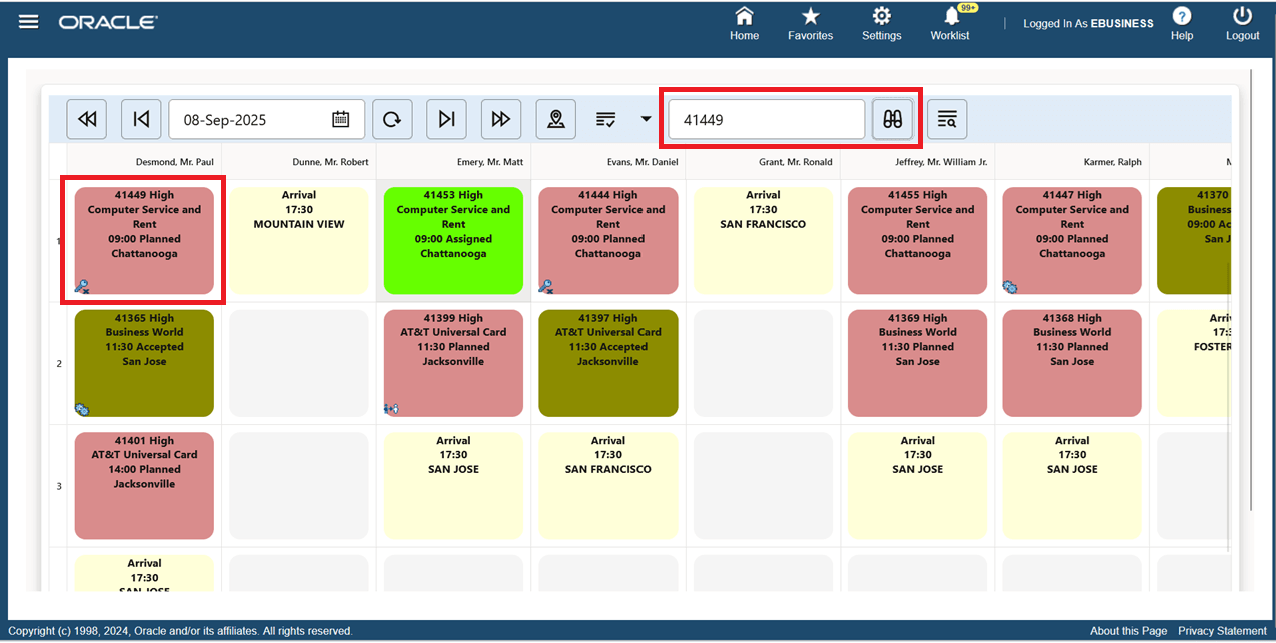
Planboard Search Task Icon
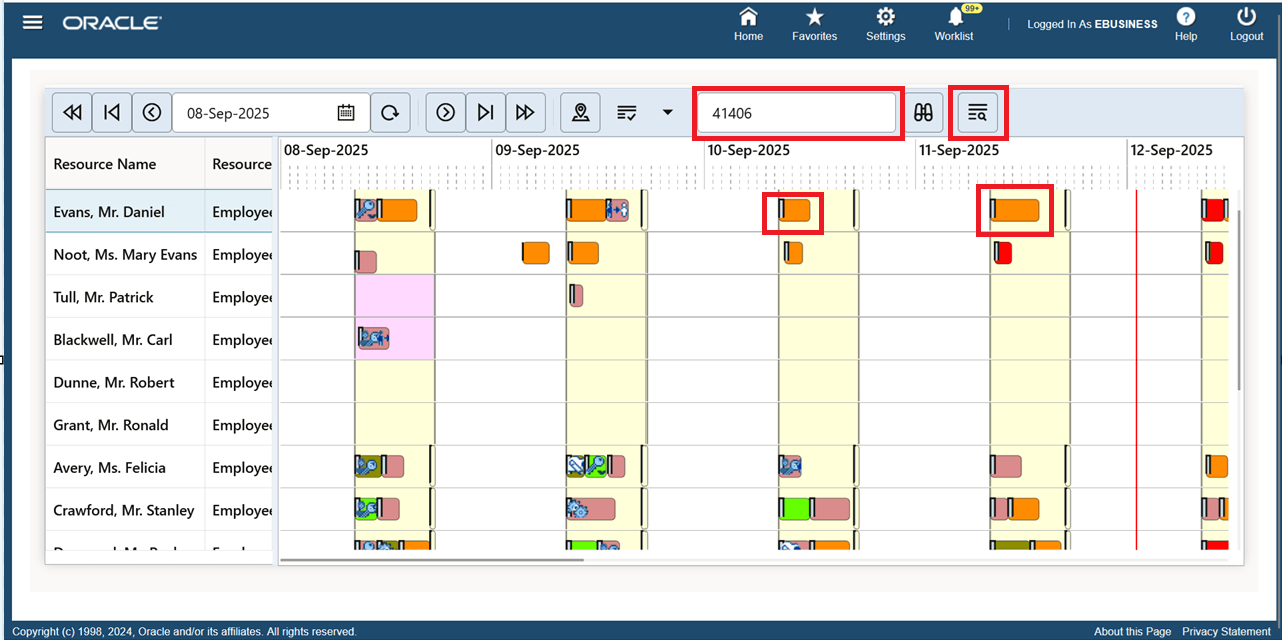
The following screenshot shows how to display same site tasks. Enter the task number in Search Task text box and click on Same Site Tasks icon. The Planboard displays all the tasks that have the same location as the task that you entered in text box.
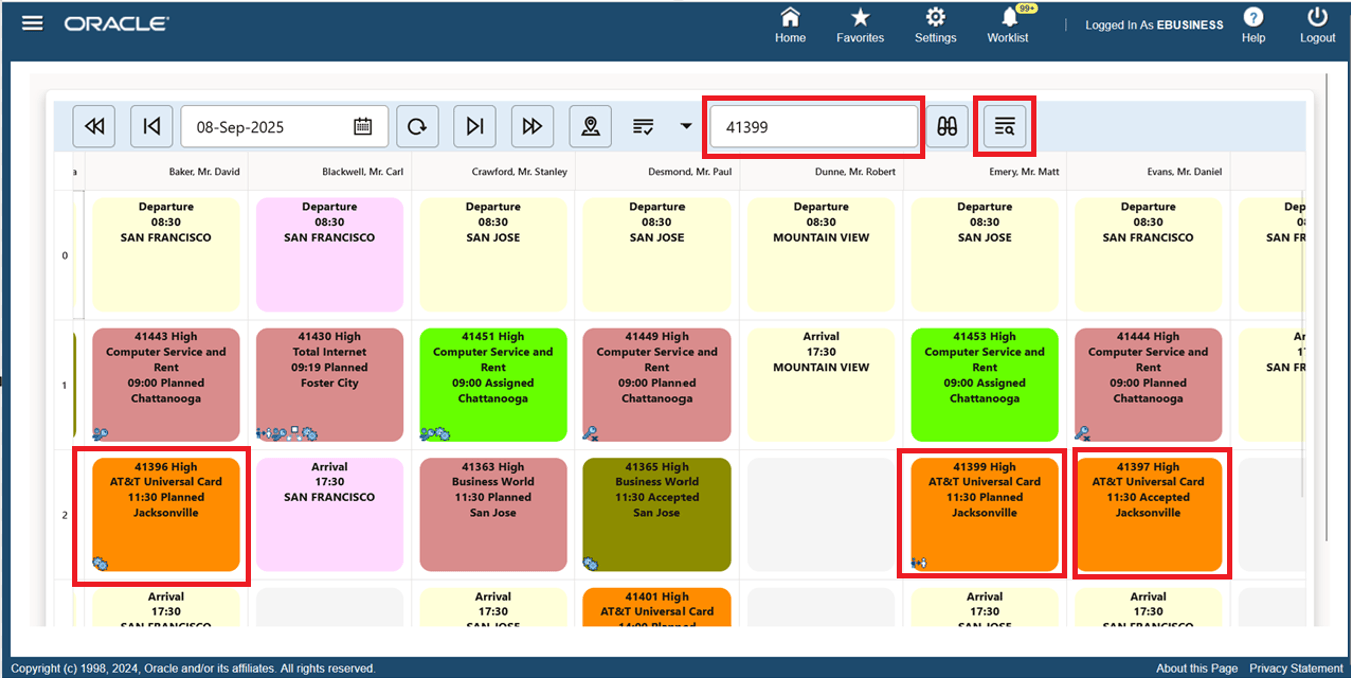
Planboard Same SIte Task Icon
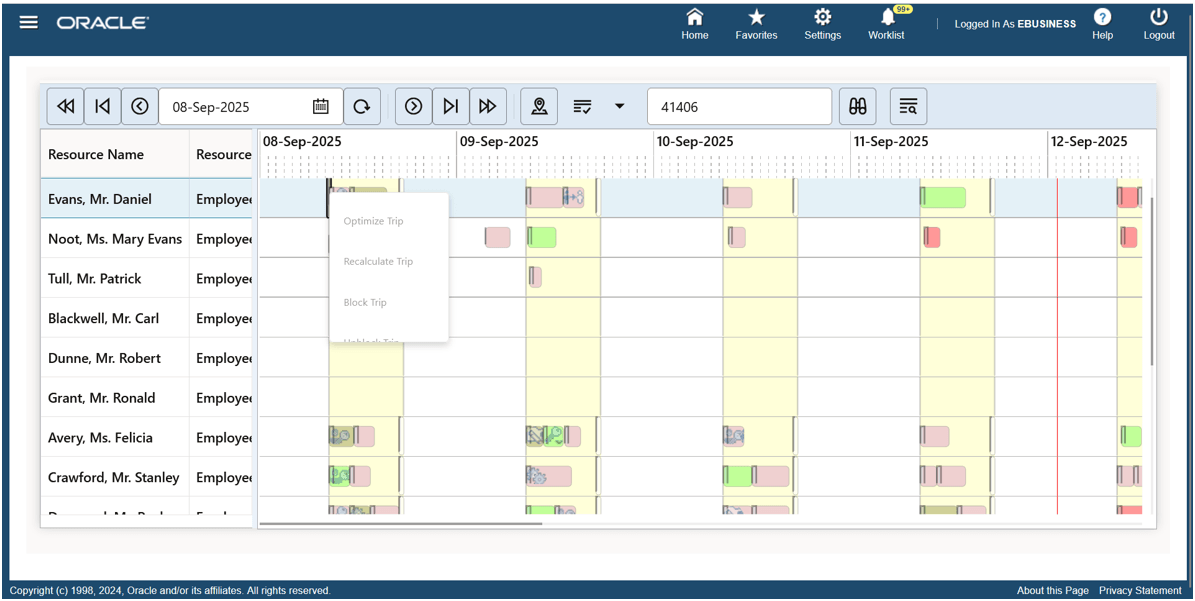
The following screenshot shows the Task Right-click menu, which you can open by right clicking on a task.
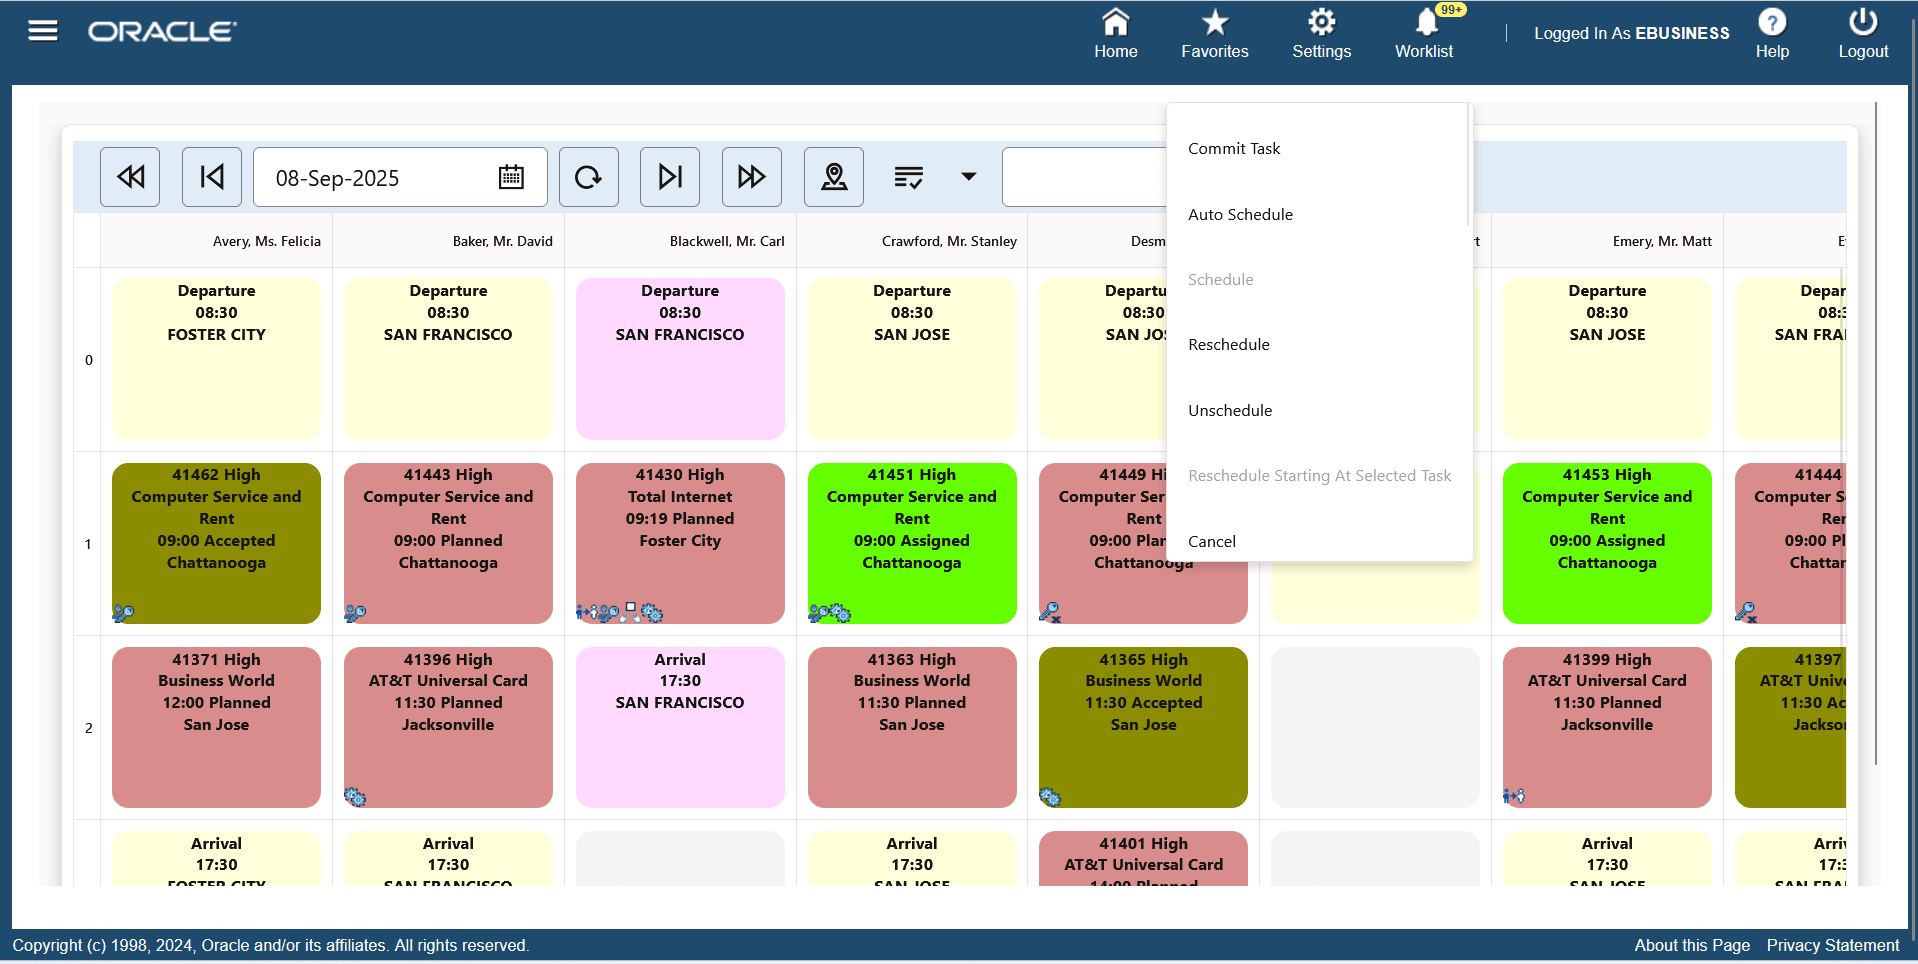
Planboard Task Right-click Menu
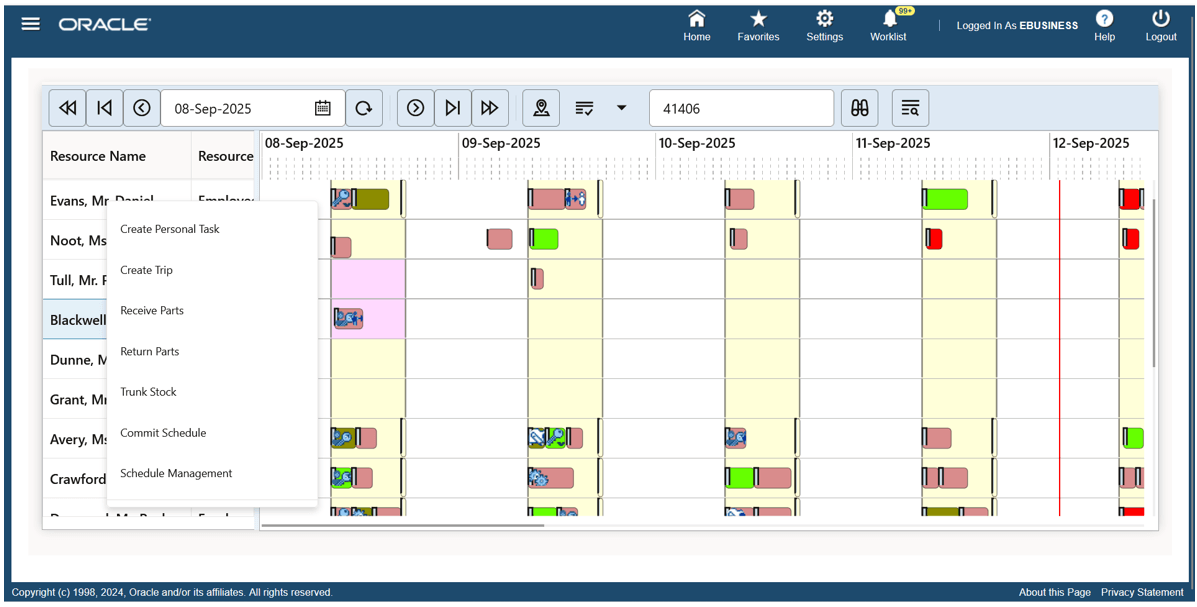
The following screenshot shows tthe Resource Right-click menu, which you can open by right clicking on a resource.
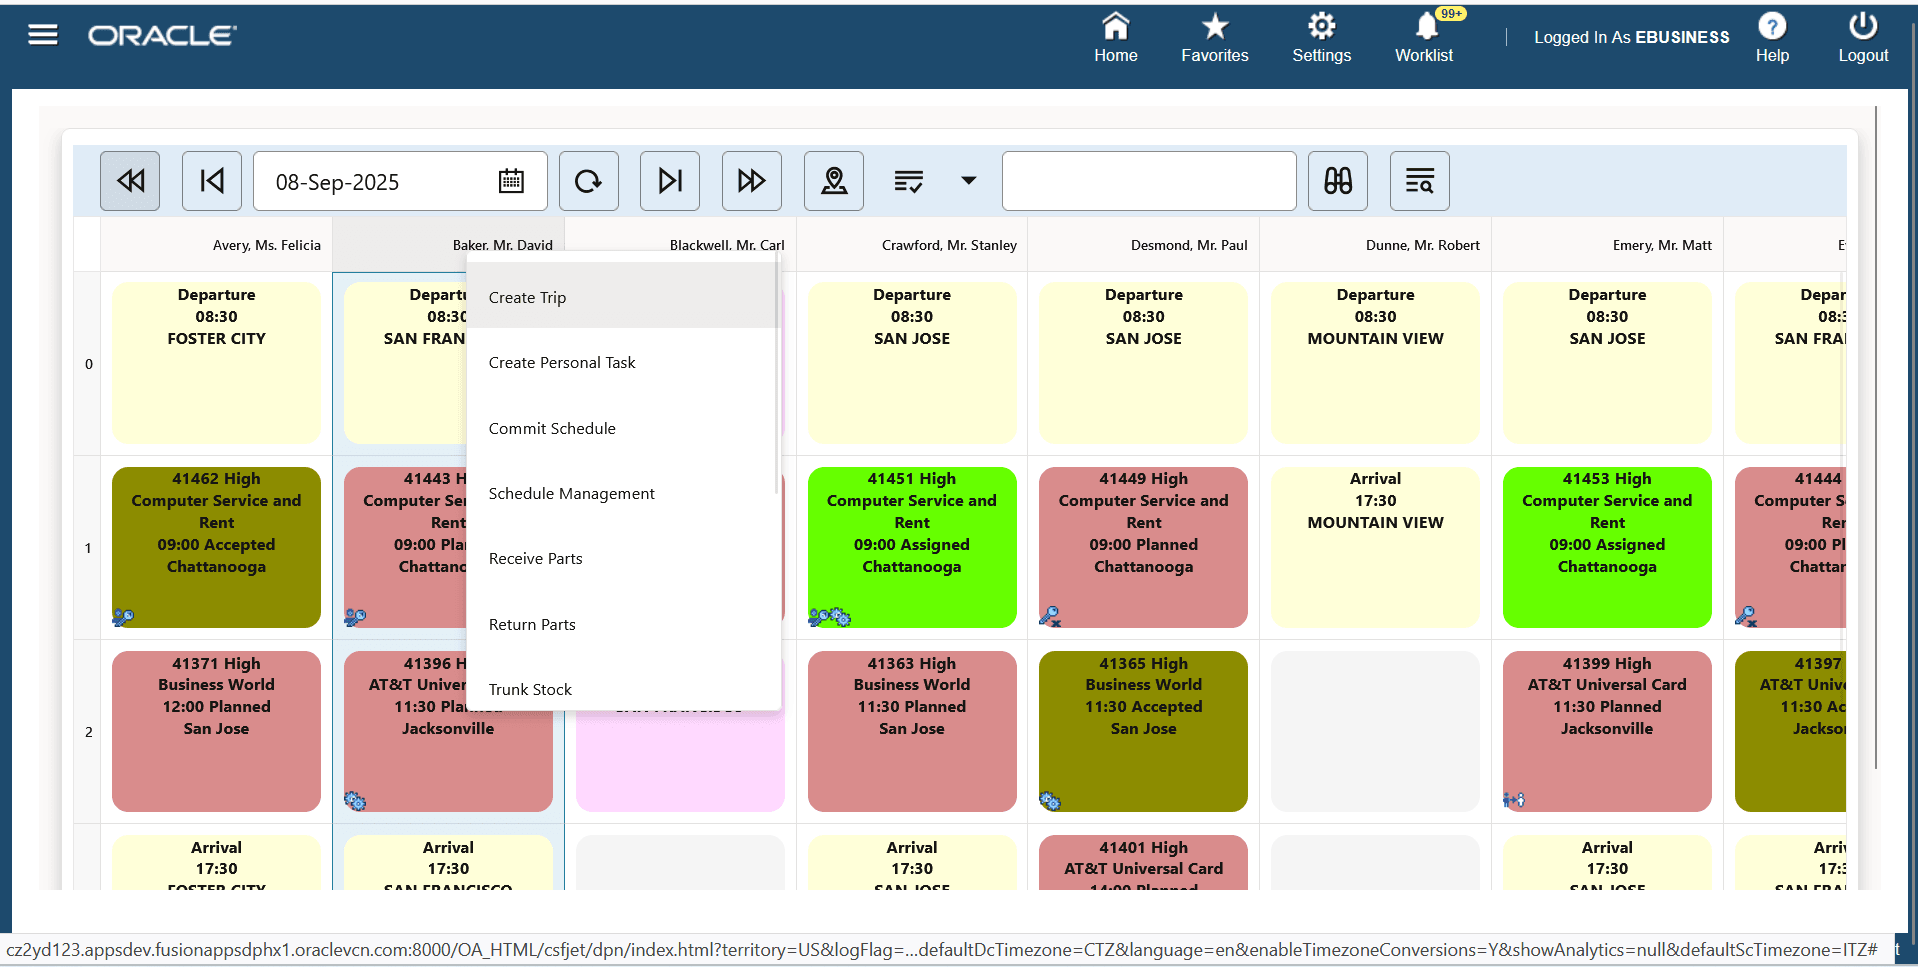
Planboard Resource Right-click Menu
3. Gantt
The following screenshot shows menu that's available in the Task List region. You can navigate to the menu as follows: From the Navigator, click the Field Service Manager responsibility, then click Field Service Dispatcher, then click Schedule and Dispatch, then click the Menu icon, and choose Gantt.

How to Navigate to the Gantt UI
The following screenshot shows the Gantt UI.
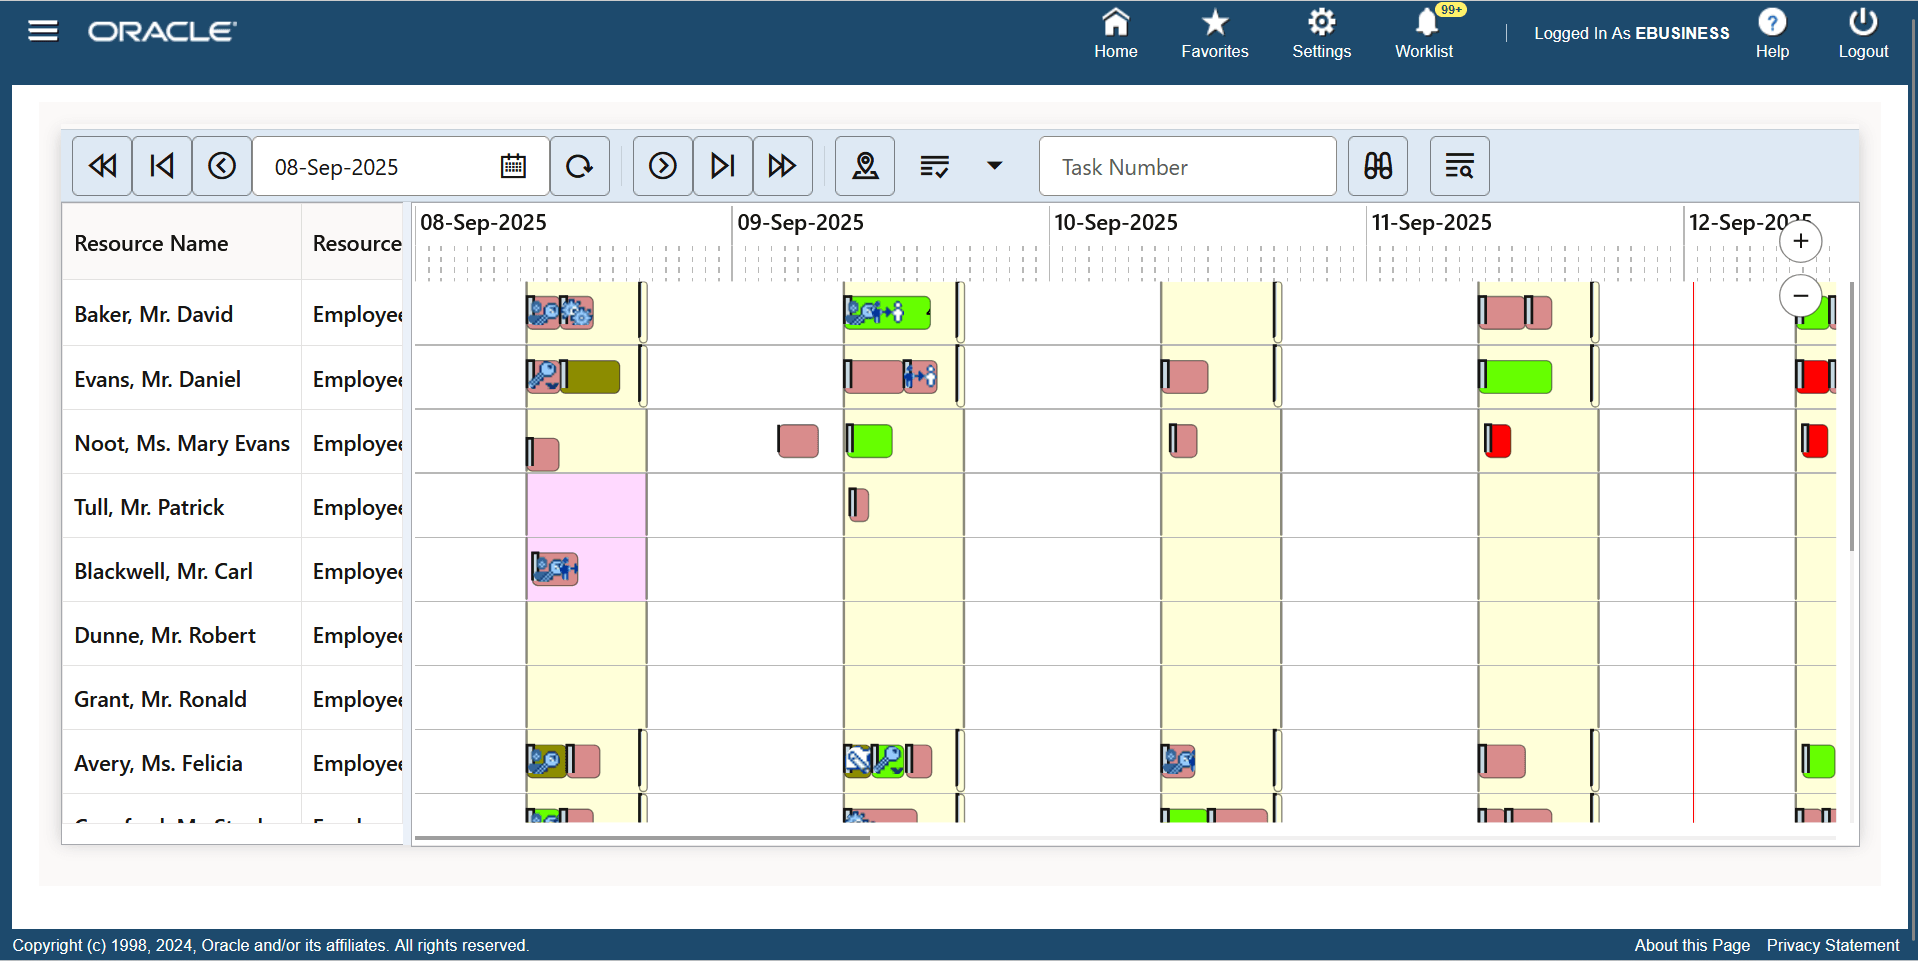
Gantt UI
The Gantt UI displays data for the selected date. You can update the date manually, change the date using icons, such as One Week Back, One Day Back, One Day Ahead, and One Week ahead, and click the Refresh icon. The Gantt UI displays the data for the selected date.

Gantt Date Region
The following screenshot shows the Map icon, click it to see all the tasks and resources displayed on the Gantt UI.

Gantt Map Option
Gantt Map Resources and Tasks Menu
The following screenshot shows the Menu icon. Click it to show and hide technicians, blocked trips, shifts, and shift tasks.
Gantt Menu
The following screenshot shows the Search Task text box. Enter a task number in text box, then click the Search icon. The task appears in first column of Gantt UI.
Gantt Search Icon
The following screenshot shows how to display same site tasks. Enter the task number in Search Task text box and click on Same Site Tasks icon. The Gantt displays all the tasks that have the same location as the task that you entered in text box. The same site tasks are the same color (orange). The same site tasks color can be configured using the CSF: Same Site Tasks Signal Color profile option.
Gantt Same Site Task
The following screenshot shows the Shift Task Right-click menu, which you can open by right clicking on a shift task.
Gantt Shift Task Right-click Menu
The following screenshot shows the Task Right-click menu, which you can open by right clicking on a task.

Gantt Task Right-click Menu
The following screenshot shows the Resource Right-click menu, which you can open by right clicking on a resource.
Gantt Resource Right-click Menu
The following screenshot shows that you can hover over the task bar to display the tooltip.
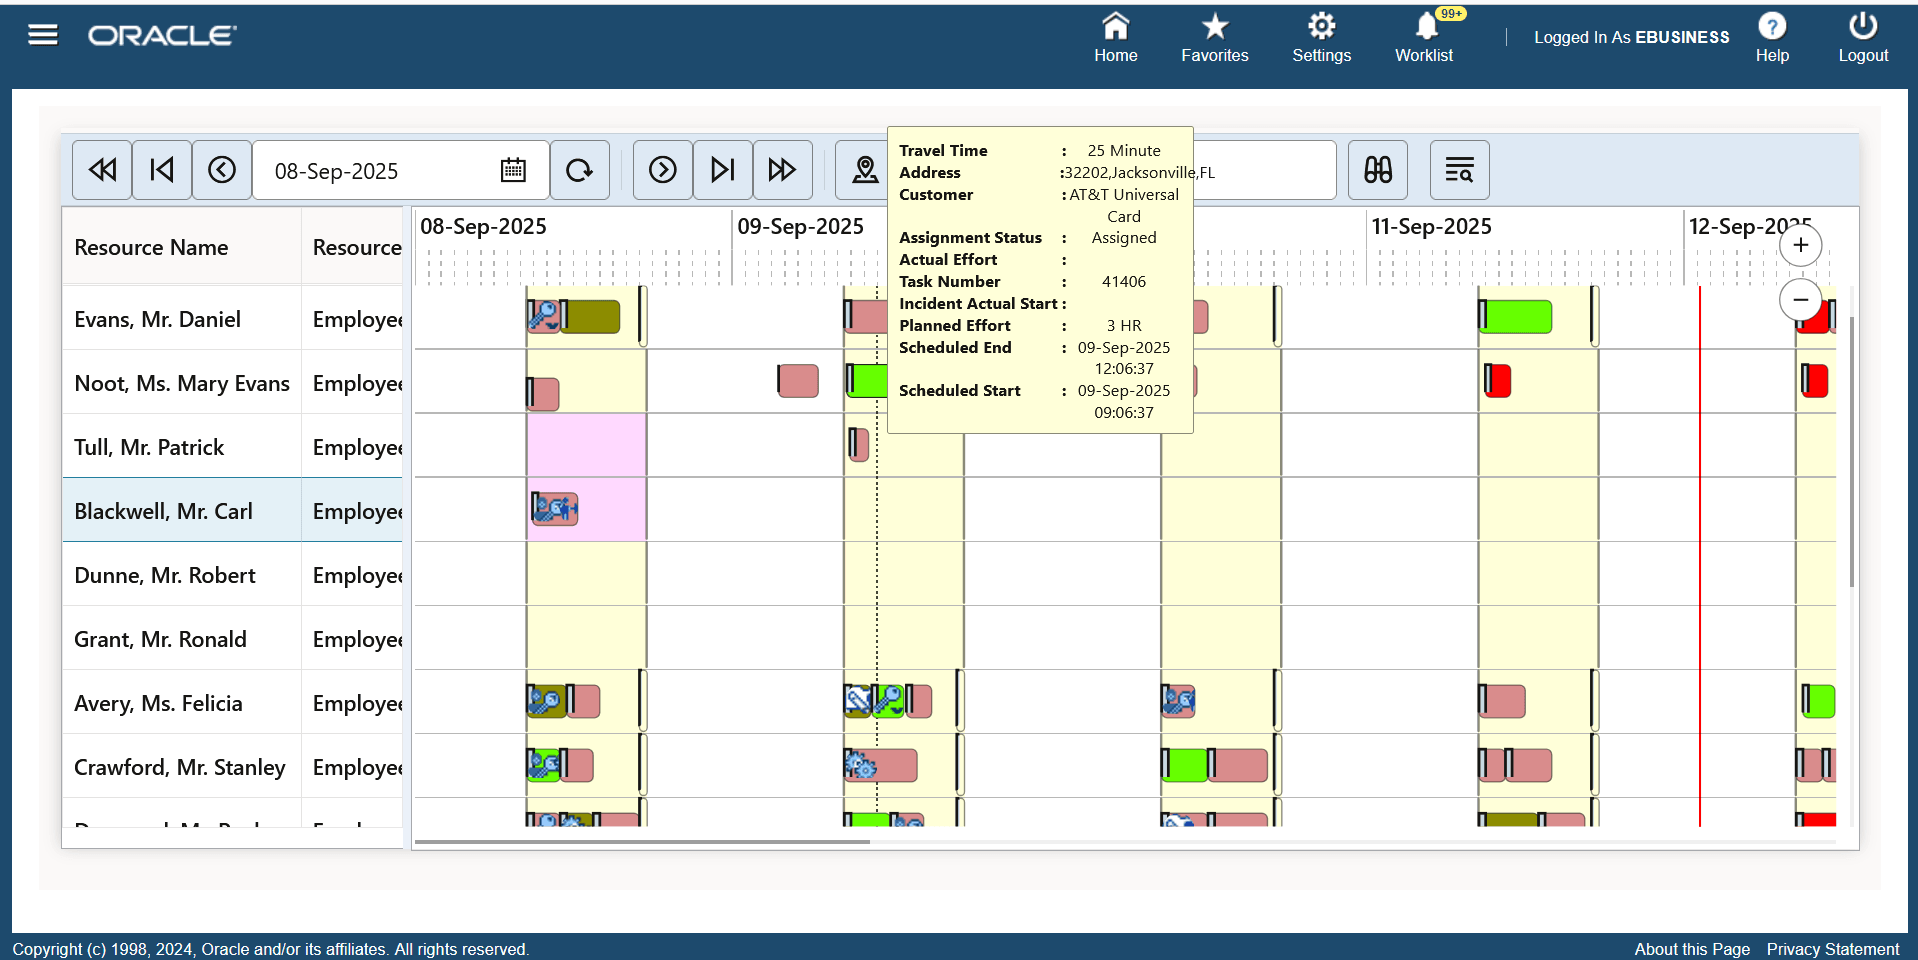
Gantt Tooltip
4. Map
The following screenshot shows menu that's available in the Task List region. You can navigate to the menu as follows: From the Navigator, click the Field Service Manager responsibility, then click Field Service Dispatcher, then click Schedule and Dispatch, then click the Menu icon, and choose Map.

How to Navigate to the Map UI
The following screenshot shows the Map UI.
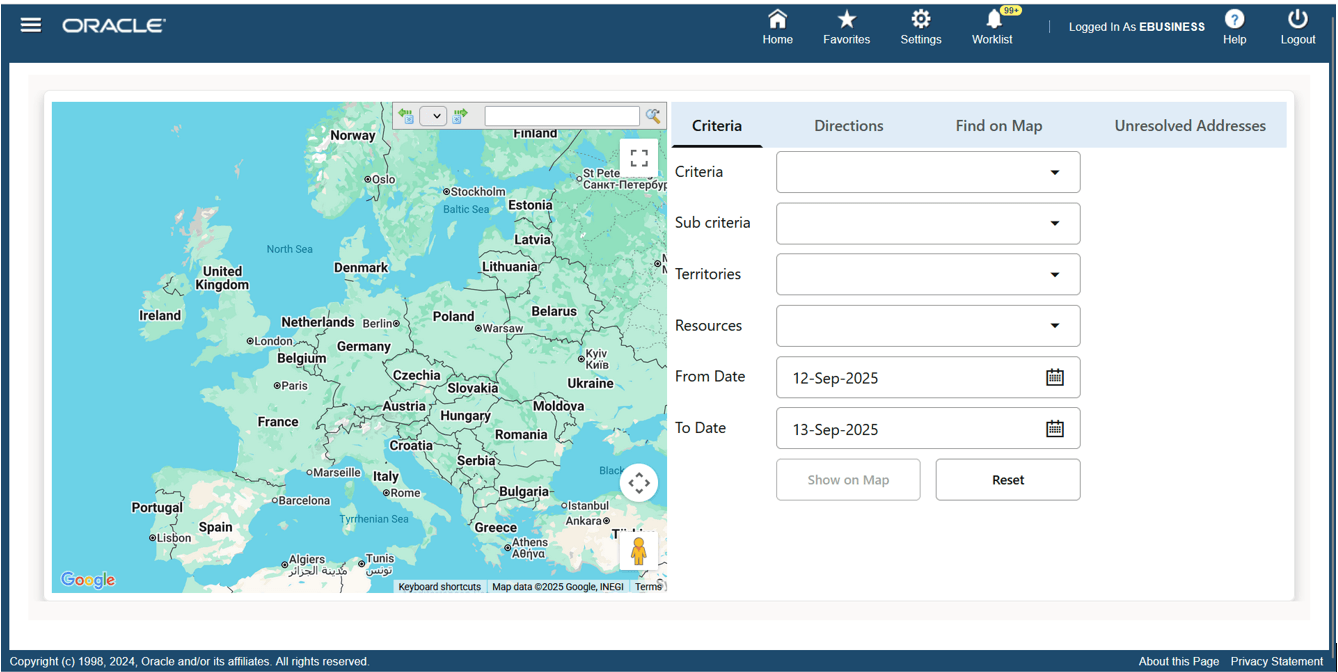
Map UI
The following screenshot shows Map Criteria 1. Enter the information and click the Show on Map button to get results.
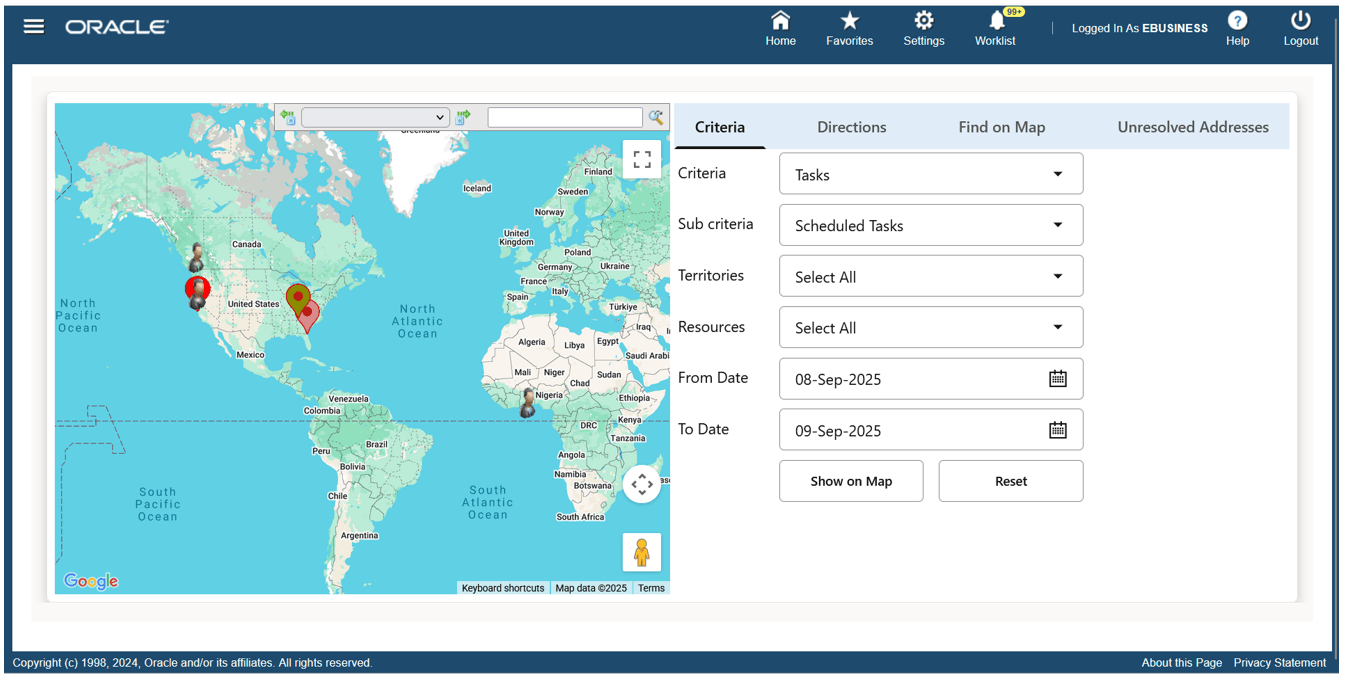
Map Results with Criteria 1
The following screenshot shows Map Criteria 2. Enter the information and click the Show on Map button to get results.
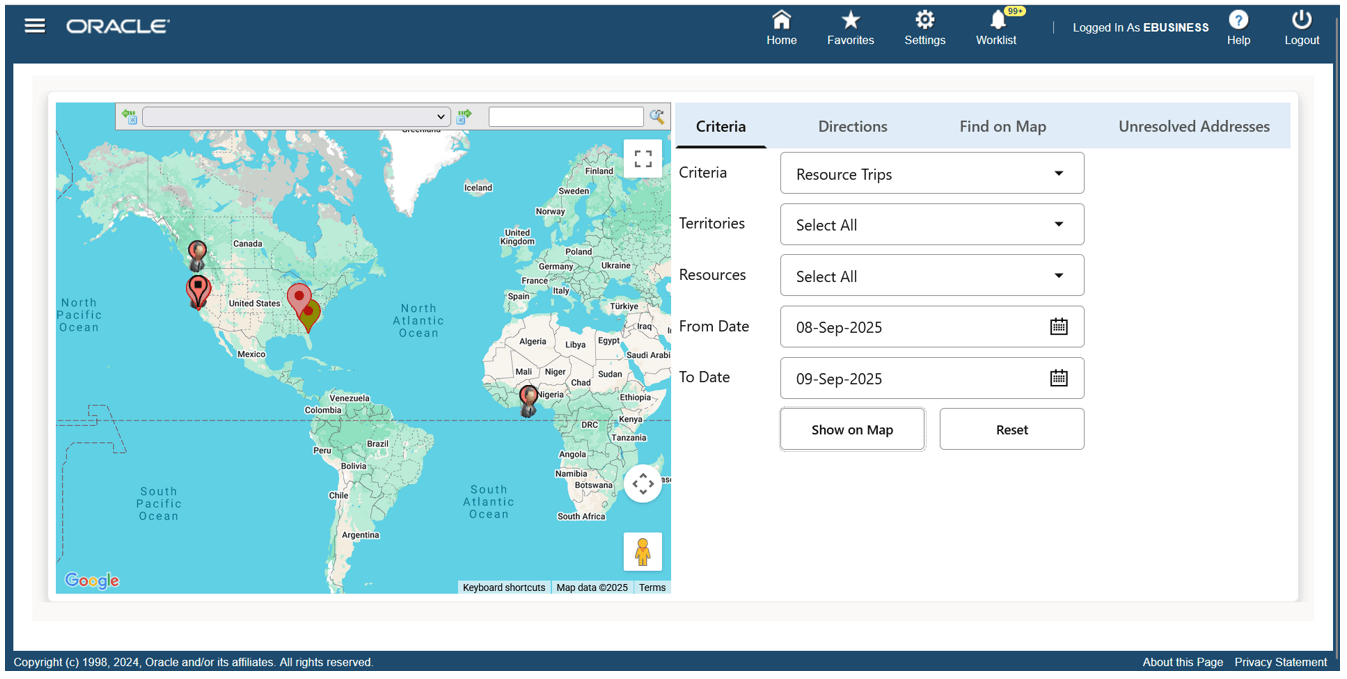
Map Results with Criteria 2
The following screenshot shows the map for the resource trip. The resource and trips are shown in the Map drop-down list. Select a trip and the directions display in the Directions tab.
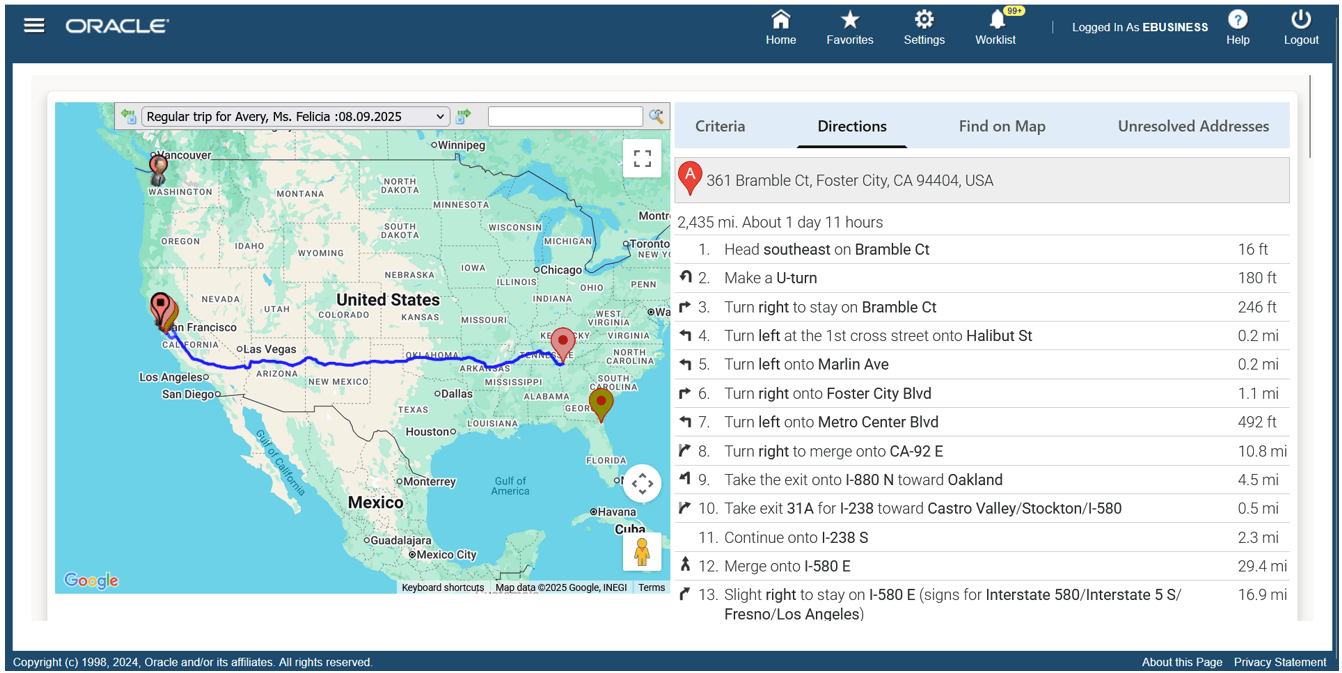
Map Resource Trip
The following screenshot shows how to find an address on a map. Enter an address and click the Show on Map button. The address appears on the map.

Find on Map
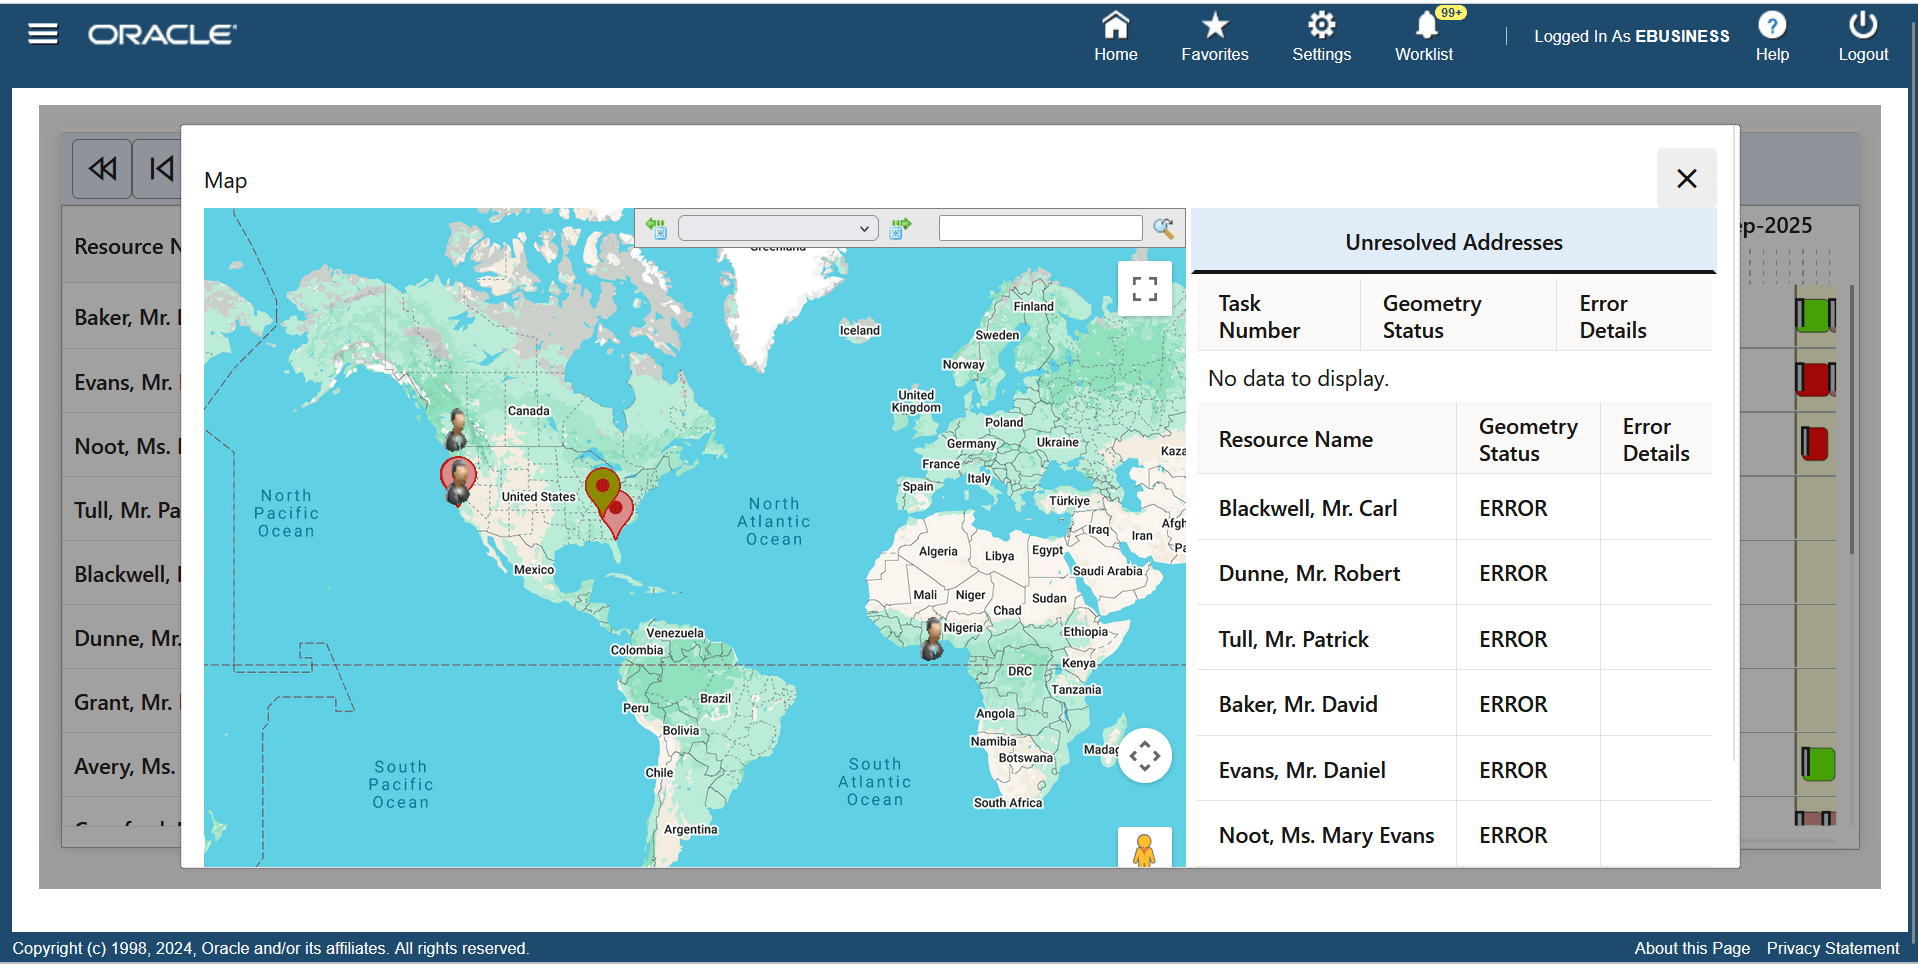
The following screenshot shows how to find unresolved address. Select the Unresolved Addresses tab.
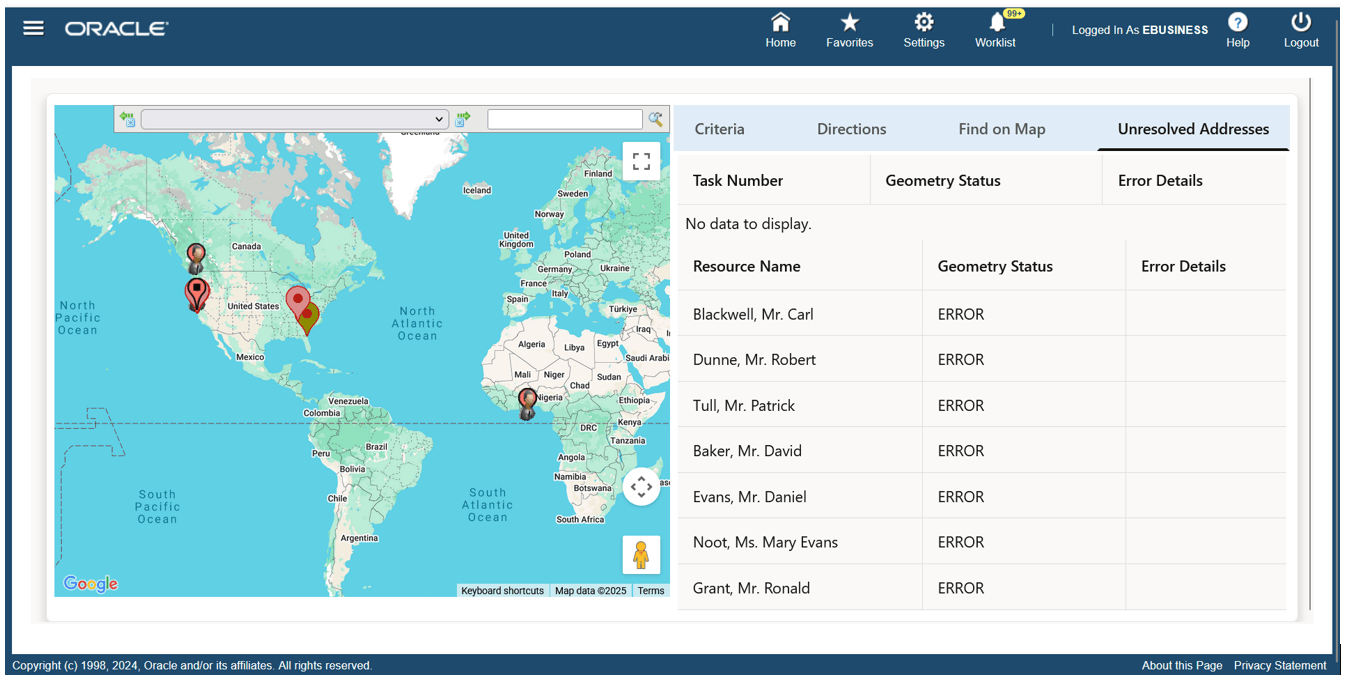
Map Unresolved Address section
5. Setup
The following screenshot shows menu that's available in the Task List region. You can navigate to the menu as follows: From the Navigator, click the Field Service Manager responsibility, then click Field Service Dispatcher, then click Schedule and Dispatch, then click the Menu icon, and choose Setup.

How to Navigate to the Setup UI
The following screenshot shows the Setup UI.
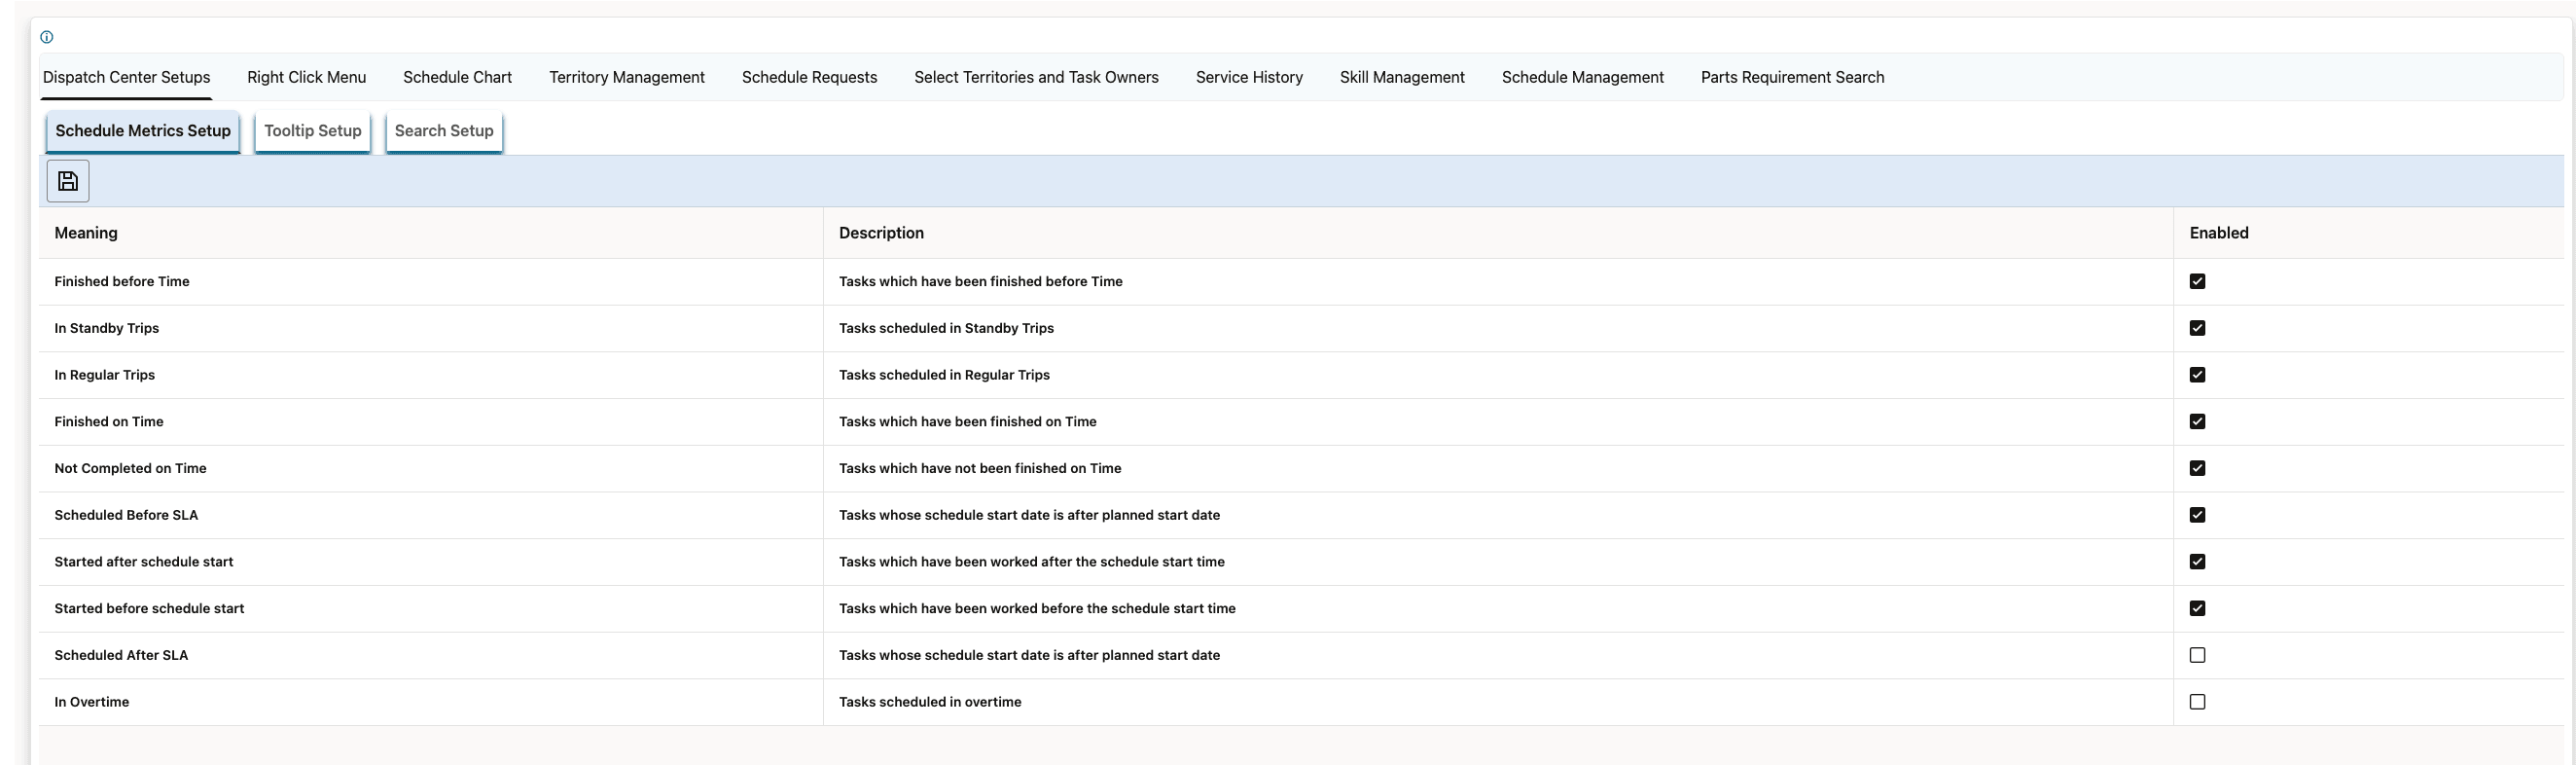
Setup UI
The following screenshot shows the Schedule Metrics Setup subtab in the Dispatch Center Setups tab. You can enable schedule metrics here and the setups that you enable will be used in the Analytics UI.
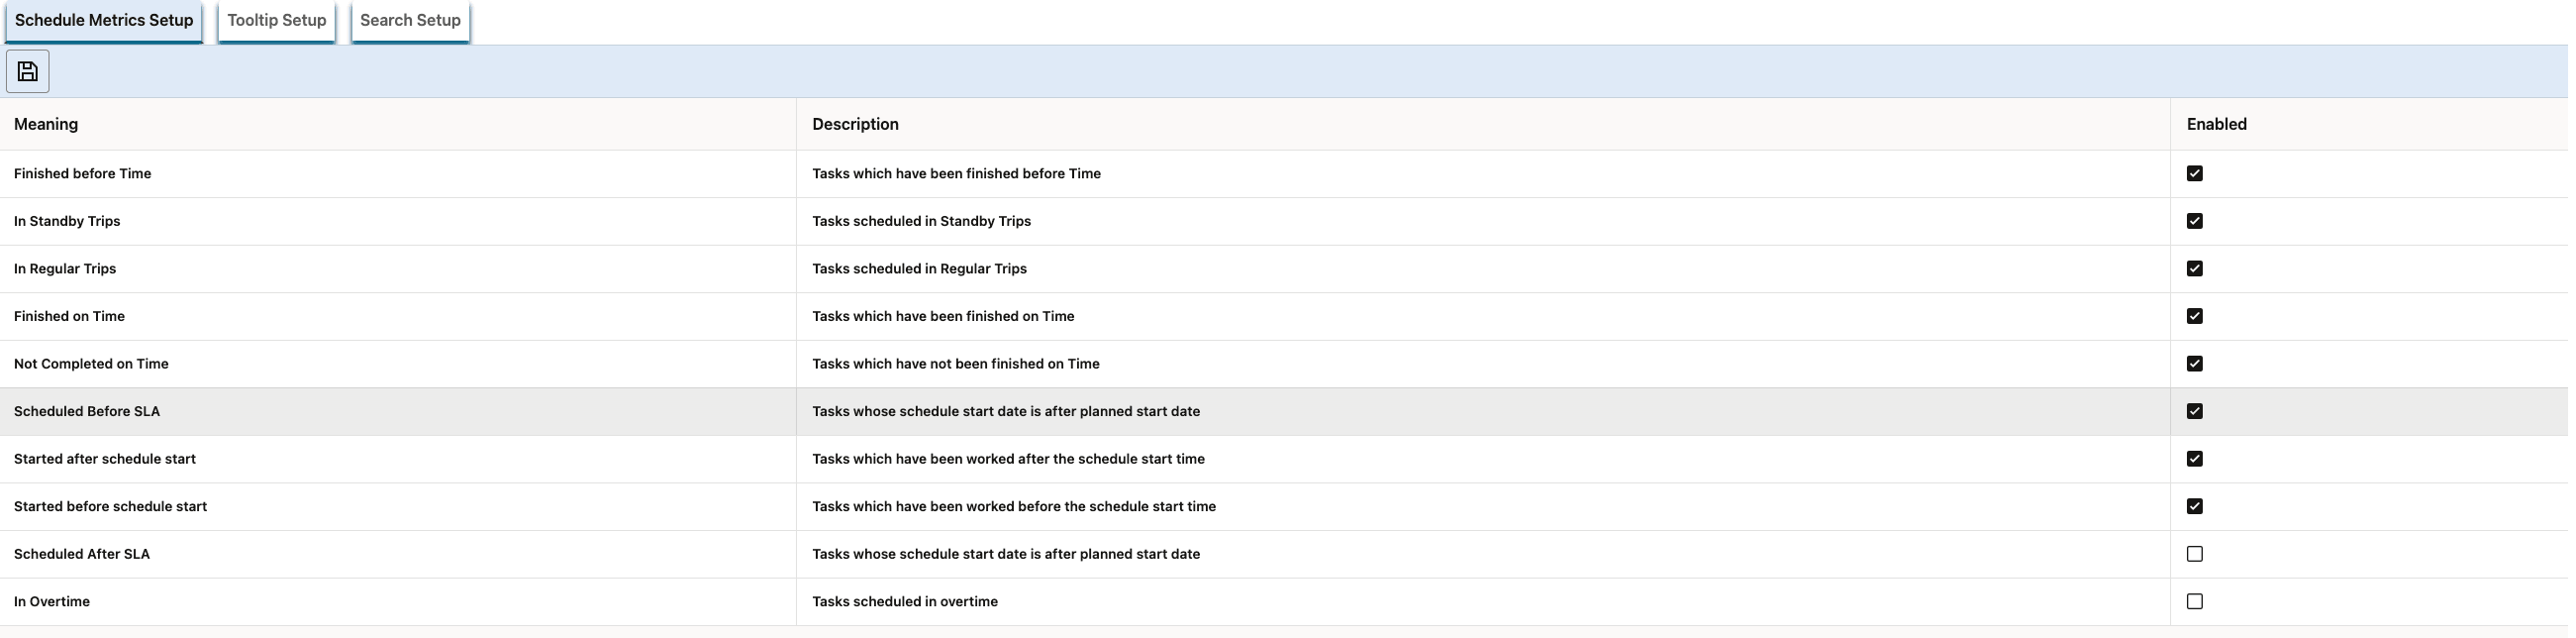
Dispatch Center Setup Tab: Schedule Metrics Setup
The following screenshot shows the Tooltip Setup subtab in the Dispatch Center Setups tab. You can enable tooltips here and the setups that you enable will be used in the Gantt chart.
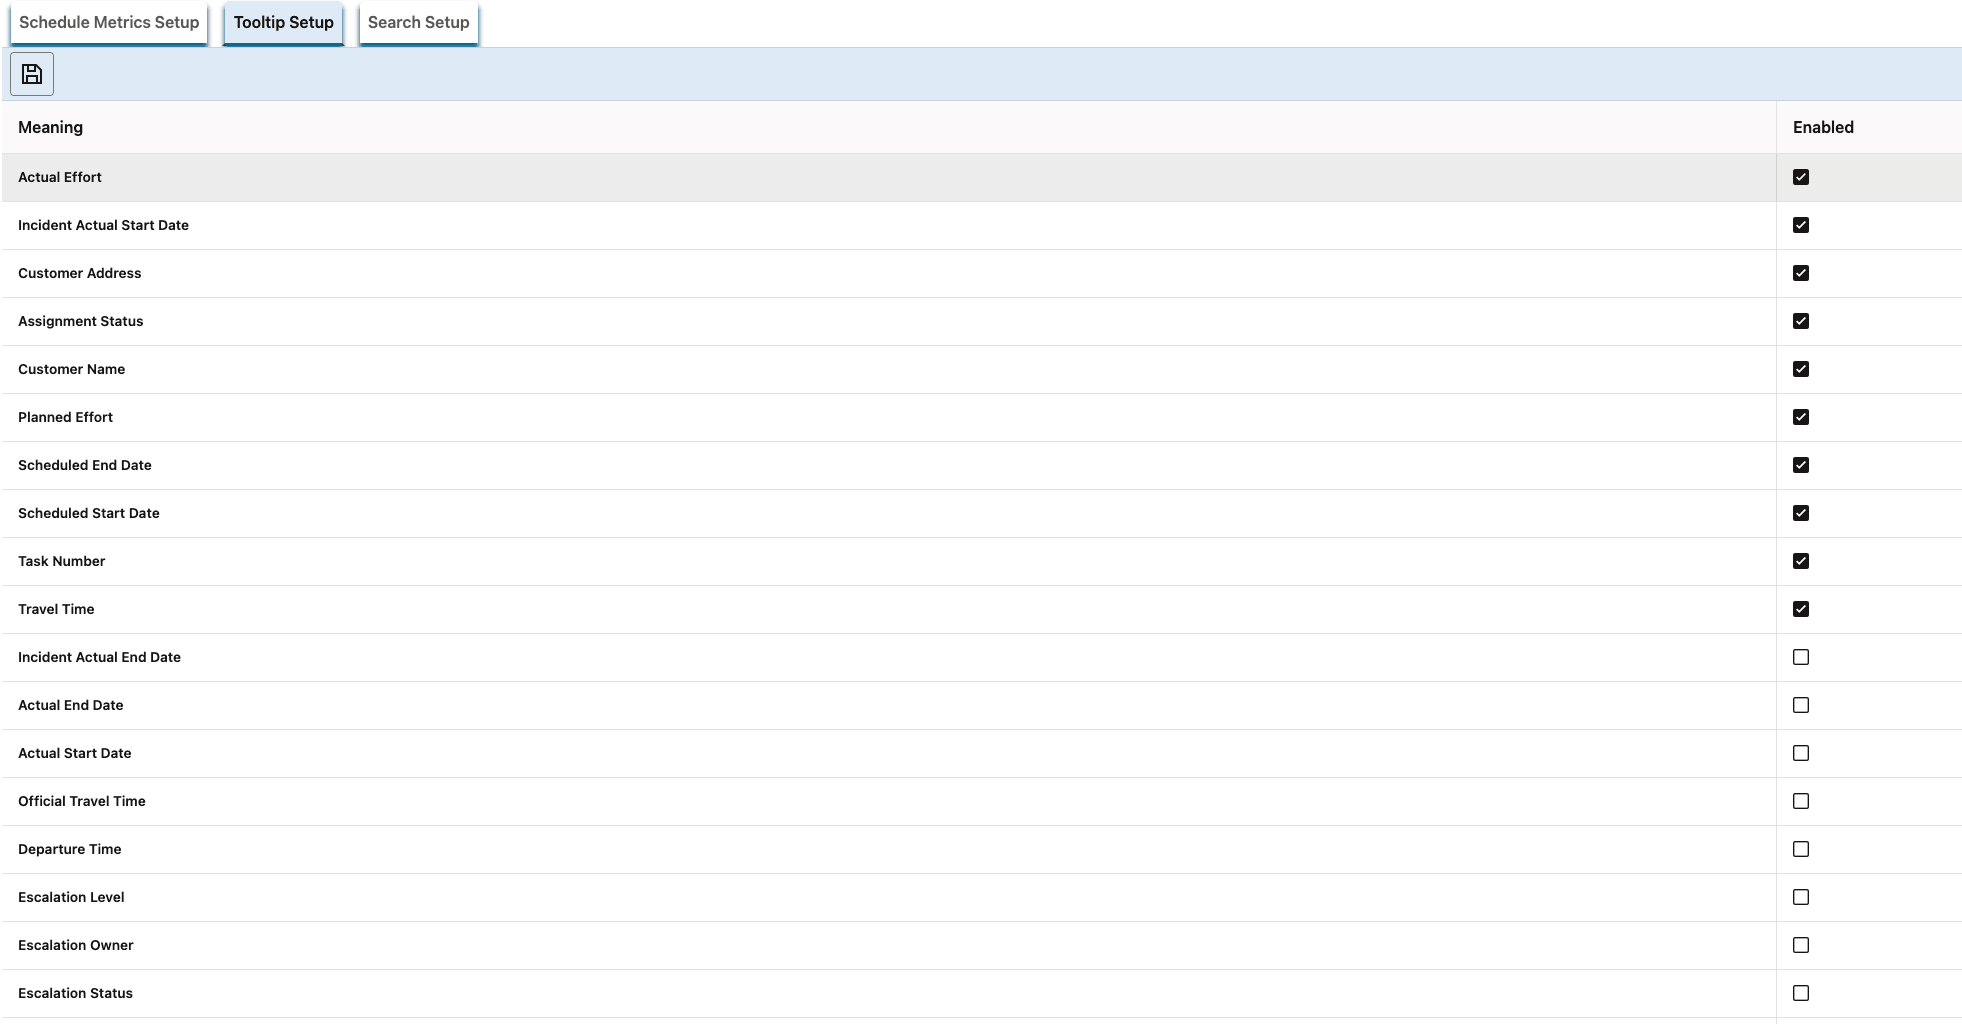
Dispatch Center Setup Tab: Tooltip Setup
The following screenshot shows the Search Setup subtab in the Dispatch Center Setups tab. You can enable search by criteria here and the setups that you enable will be used in the search functionality for the Task List region.
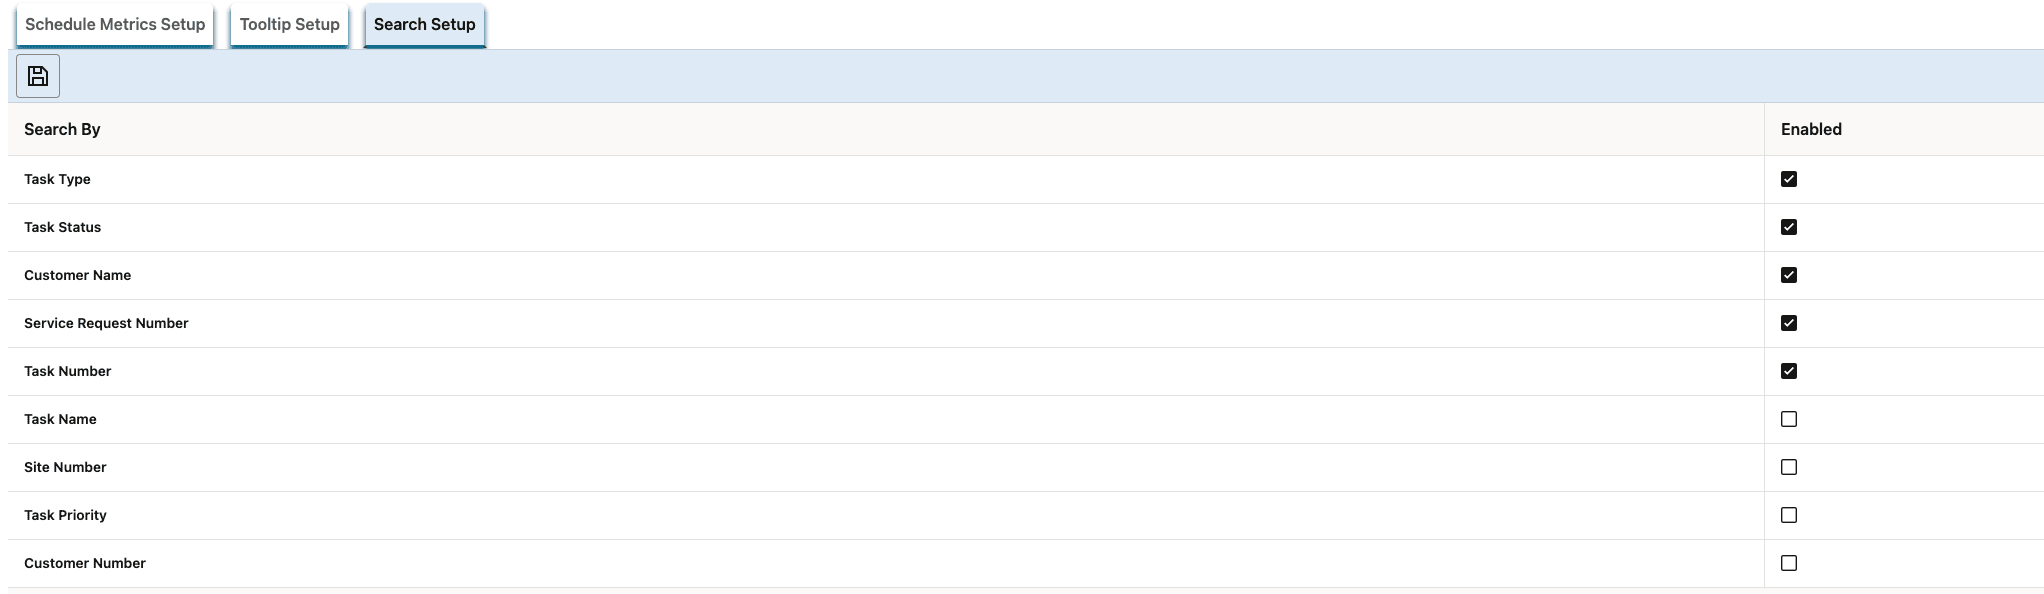
Dispatch Center Setup Tab: Search Setup
The following screenshot shows the Right Click Menu tab: You can use it to add and order the menu items that appear in the Right-click Menu for tasks.

Right Click Menu Tab
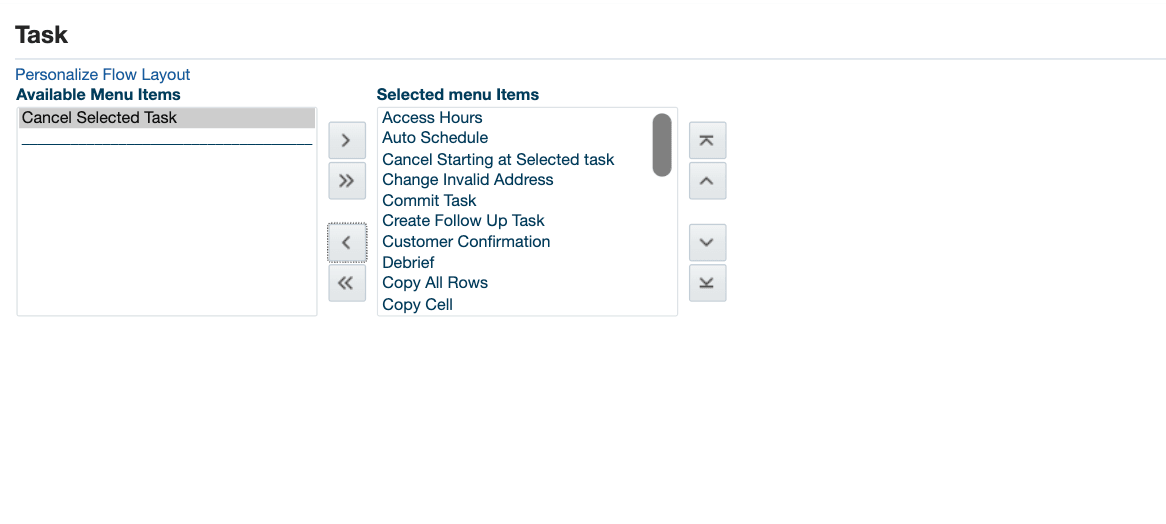
Right Click Setup OA Page
The following screenshot shows the TaskBar Icon Setup subtab in the Schedule Chart tab. You can enable and order the icons that appear in Gantt Chart Taskbar.
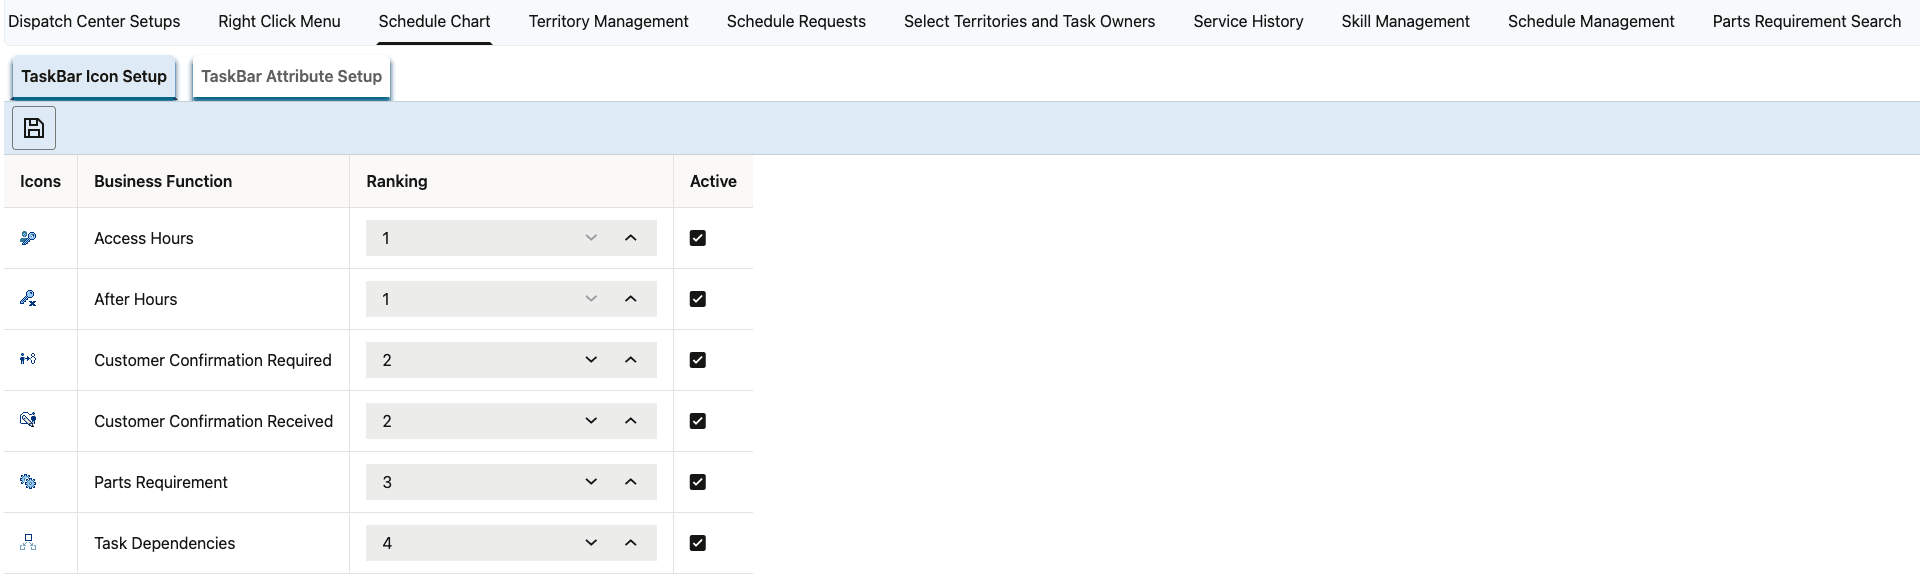
Schedule Chart Tab: Taskbar Icon Setup
The following screenshot shows the TaskBar Attribute Setup subtab in the Schedule Chart tab. You can enable and order the attributes that appear in Gantt Chart Taskbar.
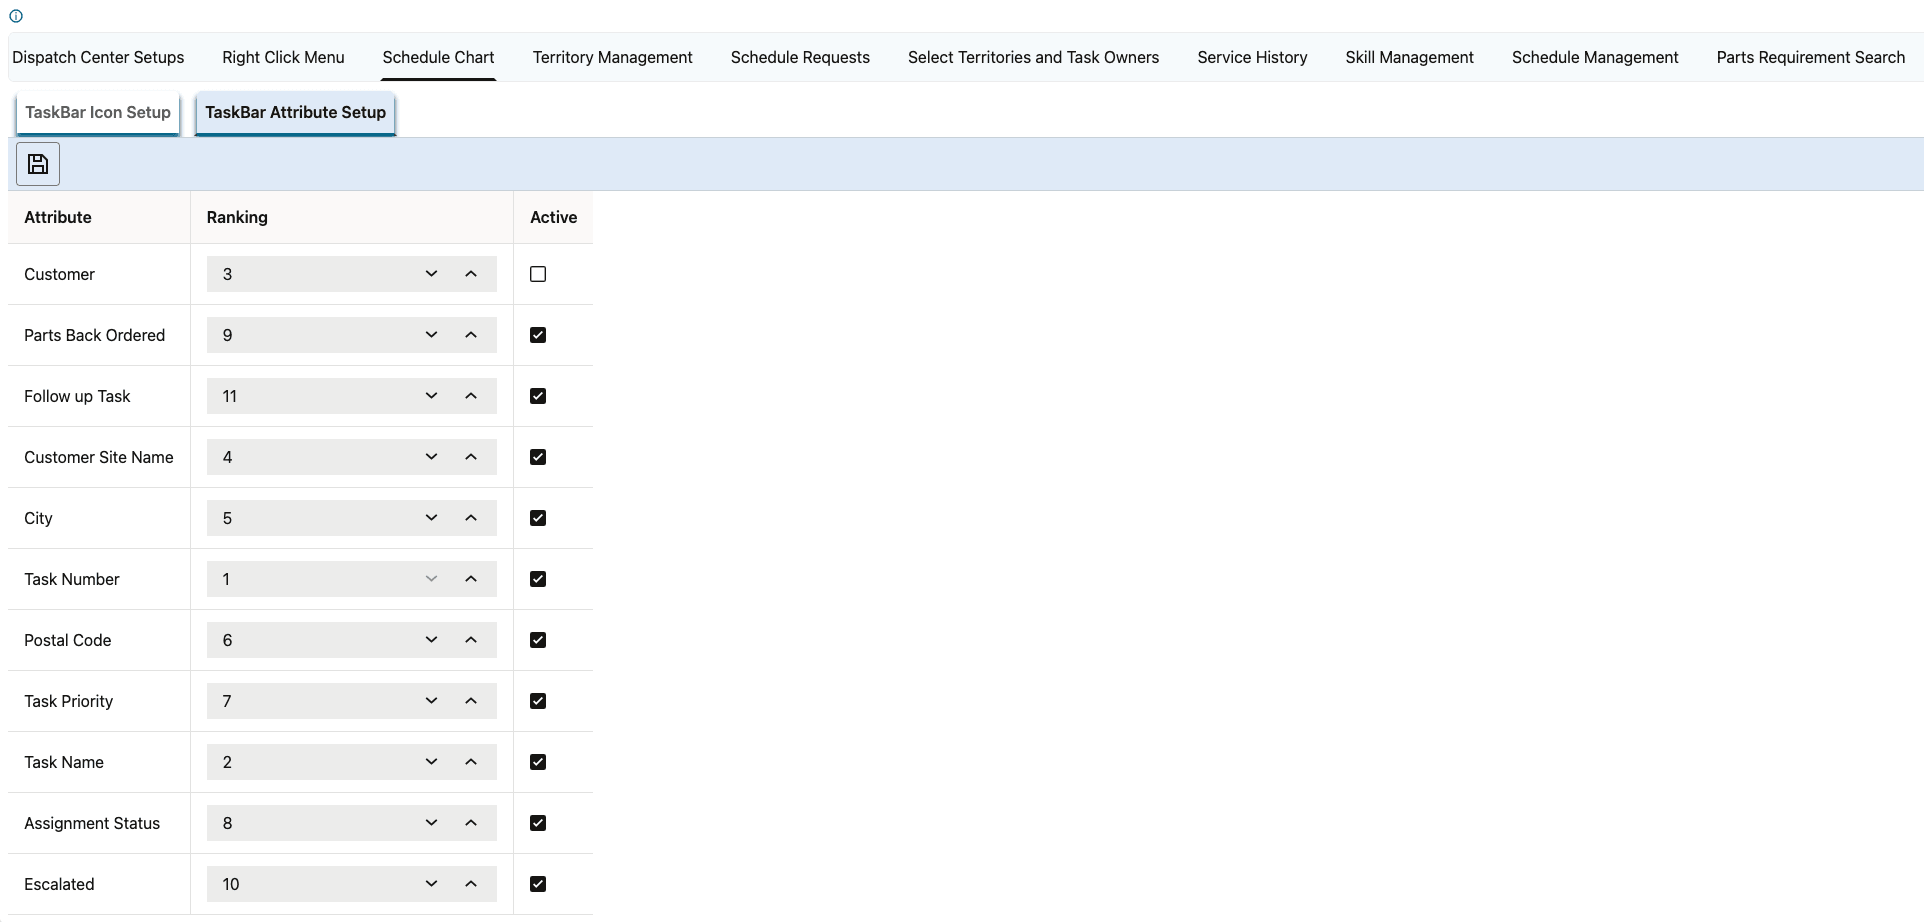
Schedule Chart Tab: Taskbar Attributes Setup
The following screenshot shows the Territory Management tab. You can use this tab to navigate to the Territory Management UI.

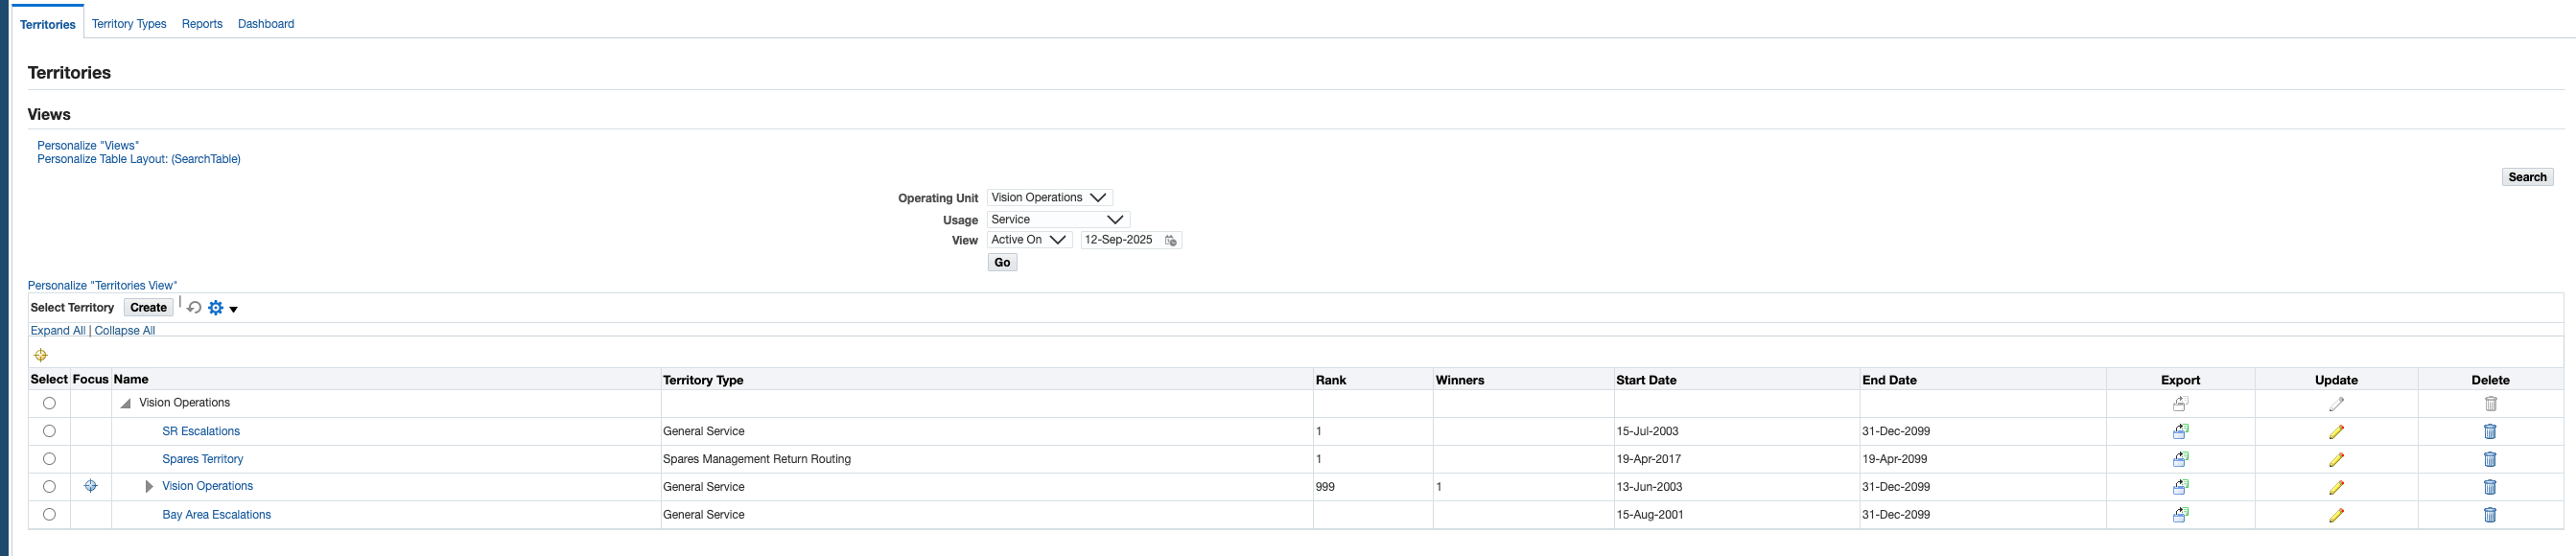
Territory Management OA Page
The following screenshot shows the Schedule Request tab. You can use this tab to submit concurrent programs.

Schedule Request Option
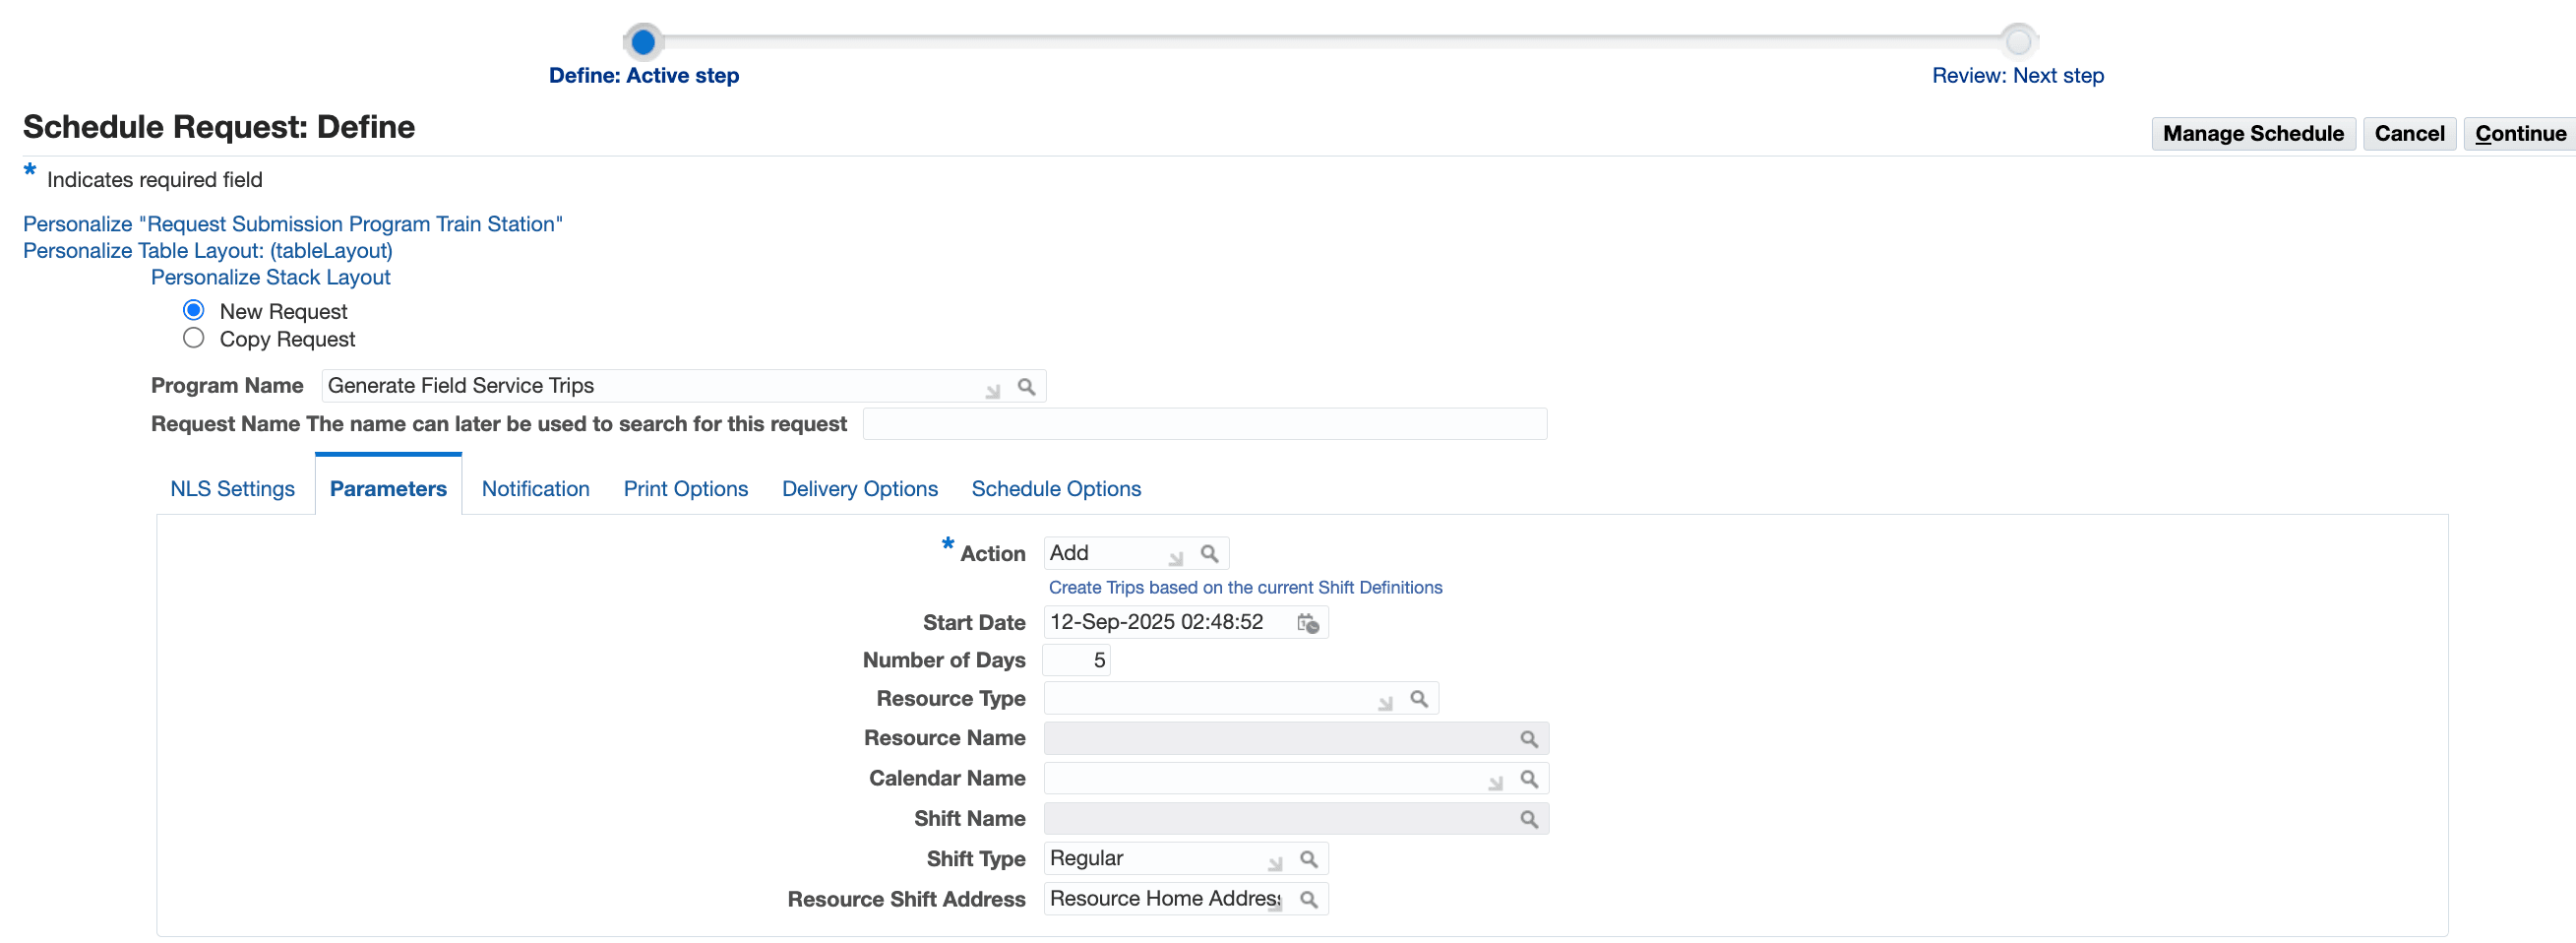
Schedule Request OA Page
The following screenshot shows the Select Territories and Task Owners tab. You can use this tab to select territories and task owners that are used in the Gantt and Planboard UIs.
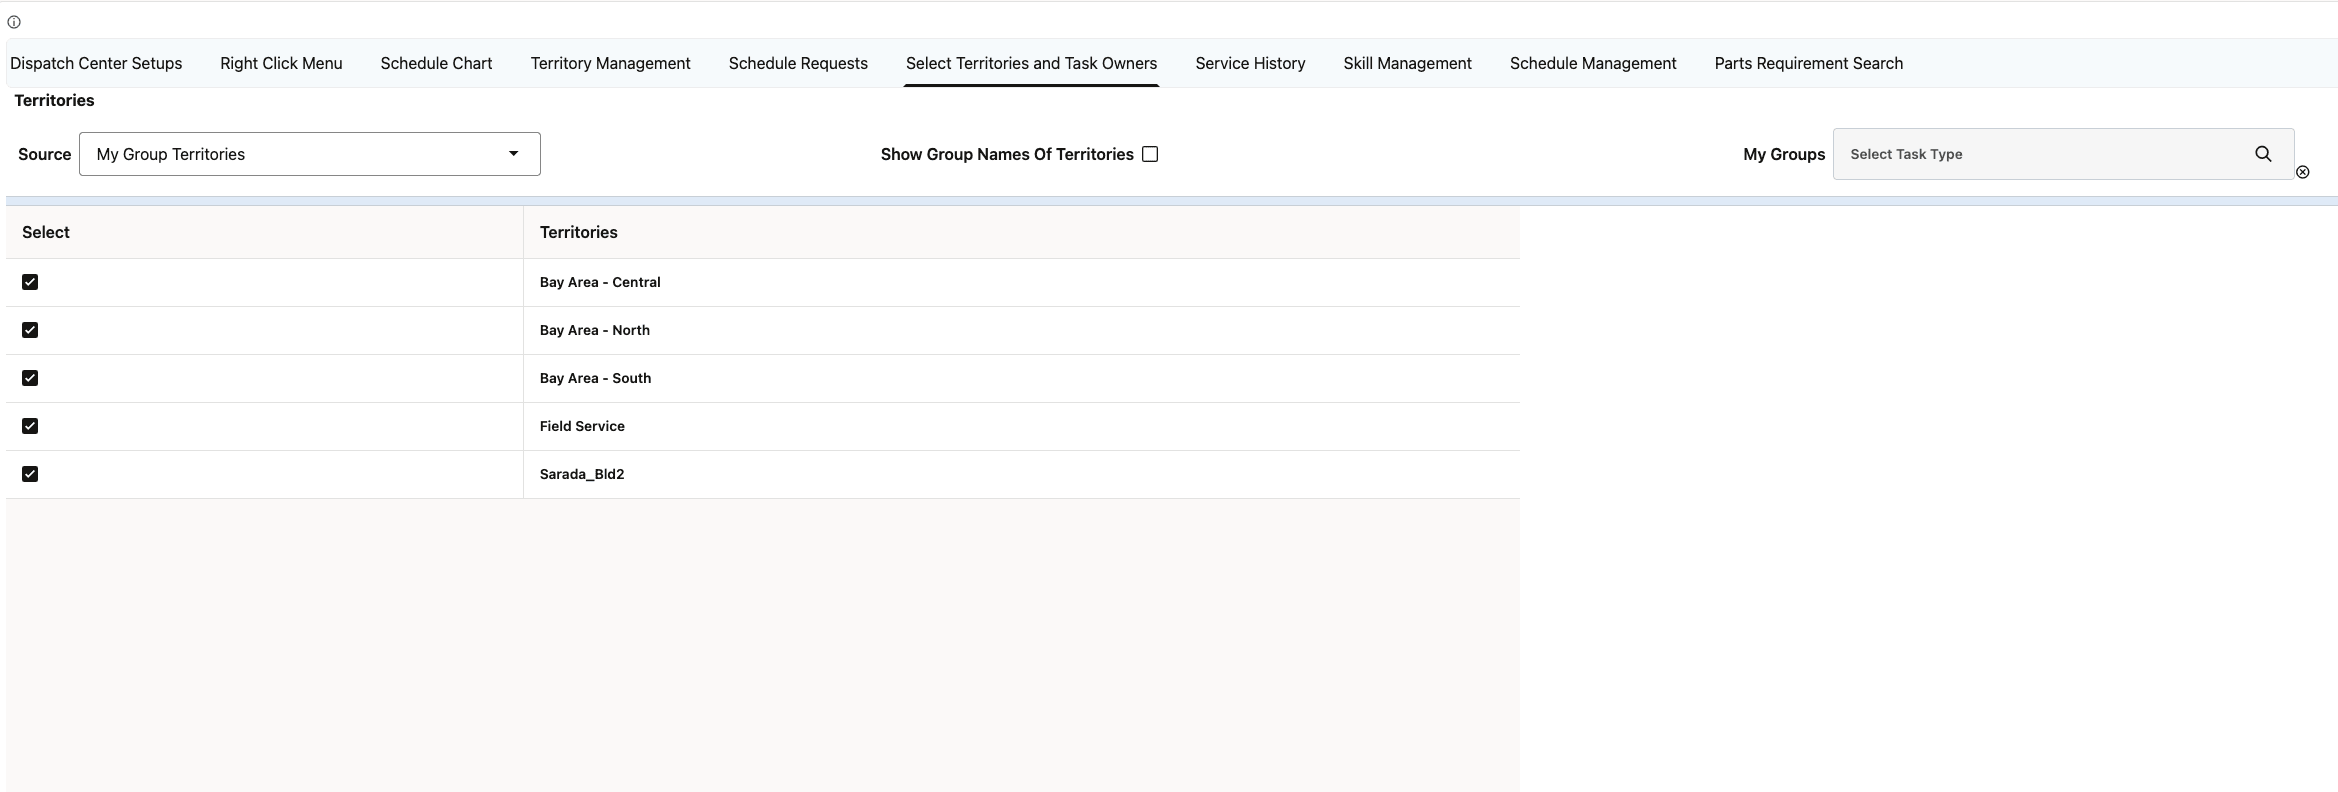
Select Territories and Task Owners Tab
The following screenshot shows the Service History tab. You can use this tab to search tasks and service requests.
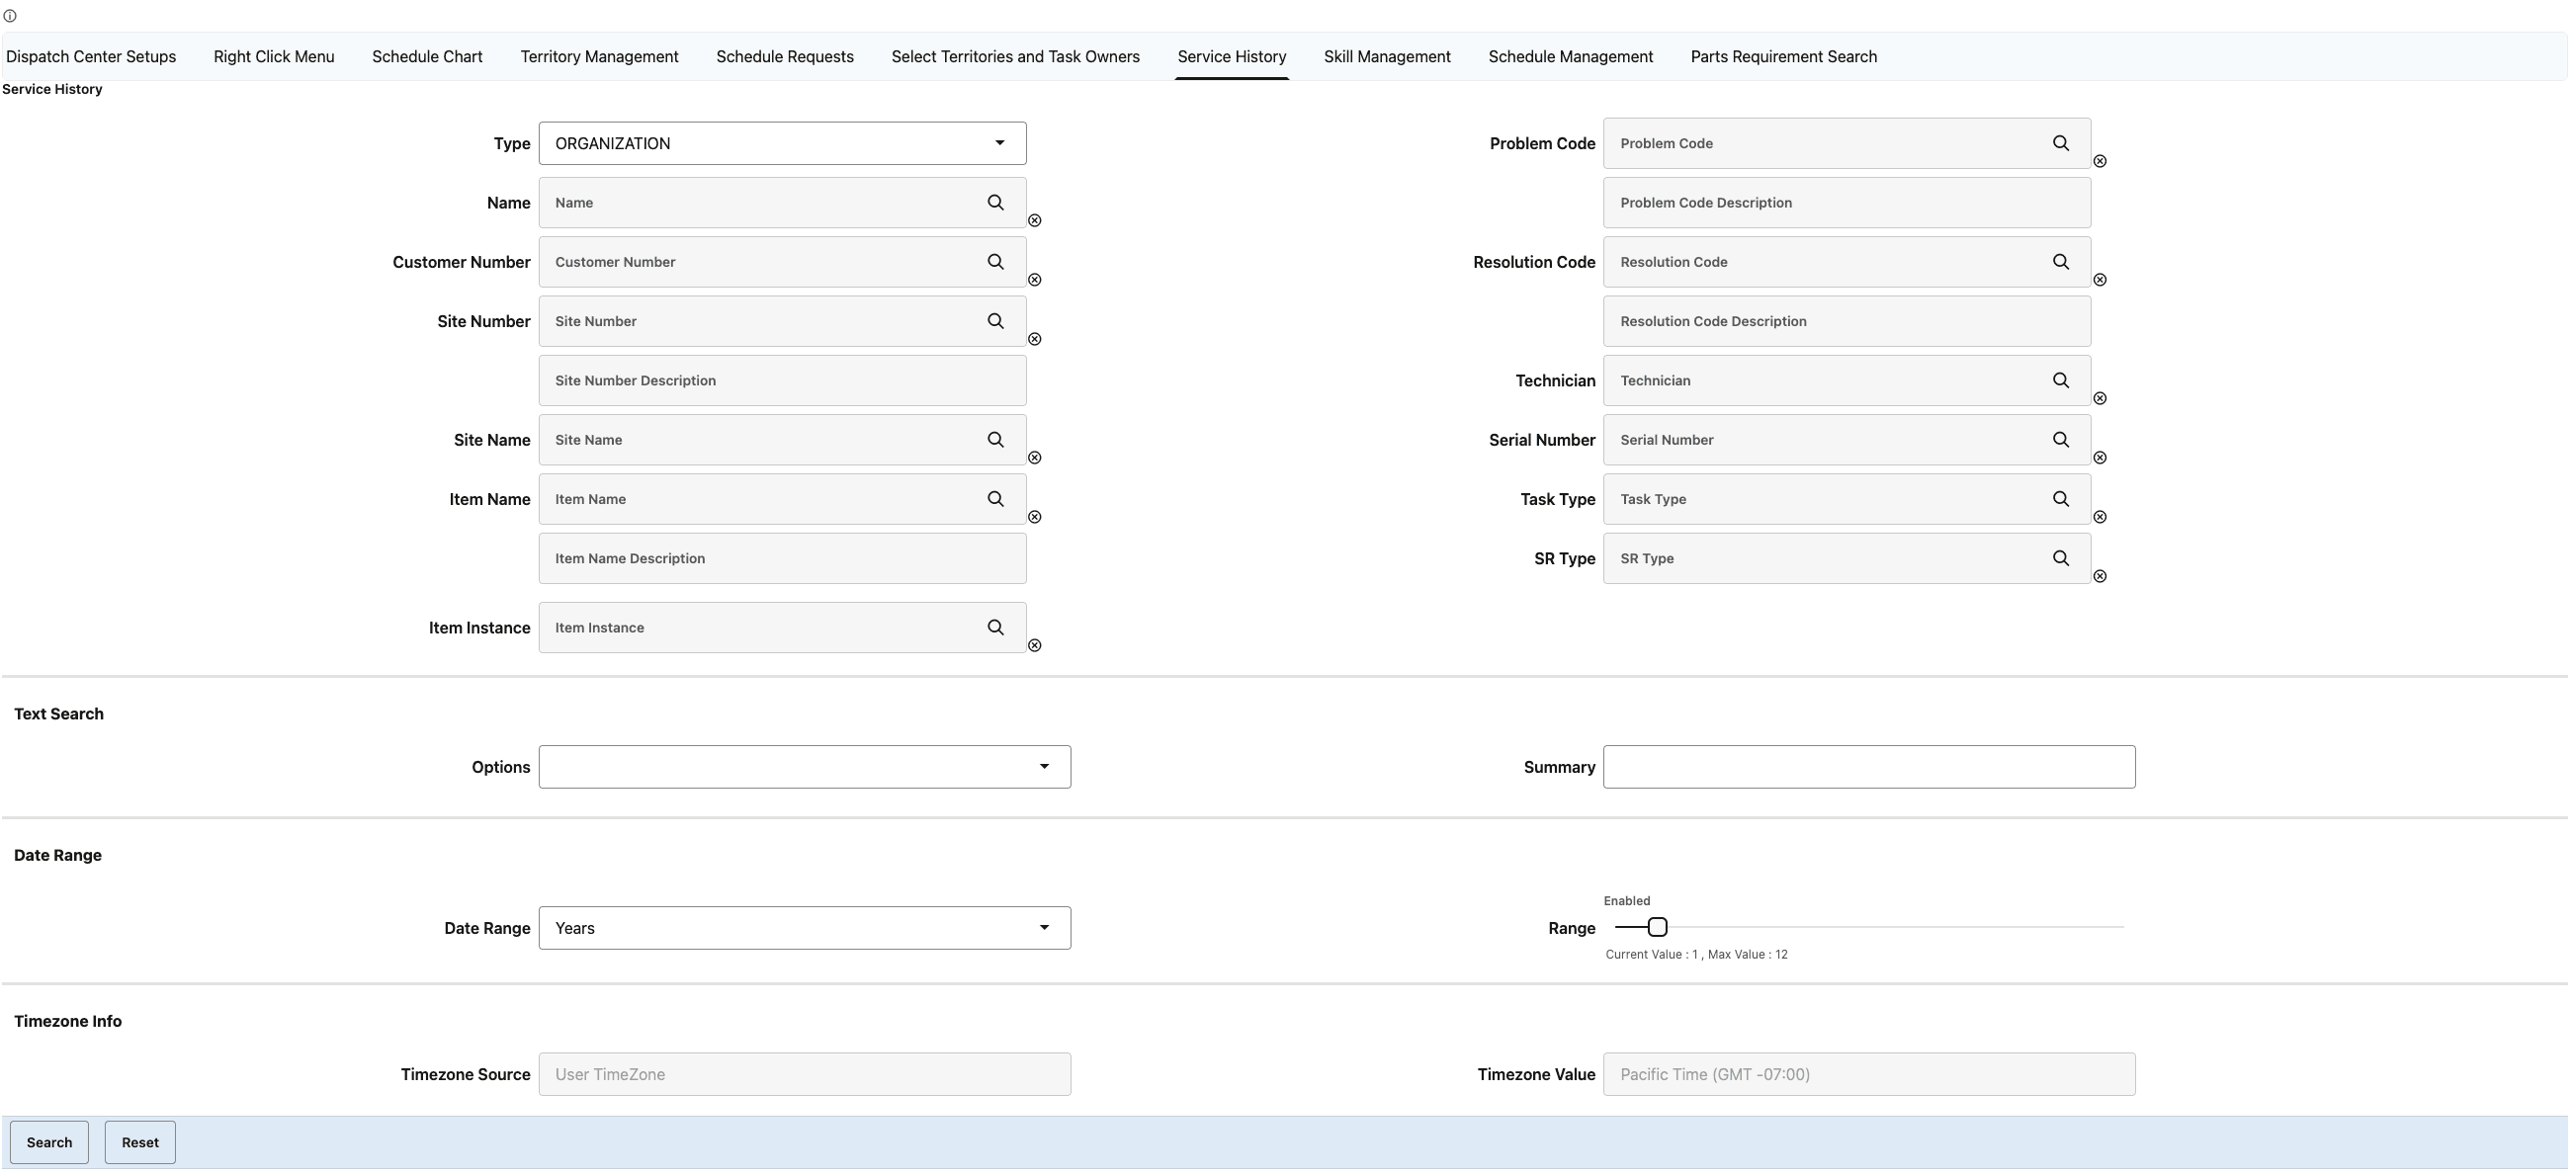
Service History Tab
The following screenshot shows the Skill Type Setup subtab in the Skill Management tab. You can use this tab to enter and view skill types.
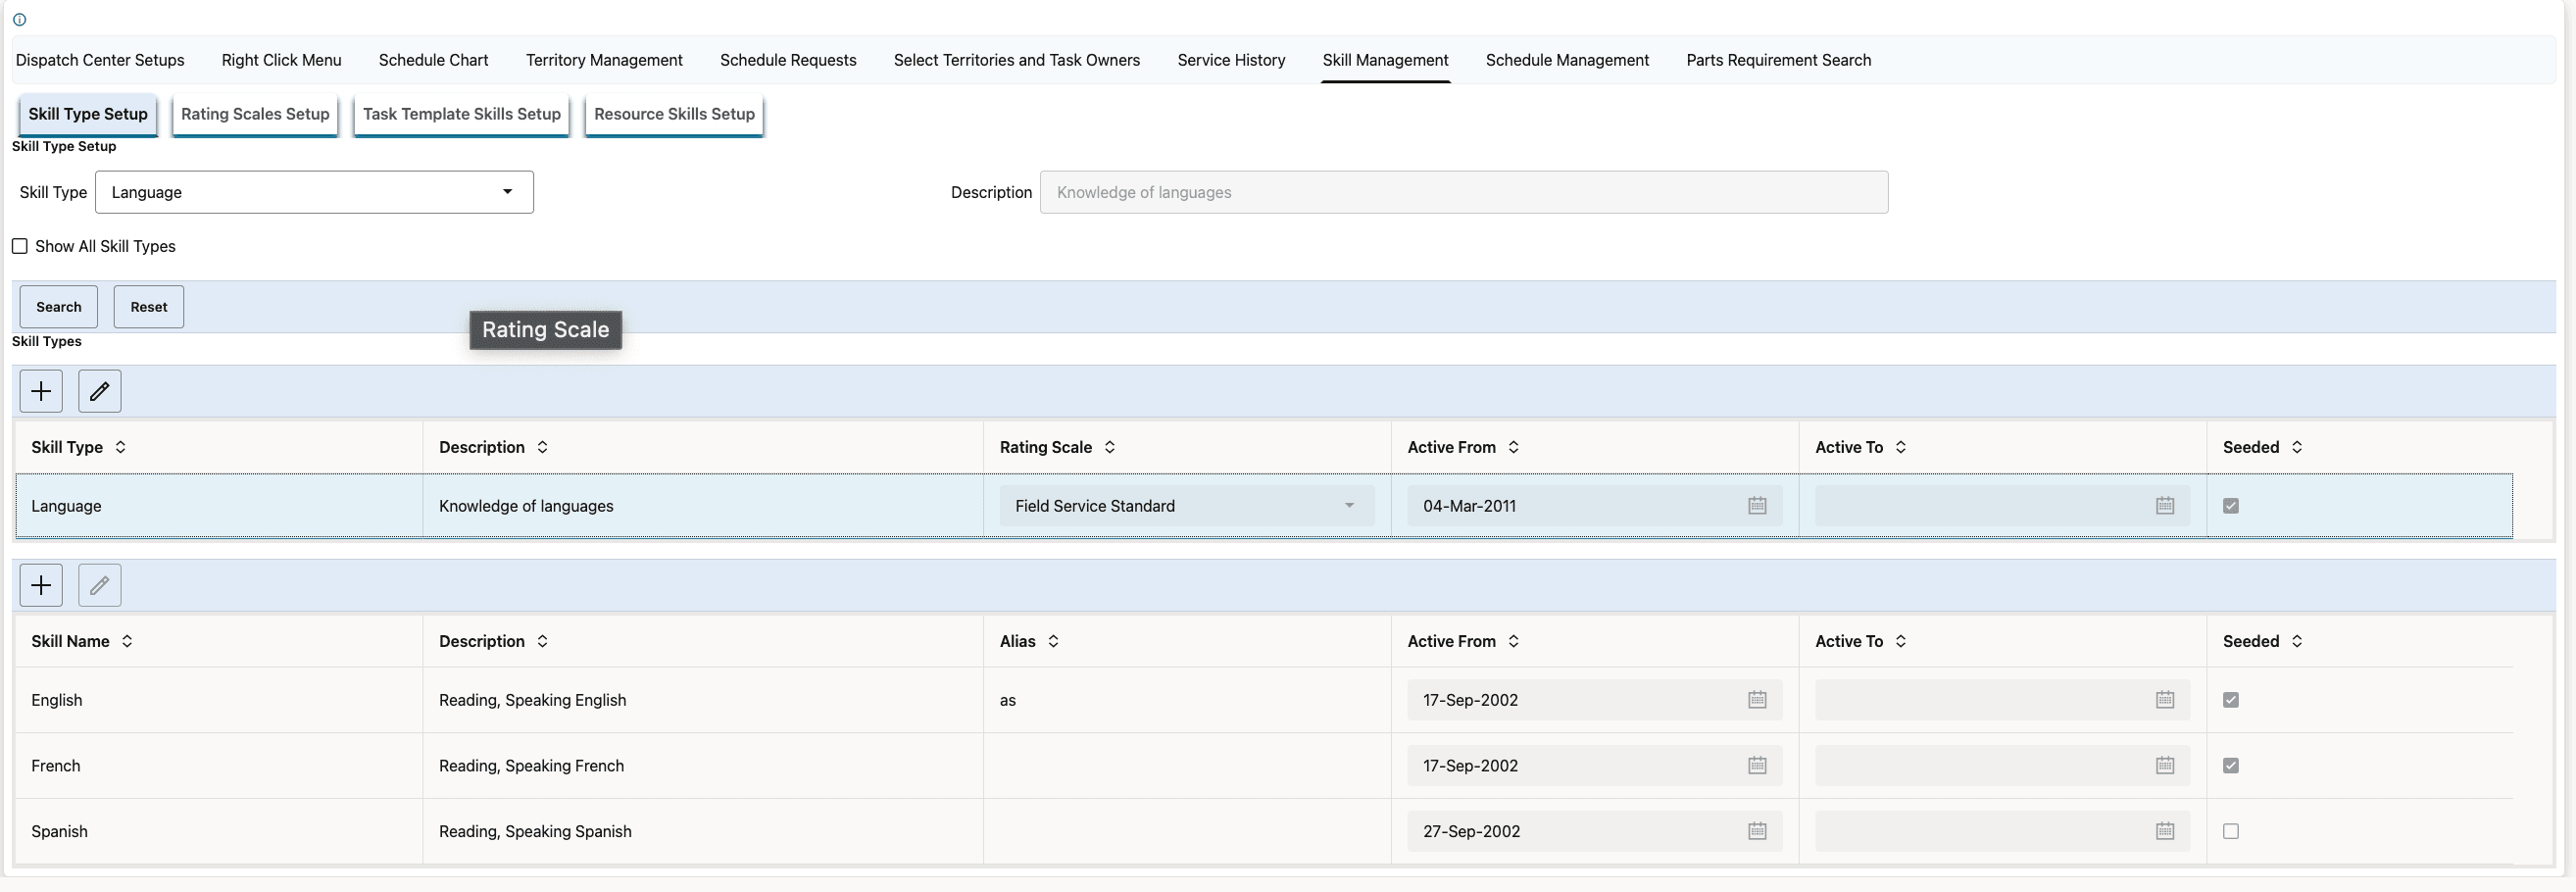
Skill Management Tab: Skill Type Setup
The following screenshot shows the Rating Scales Setup subtab in the Skill Management tab. You can use this tab to enter and view rating scales.
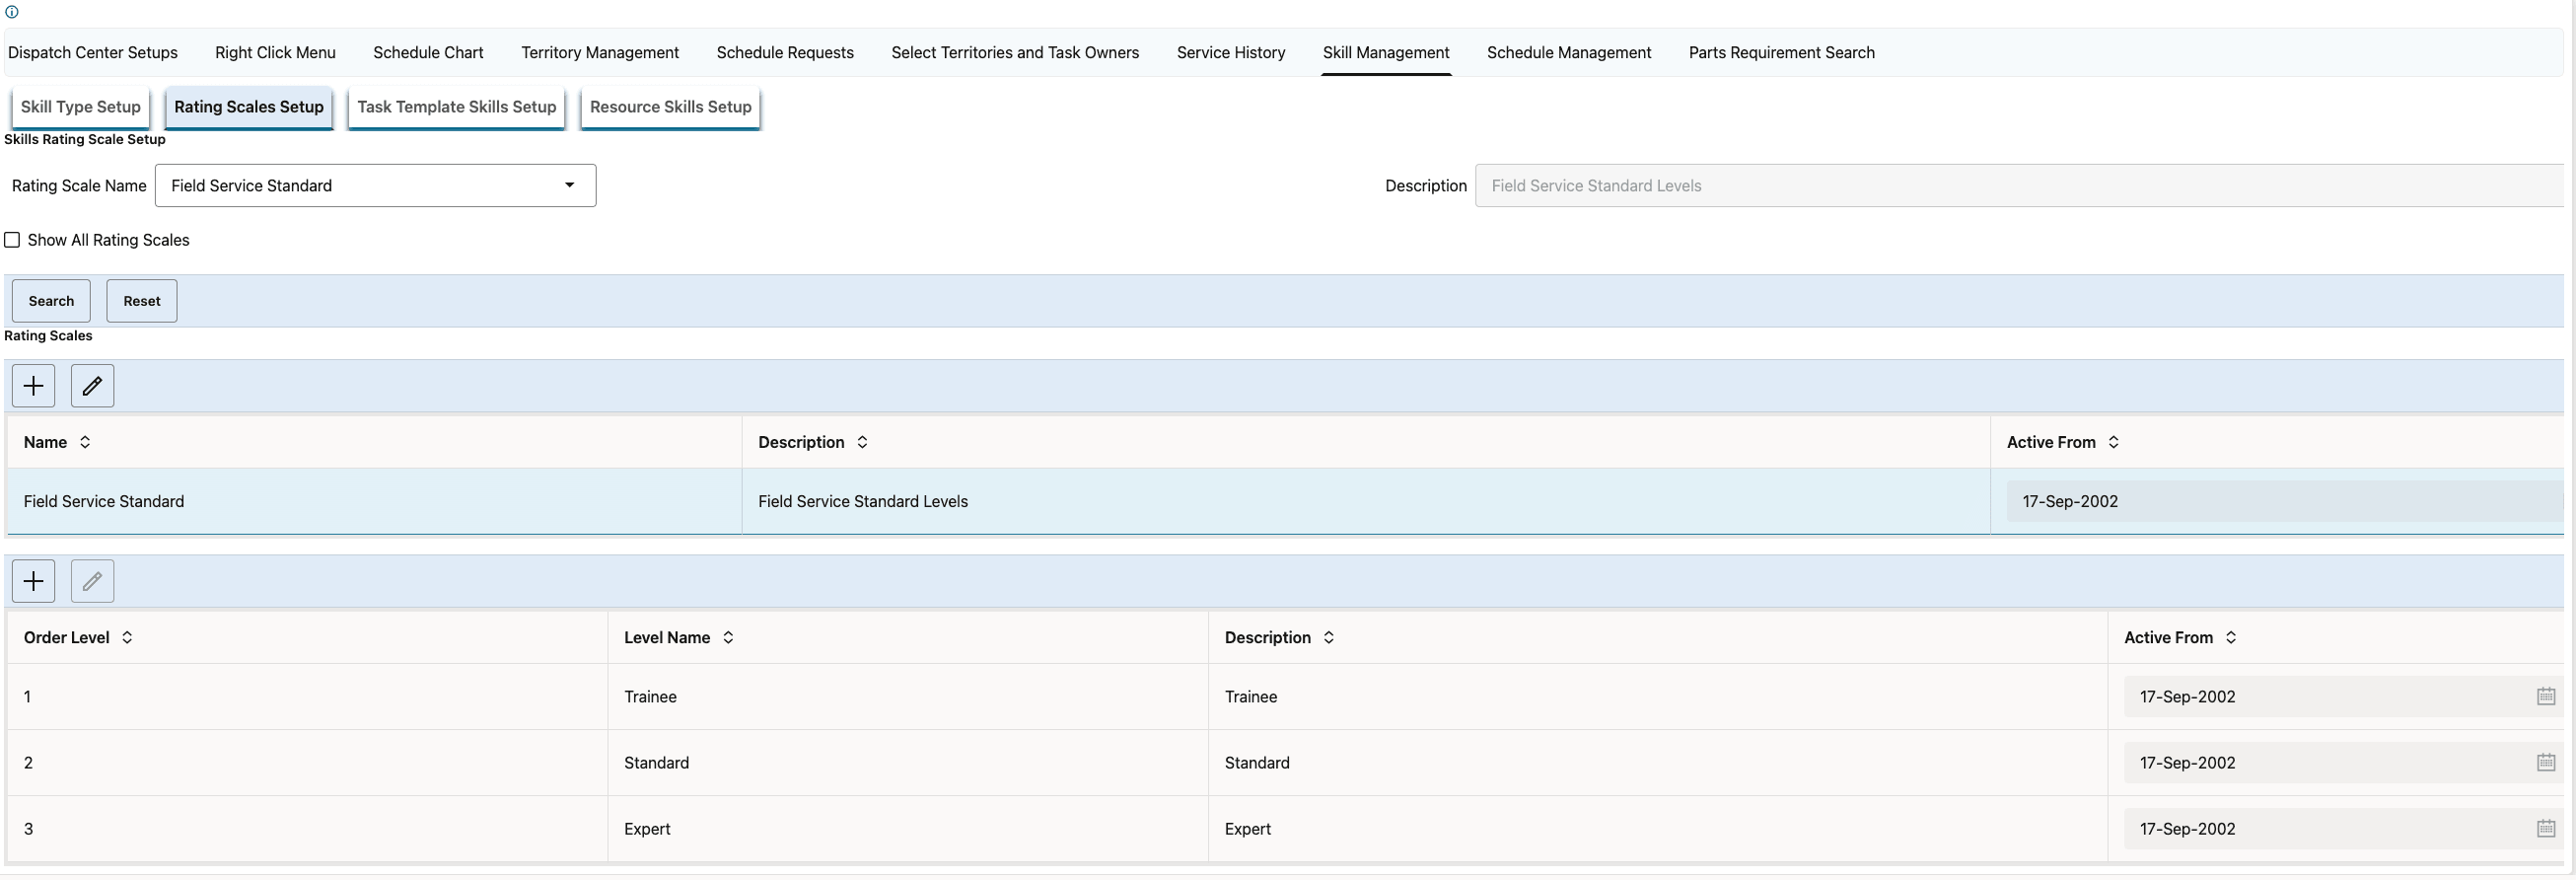
Skill Management Tab: Rating Scales Setup
The following screenshot shows the Task Template Skills Setup subtab in the Skill Management tab. You can use this tab to enter and view task template skills.
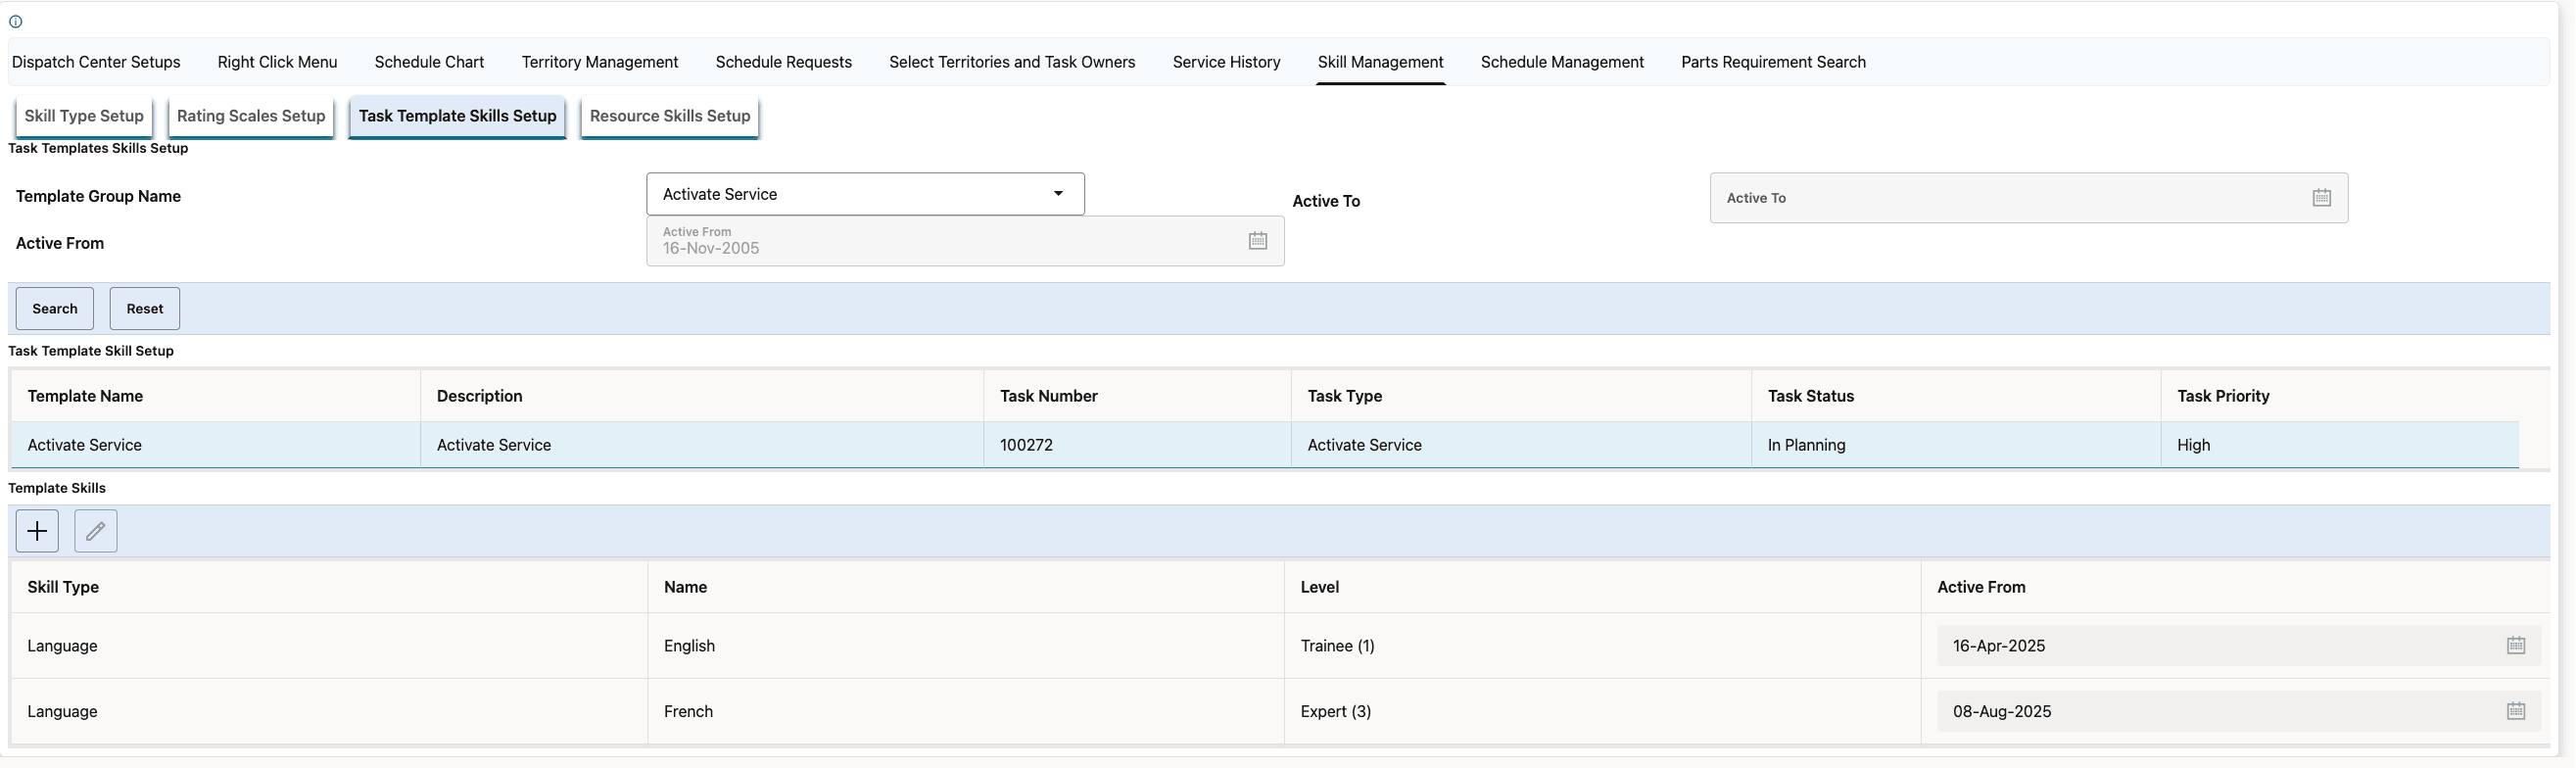
Skill Management Tab: Task Template Skills Setup
The following screenshot shows the Resource Skills Setup subtab in the Skill Management tab. You can use this tab to enter and view resource skills.
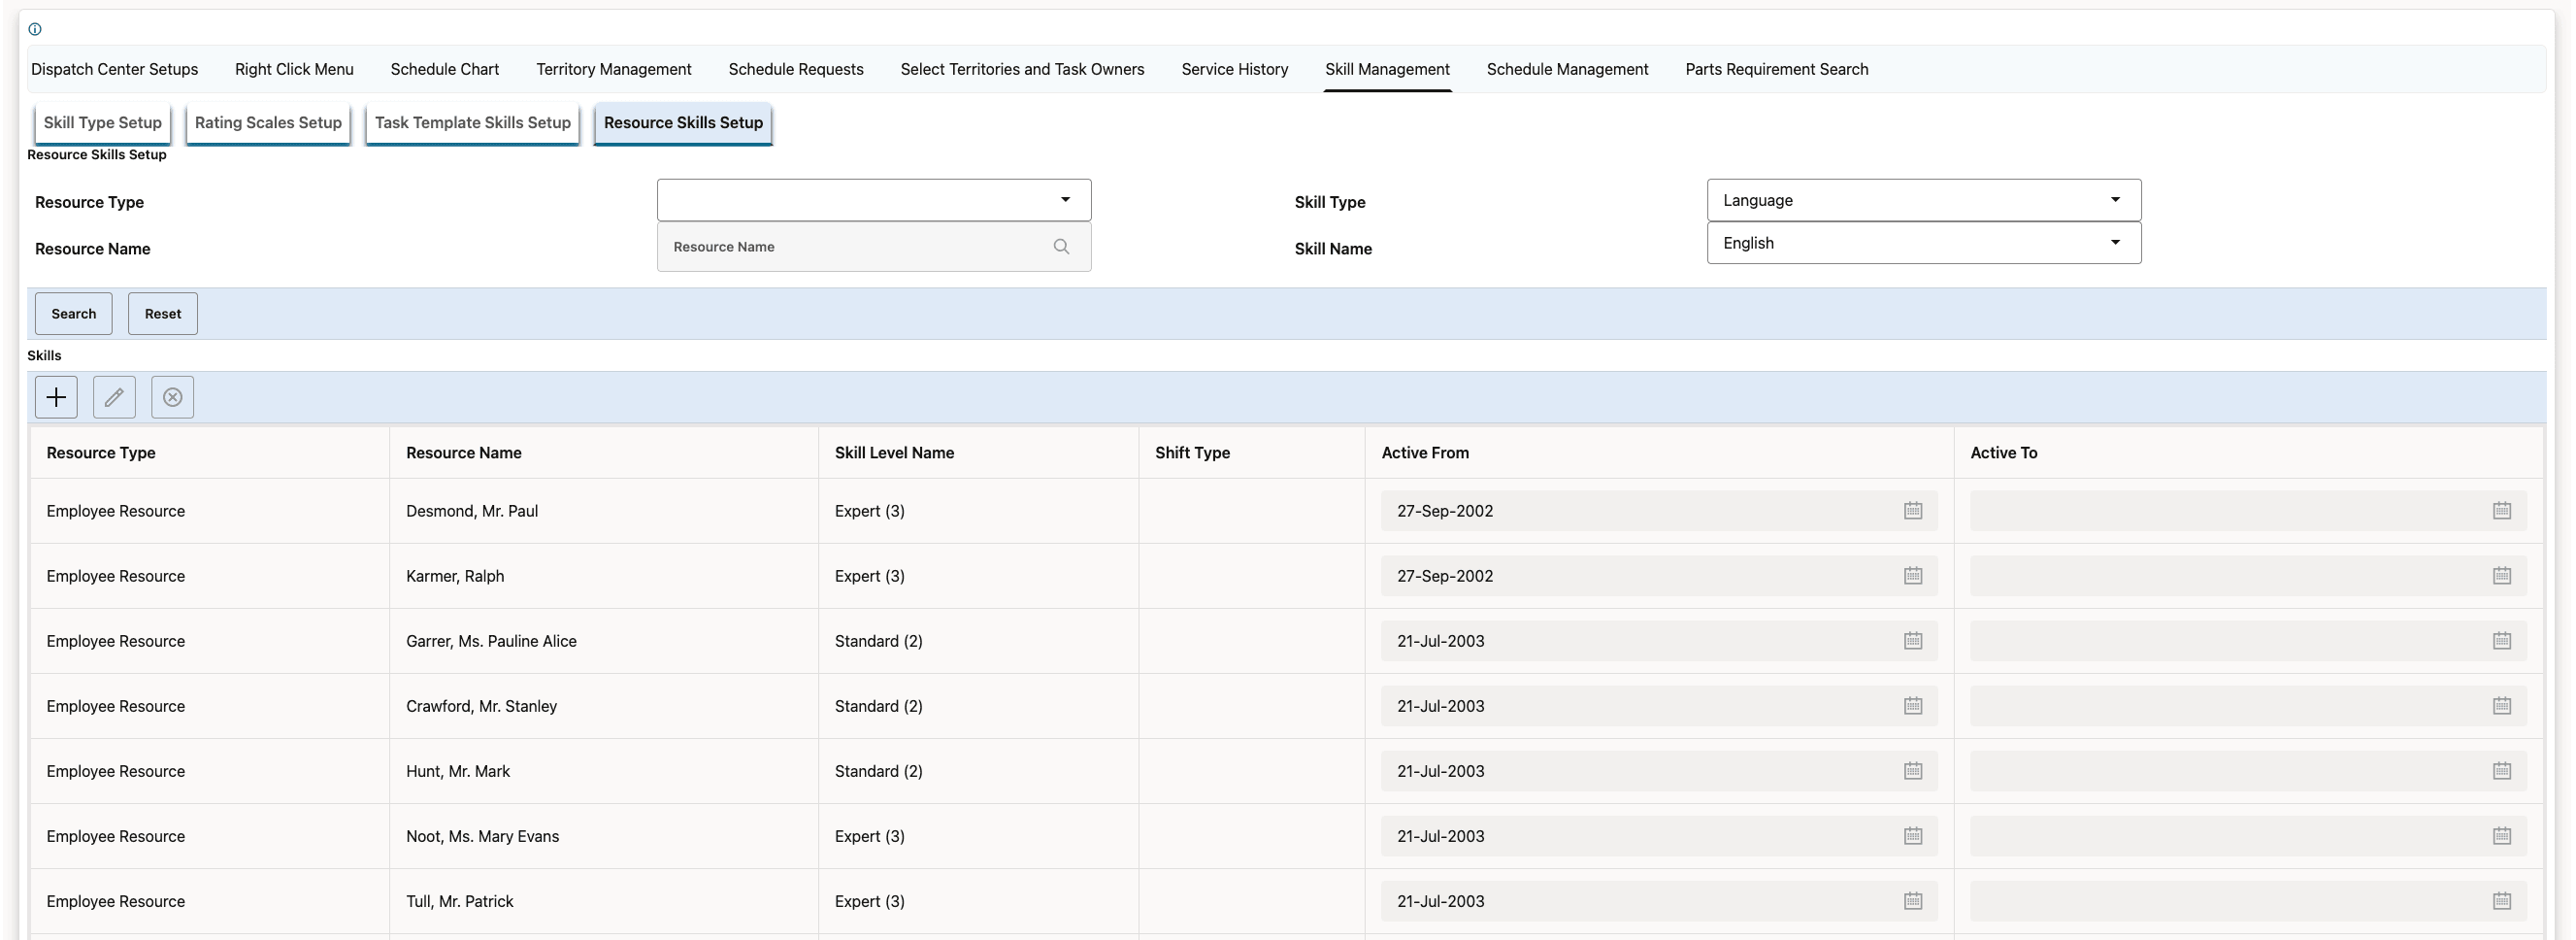
Skill Management Tab: Resource Skills Setup
The following screenshot shows the Schedule Management tab. You can use this tab to manage the schedules of resources.
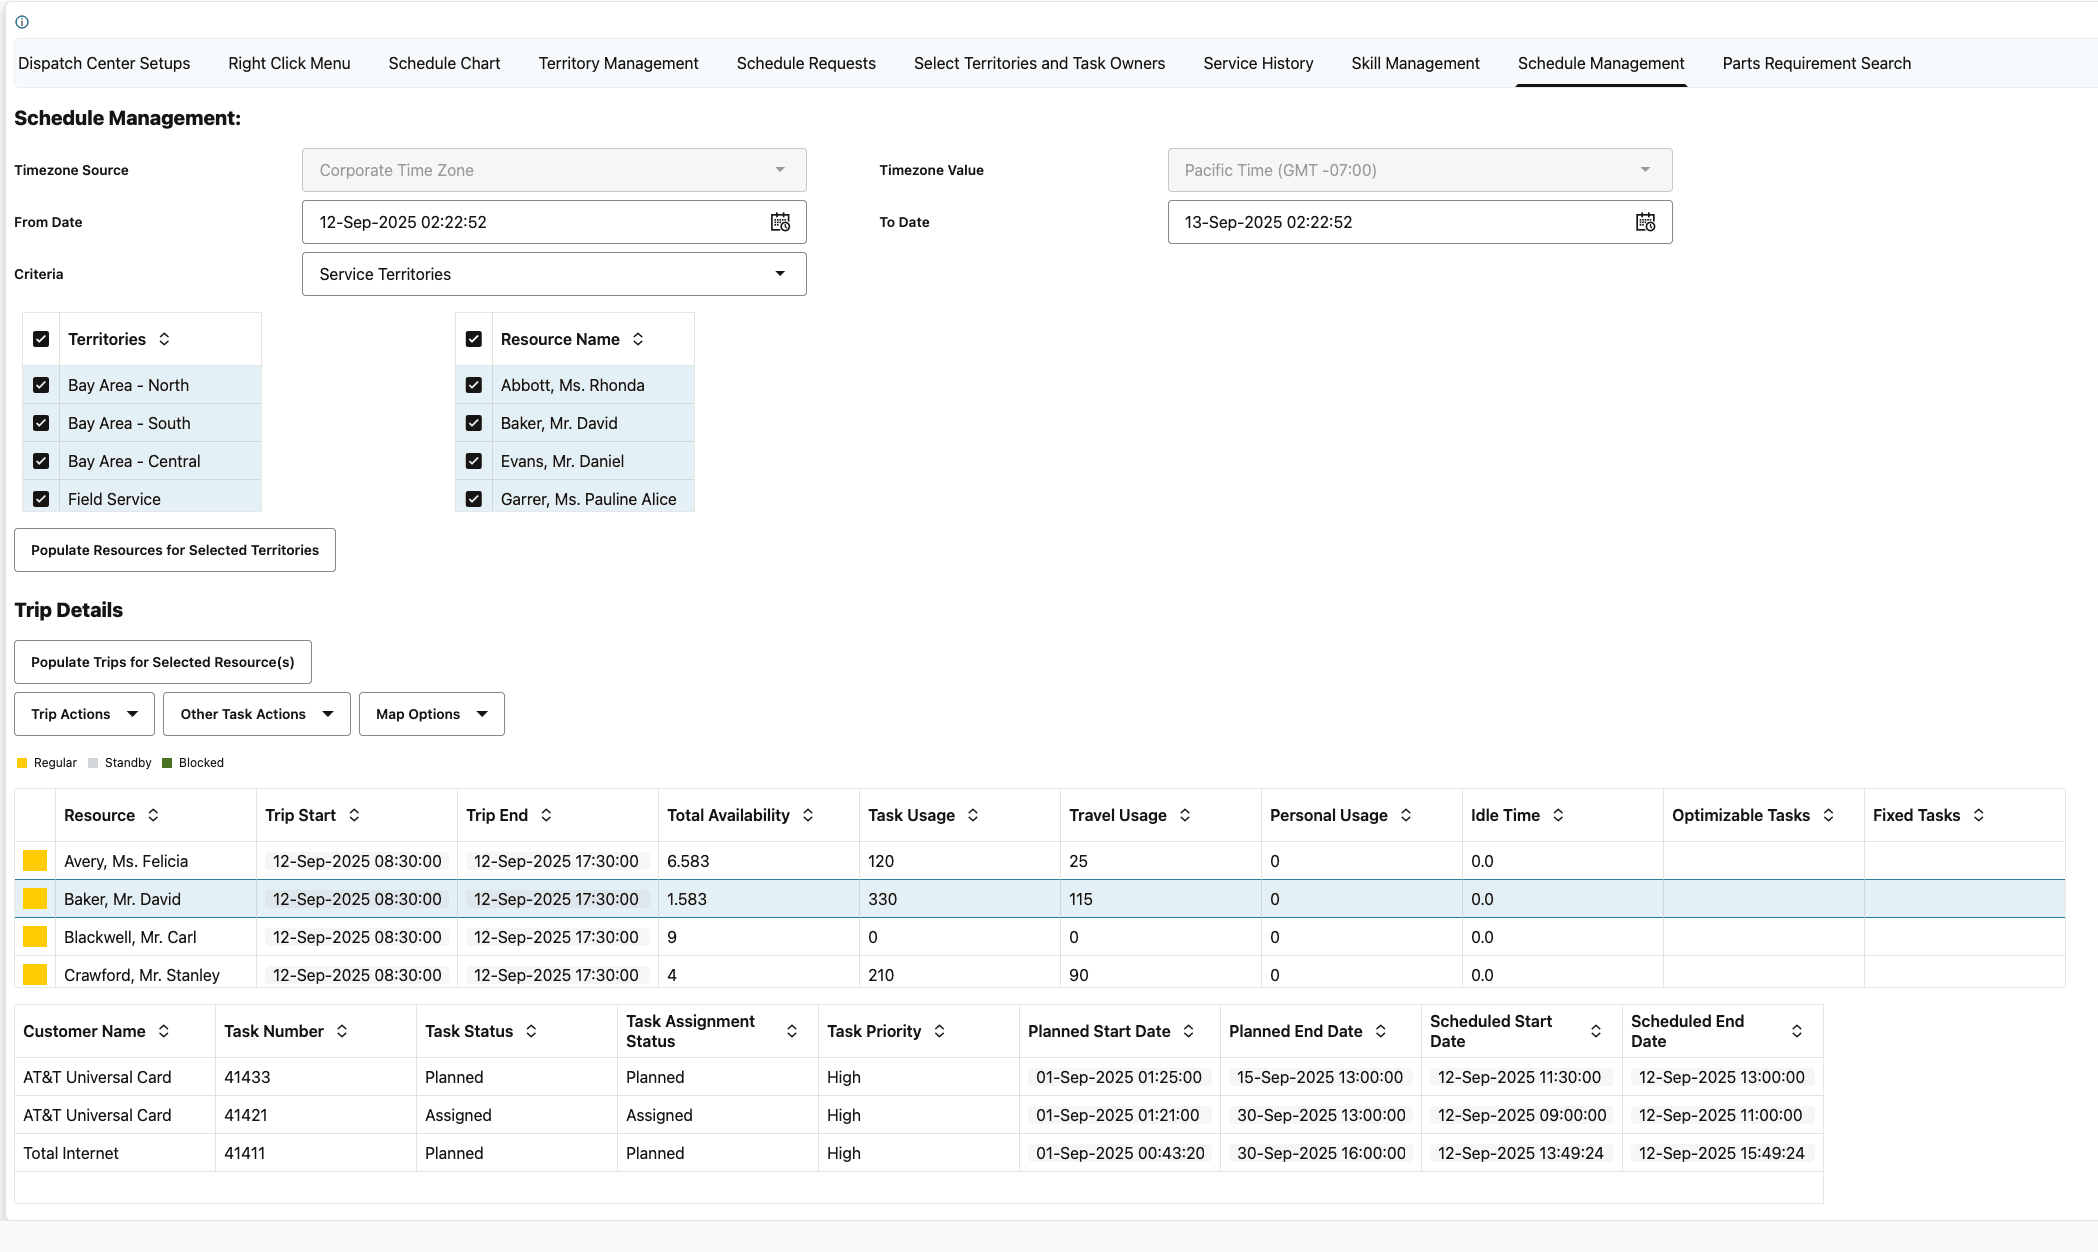
Schedule Management Tab
The following screenshot shows the Skill Parts Requirements tab. You can use this tab to view parts requirement for a task.
 Parts Requirement Search Tab
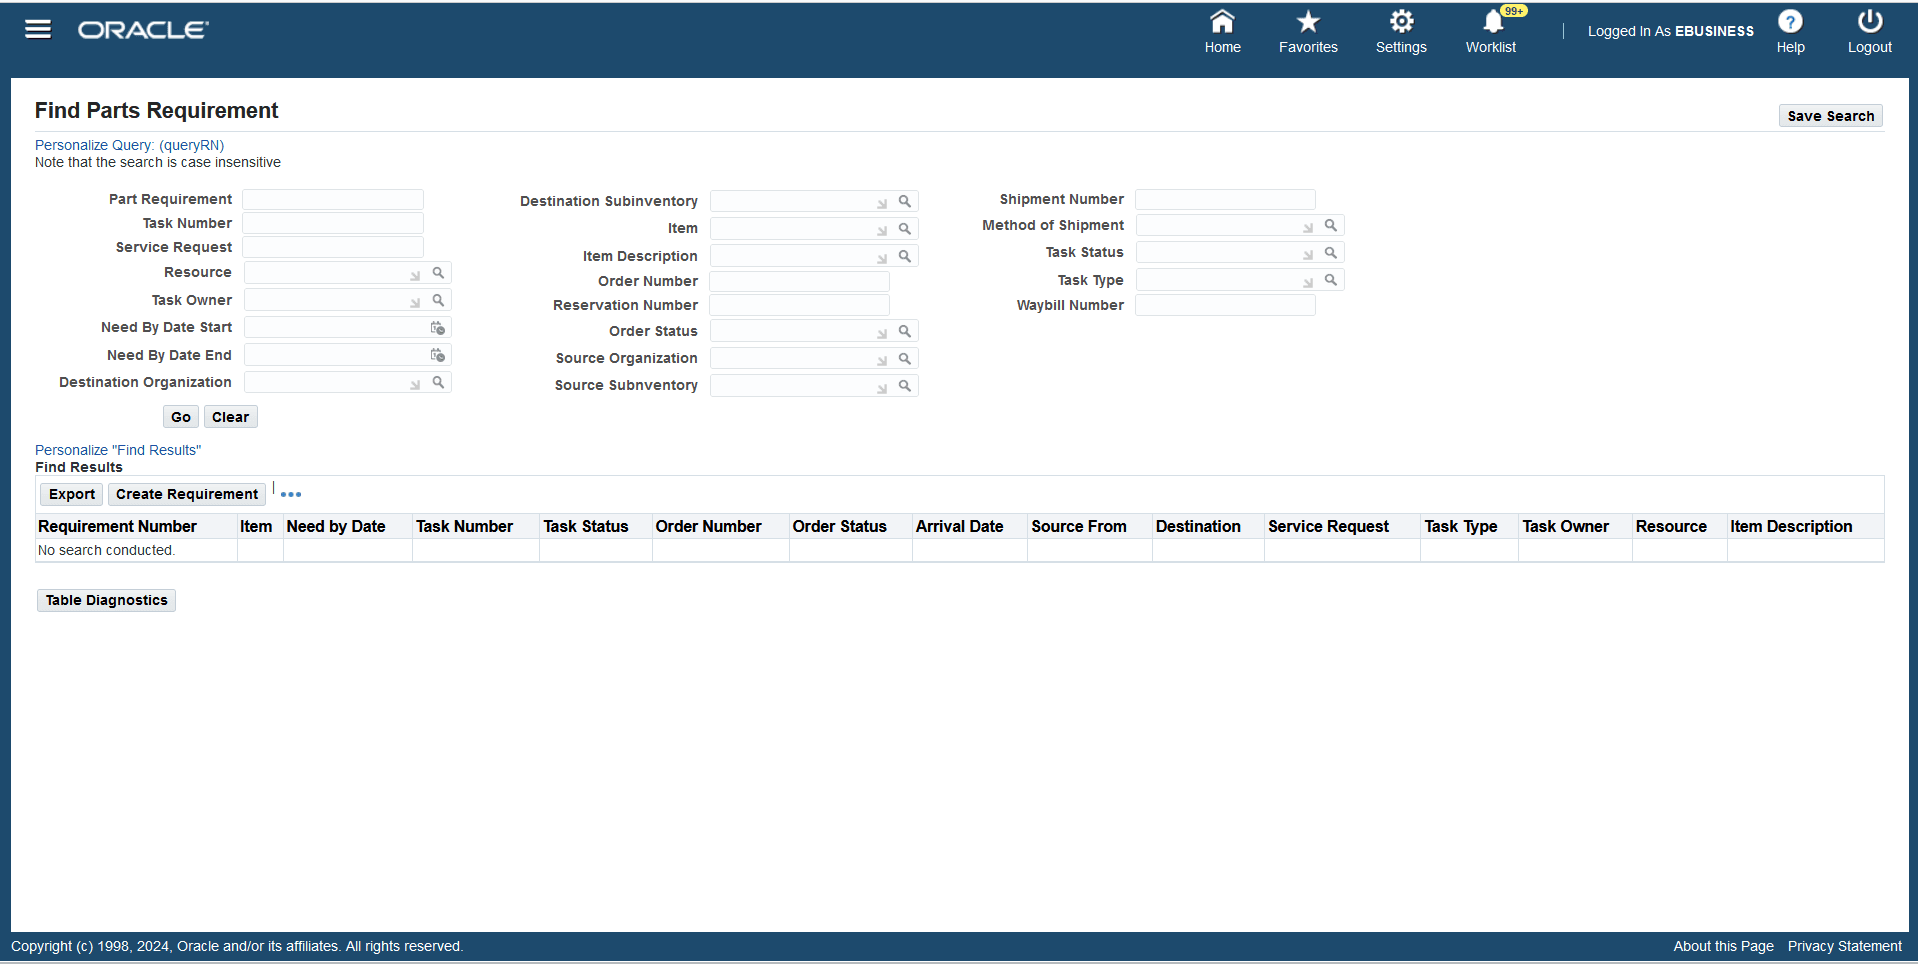
Parts Requirement Search OA UI
6. Analytics
The following screenshot shows menu that's available in the Task List region. You can navigate to the menu as follows: From the Navigator, click the Field Service Manager responsibility, then click Field Service Dispatcher, then click Schedule and Dispatch, then click the Menu icon, and choose Analytics.

How to Navigate to the Analytics UI
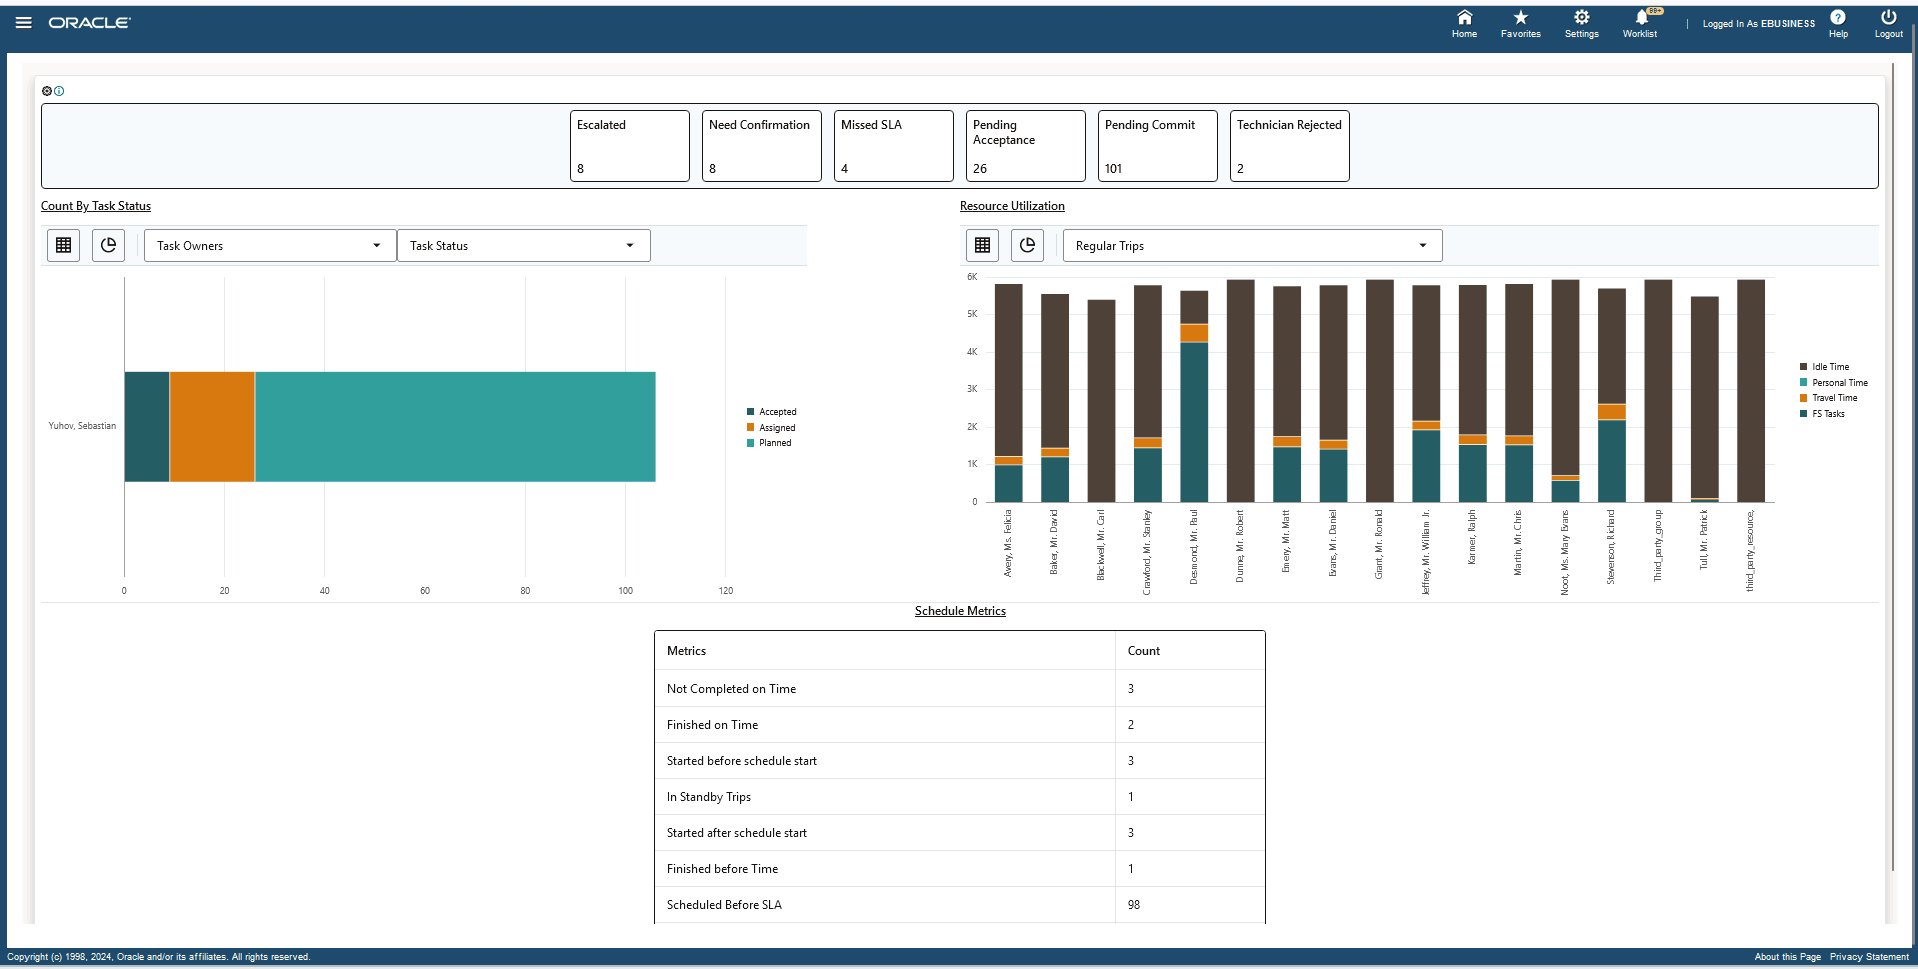
Analytics UI
The following screenshot shows the Tasks Quick Watch UI, which shows counts of the tasks by status.

Tasks Quick Watch UI
The following screenshot shows the Task Quick Watch setup. You can access the Configure Analytics Setup page by clicking the Watch icon. Here you choose the analytics that will appear in the Analytics UI.
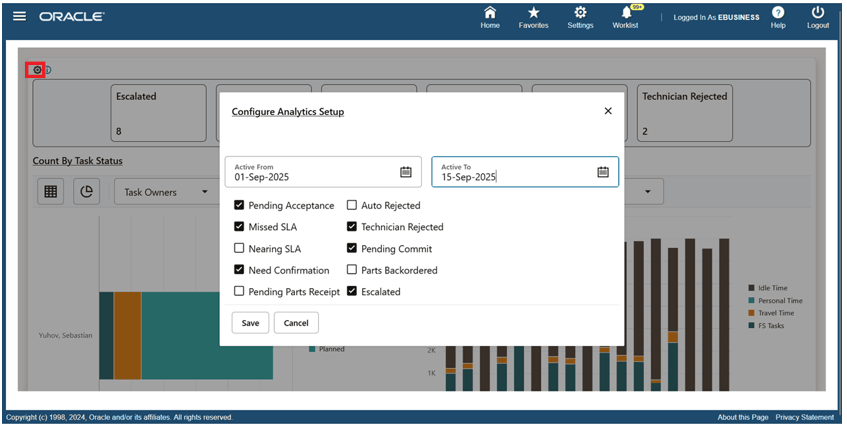
Task Quick Watch Setup
The following screenshot shows the Count By Selected Dimension and Series metrics. Tasks displayed in the Planboard, Gantt, and Map UIs are grouped according to the dimension and series that you select. By default, the tasks are grouped by territories and groups and the default series is task status. You can group by dimensions by city, country, customer, groups, postal code, state, task owners, and technicians. You can group series for plotting by task status, task priority, and task type. The chart label will dynamically change according to the selected series dimension.
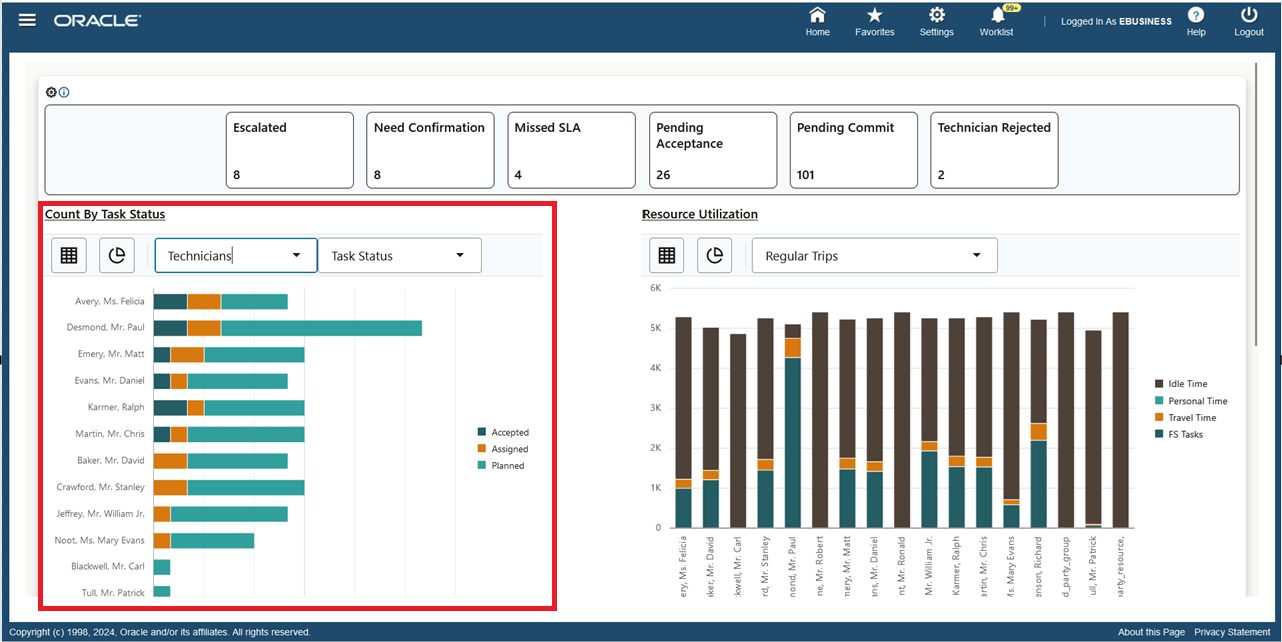
Count By Selected Dimension and Series
The following screenshot shows the Resource Utilization metrics. You can analyze the trip usage for the resources displayed in the Planboard, Gantt, and Map UIs, which are grouped by territory names or groups. This grouping depends on the resource selection criteria.
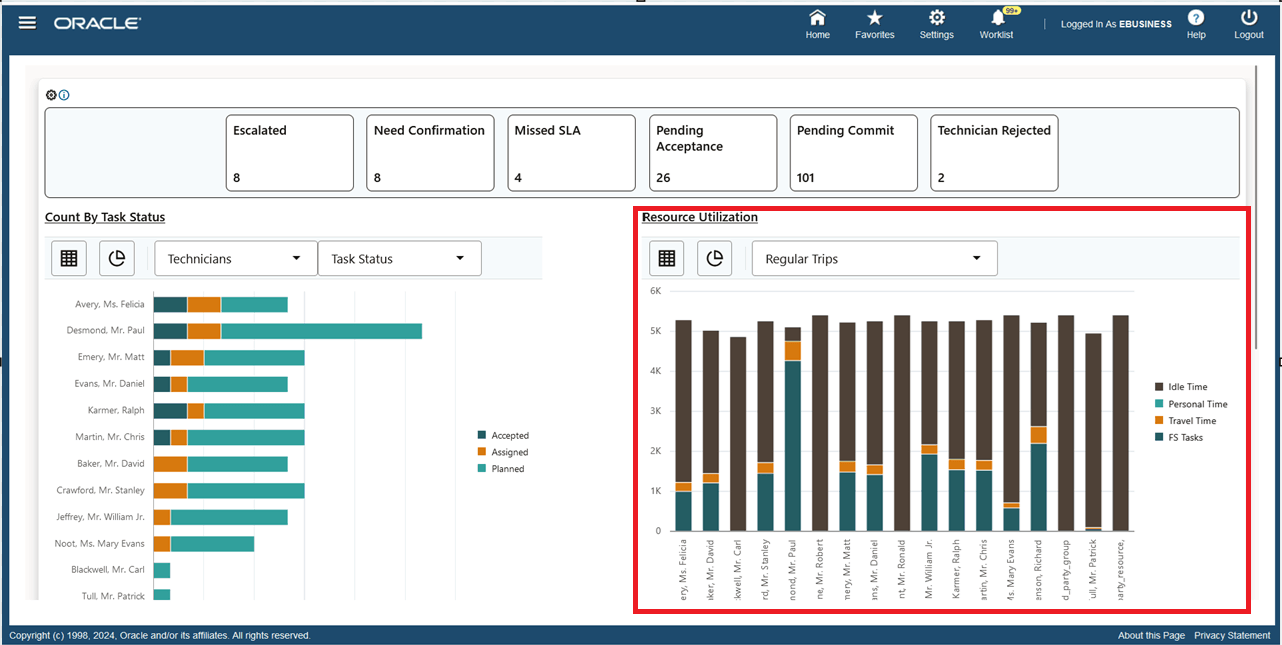
Resource Utilization
The following screenshot shows the Schedule Metrics. You can analyze the tasks scheduled to the resources displayed in the Dispatch Center.
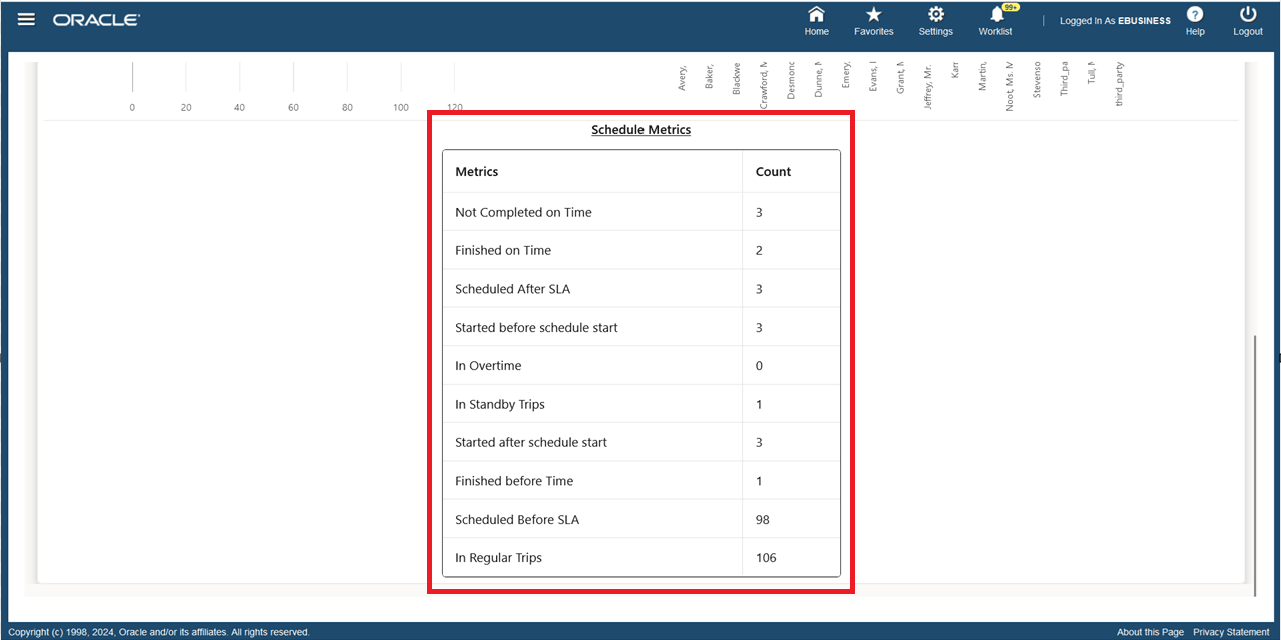
Schedule Metrics UI
7. Schedule Advise
The following screenshot shows Schedule Advise icon in the Task List region. You can navigate to the Schedule Advise UI as follows: From the Navigator, click the Field Service Manager responsibility, then click Field Service Dispatcher, then click Schedule and Dispatch, then select All Open from the task query drop-down list, then select a task in table, and click the Schedule Advise icon. The Schedule Advise UI appears.
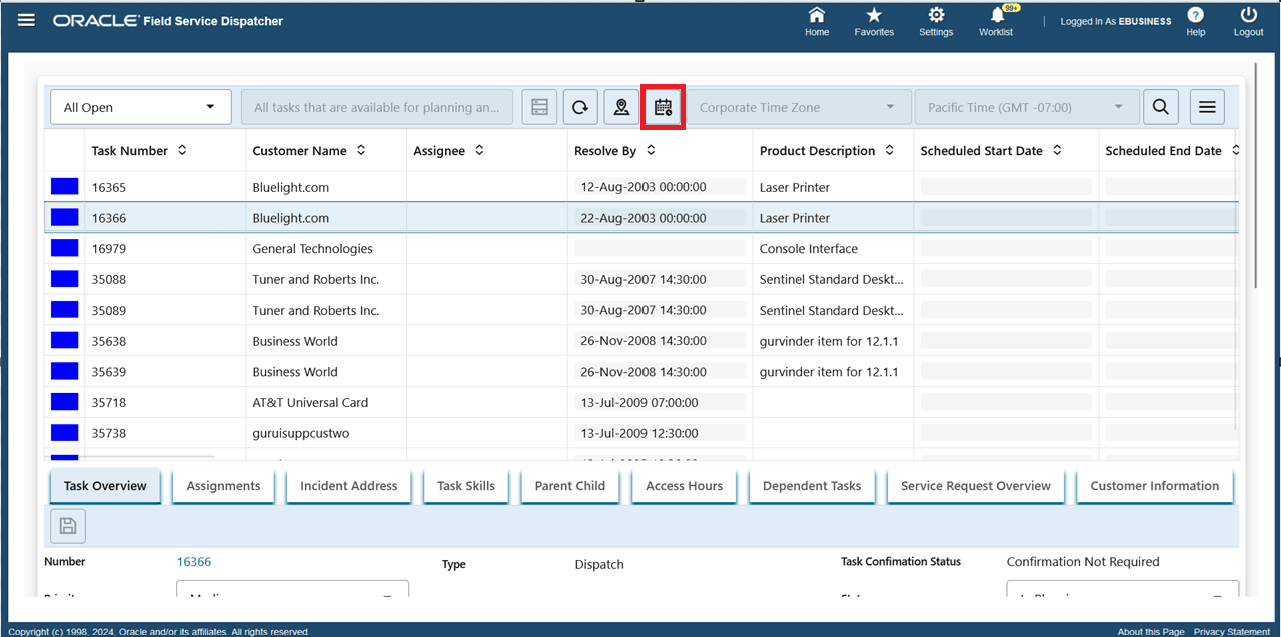
Schedule Advise Icon
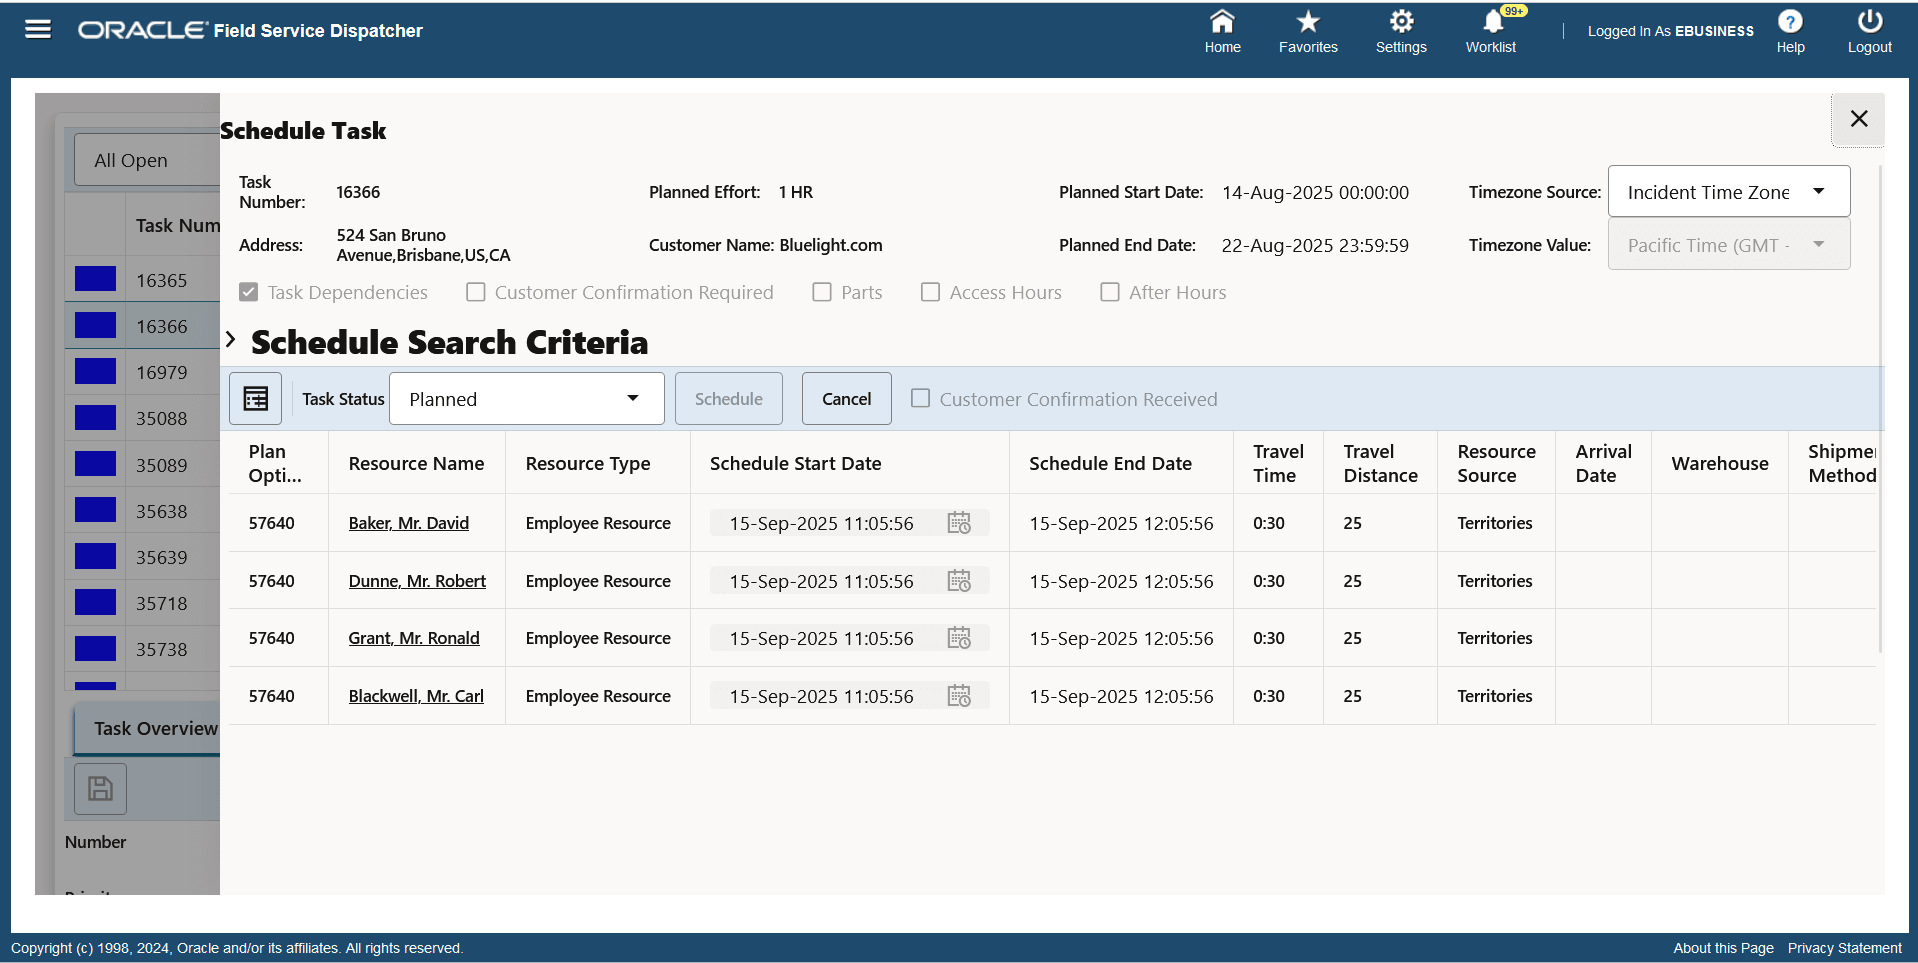
Schedule Advise UI
The following screenshot shows the Schedule Advise UI. You can schedule a task by selecting a plan option, and clicking the Schedule button.
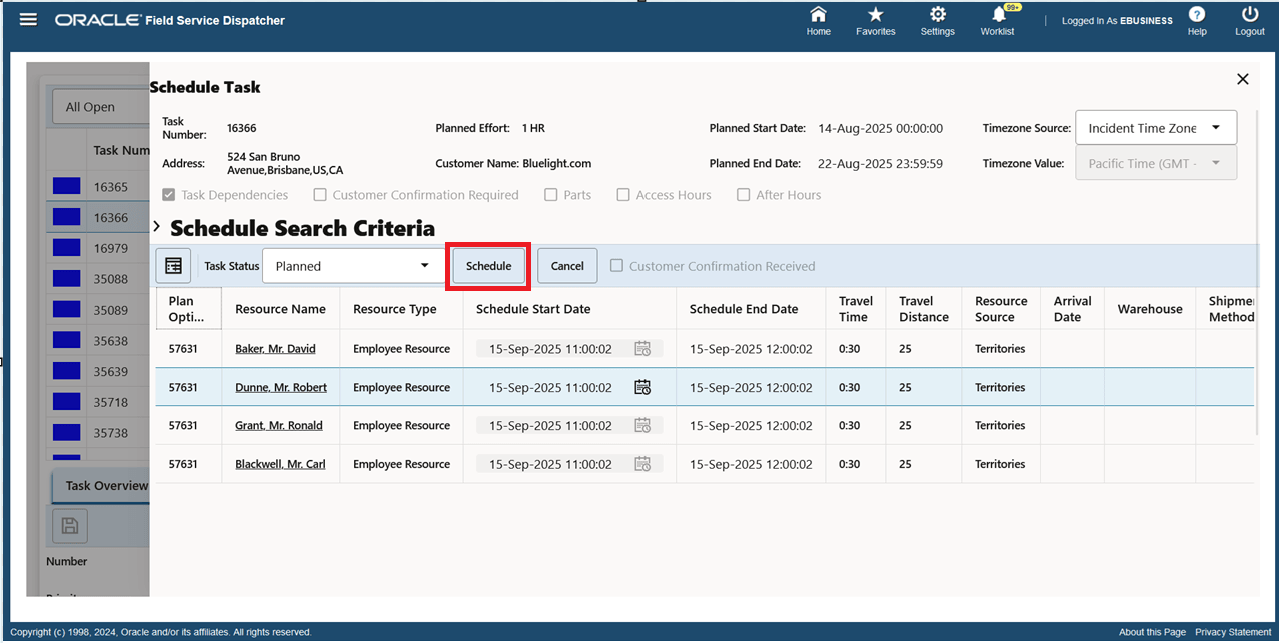
Scheduling of Task with Schedule Button
The following screenshot shows the schedule message after you schedule the task.
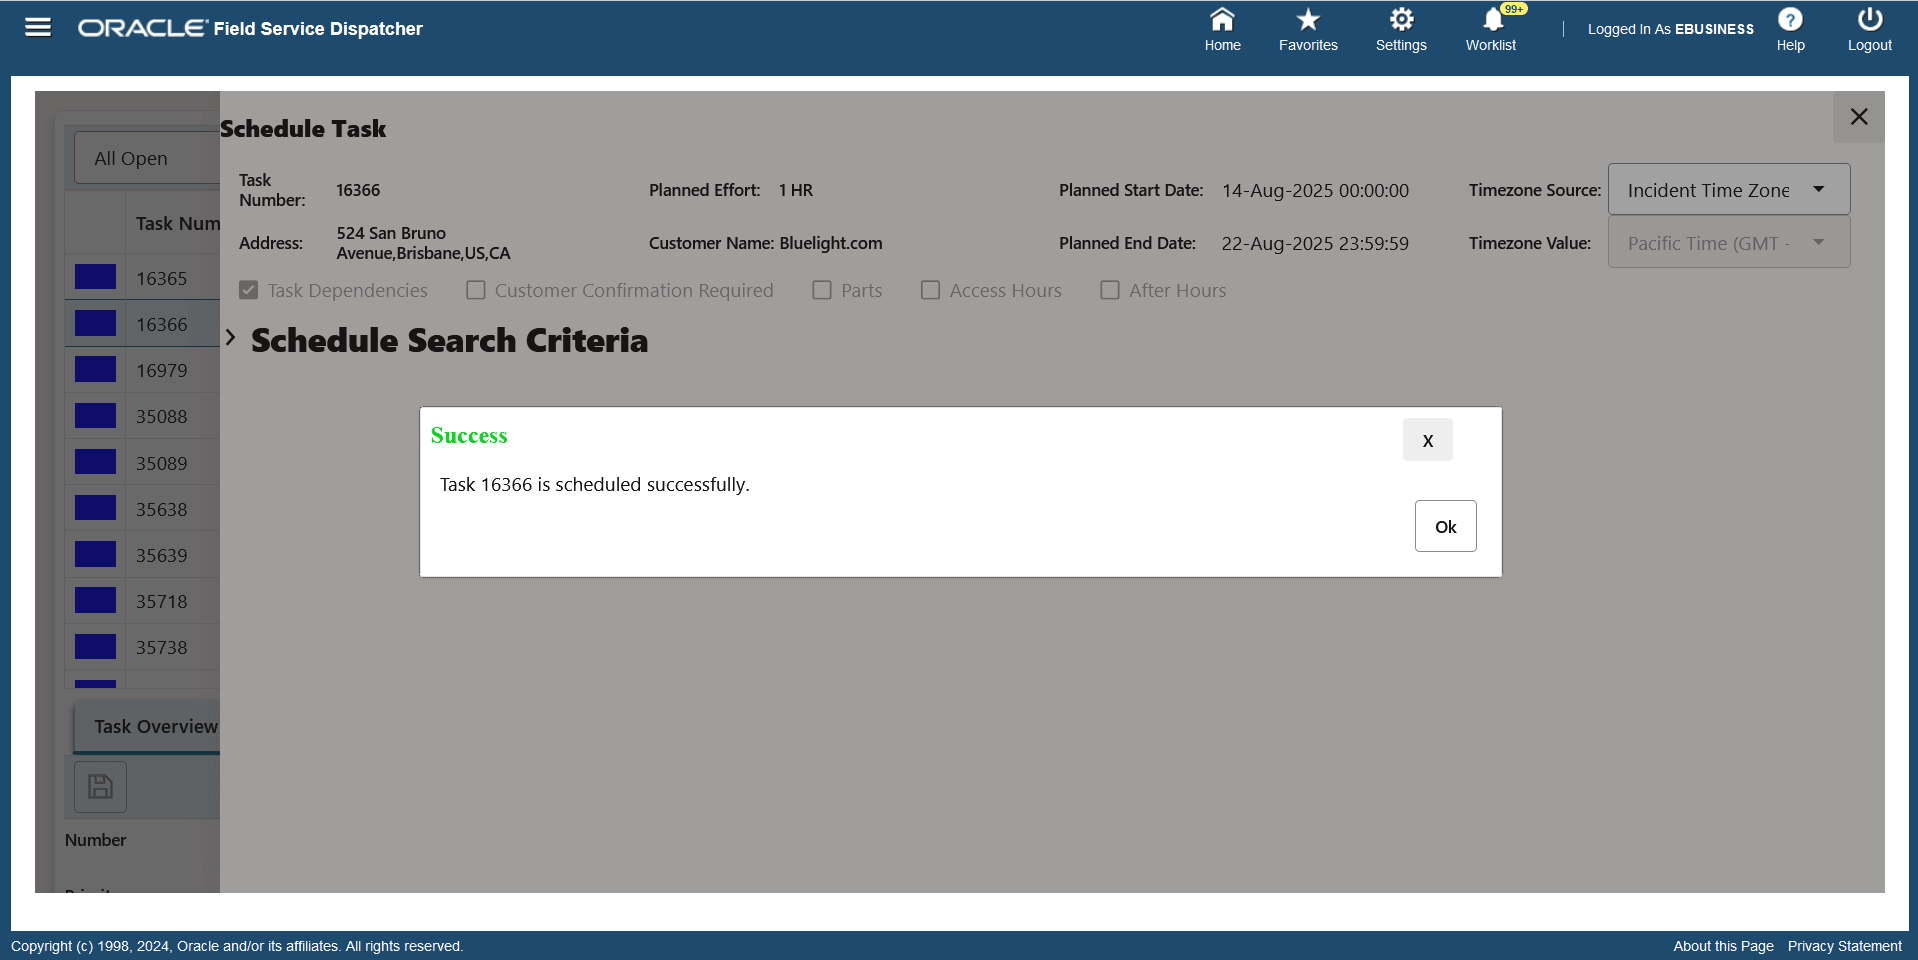
Schedule Message after Scheduling Task
The following screenshot shows that schedule search criteria can be modified. You can click the Search button to find plan options.
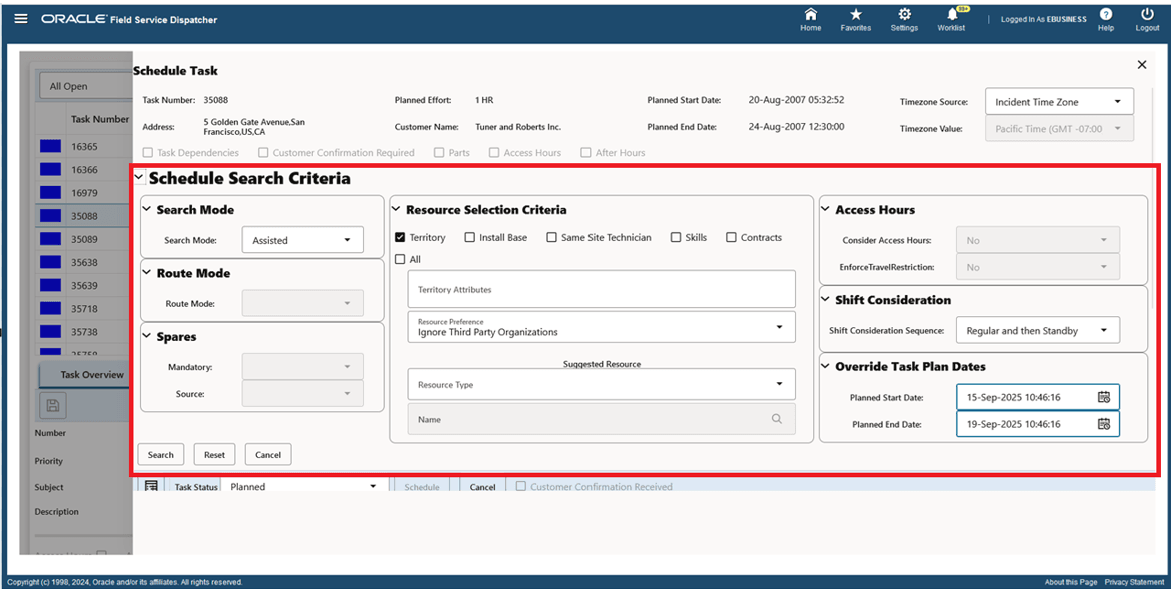
Override Schedule Search Criteria
The following screenshot shows that you can view the plan options in either tabular or Gantt format.
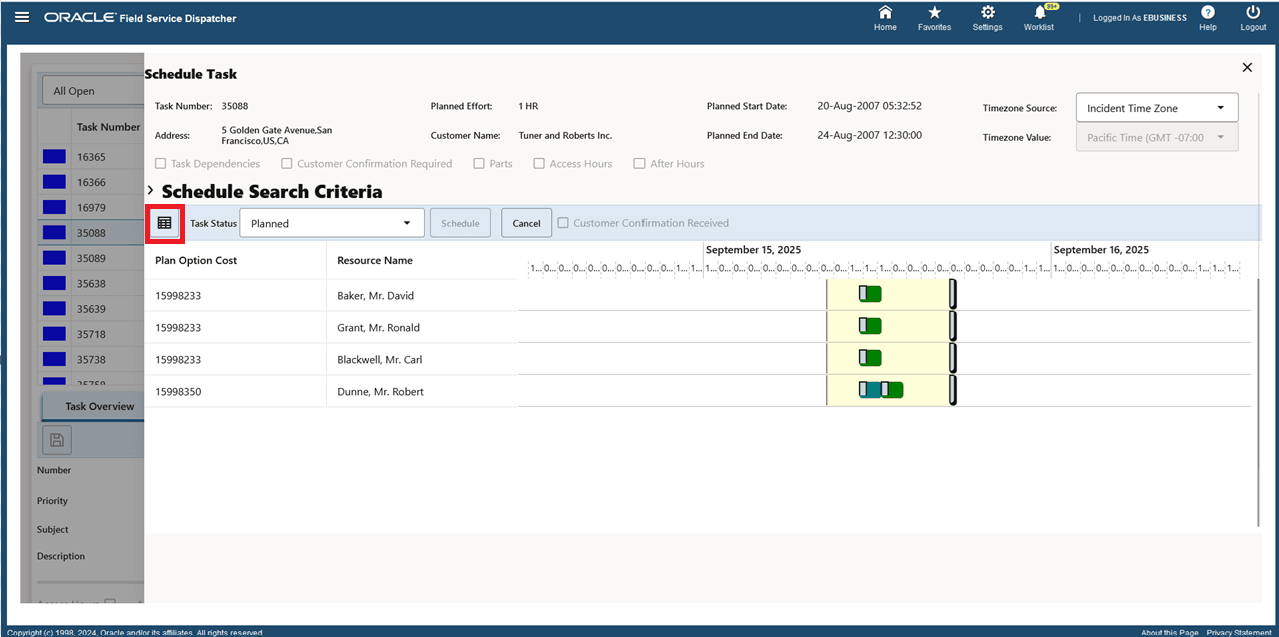
Display Plan Options in Gantt View
Steps to Enable
You don't need to do anything to enable this feature.
Key Resources
- Oracle Field Service User Guide (Part No. E49089)
- Oracle Field Service Implementation Guide (Part No. E49088)
- Oracle Field Service Release Notes for Release 12.2.15 (Doc ID 3101879.1)