Compiling the TSM Library and Documentation

Read the documentation that corresponds to your application's target operating system.

Operating System Description Location
Android logo
This file provides information on how to compile the TSM SDK for Android. sdk/lib/README.android
iOS logo
This file provides information on how to compile the TSM SDK for iOS. sdk/lib/README.ios
Linux logo
This file provides information on how to compile the TSM SDK for Linux. sdk/lib/README

WARNING:

The OpenSSL library must be downloaded before proceeding with development.

SDK Directories

SDK directories are shown below. Note that not all listed directories may be present (or supported) in the current release.

Path Description
apps SDK based applications
apps/tsc_sip Reference demonstration/development guide app (tsc_sip_client.c)
docs SDK Documentation
docs/html Authoritative API HTML-based documentation. Access via “.../html/index.html” after running `make doxygen`.
extlib External, optional libraries
lib SDK Library source – to be linked with the target application
lib/android-ndk Android Specific library instructions and precompiled libs
lib/CSM Tunneling Client State Machine
lib/EIP Embedded TCP/UDP/IP Stack
lib/include SDK API definitions
lib/OSAA Operating System Application Adaptation APIs
lib/TAPI Tunnel Data and Control APIs
lib/TPL Tunnel Control and Data Message Parsing Libraries
tools Development Tools
tools/wireshark TSCF protocol dissector

Download and Compile OpenSSL

The default version of OpenSSL has been removed. Developers should download the desired version of OpenSSL and modify the build script to allow on-the-fly integration with the SDK.

  1. Download the version of OpenSSL you want to integrate into the SDK.
    The customer is responsible for selecting a secure version of OpenSSL from https://www.openssl.org/. Oracle can confirm OpenSSL version 1.1.1a works with the SDK.
  2. In the build script for your target operating system, set the VERSION variable to the version number of OpenSSL.
    The build scripts are located in the sdk/extlib directory and the VERSION variable is found at the top of the script.
    VERSION="1.1.1a"
  3. Run the build script for your target operating system.
    For example:
    ./build_androidlib.sh

Android Development

Use the following method when developing for Android.

Install Android Build Environment Pre-Requisites

Before setting up the Android build environment, extract the SDK tar file and install the following pre-requisites.

  1. Extract the TSM SDK 2.0 tar file.
    tar xvf nnTSC200.tar.gz
  2. Install the latest version of the Java Development Kit.
  3. Download and extract the latest Android Studio with the Android SDK.
    1. Navigate to https://developer.android.com/studio/#downloads.
    2. Download the package for your operating system.
    3. Extract the downloaded package.
      tar xvf android-studio-ide-191.5791312-linux.tar.gz
  4. Download and extract the latest Android NDK.
    1. Navigate to https://developer.android.com/ndk/downloads.
    2. Download the package for your operating system.
    3. Extract the downloaded package.
      unzip android-ndk-r20-linux-x86_64.zip
  5. Download the desired version of OpenSSL into the sdk/extlib directory.
    TSM SDK 2.0 supports the 64-bit OpenSSL version 1.1.1a.
    cd sdk/extlib/
    curl -O https://www.openssl.org/source/old/1.1.1/openssl-1.1.1a.tar.gz

Build the TSC SDK Libraries for Android

  1. In the sdk/extlib directory, update the android_env.sh script based on the setup, and source it to set the environment. Then run the build_androidlib.sh script with the OpenSSL version as a parameter.
    source android_env.sh
    ./build_androidlib.sh 1.1.1a
  2. Run an NDK build in the sdk/lib/android-ndk directory.
    1. Set the NDK_PROJECT_PATH variable to the sdk/lib/android-ndk directory and navigate to that directory.
      cd ..
      export NDK_PROJECT_PATH="$PWD/lib/android-ndk"
      cd $NDK_PROJECT_PATH
    2. Run the NDK build.
      ndk-build APP_ABI=arm64-v8a APP_PLATFORM=android-28 clean
      ndk-build APP_ABI=arm64-v8a APP_PLATFORM=android-28 build
  3. Run an NDK build in the sdk/apps/tsc_sip/tsc_sip_client/ directory.
    1. Now set the NDK_PROJECT_PATH variable to the sdk/apps/tsc_sip/tsc_sip_client/ directory and navigate to that directory.
      cd ../..
      export NDK_PROJECT_PATH="$PWD/apps/tsc_sip/tsc_sip_client"
      cd $NDK_PROJECT_PATH
    2. Run the NDK build again.

      Note:

      Do not include build at the end of the second command.
      ndk-build APP_ABI=arm64-v8a APP_PLATFORM=android-28 clean
      ndk-build APP_ABI=arm64-v8a APP_PLATFORM=android-28

Create the Android Application with Android Studio

After following the steps in the sdk/lib/README.android file, follow these steps to complete the set up of the Android build environment.

  1. Start Android Studio and open the SDK Manager.
    1. Click File, then Settings.
    2. Expand Appearance & Behavior, then expand System Settings.
    3. Click Android SDK.
  2. From the SDK Manager, select Android 9.0 (Pie).

    If you plan to develop for more than one Android release, select that release as well.

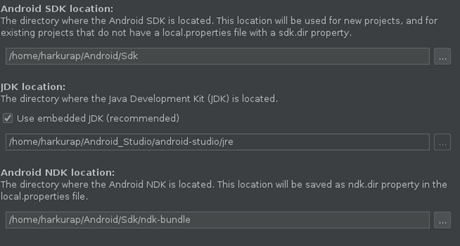
    Figure 2-1 SDK Manager


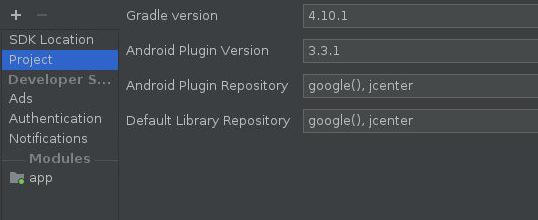
  3. Confirm the locations and versions of the Android SDK and Gradle.

    Figure 2-2 Android SDK and Gradle


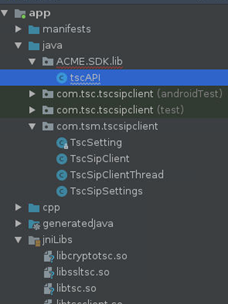
  4. Create an Android project Tscsipclient using the Java files available in the sdk/apps/tsc_sip/tsc_sip_client/android_apk_build/src/main/java.

    Figure 2-3 Android Project


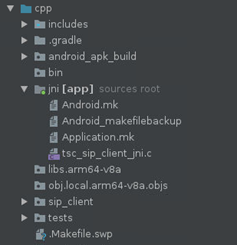
  5. Add the JNI file sdk/apps/tsc_sip/tsc_sip_client/jni/tsc_sip_client_jni.c.

    Figure 2-4 JNI File


  6. Verify your build.gradle file looks similar to the following:
    apply plugin: 'com.android.application'
    android {
            compileSdkVersion 28
            defaultConfig {
                    applicationId "com.tsm.tscsipclient"
                    minSdkVersion 26
                    targetSdkVersion 28
                    versionCode 1
                    versionName "1.0"
                    testInstrumentationRunner "android.support.test.runner.AndroidJUnitRunner"
            }
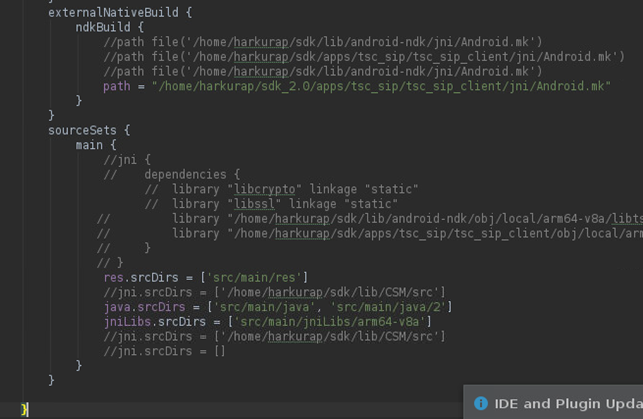
  7. Update the location of the tsc_sip_client folder and set the ANDROID_NDK variable to point to sdk/apps/tsc_sip/tsc_sip_client/jni/Android.mk

    Figure 2-5 build.gradle

    export ANDROID_NDK=sdk/apps/tsc_sip/tsc_sip_client/jni/Android.mk
  8. Copy the following libraries into the jniLibs folder.
    • libcryptotsc.so
    • libssltsc.so
    • libtsc.so
    • libtscclient.so
    cp sdk/apps/tsc_sip/tsc_sip_client/libs/arm64-v8a/*.so android-ndk-r20/sources/third_party/vulkan/src/build-android/jniLibs
  9. Build the SDK and then copy the generated APK file to an Android 9.x phone.

    Attention:

    The Android phone should be set to 'Developer Mode' with 'USB debug mode' enabled.

    Note:

    View the Logcat in Android Studio to see process information from the connected device.

iOS Development

Use the following method when developing for iOS.

Set up iOS Environment

  1. On your Mac machine, install XCode IDE and the iOS SDK for 12.x.

    Note:

    An Apple ID is required to develop iOS applications.
  2. Extract the nnTSC200m1.tar.gz file.
  3. Download OpenSSL 1.1.1a and place it in the extlib folder.

Build TSC SDK Libraries for iOS

  1. Execute the sdk/exlib/build_ioslib.sh script to compile the OpenSSL libraries.
  2. Execute the sdk/lib/build_ioslib.sh script to compile the TSC SDK library.
  3. Verify libtsc.a compiled for the arm64 architecture.
    xcrun --sdk iphoneos lipo -info libtsc.a
  4. Open the project sdk/apps/tsc_sip/tsc_sip_client/ios_xcode_app/tsc_sip_client.xcodeproj in XCode IDE.
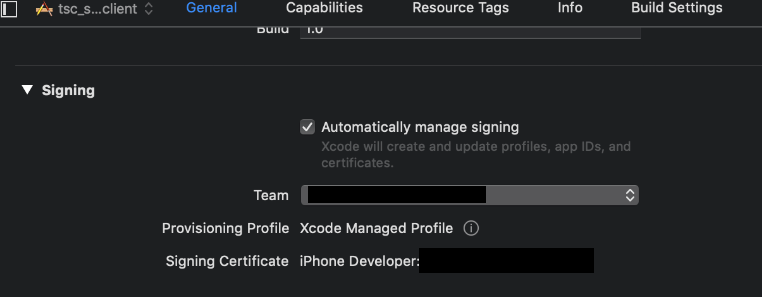
  5. Click Target, and then General to provide credentials for certificate signing.

    Figure 2-6 General Tab

  6. Click General, and then Development Info to set the build devices.

    Figure 2-7 Build Devices

  7. Copy the libssl.1.1.dylib , libcrypto.1.1.dylib and libtsc.a libraries, which are compiled in earlier steps, to the Libraries subfolder under the ios_sdk_app directory or the project directory.
  8. Click Build Settings, and then All:
    1. Verify that arm64 is listed as a valid architecture.

      Figure 2-8 Build Settings

    2. Verify the library search and header search paths.
      If the project is run directly from the tar file, append these paths:
      • ${project_dir}/../../../../lib/OSAA/include
      • ${project_dir}/../../../../lib/include

      Figure 2-9 Search Paths

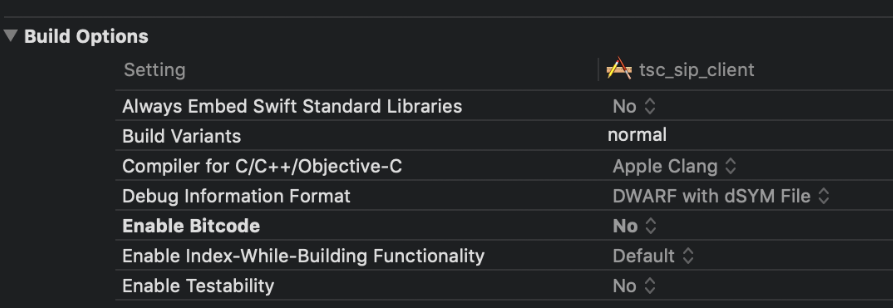
    3. Verify Enable Bitcode is set to No.

      Figure 2-10 Disable Bitcode

    4. Click Build Phases, and then Link Binary with Libraries to verify that libtsc.a is added.
    5. Click Build Phases, and then Copy Files to verify that libcrypo.1.1.dylib and libssl.1.1.dylib are added.
    6. Click Product, and then Destination and set the destination to the connected iPhone or iPad device.
      The connected iPhone or iPad should have the updated iOS SDK.
    7. Click Product, and then Run to build the application.

Generate the API Documentation

  1. Navigate to the lib folder.
    cd sdk/lib
  2. Generate the API documentation.
    doxygen ../docs/doxygen/doxygen.conf
  3. Open the documentation using a browser pointing to sdk/docs/html/index.html.