In this part of the tutorial you create a JSF page to access the business components that you created in the previous part.
You create a form that can be used to display and modify data. You use a master-detail relationship to display information about employees in a department. To build the page you'll use Oracle ADF Faces Rich Client components. These components allow you to build an Ajax-based rich Web UI without writing low-level HTML and Javascript code.
-
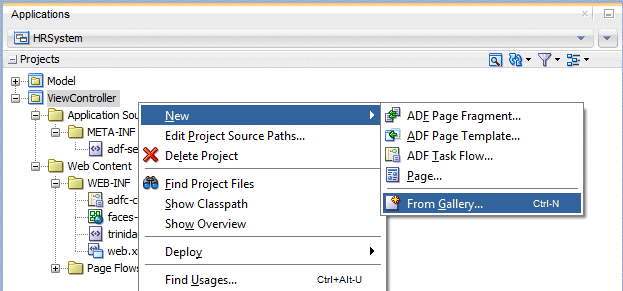
Right-click the ViewController project node in the Applications window, and select New > From Gallery...
-
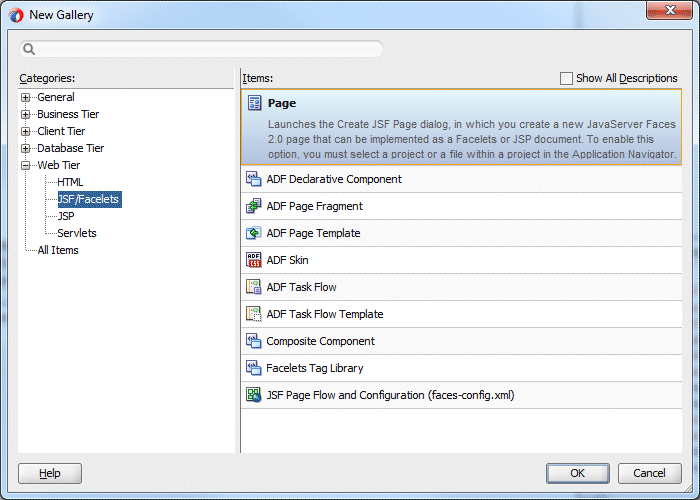
In the New Gallery, navigate to JSF/Facelets under the Web Tier node, and select Page in the Items pane. Click OK.
-
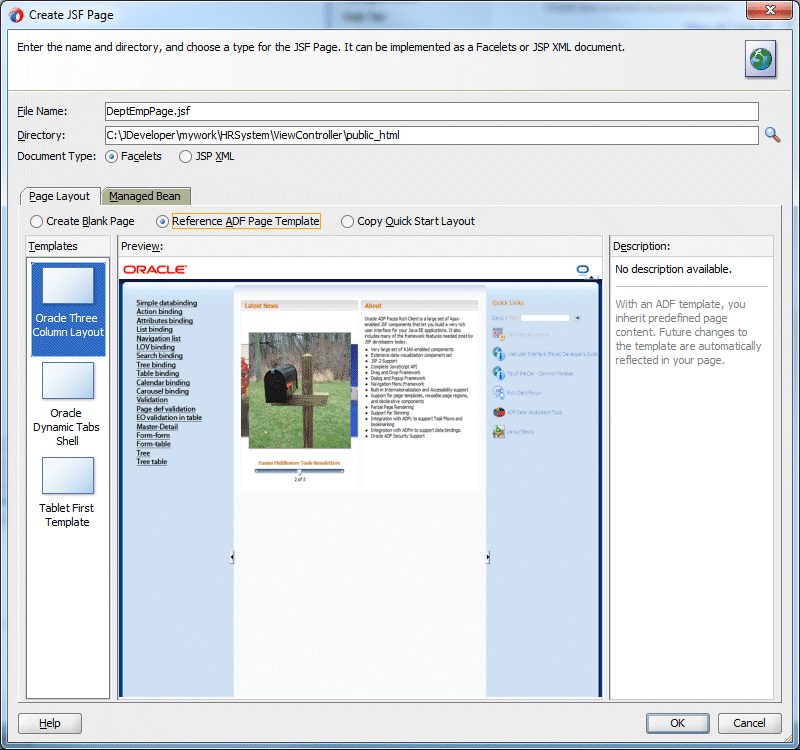
In the Create JSF Page dialog, rename the page to DeptEmpPage.jsf; make sure the Document Type radio button is set to Facelets, and in the Page Layout tab select the Reference ADF Page Template radio button and select Oracle Three Column Layout.
Click OK.
-
The page displays in the Design Editor. The template has three columns in it, but you only need two in the page, so delete the third one.
In the Structure window,expand af:form > af:pageTemplate > Template facets. Right-click af:facet - end and select Delete. You will notice that the end facet is not deleted from the list of page template facets. It is however removed from the page usage.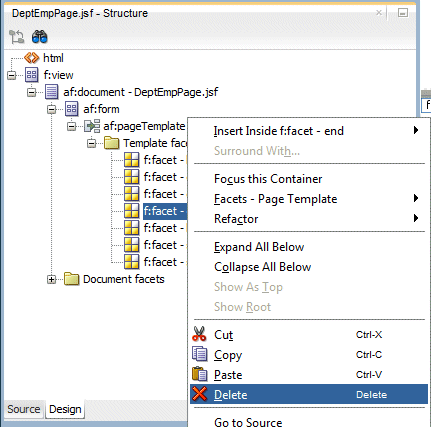
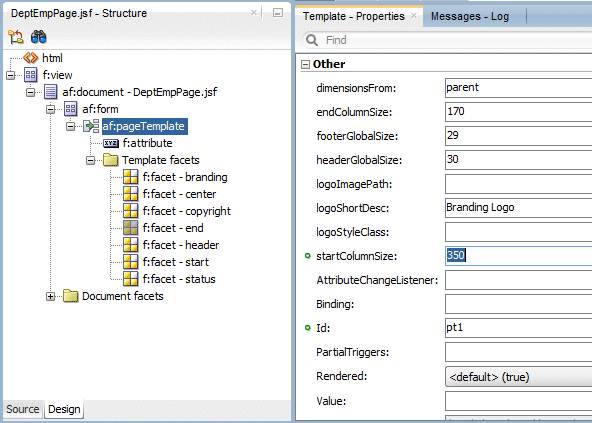
With af:pageTemplate selected in the Structure window, in the Properties window set the startColumnSize property to 350.
-
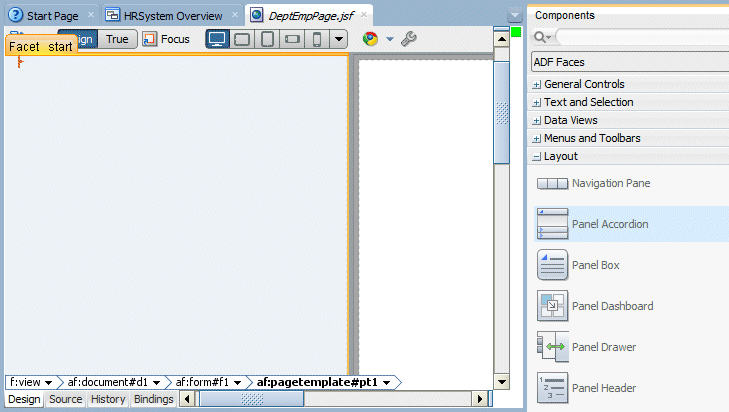
In the Components window expand the Layout group of components and locate the Panel Accordion component in the Interactive Containers and Headers section. Drag it into the start facet of your page.
-
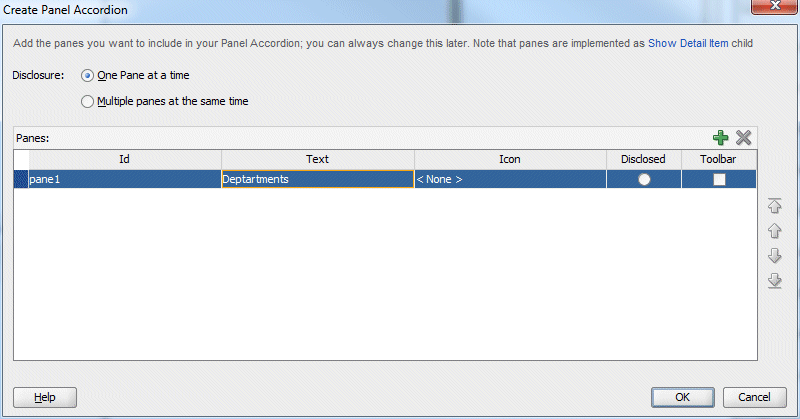
In the Create Panel Accordion window, set the Text property to Departments and click OK.
-
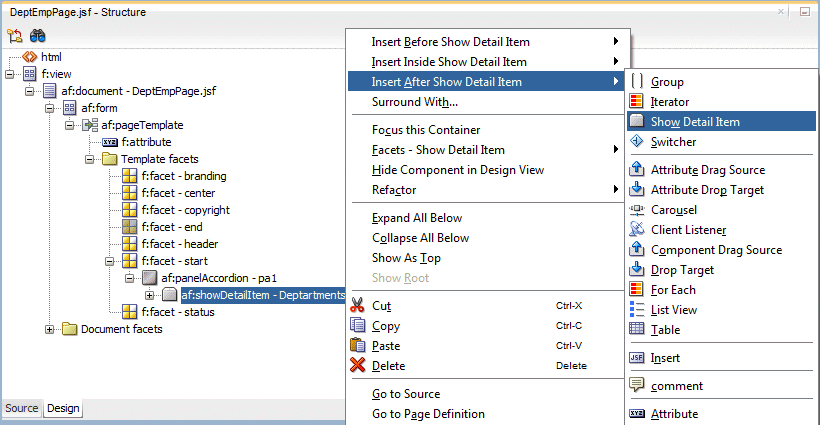
Expand the af:panelAccordion to expose the show detail item. Right-click the new Departments Show Detail Item, and select Insert after Show Detail Item - Departments > Show Detail Item. This adds another accordion to your page.
-
Change the Text property to More Info.
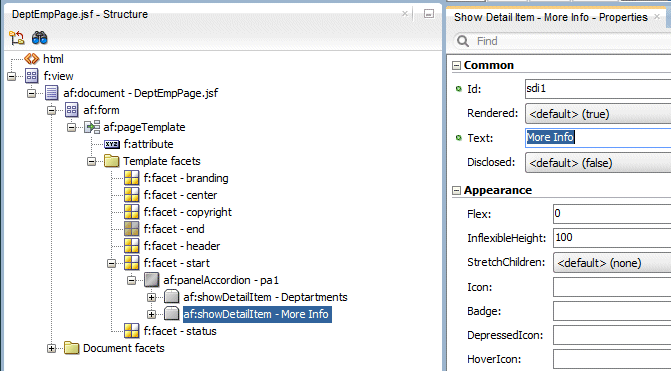
This is another way of adding components to a page using context menus directly inside the Design Editor (instead of dragging and dropping from the Components window).
-
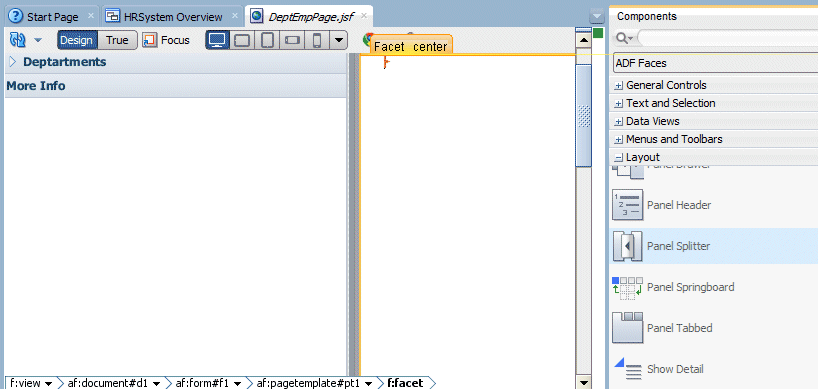
From the Layout components, click and drag a Panel Splitter component onto the center facet of your page.
-
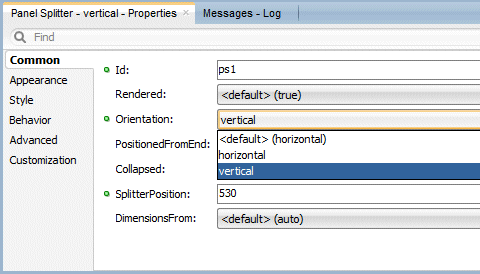
In the Properties window change the Orientation property of the new splitter to vertical.
-
From the Layout components, drag a Panel Collection component into the first facet at the top of the splitter on your page.
It might be easiest to use the Structure window to drop the component in the correct position.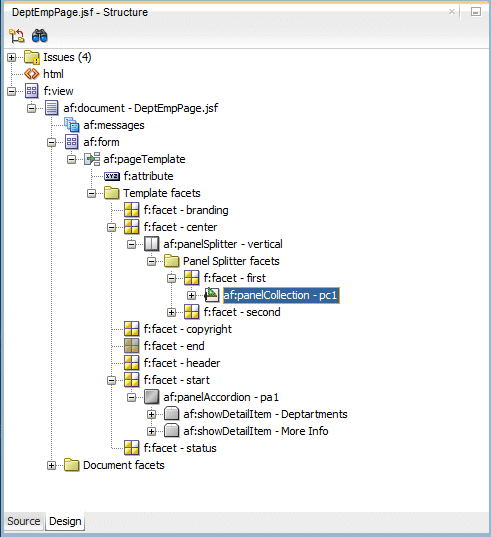
A panel collection is a component that aggregates collection components like table, treeTable and tree to display standard/application menus, toolbars and status bar items.
-
Using the Structure window, drag a Panel Tabbed component into the second facet of the splitter on your page.
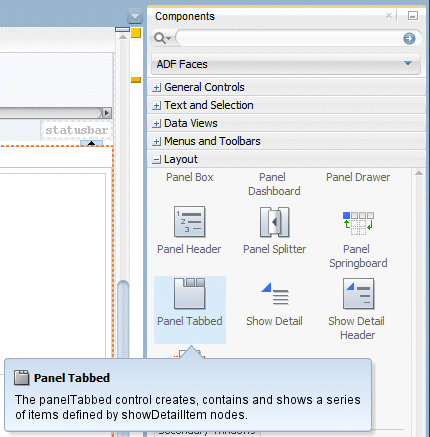
-
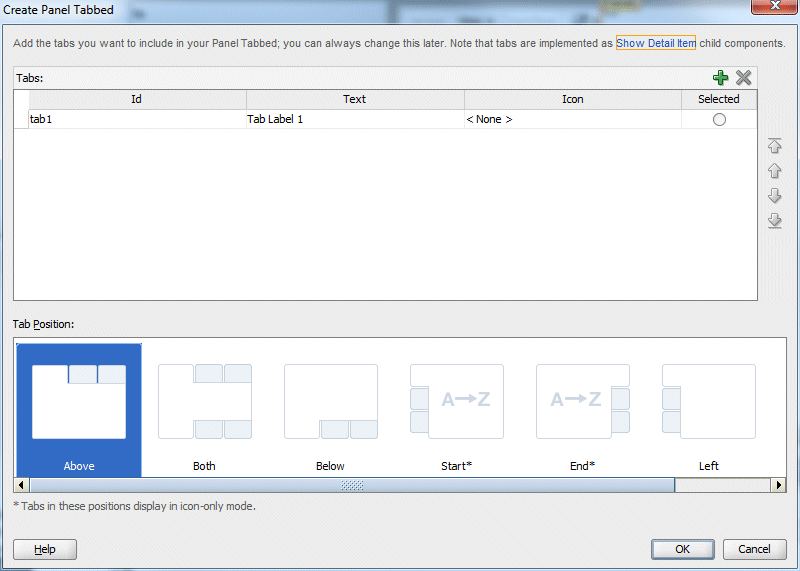
In the Create Panel Tabbed window, keep the defaults like the image below and click OK.
-
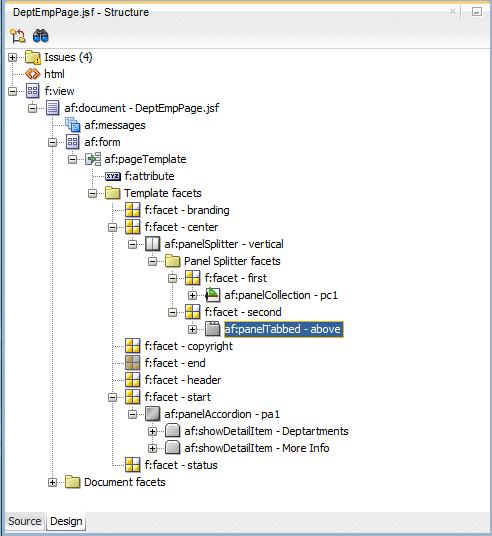
The Structure window should look like the screen shot below.
-
Click the Save All icon on the JDeveloper menu bar to save your work.
Maintaining a separation between the Model layer and the user interface by developing them in separate projects, makes the business services layer more reusable.
Next, add some layout components to the page.
In this step you bind the business components you created in Part 1 of this tutorial to the user interface. You do this with simple drag and drop operations; behind the scenes the ADF Model layer takes care of binding the data for you.
-
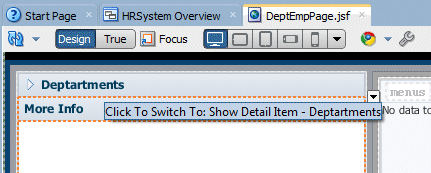
In the Design Editor click the Departments accordion to expand it.
-
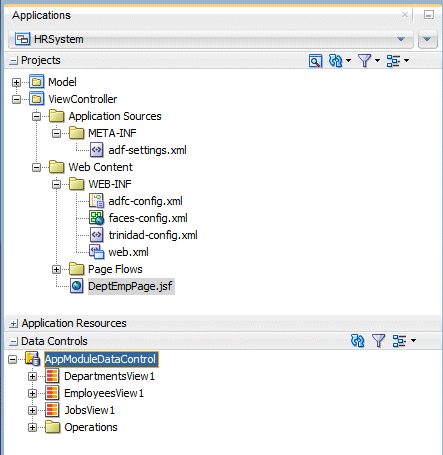
In the Applications window expand the Data Controls accordion, and in it expand AppModuleDataControl to expose the business services you defined in the first part of this tutorial.
-
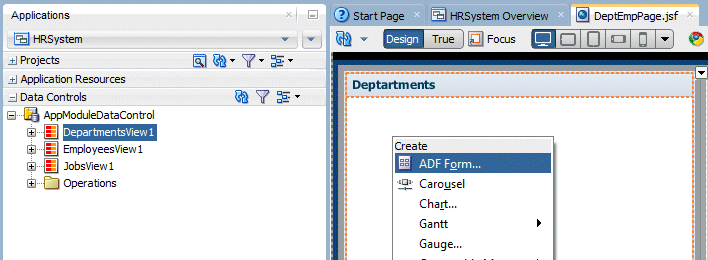
Drag the DepartmentsView1 data control into the Departments accordion in your JSF page. When prompted to select the type of component you want to create, select ADF Form.
-
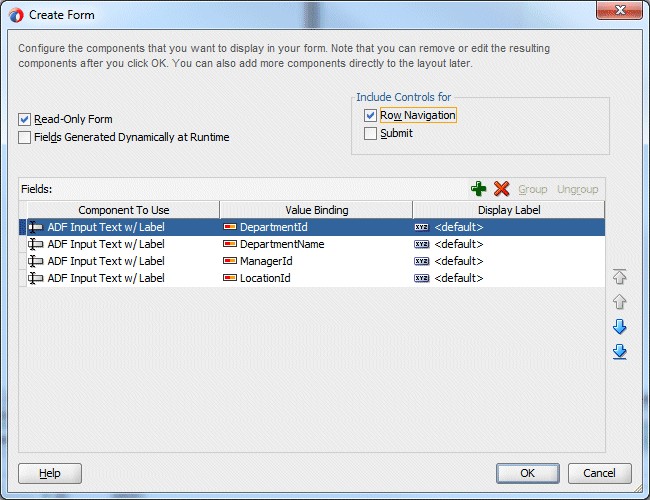
In the Edit Form Fields dialog, check the Read-Only Form and Row Navigation Controls checkbox and click OK.
-
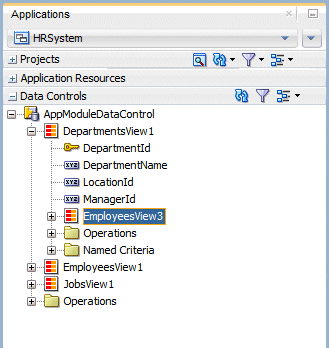
In the Data Controls accordion expand DepartmentsView1 to expose the fields it contains, as well as the related EmployeesView3 control for the employees in each department. Note that these are the "detail" employees for the "master" departments - they are linked and therefore at runtime, the employees you see in this view object are the ones who belong to the selected (or viewable) department.
-
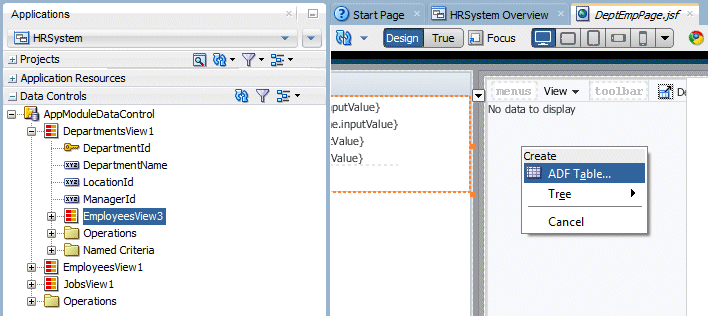
Drag the EmployeesView3 data control onto the Panel Collection that you created in the first facet of the PanelSplitter. Create it as an ADF Table...
-
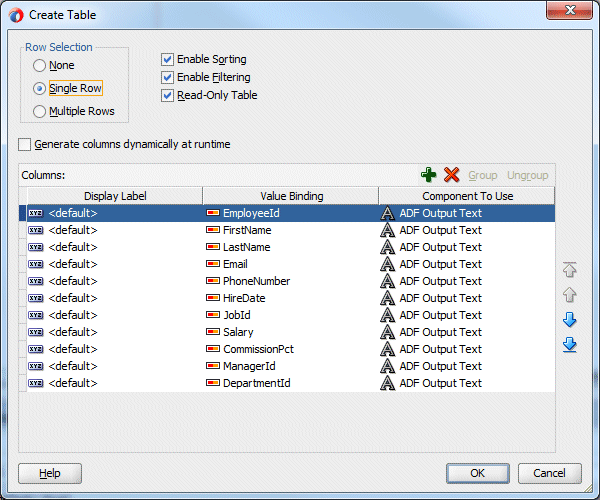
In the Create Table dialog, select Single Row in Row Selection, and check the checkboxes for Sorting and Filtering and Read-Only Table checkboxes. Click OK.
-
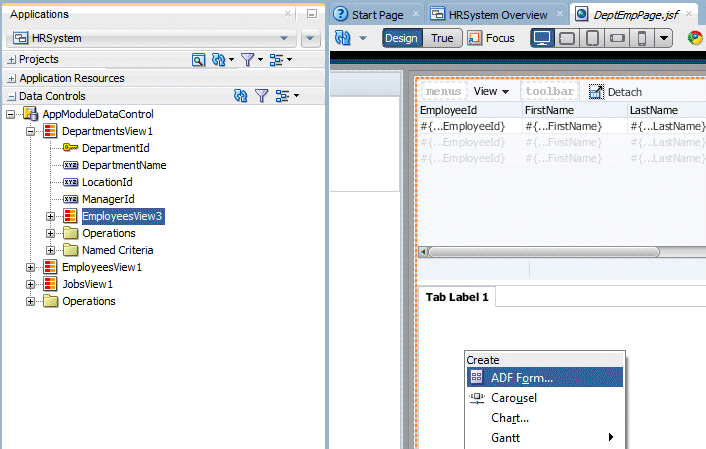
Drag the EmployeesView3 data control again but this time onto showDetailItem 1 in the panelTabbed component in the second facet of the panelSplitter. Create it as an ADF Form.
-
In the Create Form dialog, check the Include Submit Button check box. Using your mouse and the Shift key select the bottom three fields from the list: CommissionPCT, ManagerId, DepartmentID and delete them by clicking the Delete button
 .
.
Click OK.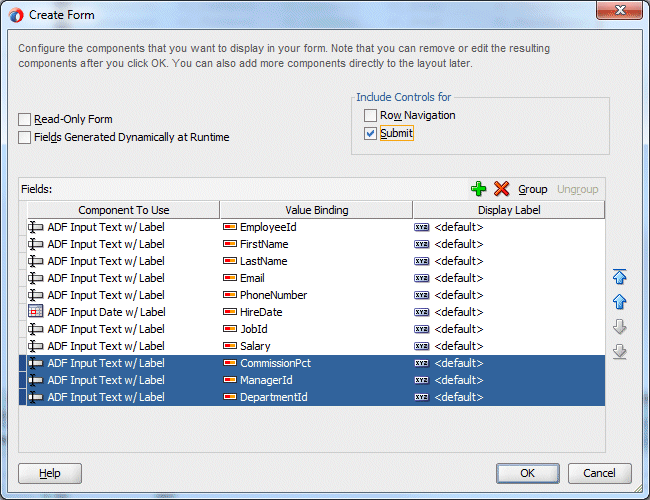
Click the Save All
 icon on the JDeveloper menu bar to save your work.
Right-click in the page and select Run. This will compile your project, build it, and launch the integrated WebLogic Server to run it. The default web browser opens to display the page. You can follow the progress of these steps in the Log window in JDeveloper.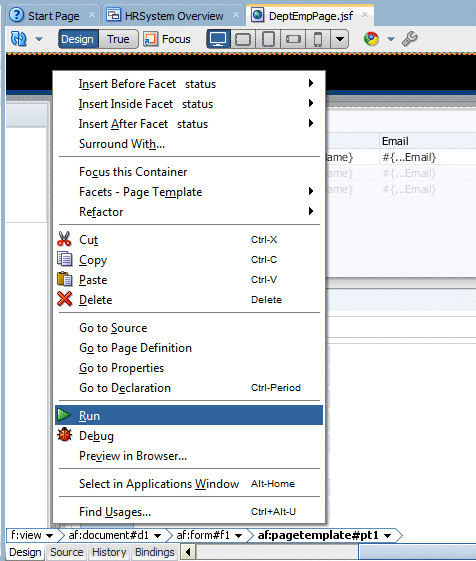
-
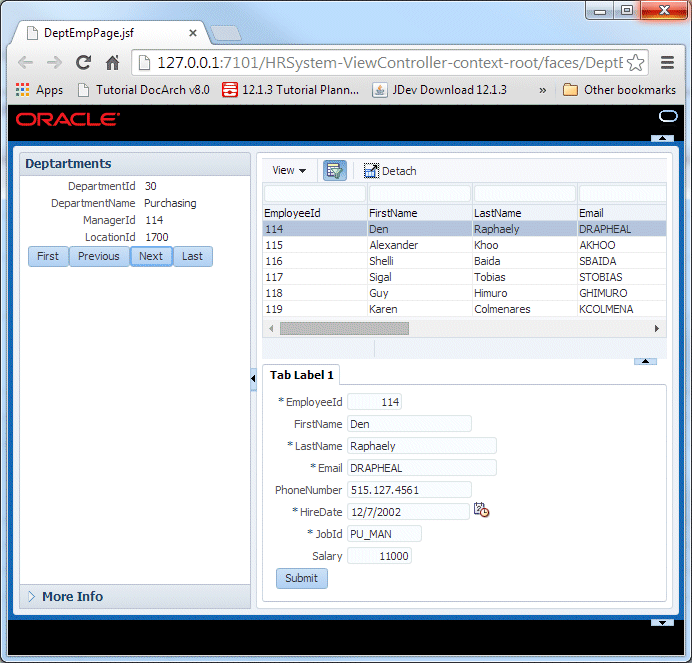
Once the page displays in the browser, resize the page area using the splitter to display the department data. Then use the Next button to scroll through the departments. Notice that the employee data changes to show the employees within the displayed department. Notice also that the employee form displays the currently selected employee.
-
Close the browser window.
In these steps you refine the business services by adding validation rules, formatting and default values.
-
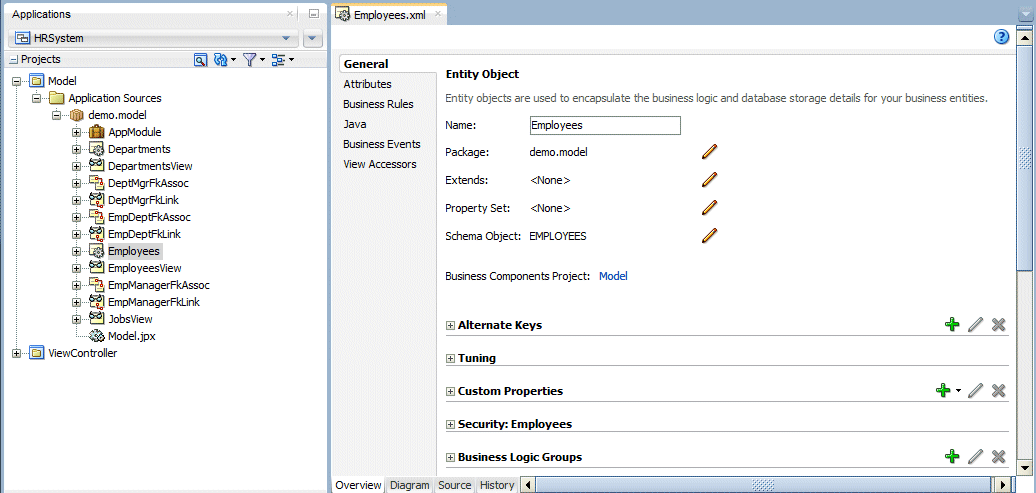
In the Applications window under the Model project, locate the Employees entity object and double-click it to open it for editing.
-
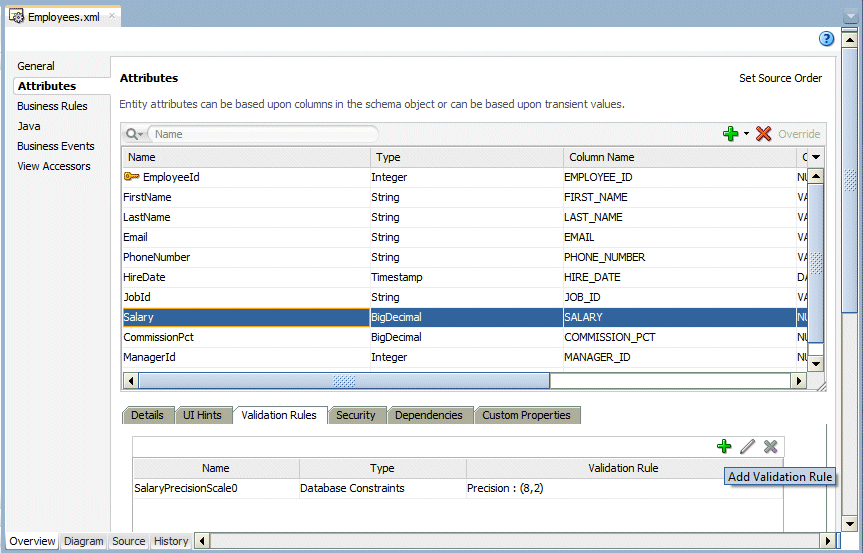
In the Employees.xml window, click the Attributes finger tab and locate and select the Salary attribute. Scroll down in the page to the Validation Rules tab and click the Add icon to add a new validation rule.
-
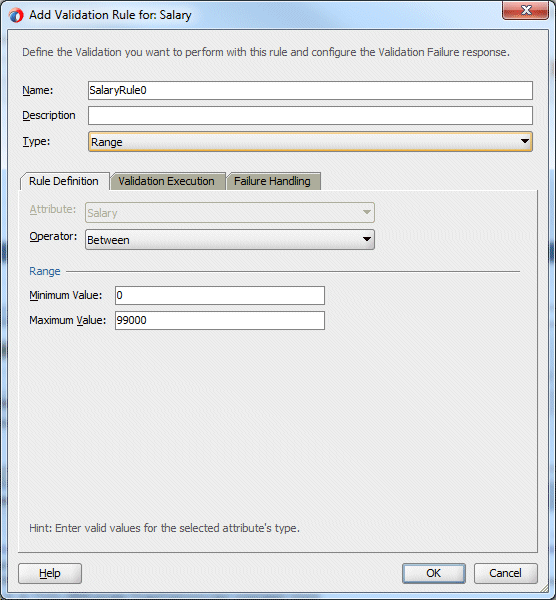
Keep the default Name and in the Add Validation Rule dialog select Range from the Rule Type drop down list. Note the various other types of rules you can define here. In the Operator field ensure that the value is set to Between, and type 0 for the minimum value and 99000 for the maximum value fields.
-
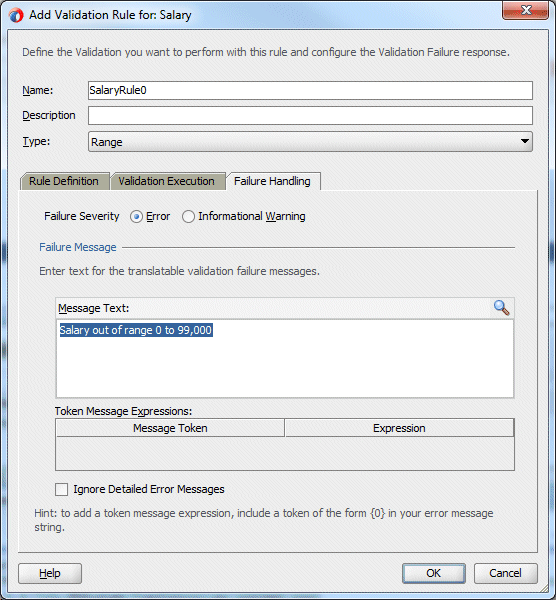
Click the Failure Handling tab to define an error message that will display when the validation fails. In the Message Text field type an error message like "Salary out of range 0 to 99,000" and click OK.
-
Next you add a default value to the hire date field - so that when a new employee is created the hire date defaults to the current date.
In the Employees.xml window, locate the HireDate attribute, and select it. In the Value section of the Properties window, locate the Default Value Type property and select Expression, then set the Default Value property to adf.currentDate. This will ensure the default value for a new record is set to today's date.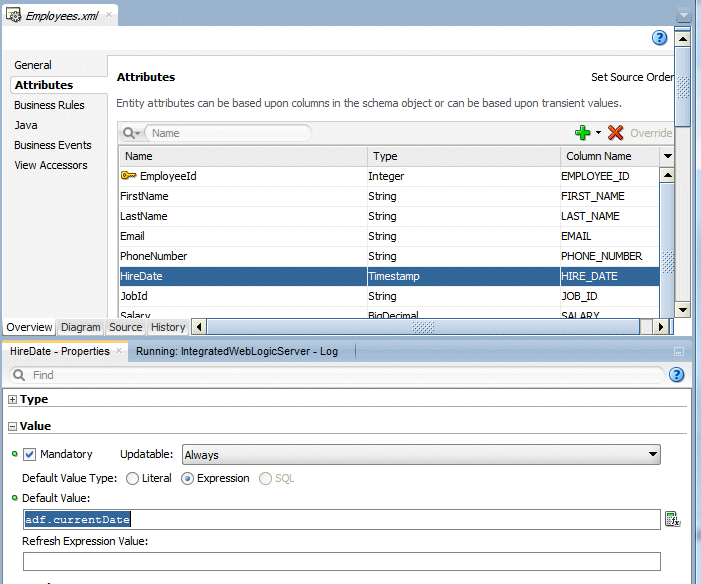
-
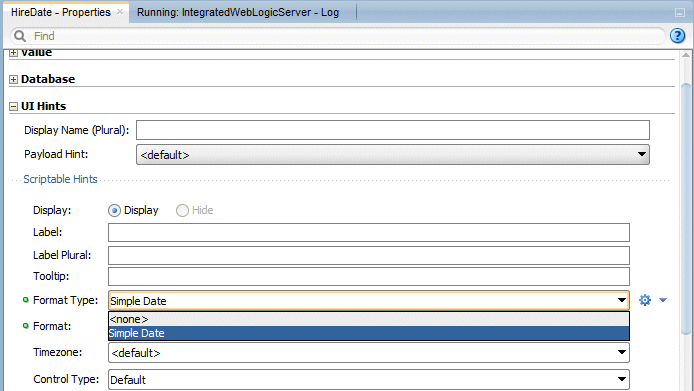
In the UI Hints section of the Properties window locate the Format Type property and select Simple Date.
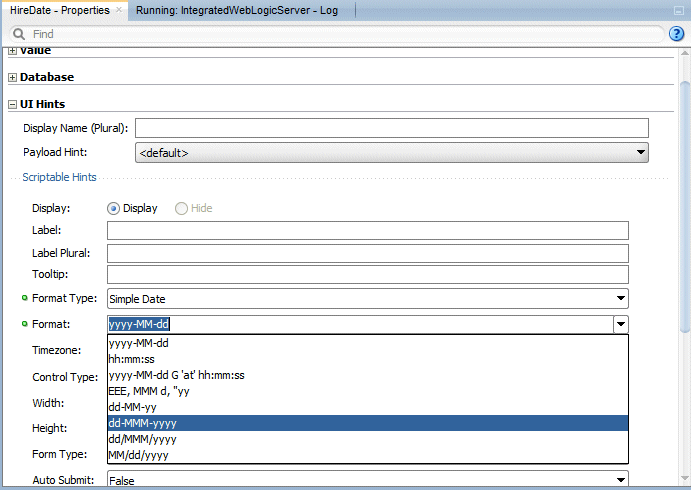
Set the Format property to dd/MMM/yyyy. You should get a warning message indicating that this will change the format in a resource bundle. Click Yes to acknowledge the message.
-
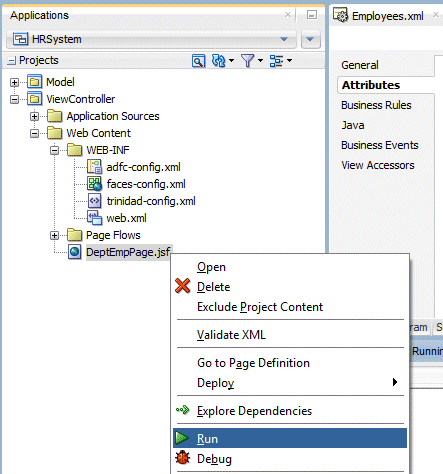
Run the page again to test the refinements you have made.
-
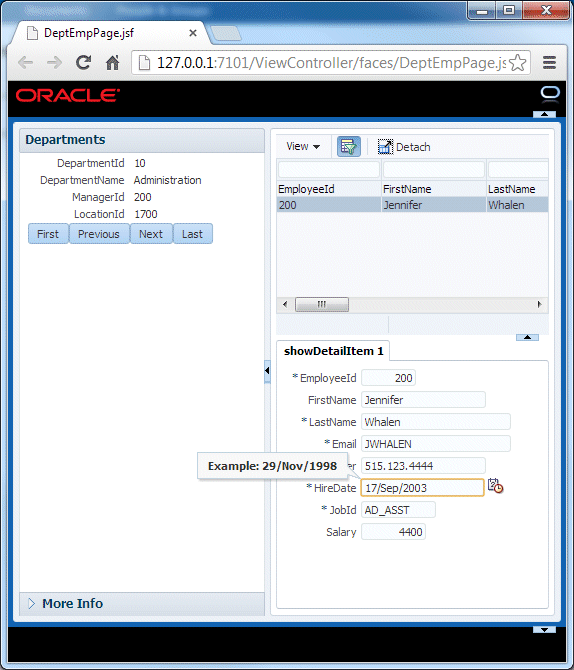
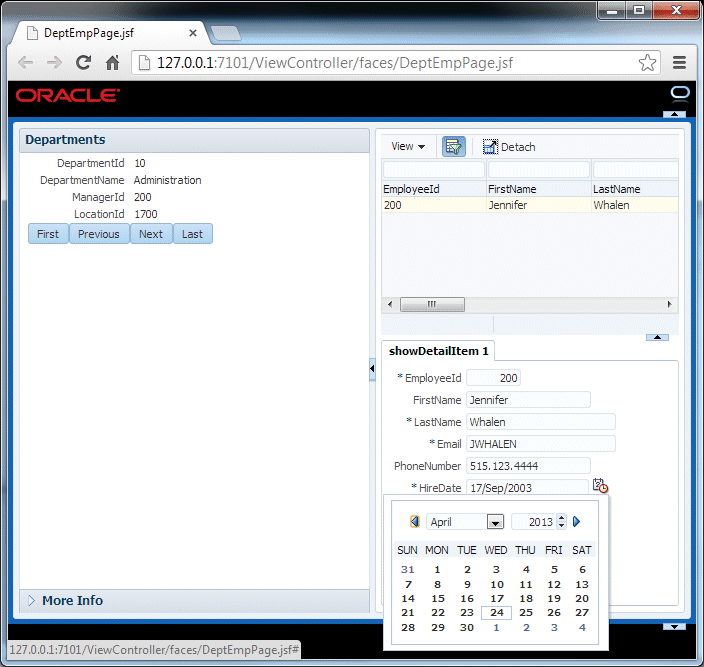
Test the HireDate field. Notice that as soon as you click in the field you are provided with an example of the format for the date (as you defined it).
-
Use the Clock/Calendar icon next to the field to display a pop-up calendar and select a valid date.
-
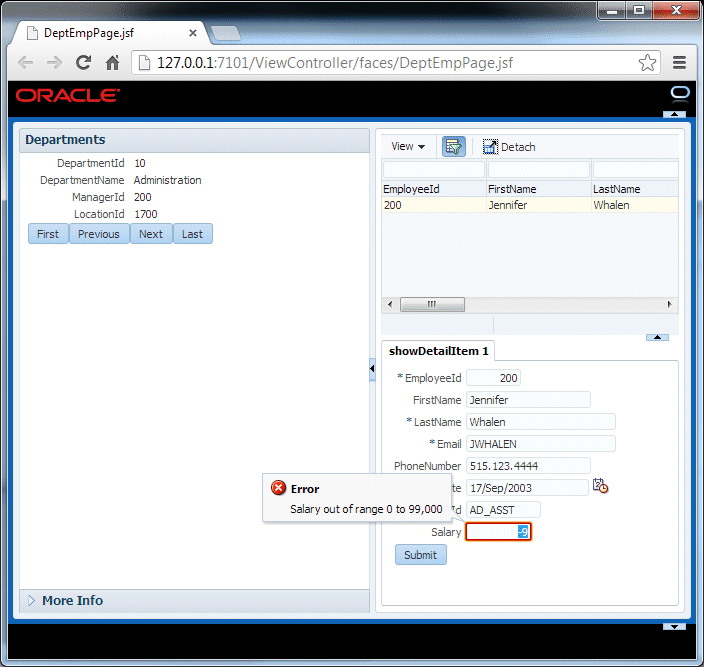
Update the Salary field to a value that will break the validation you created earlier (e.g. -9) and click the Submit button to see the error message you created.
-
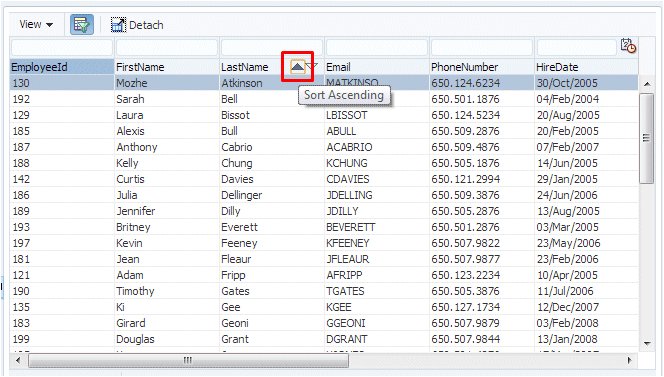
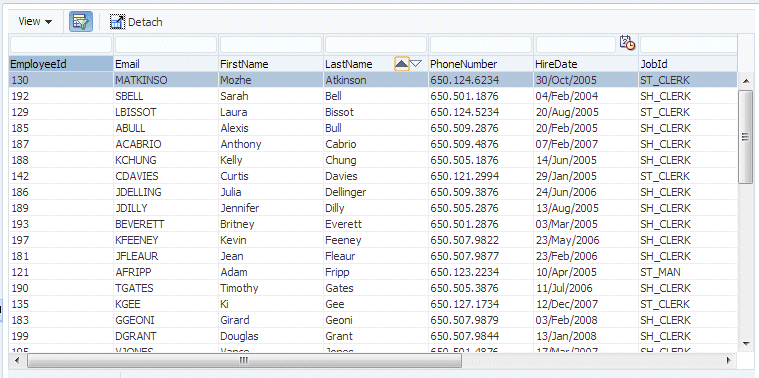
Browse to department 50 and notice that you can now sort the data in the employees table. Click on one of the column headers in the table to sort the data in the table.
-
Click a column heading in the table and drag it to reposition it in the table.
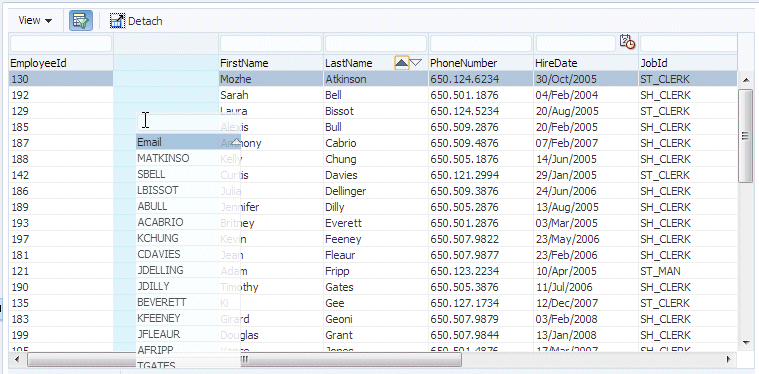
The new column order looks as follows:
-
In the Filter field above the LastName column, type B% and press Enter to filter the table to show only those employees whose surname begins with the letter B.

-
Experiment with the other menus and buttons of the table to see additional functionality. Once you are finished, close the browser and return to JDeveloper.
You can also specify UI Hints for attributes to control how they display by default in the forms and pages that use them. In this step you add a default format mask for the hire date field. You can also specify labels and tooltip help here.
In the next steps you enhance the user interface by modifying the table of employees to add the ability to do column selection, by reordering the fields in the Employee details tab, and by binding the business components to a graph representation. You do this with simple drag and drop operations - behind the scenes the ADF Model layer handles the data binding for you.
-
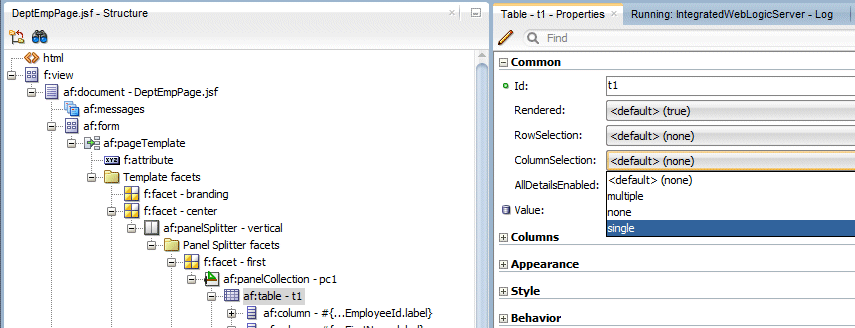
Click the DeptEmpPage.jsf tab to return to the page in the Design Editor. Select the Employees (t1) table in the Design Editor or in the Structure window. Set the Column Selection property of the table to Single.
-
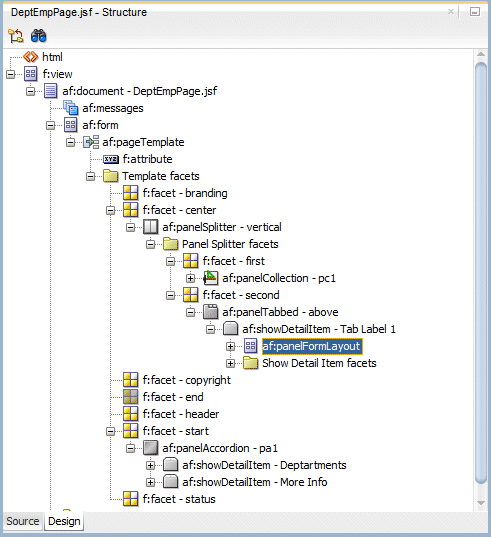
In the Structure window select the panelFormLayout that surrounds the employee details fields in the showDetailItem tab.
-
In the Properties window set the Rows property to 5.
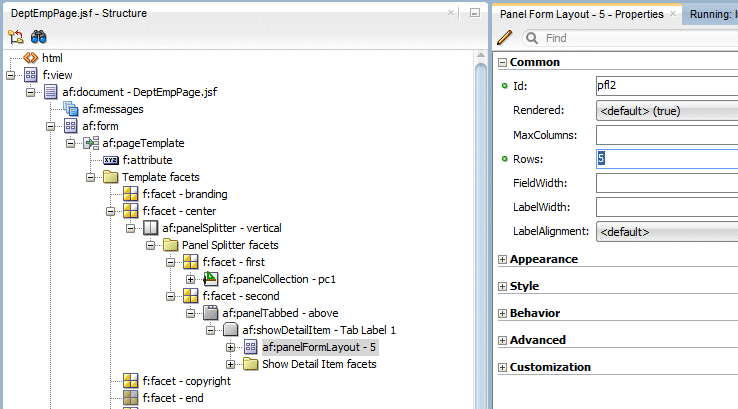
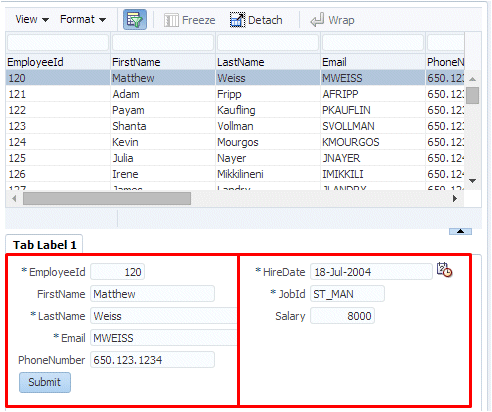
When you run the page in a later step you will see that the fields in the tab are now arranged in two columns.
Notice that you can control layout of the objects within a layout container by setting the properties of the container. -
In the Design Editor click the More Info accordion to expand it. Then drag the EmployeesView3 data control into the More Info accordion and create it as a Chart.
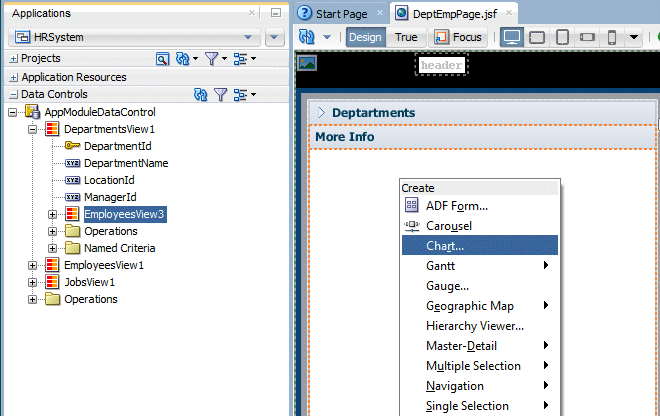 The graph can be displayed as static PNG image or an interactive Flash component.
You control these behaviors through the properties of the graph component. -
In the Component Gallery select Pie from the list of graphs on the left and Pie again as the graph type. In the bottom pane, select the first Quick Start Layout.
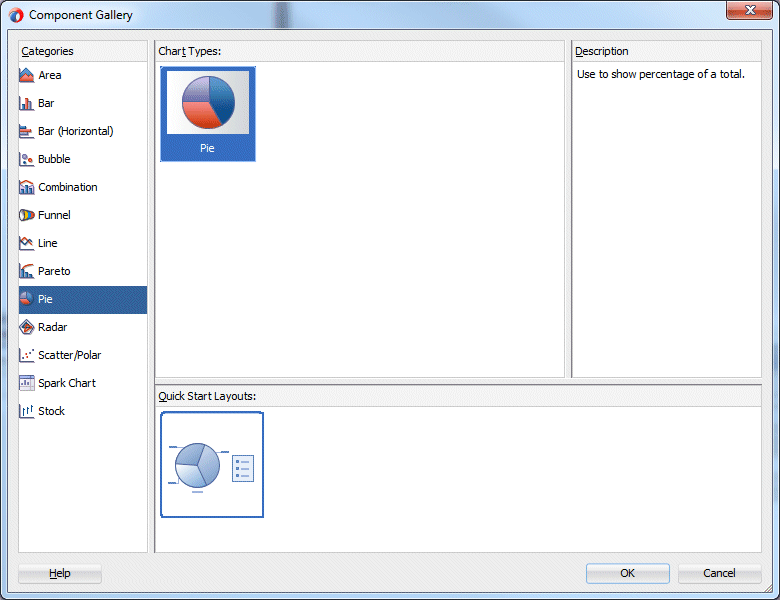
Click the OK.
-
In the Create Pie Graph dialog select Salary in the Pie drop down and then, drag and drop LastName into the Slices field. Click OK.
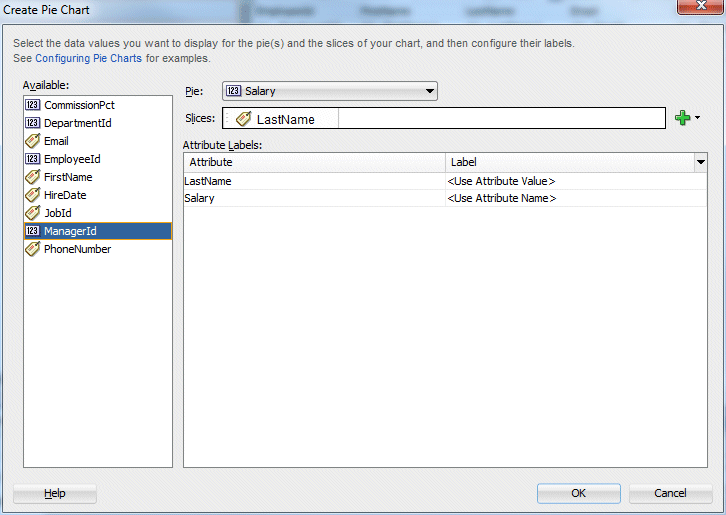
Click OK. -
Click the Save All
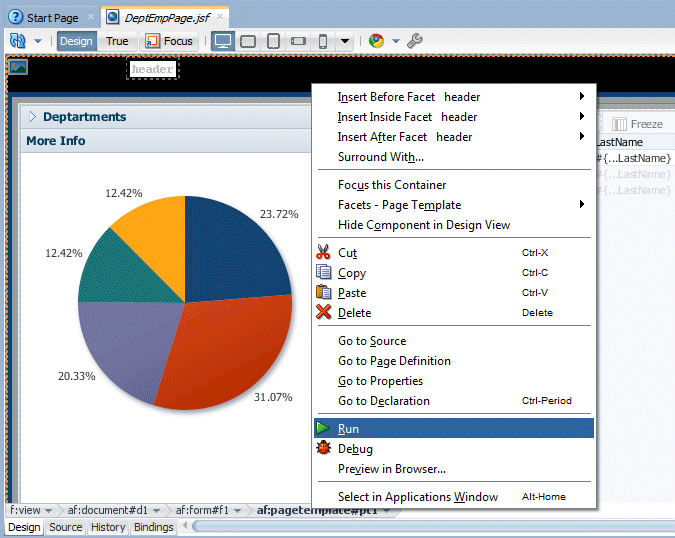
 icon on the JDeveloper menu bar to save your work and then right-click within the page and select Run from the context menu.
-
Browse to department 50. Because you set the column selection to single, note the additional behaviors for the table that are available once you select a column - such as Freeze and Wrap.
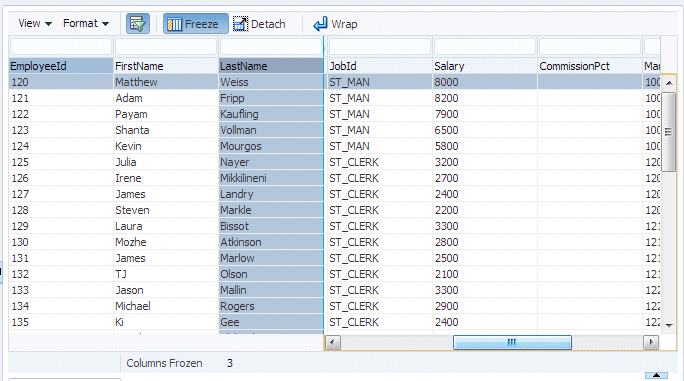
Select a column, then click the Freeze button. Now use the horizontal scroll bar to view the right-most columns. The Columns Frozen value is the number of columns (inclusive) to the left of the frozen column.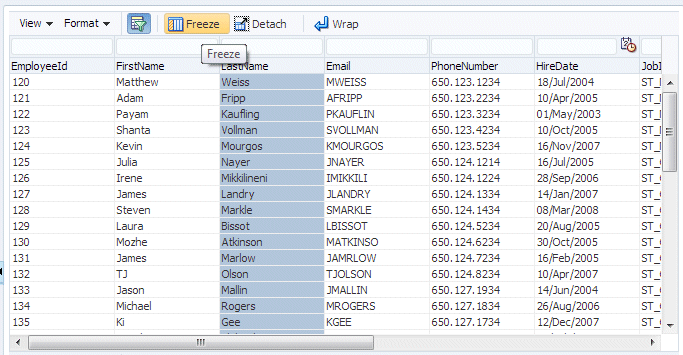
-
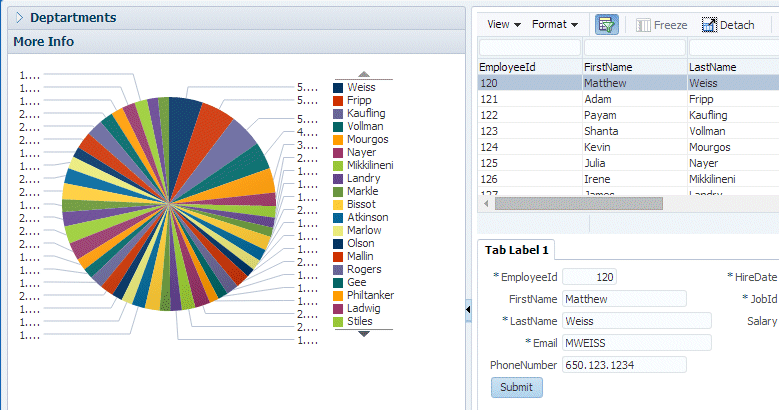
In department 50 expand the More Info accordion and notice the graph and the popup that displays when you hover over it with your mouse.
Since we plotted salary by last name, each slice of the pie represents the salary amount relative to the other employees. In this case Weiss, Fripp and Kaufling make the most.
-
Scroll over to the Tab Label 1 tab, and notice how the fields have been reordered into two columns.
Next you add a graph representation of the data to the page; this is done using the ADF Data Visualization set of JSF components.
When you are done, close the browser and return to JDeveloper.
In this step you add a new business service to the application to display a subset of the fields from the Employees table, along with the department name from the Departments table. You also add a field that calculates the annual salary of an employee and a list of values field for department names. Oracle ADF Business Components allows you to create such complex updateable components in a declarative way.
-
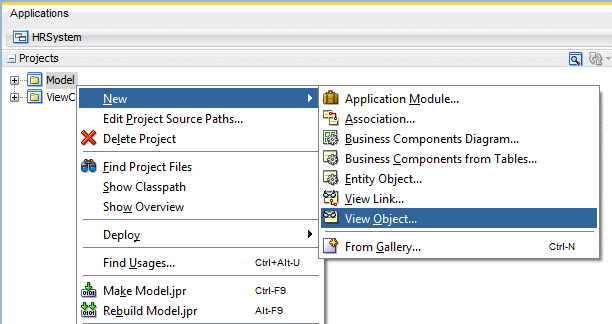
In the Applications window right-click the demo.model package and select New View Object.
-
In the Name page of the Create View Object wizard, type EmpDetails as the Name and retain Entity as the default Data Source.
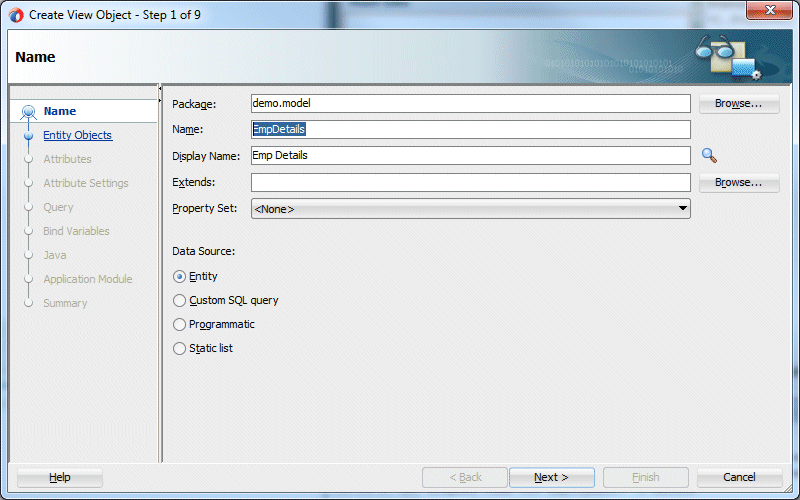
Click Next.
-
In the Entity Objects page of the wizard first select Employees and shuttle it to the right, and then select the Departments entity and add it also to the Selected pane.
Note that only the Employees entity has the updateable checkbox checked - the departments entity is used to read data only.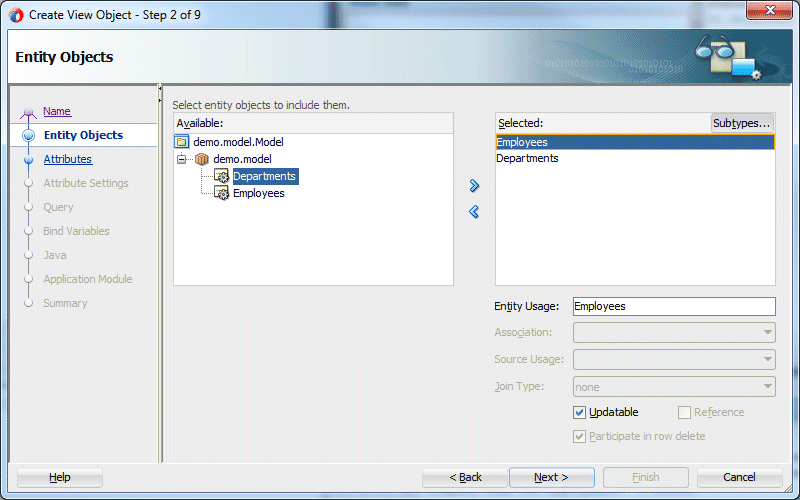
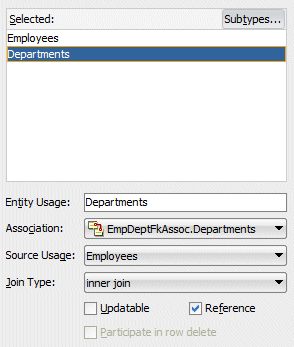
Click Next.
-
In the Attributes page of the wizard, shuttle the following Employees attributes into the Selected pane:
EmployeeId, FirstName, LastName, Email, Salary, HireDate, JobId. The order you select the attributes will become the order they're displayed.
And from the Departments entity, shuttle the following attributes into the Selected pane:
DepartmentId, DepartmentName.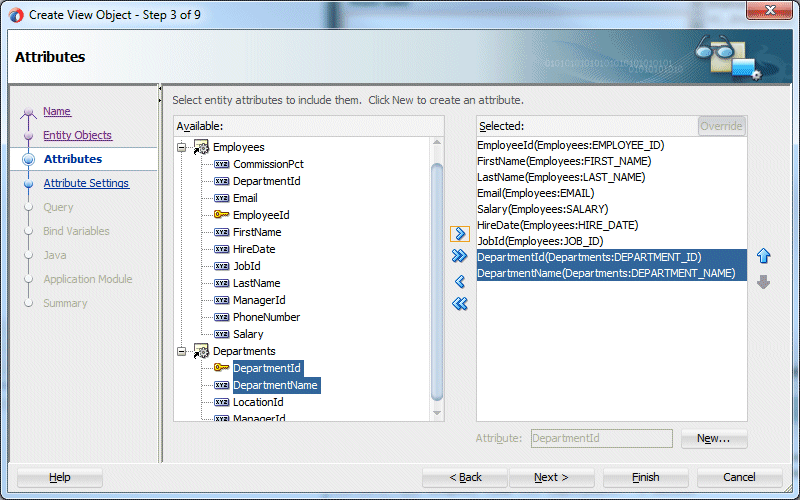
Click Finish to complete the view object creation.
-
Next you add a calculated attribute to the view object, that displays the employee's annual salary.
If it is not already open, double-click EmpDetails in the Applications window.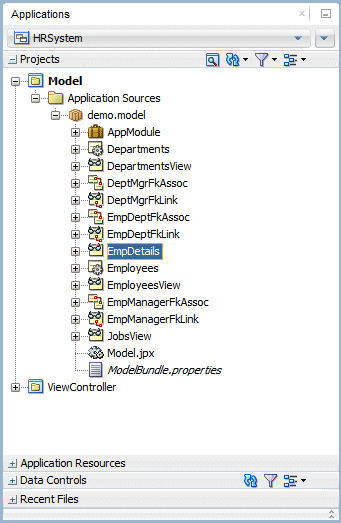
-
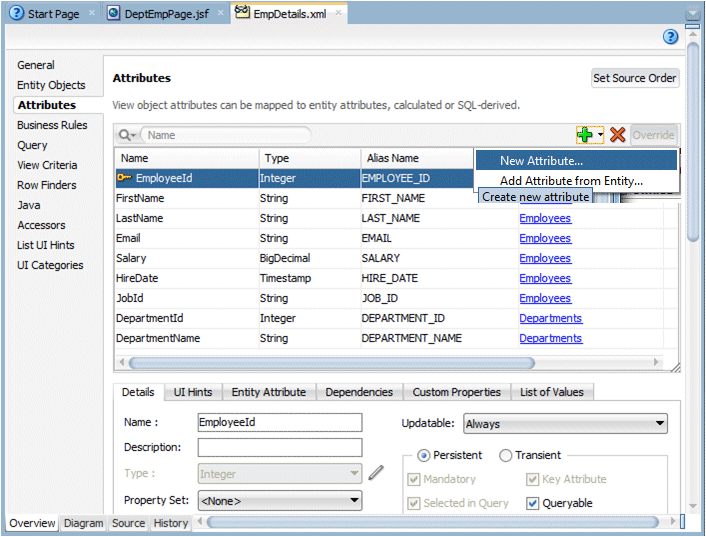
Click the Attributes finger tab and from the drop down list select New Attribute...
-
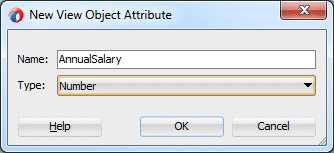
In the New View Object Attribute dialog type AnnualSalary as the name for the new attribute and Number as the Type, then click OK.
-
In the Details tab at the bottom of the attributes list, set the following properties for the AnnualSalary attribute:
Field Value Name AnnualSalaryType NumberDefault Value Expression (Checked)Value (Salary == null ? 0 : Salary) * 12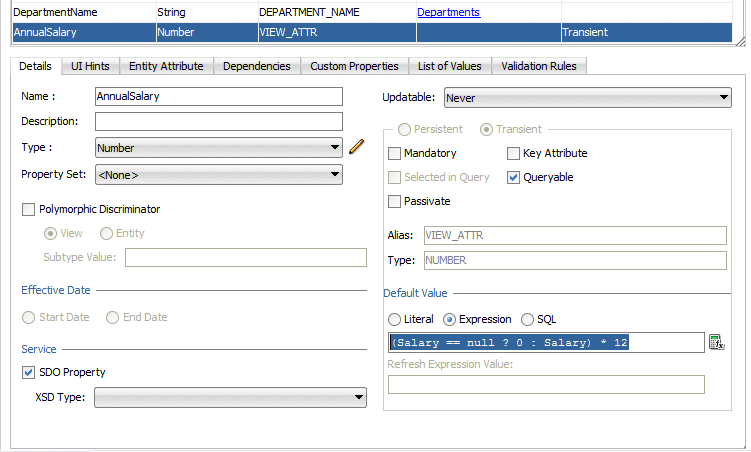 .
.
In the next steps you add a list of values to a field based on a set of values stored in another table. In this case you create a list of values for possible job titles based on the Jobs table.
-
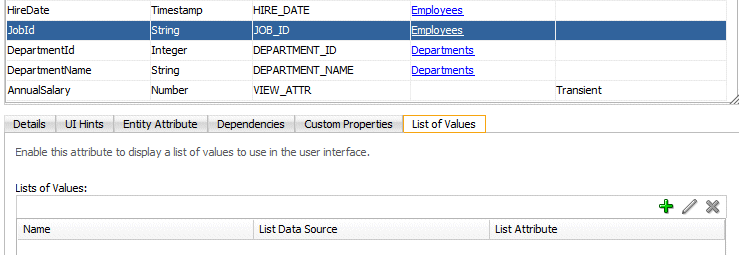
In the EmpDetails.xml editor click the Attributes tab and select the JobId attribute. Click the List Of Values tab at the bottom of the attributes list.
-
In the List of Values tab click the Add button to create a list of values.

-
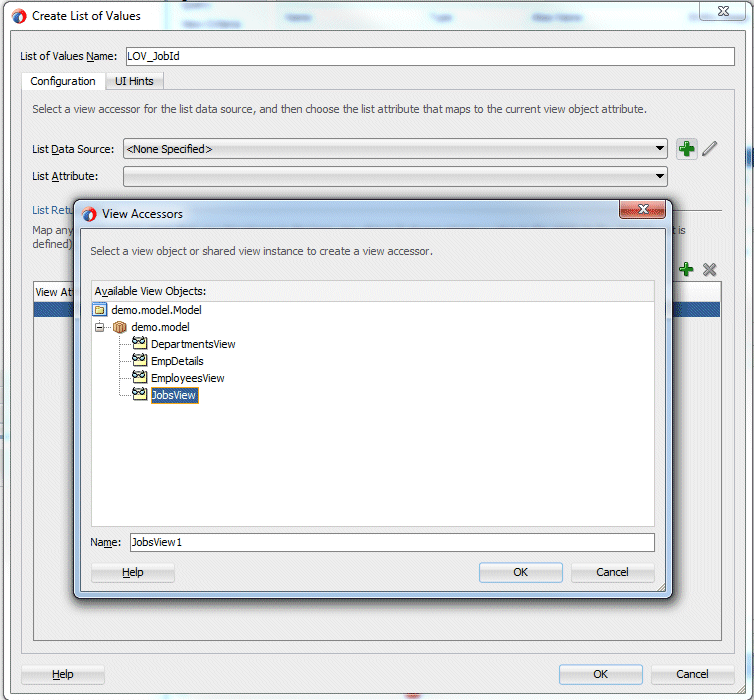
In the Create List of Values dialog click the green plus to the right of the List Data Source field. In the View Accessors dialog, select JobsView.
Click OK.
-
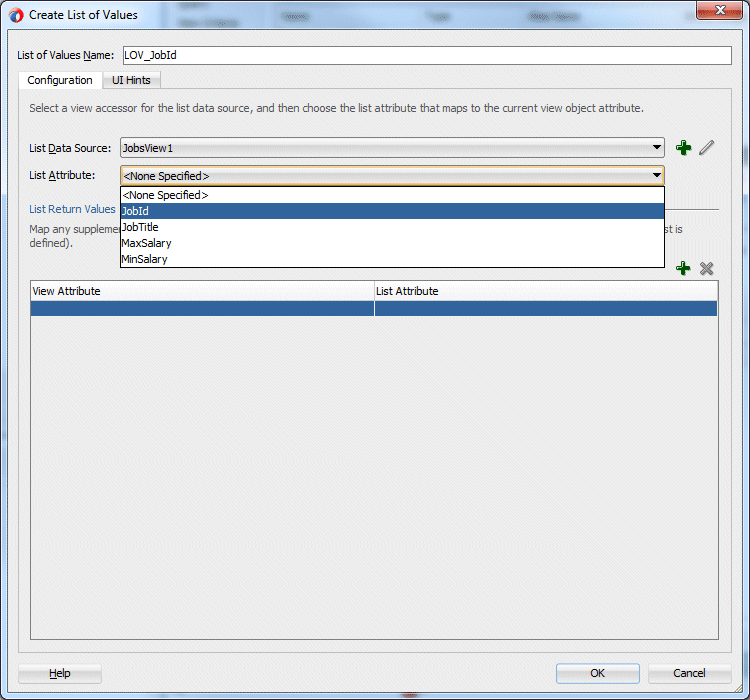
Back in the Create List of Values dialog, select JobId as the List Attribute.
-
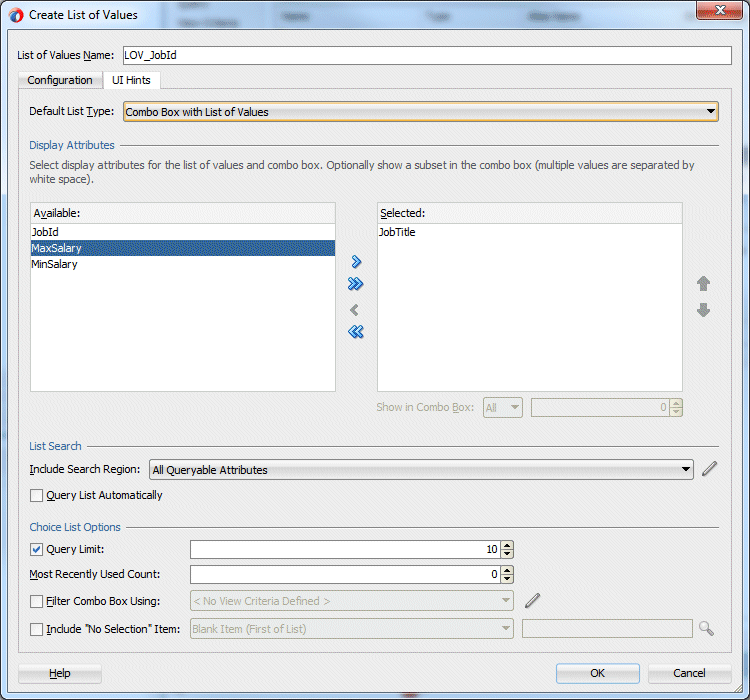
Still in the Create List of Values dialog click the UI Hints tab and select Combo Box with List Of Values as the Default List Type and then shuttle the Job Title attribute into the Selected pane.
-
Click OK and save your work.
-
In the Applications window double-click AppModule to open it for editing and select the Data Model tab.

-
Click the EmpDetails view object and shuttle it into the Data Model pane. Notice how the name for the new instance is EmpDetails1.
Save your work.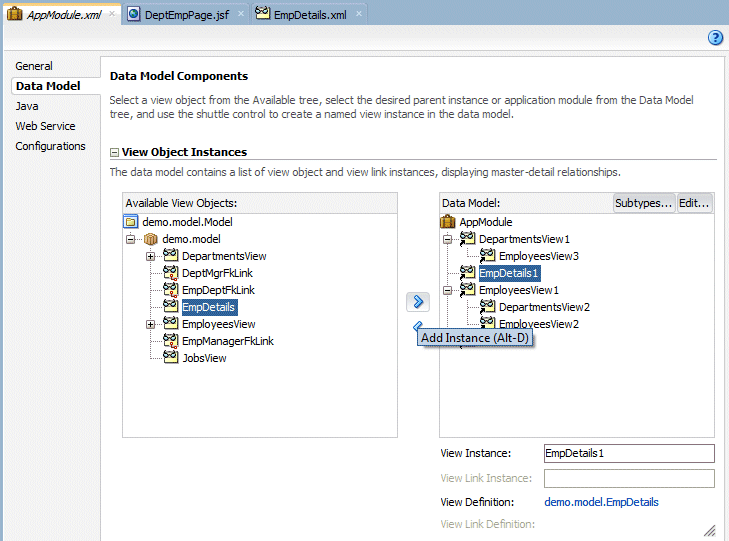
-
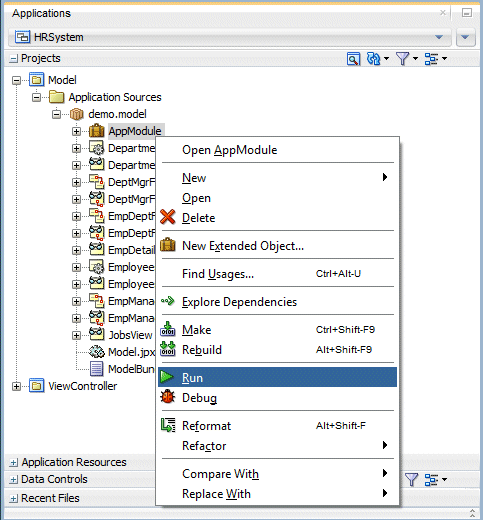
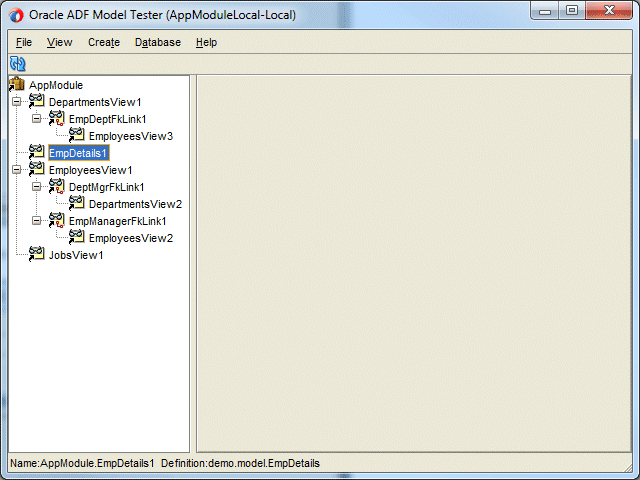
Use the Business Component Browser to test the new functionality you have just incorporated through the EmpDetails view object. In the Applications window right-click AppModule and select Run to invoke the tester.
-
Double-click the EmpDetails1 view object.
-
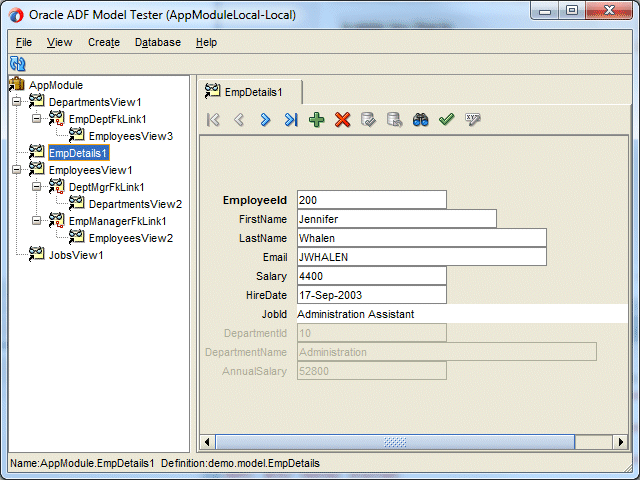
Notice that the new calculated AnnualSalary field is displayed, along with DepartmentId and DepartmentName. None of the them are updateable here.
-
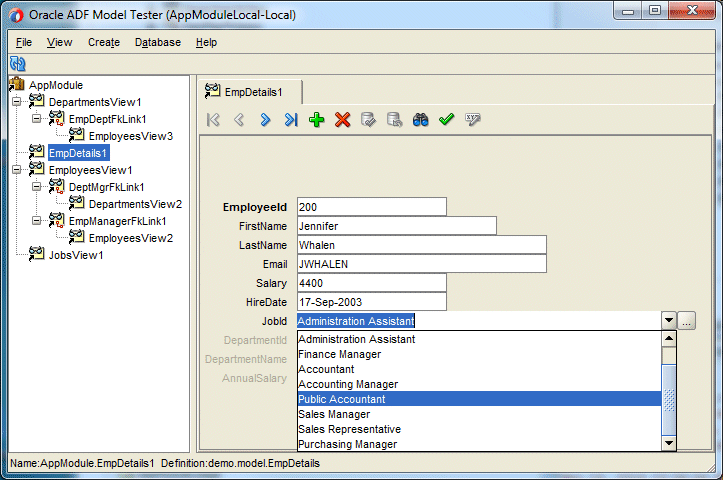
Use the drop down list for the JobId field to select a new job.
-
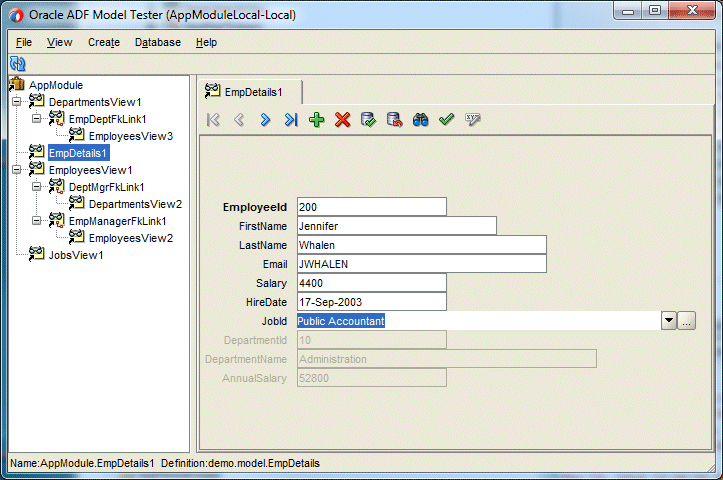
The field is populated with the new job.
-
Close the Business Component Browser window without committing the changes.
Now you add the new object that you've created to the data model.

 Part 1: Creating a Fusion Web Application and Building the Business Services
