


|
|
The following sections provide an overview of a sample WebLogic Server Virtual-Edition (WLS-VE) configuration, describe the main components in the configuration, and summarize the main steps required to successfully install and configure WLS-VE:
To successfully configure and use WLS-VE, it is important to understand the overall architecture and components of a WLS-VE configuration. Figure 1-1 provides a sample configuration consisting of two WLS-VE instances in a virtual environment.
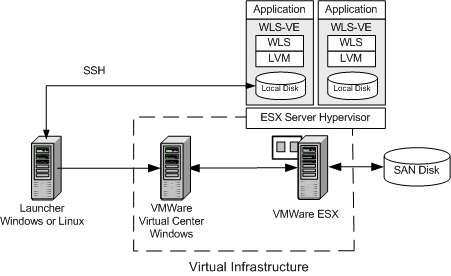
The following table describes the components of the sample WLS-VE configuration.
The following steps summarize the overall process for installing and configuring BEA WebLogic Server Virtual Edition™. Installation procedures are documented in the WLS-VE Installation Guide. Subsequent sections of this document provide details for configuring and using WLS-VE.
|
Details about installing the software are provided in the
WLS-VE Installation Guide.
|
|
Run the LiquidVM Configuration Wizard on the launcher machine to configure the connection between the LiquidVM tools running on the launcher machine and the Virtual Center and ESX server.
For details, see Configuring LiquidVM Connection Parameters.
|
|
Use the WebLogic domain Configuration Wizard to create the WLS-VE domain on the launcher machine. For details, see Creating WLS-VE Domains Using the Configuration Wizard.
If you are using an NFS share, you can generate the domain directly to the NFS share. For more information, see Generating the Domain to an NFS server.
|
|
Before you can copy a domain or start a WLS-VE instance, you need to edit the default start scripts that are created when you create the domain. For details, see Editing the Start Scripts.
|
|
After you have created the domain and edited the start scripts, you need to copy the domain to the virtual machine in either of the following ways:
|
|
If you have experience using non-virtualized WLS, you might want to use some of the configuration techniques common to that product. If so, you need to be aware that some of techniques with which you are familiar will not work with WLS-VE. For example:
boot.properties and SerializedSystemIni.dat files. When WLS-VE is started, it obtains the password from these files. WLS-VE does not provide an interactive prompt so you cannot specify credentials when the server is starting.By default, both the server and LiquidVM console log files are created on the local disk of the virtual machine. VMware logs are also created and stored on the ESX server.
To view the log files, you need to copy them to your local machine using SSH, use a remote syslog collector, or put the logs on an NFS share. For more information, see Configuring Logging.
startWLSVE.sh start script that is created will specify the IP address for the Administration Server.


|