


|
|
The VMware VI Client provides a graphical view to WLS-VE through the VMware VirtualCenter, a component of VMware Infrastructure. It allows you to provision virtual machines and monitor performance of physical servers and virtual machines. VirtualCenter can optimize resources, ensure high availability to all applications running on virtual machines and improve the responsiveness of your IT environment with virtualization-based distributed services.
This section provides an overview of the VI Client to help you familiarize yourself with its components and some of its uses. This section is not intended as a VI Client user guide beyond functionality that is specific to WLS-VE. For complete information on this product, we strongly recommend that you refer to the
VMware Infrastructure Documentation at
http://www.vmware.com/support/pubs/vi_pubs.html
This section contains information on these topics:
For information about installing VMware VirtualCenter, see the VMware installation documentation at
http://www.vmware.com/support/pubs/vi_pubs.html.
To use SSL with VirtualCenter (which is strongly recommended), you must install the VMware Web Service. The VMware Web Service is installed by default when you choose the typical installation for VirtualCenter. For information about how to set up the VMware Web Service and verify that it is operating correctly, see the VMware Installation and Upgrade Guide. See also the Developing Client Applications chapter of the VMware Infrastructure SDK Programming Guide.
You can start an existing WLS-VE instance from the VI Client as follows:
If you stop WLS-VE, you risk losing any underlying server connections, with no guarantee that these connections will be restored when the machine is restarted. For this reason, stopping WLS-VE using VirtualCenter is not recommended. If you must stop WLS-VE, follow the instructions for doing so in Stopping WLS-VE. For more detailed information on starting (and stopping) a machine from VirtualCenter, refer to Starting WLS-VE
You can edit the properties of a running virtual machine while it is running from within the VI Client. To do so, either:
The Virtual Machine Properties window appears (Figure 5-1).
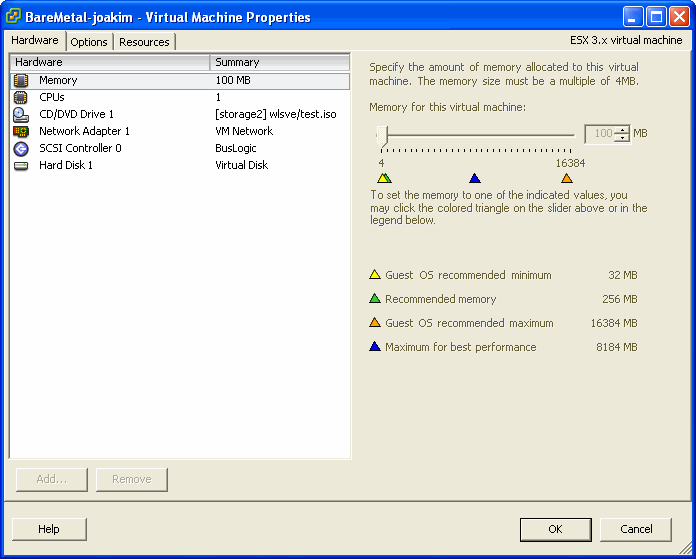
This window is divided into three tabs, each providing access to certain groups of properties that you can edit, as described in Table 5-1. Unless otherwise specified, you can edit any of the values on these tabs as long as those properties are enabled for your VM.
For details on how to use the Virtual Machine Properties window to edit VM settings, refer to the VMware document, Basic System Administration, in the VMware Infrastructure documentation at
http://www.vmware.com/support/pubs/vi_pubs.html.
Pausing, or hibernating, a VM causes it to stop running while allowing all other processes to continue. You can pause a VM either by clicking the Suspend button or by right-clicking a running machine in the Hosts & Clusters list and selecting Suspend from the context menu that appears.
You should be very careful when pausing a VM; only use this function when absolutely necessary. When you pause a VM instance while you have open connections to the server, you risk losing these connections when you resume the VM. The resultant unpredictable behavior might cause these connections to be reset.
While most of the VI Client tabs are fairly straightforward in their use, the Console tab does support certain functions specific to WLS-VE. This section describes those functions.
When you select the Console tab and click inside the Console window, most keys on your keyboard are disabled and your mouse pointer disappears. You can use the key sequences listed in Table 5-2 to perform certain functions when the Console is open:
Text written to the console also gets written to a log file. This log file is normally stored in the current working directory (/domain by default), as seen from inside the WLS-VE instance. By default, the LiquidVM output is recorded in the \domain\WLS-servername.lvm.out file, unless you have specified a different location using the LVM_CONSOLE_LOG property in the start script. For details about setting properties in the start script, see Editing the Start Scripts.
Before the LiquidVM has a network connection, it cannot write to the log file because it needs a network connection to do so. If something fails during initialization, you may want to see what happened without having to use the Virtual Infrastructure Client. WLS-VE supports such monitoring with the help of the WLS-VE launcher. After the WLS-VE instance is launched, the launcher continues to monitor the boot process until the JVM has started successfully. If anything fails during this early stage, the error messages are displayed in your launcher. If the failure happened early in the boot process, this message may not be shown in the LiquidVM console log because the log file may not have been created at the time of the failure.This request uses the VMware communication channels that don't require networking to be set up, therefore the WLS-VE launcher can get machine log information even if networking initialization has failed.


|
 .
.