Extending the Administration Console
|
|
Understanding Administration Console Extensions
Administration Console extensions enable you to add content to the WebLogic Server Administration Console, replace content, and change the logos, styles and colors without modifying the files that are installed with WebLogic Server. For example, you can add a portlet that provides custom monitoring and management facilities for your applications.
The Administration Console is a J2EE Web application that uses the WebLogic Portal framework, Apache Beehive, Apache Struts, Java Server Pages (JSP), and other standard technologies to render its user interface (UI) and content. It also uses the WebLogic Portal framework to enable extensions.
The following sections describe Administration Console extensions:
- What Is an Administration Console Extension?
- UI Controls in the Administration Console
- The Look and Feel in the Administration Console
- JSP Templates and Tag Libraries
- Example: How an Extension Finds and Displays Content
What Is an Administration Console Extension?
An Administration Console extension is a JAR file that contains the resources for a section of a WebLogic Portal Web application. When you deploy the extension, the Administration Console creates a union of the files and directories in its WAR file with the files and directories in the extension JAR file. Once the extension has been deployed, it is a full member of the Administration Console: it is secured by the WebLogic Server security realm, it can navigate to other sections of the Administration Console, and if the extension modifies WebLogic Server resources, it participates in the change control process.
The two key components of an Administration Console extension are:
- The resources that make up your section of the Administration Console.
- A JSP or HTML file that contains the content you want to display.
- A portlet XML file that defines a WebLogic Portal portlet, which is a container for JSPs, HTML files, and other types of content. Some portlets provide borders and minimize/maximize controls; some do not.
- Java classes.
- Configuration files and Java classes for Apache Struts applications.
- Support files for Apache Beehive Page Flows.
- XML files that describe other types of WebLogic Portal UI controls, such as tabs and subtabs (see UI Controls in the Administration Console).
- A NetUI Extension XML file that describes the location in the UI in which you want your extension to display.
How Do the WebLogic Portal Framework and WebLogic Portal Differ?
The WebLogic Portal framework provides basic support for rendering the UI. The full WebLogic Portal product provides the framework and additional features such as personalization, interaction management, content management, and the ability for end users to customize their portal desktops.
If your BEA product license includes only WebLogic Server, then you can use the WebLogic Portal framework when creating Administration Console extensions. If you want your own Web applications to provide a portal interface, you can purchase the WebLogic Portal product.
UI Controls in the Administration Console
The UI for the Administration Console is rendered by groups of specialized WebLogic Portal components called UI controls. For example, one group of UI controls renders the two-column layout that you see after you log in to the Administration Console. Other groups render individual tabs in the tabbed interface.
Many of these UI controls are identified by unique labels, and your NetUI Extension XML file specifies the labeled control that you want to append or replace. You can also use these labels with WebLogic Server JSP tags to forward requests to specific UI controls. If a UI control is not identified by a label, you cannot extend it or forward to it. You must either interact with its labeled ancestor control or a labeled child control.
The following sections describe the labeled UI controls in the Administration Console:
- Types of UI Controls
- The Desktop
- The Home Book and Page
- The ContentBook
- Summary of the Administration Console UI Controls
Types of UI Controls
The following is a list of the types of UI controls that the Administration Console labels:
- Desktop
Contains the Look and Feel for the Administration Console and the top-level book. It provides little functionality beyond entitlement checking and aggregating other controls.
- Book
Aggregates a set of pages or other books. It can contain an optional menu control that provides navigation among its pages and books.
- Page
- Layout
Defines a grid in the UI. Each column in the grid is called a placeholder, and each placeholder can host zero or more portlets or books.
Most pages in the Administration Console use a single column layout, but one of the top pages uses a two-column layout to create the left column that contains the Change Center, Domain Structure, and other portlets, and the right column that contains the tabbed interface.
- Portlet
The Desktop
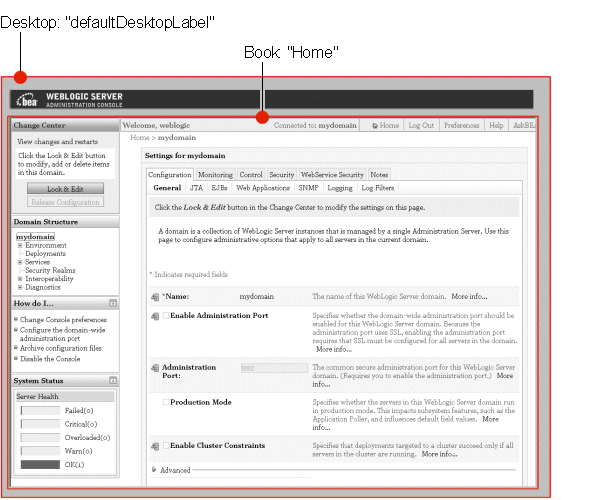
Every WebLogic Portal Web application must have at least one desktop control, and the Administration Console supports only one. Its label is defaultDesktopLabel (see Figure 2-1).
Extending the Desktop
You can use Administration Console extensions to replace the desktop's Look and Feel, but you cannot replace the top-level book. To replace the Look and Feel, use the desktop-extension element in the netuix-extension XML file (see desktop-extension in the NetUI Extension Schema Reference):
<desktop-extension>
    <look-and-feel-content title="myLookandFeel"
      ...
   />
</desktop-extension>
The Home Book and Page
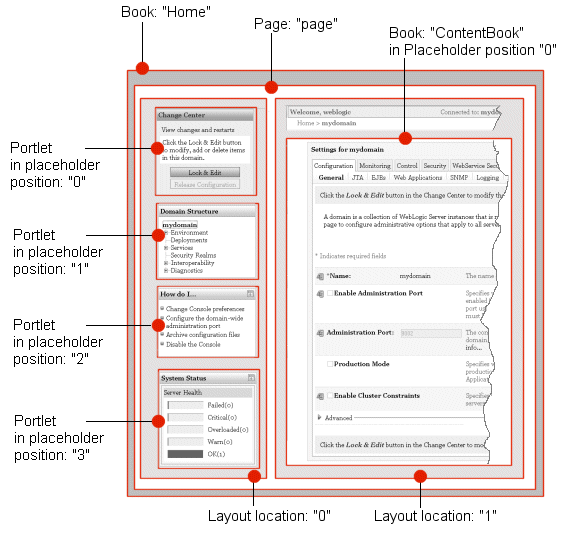
The top-level book in the Administration Console is identified by the label Home. It contains a single page (labeled page) within which resides all of the Administration Console content (see Figure 2-2).
Figure 2-2 The Home Book and Page
The page page uses a two-column layout. The left column (layout location 0) contains portlets that provide essential services when using the Administration Console. The right column (layout location 1) contains:
- Portlets:
- The topmost portlet displays a welcome message and contains buttons that launch online help and other services.
- The second portlet displays breadcrumbs, which are a series of hypertext links that keep a history of your navigation in the Administration Console.
- A third portlet is hidden by default and displays error messages and other status messages.
- A book named
ContentBook. See The ContentBook.
Extending the Home Book
The simplest extensions within the Home book add portlets to either column of its page page. For example, below the System Status portlet, you can add a portlet that monitors your applications.
To extend the page page, use the page-extension element in the netuix-extension XML file (see page-extension in the NetUI Extension Schema Reference):
<page-extension>
<page-location>
<parent-label-location label="page"/>
...
</page-location>
...
</page-extension>
The ContentBook
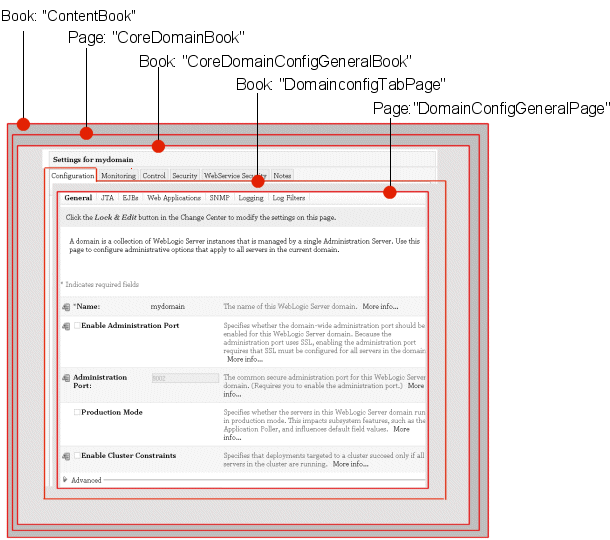
The ContentBook is a book that contains over 40 pages, but it displays only one page at a time. Navigational controls throughout the Administration Console determine which page is displayed. For example, if a user clicks on "mydomain" in the portlet whose user-visible title is Domain Structure (NavTreePortlet), the ContentBook displays the page that contains controls for the configuration a domain (see Figure 2-3).
Each page in ContentBook contains a single content-specific book. This content-specific book contains multiple books, some of which use a singleLevelMenu control to display a tabbed interface. Each of the tabs in Figure 2-3 (Configuration, Monitoring, Control, Security, Web Services Security, and Notes) is rendered by a book that uses the singleLevelMenu control.
Note: The CoreDomainBook contains additional labeled controls that are omitted for the sake of brevity.
Each book that displays a tabbed interface contains at least one page. If the book contains multiple pages, each page uses a singleLevelMenu control to display a subtab. In Figure 2-3, the DomainconfigTabPage book renders the Configuration tab. Each of the subtabs in this book is a page. For example, the DomainConfigGeneralPage is the page that contains the portlet that renders the General subtab.
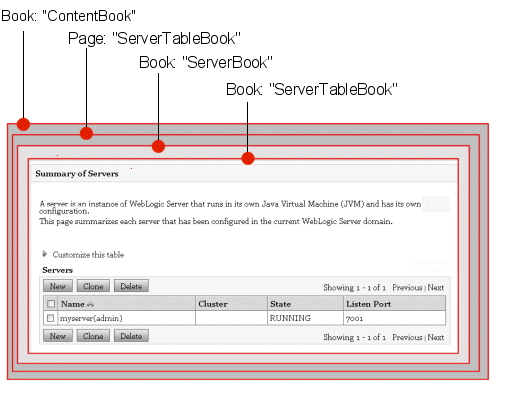
Some content-specific books do not display a tabbed interface. Figure 2-4 shows the ServerBook, which does not display a tabbed interface.
Extending the ContentBook
The simplest extensions within the ContentBook add a tabbed book to a content-specific book or add a subtab. To extend the ContentBook, use the book-extension element in the netuix-extension XML file (see book-extension in the NetUI Extension Schema Reference).
For example, the following XML stanza adds a tabbed book to CoreDomainGeneralBook:
<book-extension>
   <book-location>
      <parent-label-location label="CoreDomainGeneralBook"/>
      <book-insertion-point action="append"/>
   </book-location>
</book-extension>
The following XML stanza adds a subtab to the DomainconfigTabPage book:
<book-extension>
   <book-location>
      <parent-label-location label="DomainconfigTabPage"/>
      <book-insertion-point action="append"/>
   </book-location>
</book-extension>
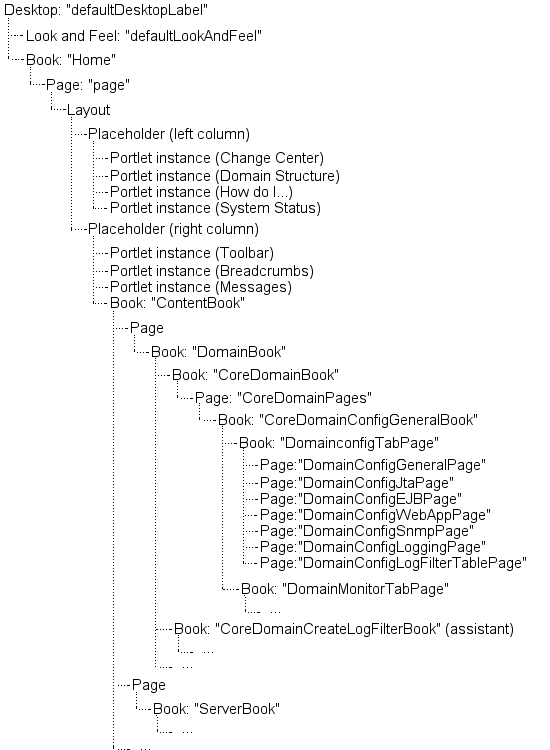
Summary of the Administration Console UI Controls
Figure 2-5 shows the top levels of the Administration Console's labeled UI controls. For a complete list of labeled UI controls, including all of the content-specific books, download and install a Look and Feel that causes the Administration Console to display labels for its controls. See Deploy a Development Look and Feel to See UI Control Labels.
Figure 2-5 Summary of the UI Control Hierarchy
The Look and Feel in the Administration Console
A Look and Feel is a collection of images, cascading style sheets, XML files, and other file types that control the physical appearance of a portal application. For example, it defines the fonts and colors used by the Administration Console, the layout of portal components, and the navigation menus.
Creating a simple Look and Feel that contains your company's logos, fonts, and color scheme requires you to copy a sample Look and Feel that WebLogic Server provides and then replace the logos and some cascading style sheet (CSS) definitions. Making complex changes to the WebLogic Server Look and Feel, such as changing the layout of portal components and navigation menus, requires an advanced knowledge of WebLogic Portal Look and Feels. If you have a license for WebLogic Workshop, you can use its Look and Feel editor to make these complex changes. For more information about Look and Feels, see the Portal User Interface Framework Guide.
Note: Because the Administration Console uses only the WebLogic Portal Framework, it supports only a single Look and Feel. Portal applications that use the entire set of features available with a license for the BEA WebLogic Portal product can support multiple Look and Feels that are personalized based on user or group ID.
JSP Templates and Tag Libraries
Most of the content in the Administration Console is rendered by JSPs, and most of these JSPs import one of several template JSPs to provide a basic structure for the content. In addition, the JSPs use several JSP tag libraries to render such UI features as tables, data-entry boxes, and buttons.
Your console extensions can follow this same pattern and use the Administration Console's JSP templates and tag libraries. For example, by using JSP tags and templates, less than 45 lines of code are needed to generate the Server table page in Figure 2-4 (see Listing 2-1).
Listing 2-1 JSP for Server Table Page
<%@ page language="java" %>
<%@ taglib uri="/WEB-INF/console-html.tld" prefix="wl" %>
<%@ taglib uri="/WEB-INF/fmt.tld" prefix="fmt" %>
<%@ taglib uri="/WEB-INF/beehive-netui-tags-template.tld" prefix="beehive-template" %>
<fmt:setBundle basename="core" var="current_bundle" scope="page"/>
<beehive-template:template templatePage="/layouts/tableBaseLayout_netui.jsp">
   <beehive-template:section name="configAreaIntroduction">
      <fmt:message key="core.server.servertable.introduction"
            bundle="${current_bundle}"/>
   </beehive-template:section>
   <beehive-template:section name="table">
      <wl:table name="extensionForm"
             property="contents"
             showcheckboxes="true"
             captionEnabled="true"
             controlsEnabled="true"
             checkBoxValue="handle"
             bundle="core"
             formEnabled="true"
             singlechange="false">
         <wl:caption>
            <fmt:message key="server.table.caption"
                 bundle="${current_bundle}"/>
         </wl:caption>
         <wl:column property="name" label="server.table.label.name">
            <wl:column-dispatch perspective="configuration-page"/>
         </wl:column>
         <wl:column property="clusterName"
            label="server.table.label.cluster"/>
         <wl:column property="machineName" label="server.table.label.machine"/>
      </wl:table>
</beehive-template:section>
</beehive-template:template>
WebLogic Server JSP Templates
Table 2-1 describes the JSP templates that you can use for your Administration Console extensions. All of the templates are located in the /layouts directory, which is relative to the WEB-INF directory of the Administration Console. WebLogic Server does not publish the templates themselves, but Creating Portlets That Match the Administration Console describes how to use them.
If these templates do not meet your needs, you can create your own templates and structure the content directly in your JSP.
|
The Administration Console uses this template for all of its JSPs that render a single table (see Figure 2-4). To create the overall structure of the document, the template outputs an HTML table with two rows. The first row contains everything in the including document's The second row contains everything in the including document's <beehive-template:section name="table"> tag, which is usually a table that displays a list of WebLogic Server resources and a button bar for working with the resources. Listing 2-1 uses this template. |
|
|
The Administration Console uses this template for all of its JSPs that render an introductory description, an HTML form, and Save and Cancel buttons (see Figure 2-3). The template output depends on whether the user has privileges to modify the domain's configuration. If a user has permission, the template outputs an HTML table with four rows. The first and last rows display Save and Cancel buttons along with a message indicating whether the user has a lock on the configuration and can make changes. If a user does not have permission, the table does not contain these rows. The second row contains everything in the including document's The third row contains everything in the including document's <beehive-template:section name="form"> tag, which is a form that provides user-input controls and descriptions. |
JSP Tag Libraries
For each of the tag libraries in Table 2-2, the Administration Console provides runtime support by default. If you want development support for these libraries (for example, if you use an integrated development environment that provides code completion for JSP tags), you must configure your development environment to include these tags. (See Set Up Your Development Environment.)
Note: You can create custom tag libraries or use additional tag libraries, but you must include all of the necessary support files for custom tag libraries in your extension JAR file. See Programming WebLogic JSP Tag Extensions.
|
WebLogic Server JSP tags for creating HTML forms and tables that match the functionality of the forms and tables in the Administration Console. Use these tags only to extend the WebLogic Server Administration Console. The documentation for this tag library is in the WebLogic Server 9.0 JSP Tags Reference. |
|
|
|
Apache Beehive JSP tags for associating JSPs with a JSP template, binding data, and generating basic HTML tags. You can download the Beehive distribution, which includes the tag libraries and documentation from http://incubator.apache.org/beehive/downloads.html. |
|
JavaServer Pages Standard Tag Library (JSTL) tags which provide core functionality common to many JSP applications. You can download the JSTL distribution from http://java.sun.com/products/jsp/jstl/downloads/index.html. The documentation for these tag libraries is in the JSTL Tag Library Reference. |
|
|
Apache Struts tags for interacting with the Struts framework. You can download the Struts distribution from http://struts.apache.org/download.cgi. The documentation for these tag libraries is available from http://struts.apache.org/. |
Example: How an Extension Finds and Displays Content
The following steps describe how the portal framework uses an extension's source files to find and display data. The steps describe an extension that uses WebLogic Server JSP tags and Struts actions:
For example, the following stanza in a NetUI Extension file describes the location in which to display the extension and a portlet file to load into the location:
<page-extension>
   <page-location>
      <parent-label-location label="page"/>
      <page-insertion-point layout-location="0"
          placeholder-position="0"
      />
   </page-location>
   <portlet-content
      content-uri="/portlets/desktop/desktop_view.portlet"
       title="My Extension"
      orientation="top" default-minimized="false"
      instance-label="PortletExtensionInstanceLabel"
   />
</page-extension>
If your extension adds books or pages to the Administration Console, the NetUI Extension file names a portal include file (instead of a portlet file) that defines the books or pages. The portal include file names a portlet file to be loaded.
For example, the following stanza from a portlet file defines a portlet and names a Struts action to run:
<portal:root>
   <netuix:portlet
      definitionLabel="MyPortlet"
      title="my.portlet.title">
   <netuix:strutsContent module="/mycompany"
      action="MyExtensionAction"
      refreshAction="MyExtensionAction"/>
   </netuix:portlet>
</portal:root>
You can create portlets that load JSPs or Beehive Page Flows instead of running a Struts action.
