

|
|
|
|
|
|
| | | |
WebLogic JSP Reference
The following sections provide reference information for writing JavaServer Pages (JSPs):
The following table describes the basic tags that you can use in a JSP page. Each shorthand tag has an XML equivalent.
|
JSP Tag |
Syntax |
Description |
|---|---|---|
|
Scriptlet |
<% java_code %> . . . or use the XML equivalent: <jsp:scriptlet> |
Embeds Java source code scriptlet in your HTML page. The Java code is executed and its output is inserted in sequence with the rest of the HTML in the page. For details, see Scriptlets. |
|
Directive |
<%@ dir-type dir-attr %> . . . or use the XML equivalent: <jsp:directive.dir_type dir_attr /> |
Directives contain messages to the application server. A directive can also contain name/value pair attributes in the form attr="value", which provides additional instructions to the application server. See Directives for WebLogic JSP. |
|
Declarations |
<%! declaration %> . . . or use XML equivalent... <jsp:declaration> |
Declares a variable or method that can be referenced by other declarations, scriptlets, or expressions in the page. See Declarations. |
|
Expression |
<%= expression %> . . . or use XML equivalent... <jsp:expression> |
Defines a Java expression that is evaluated at page request time, converted to a String, and sent inline to the output stream of the JSP response. See Expressions. |
|
Actions |
<jsp:useBean ... > JSP body is included if the bean is instantiated here </jsp:useBean> |
Provide access to advanced features of JSP, and only use XML syntax. These actions are supported as defined in the JSP 1.1 specification. See Actions. |
Reserved Words for Implicit Objects
JSP reserves words for implicit objects in scriptlets and expressions. These implicit objects represent Java objects that provide useful methods and information for your JSP page. WebLogic JSP implements all implicit objects defined in the JSP 1.1 specification. The JSP API is described in the Javadocs available from the Sun Microsystems JSP Home Page.
Note: Use these implicit objects only within Scriptlets or Expressions. Using these keywords from a method defined in a declaration causes a translation-time compilation error because such usage causes your page to reference an undefined variable.
  ByteArrayOutputStream ostr = new ByteArrayOutputStream();
  exception.printStackTrace(new PrintWriter(ostr));
  out.print(ostr);
For more information on the underlying HTTP servlet framework, see the related developers guide, Programming WebLogic HTTP Servlets.
Use directives to instruct WebLogic JSP to perform certain functions or interpret the JSP page in a particular way. You can insert a directive anywhere in a JSP page. The position is generally irrelevant (except for the include directive), and you can use multiple directive tags. A directive consists of a directive type and one or more attributes of that type.
You can use either of two types of syntax: shorthand or XML:
Replace dir_type with the directive type, and dir_attr with a list of one or more directive attributes for that directive type.
There are three types of directives page, taglib, or include.
Using the page Directive to Set Character Encoding
To specify a character encoding set, use the following directive at the top of the page:
<%@ page contentType="text/html; charset=custom-encoding" %>
Replace the custom-encoding with a standard HTTP-style character set name .
The character set you specify with a contentType directive specifies the character set used in the JSP as well as any JSP included in that JSP.
You can specify a default character encoding by specifying it in the WebLogic-specific deployment descriptor for your Web Application. For more information, see the jsp-descriptor section.
Using the taglib Directive
Use a taglib directive to declare that your JSP page uses custom JSP tag extensions that are defined in a tag library. For details about writing and using custom JSP tags, see "Programming WebLogic JSP Extensions".
Use declarations to define variables and methods at the class-scope level of the generated JSP servlet. Declarations made between JSP tags are accessible from other declarations and scriptlets in your JSP page. For example:
<%!
  int i=0;
  String foo= "Hello";
  private void bar() {
    // ...java code here...
  }
%>
Remember that class-scope objects are shared between multiple threads being executed in the same instance of a servlet. To guard against sharing violations, synchronize class scope objects. If you are not confident writing thread-safe code, you can declare your servlet as not-thread-safe by including the following directive:
<%@ page isThreadSafe="false" %>
By default, this attribute is set to true. When set to false, the generated servlet implements the javax.servlet.SingleThreadModel interface, which prevents multiple threads from running in the same servlet instance. Setting isThreadSafe to false consumes additional memory and can cause performance to degrade.
JSP scriptlets make up the Java body of your JSP servlet's HTTP response. To include a scriptlet in your JSP page, use the shorthand or XML scriptlet tags shown here:
<%
  // Your Java code goes here
%>
<jsp:scriptlet>
  // Your Java code goes here
</jsp:scriptlet>
Note the following features of scriptlets:
Any time you print data that a user has previously supplied, BEA recommends that you remove any HTML special characters that a user might have entered. If you do not remove these characters, your Web site could be exploited by cross-site scripting. See Securing User-Supplied Data in JSPs.
To include an expression in your JSP file, use the following tag:
<%= expr %>
Replace expr with a Java expression. When the expression is evaluated, its string representation is placed inline in the HTML response page. It is shorthand for
<% out.print( expr ); %>
This technique enables you to make your HTML more readable in the JSP page. Note the use of the expression tag in the example in the next section.
Expressions are often used to return data that a user has previously supplied. Any time you print user-supplied data, BEA recommends that you remove any HTML special characters that a user might have entered. If you do not remove these characters, your Web site could be exploited by cross-site scripting. See Securing User-Supplied Data in JSPs.
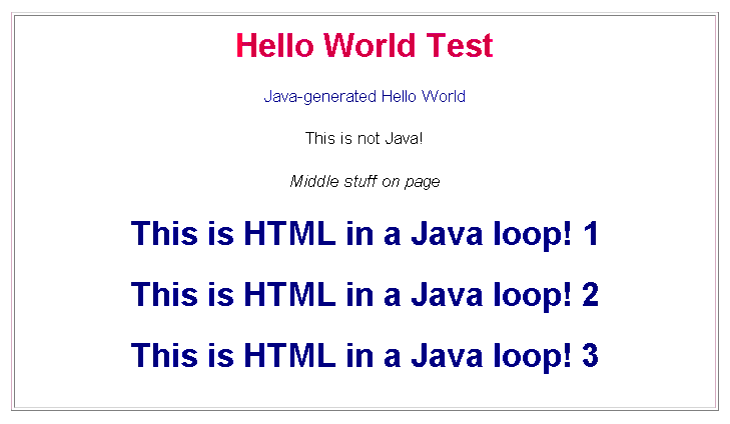
Example of a JSP with HTML and Embedded Java
The following example shows a JSP with HTML and embedded Java:
<html>
  <head><title>Hello World Test</title></head>
<body bgcolor=#ffffff>
<center>
<h1> <font color=#DB1260> Hello World Test </font></h1>
<font color=navy>
<%
    out.print("Java-generated Hello World");
%>
</font>
<p> This is not Java!
<p><i>Middle stuff on page</i>
<p>
<font color=navy>
<%
          for (int i = 1; i<=3; i++) {
%>
                <h2>This is HTML in a Java loop! <%= i %> </h2>
<%
          }
%>
</font>
</center>
</body>
</html>
After the code shown here is compiled, the resulting page is displayed in a browser as follows:
Actions
You use JSP actions to modify, use, or create objects that are reperesented by JavaBeans. Actions use XML syntax exclusively.
The <jsp:useBean> action tag allows you to instantiate Java objects that comply with the JavaBean specification, and to refer to them from your JSP pages.
To comply with the JavaBean specification, objects need:
Instantiating the JavaBean Object
The <jsp:useBean> tag attempts to retrieve an existing named Java object from a specific scope and, if the existing object is not found, may attempt to instantiate a new object and associate it with the name given by the id attribute. The object is stored in a location given by the scope attribute, which determines the availability of the object. For example, the following tag attempts to retrieve a Java object of type examples.jsp.ShoppingCart from the HTTP session under the name cart.
<jsp:useBean id="cart"
    class="examples.jsp.ShoppingCart" scope="session"/>
If such an object does not currently exist, the JSP attempts to create a new object, and stores it in the HTTP session under the name cart. The class should be available in the CLASSPATH used to start WebLogic Server, or in the WEB-INF/classes directory of the Web Application containing the JSP.
It is good practice to use an errorPage directive with the <jsp:useBean> tag because there are run-time exceptions that must be caught. If you do not use an errorPage directive, the class referenced in the JavaBean cannot be created, an InstantiationException is thrown, and an error message is returned to the browser.
You can use the type attribute to cast the JavaBean type to another object or interface, provided that it is a legal type cast operation within Java. If you use the attribute without the class attribute, your JavaBean object must already exist in the scope specified. If it is not legal, an InstantiationException is thrown.
Doing Setup Work at JavaBean Instantiation
The <jsp:useBean> tag syntax has another format that allows you to define a body of JSP code that is executed when the object is instantiated. The body is not executed if the named JavaBean already exists in the specified scope. This format allows you to set up certain properties when the object is first created. For example:
<jsp:useBean id="cart" class="examples.jsp.ShoppingCart"
 scope=session>
    Creating the shopping cart now...
    <jsp:setProperty name="cart"
     property="cartName" value="music">
</jsp:useBean>
Note: If you use the type attribute without the class attribute, a JavaBean object is never instantiated, and you should not attempt to use the tag format to include a body. Instead, use the single tag format. In this case, the JavaBean must exist in the specified scope, or an InstantiationException is thrown. Use an errorPage directive to catch the potential exception.
Using the JavaBean Object
After you instantiate the JavaBean object, you can refer to it by its id name in the JSP file as a Java object. You can use it within scriptlet tags and expression evaluator tags, and you can invoke its setXxx() or getXxx() methods using the <jsp:setProperty> and <jsp:getProperty> tags, respectively.
Defining the Scope of a JavaBean Object
Use the scope attribute to specify the availability and life-span of the JavaBean object. The scope can be one of the following:
For more information about using JavaBeans, see the SP 1.1 specification .
Forwarding Requests
If you are using any type of authentication, a forwarded request made with the <jsp:forward> tag, by default, does not require the user to be re-authenticated. You can change this behavior to require authentication of a forwarded request by adding the <check-auth-on-forward/> element to the <container-descriptor> element of the WebLogic-specific deployment descriptor, weblogic.xml. For example:
<container-descriptor>
<check-auth-on-forward/>
</container-descriptor>
For information on editing the WebLogic-specific deployment descriptor, see Writing the WebLogic-Specific Deployment Descriptor.
You can use the <jsp:include> tag to include another resource in a JSP. This tag takes two attributes:
Setting flush="false" can be useful when the <jsp:include> tag is located within another tag on the JSP page and you want the included resource to be processed by the tag.
Securing User-Supplied Data in JSPs
Expressions and scriptlets enable a JSP to receive data from a user and return the user supplied data. For example, the sample JSP in Listing 3-1 prompts a user to enter a string, assigns the string to a parameter named userInput, and then uses the <%= request.getParameter("userInput")%> expression to return the data to the browser.
Listing 3-1 Using Expressions to Return User-Supplied Content
<!DOCTYPE HTML PUBLIC "-//W3C//DTD HTML 4.01 Transitional//EN">
<html>
    <body>
        <h1>My Sample JSP</h1>
            <form method="GET" action="mysample.jsp">
                    Enter string here:
                    <input type="text" name="userInput" size=50>
                    <input type=submit value="Submit">
              </form>
        <br>
        <hr>
        <br>
        Output from last command:
        <%= request.getParameter("userInput")%>
    </body>
</html>
This ability to return user-supplied data can present a security vulnerability called cross-site scripting, which can be exploited to steal a user's security authorization. For a detailed description of cross-site scripting, refer to "Understanding Malicious Content Mitigation for Web Developers" (a CERT security advisory) at http://www.cert.org/tech_tips/malicious_code_mitigation.html.
To remove the security vulnerability, before you return data that a user has supplied, scan the data for any of the HTML special characters in Table 3-2. If you find any special characters, replace them with their HTML entity or character reference. Replacing the characters prevents the browser from executing the user-supplied data as HTML.
|
Replace this special character: |
With this entity/character reference: |
|---|---|
|
< |
< |
|
> |
> |
|
( |
&40; |
|
) |
&41; |
|
# |
&35; |
|
& |
&38; |
Using a WebLogic Server Utility Method
WebLogic Server provides the weblogic.servlet.security.Utils.encodeXSS() method to replace the special characters in user-supplied data. To use this method, provide the user-supplied data as input. For example,
<%= weblogic.servlet.security.Utils.encodeXSS(
request.getParameter("userInput"))%>
To secure an entire application, you must use the encodeXSS() method each time you return user-supplied data. While the example in Listing 3-1 is an obvious location in which to use the encodeXSS() method, Table 3-3 describes other locations to consider.
Sessions in WebLogic JSP perform according to the JSP 1.1 specification. The following suggestions pertain to using sessions:
Using the JSP provides a convenient way to include the Java Plug-in in a Web page, by generating HTML that contains the appropriate client browser tag. The Java Plug-in allows you to use a Java Runtime Environment (JRE) supplied by Sun Microsystems instead of the JVM implemented by the client Web browser. This feature avoids incompatibility problems between your applets and specific types of Web browsers. The Java Plug-in is available from Sun at http://java.sun.com/products/plugin/.
Because the syntax used by Internet Explorer and Netscape is different, the servlet code generated from the <jsp:plugin> action dynamically senses the type of browser client and sends the appropriate <OBJECT> or <EMBED> tags in the HTML page.
The <jsp:plugin> tag uses many attributes similar to those of the <APPLET> tag, and some other attributes that allow you to configure the version of the Java Plug-in to be used. If the applet communicates with the server, the JVM running your applet code must be compatible with the JVM running WebLogic Server.
In the following example, the plug-in action is used to deploy an applet:
<jsp:plugin type="applet" code="examples.applets.PhoneBook1"
  codebase="/classes/" height="800" width="500"
  jreversion="1.1"
  nspluginurl=
  "http://java.sun.com/products/plugin/1.1.3/plugin-install.html"
  iepluginurl=
"http://java.sun.com/products/plugin/1.1.3/
    jinstall-113-win32.cab#Version=1,1,3,0" >
<jsp:params>
    <param name="weblogic_url" value="t3://localhost:7001">
    <param name="poolname" value="demoPool">
</jsp:params>
<jsp:fallback>
    <font color=#FF0000>Sorry, cannot run java applet!!</font>
</jsp:fallback>
</jsp:plugin>
The sample JSP syntax shown here instructs the browser to download the Java Plug-in version 1.3.1 (if it has not been downloaded previously), and run the applet identified by the code attribute from the location specified by codebase.
The jreversion attribute identifies the spec version of the Java Plug-in that the applet requires to operate. The Web browser attempts to use this version of the Java Plug-in. If the plug-in is not already installed on the browser, the nspluginurl and iepluginurl attributes specify URLs where the Java Plug-in can be downloaded from the Sun Web site. Once the plug-in is installed on the Web browser, it is not downloaded again.
Because WebLogic Server uses the Java 1.3.x VM, you must specify the Java Plug-in version 1.3.x in the <jsp:plugin> tag. To specify the 1.3 JVM in the previous example code, replace the corresponding attribute values with the following:
jreversion="1.3"
nspluginurl=
"http://java.sun.com/products/plugin/1.3/plugin-install.html"
iepluginurl=
"http://java.sun.com/products/plugin/1.3/jinstall-131-win32.cab"
The other attributes of the plug-in action correspond with those of the <APPLET> tag. You specify applet parameters within a pair of <params> tags, nested within the <jsp:plugin> and </jsp:plugin> tags.
The <jsp:fallback> tags allow you to substitute HTML for browsers that are not supported by the <jsp:plugin> action. The HTML nested between the <fallback> and </jsp:fallback> tags is sent instead of the plug-in syntax.
Using the WebLogic JSP Compiler
Because the JSP Servlet automatically calls the WebLogic JSP compiler to process your JSP pages, you generally do not need to use the compiler directly. However, in some situations, such as when you are debugging, accessing the compiler directly is useful. This section is a reference for the compiler.
The WebLogic JSP compiler parses your JSP file into a .java file, and then compiles the generated .java file into a Java class, using a standard Java compiler.
Running JSPC on Windows Systems
When you run the JSP compiler on Windows systems, output files names are always created with lower case names. To prevent this behavior, and preserve the case used in class names, set the system property, weblogic.jsp.windows.caseSensitive to true. You can set the property at the command line when compiling a JSP using this following command:
java -Dweblogic.jsp.windows.caseSensitive=true weblogic.jspc *.jsp
or include this command in your WebLogic Server startup scripts:
-Dweblogic.jsp.windows.caseSensitive=true
The JSP compiler works in much the same way that other WebLogic compilers work (including the RMI and EJB compilers). To start the JSP compiler, enter the following command.
$ java weblogic.jspc -options fileName
Replace fileName with the name of the JSP file that you want to compile. You can specify any options before or after the target fileName. The following example uses the -d option to compile myFile.jsp into the destination directory, weblogic/classes:
$ java weblogic.jspc -d /weblogic/classes myFile.jsp
Note: If you are precompiling JSPs that are part of a Web Application and that reference resources in the Web Application (such as a JSP tag library), you must use the -webapp flag to specify the location of the Web Application. The -webapp flag is described in the following listing of JSP compiler options.
You can use any combination of the following options:
$ java weblogic.jspc
      -classpath java/classes.zip;/weblogic/classes.zip
      myFile.JSP
You can configure WebLogic Server to precompile your JSPs when a Web Application is deployed or re-deployed or when WebLogic Server starts up by setting the precompile parameter to true in the <jsp-descriptor> element of the weblogic.xml deployment descriptor:
For an exploded webapp, precompilation only occurs on the administration server. For an archived webapp, precompilation will occur on the administration server and the managed server once during the first deployment.
For more information on the web.xml deployment descriptor, see Assembling and Configuring Web Applications.
Windows NT command length limitations can be overcome using the new compilerclass option for WebLogic JSPs. It can be configured in the weblogic.xml file.
The in memory compilerclass option uses the compiler class used by Sun to internally compile Java files. This does not require creating a new process and thus is more efficient than compiling each Java file separately using a new process.
The compilerclass can be used by adding the following to weblogic.xml:
<jsp-descriptor>
<jsp-param>
<param-name>compilerclass</jsp-param>
<param-value>com.sun.tools.javac.Main</param-value>
</jsp-param>
</jsp-descriptor>
System Properties and JSPs
weblogic.jspc
,weblogic.jsp.windows.caseSensitive is NOT a JSPC option, it is a system property.
You can either call java -Dweblogic.jsp.windows.caseSensitive=true weblogic.jspc *.jsp or put -Dweblogic.jsp.windows.caseSensitive=true in the start server script.
|
|
|
|
|
|
|
Copyright © 2001 BEA Systems, Inc. All rights reserved.
|