|
|
Many types of web-enabled mobile devices can access your portals. Each type has unique requirements for the content that it can display.
With the multichannel framework provided in WebLogic Portal, you can extend your portals to include support for different mobile devices. This flexible framework lets you create a single portal that serves content to multiple web-capable devices seamlessly and simultaneously. You can also serve different content to different browsers, such as Mozilla Firefox, Netscape, and Internet Explorer.
When a device accesses a portal, the portal detects the device type and automatically serves the content you created for it within the assigned Look & Feel.
This chapter contains the following sections:
When a device (whether a PC or a handheld) accesses a portal, it sends information about itself to the portal in the HTTP header, including the type of browser being used and the type of device. This combination of information defines a client, which is equivalent to the model of a device.
You define a client in the WebLogic Portal classifications configuration file using a user agent element. You can group several clients into a classification. For example, there are many models (client types) of Palm handheld devices, but they all fall under the classification of “Palm.”
To enable the multichannel framework in your portal web project, you create an XML configuration file that maps clients to classifications. You must name the file client-classifications.xml and place it in the WEB-INF directory. You can create the XML file from within Workshop for WebLogic by selecting File > New > Other > XML and following the steps in the wizard.
For each client entry that maps to a classification, you can include either an explicit user agent string that maps exactly to what a device sends, or you can enter a regular expression that encompasses multiple user agent strings.
Listing 10-1 shows an example of a client classification mapping in client-classifications.xml using explicit mappings (with the <useragent> tag) and a regular expression mapping (with the <useragent-regex> tag).
<classification name="pocketpc" description="For the PocketPC">
   <useragent value="Mozilla/2.0 (compatible; MSIE 3.02; Windows CE; 240x320)"/>
   <useragent value="Mozilla/2.0 (compatible; MSIE 3.02; Windows CE; PPC;
   240x320)"/>
   <useragent-regex value=".*PDA; Windows CE.*NetFront/3.*" priority="1"/>
</classification>
You can use an explicit <useragent> value for only one classification. If you use more than one <useragent-regex> tag to map with regular expressions, it is possible that a device accessing a portal could map to more than one classification. To determine which classification the device is mapped to, use the priority attribute, as shown in Listing 10-1. The value 1 is the highest priority. Enter any whole number for the priority value.
| Note: | For portlets that are assigned client classifications, the value you enter for the description element is displayed in the WebLogic Portal Administration Console to show the classifications to which the portlet is assigned. Make sure you create descriptions that are easily understood by portal administrators. |
Based on the mappings you define in the client-classifications.xml file, the user agent value in the <useragent> property is mapped to the classification name you provide. The classification name in Listing 10-1 is pocketpc.
Figure 10-1 shows the sequence of multichannel framework processing that occurs when a device accesses a portal.
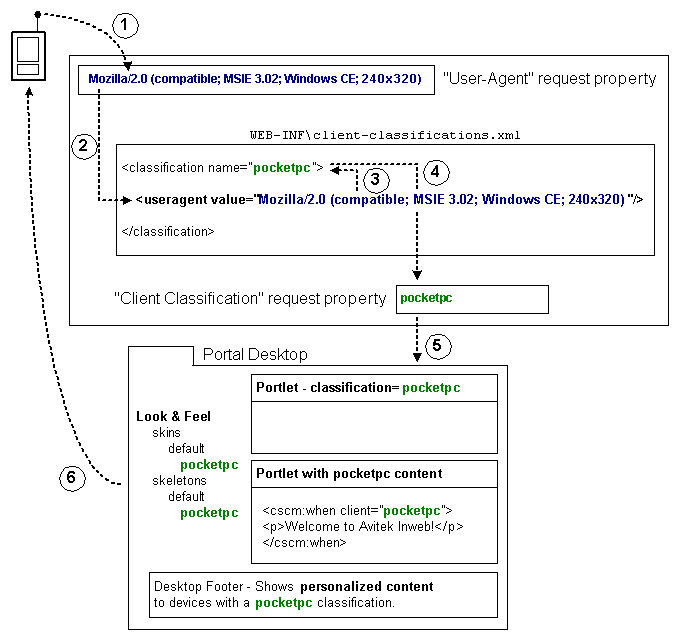
When a device accesses a portal-enabled server with a URL, the device sends a user agent string in the HTTP header to identify the client type. Because of the mappings you defined in the client-classification.xml file, the user agent string stored in the <useragent> property is mapped to the classification name you provided. As shown in Figure 10-1, the name is pocketpc.
The user agent request property is automatically included with any portal application that you create in Workshop for WebLogic. You can view this property by opening the following file in your Workshop for WebLogic workspace:
Portal_Web_Project\Data_Dir\src\request\DefaultRequestPropertySet.req
The portal uses that client classification name stored in the DefaultRequestPropertySet.req file throughout the portal framework to identify the content and presentation tailored to the device.
Based on the mapping you set up to match user agent strings in the HTTP request to classification names, the portal sends device-specific content and presentation to the different devices that access the portal.
The following sections describe how to use the portal framework to create device-specific content and presentation.
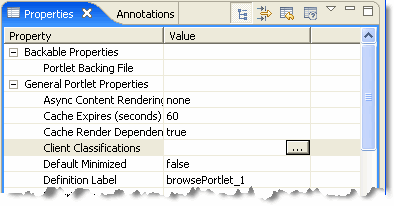
When you create a portlet, you can assign the portlet to be used by different devices (client classifications). With the portlet open in the editor, go to the Properties view and perform the following steps:
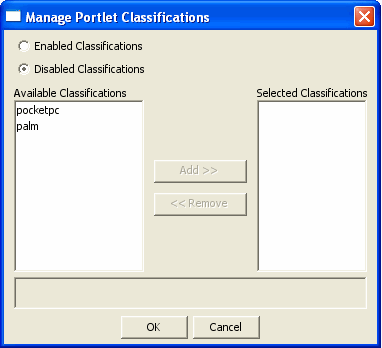
The Manage Portlet Classifications dialog displays. Figure 10-3 shows an example:
| Note: | The client-classifications.xml file must already exist in the project’s WEB-INF directory in order for this dialog to display. |
The instructions for this step assume that you want to disable a subset of classifications and leave the rest enabled.
WebLogic Portal includes JSP tags for creating device-specific inline content in JSPs. Only the content that meets the device criteria defined by the JSP tag is delivered to the device.
The relevant JSP tags have a required client attribute for mapping the JSP content to classifications. For the client value in the JSP tag, you must use the exact value that you used for the name in the client-classifications.xml file.
Listing 10-2 shows some possible uses of the client tag.
<%@ taglib uri="http://www.bea.com/servers/portal/tags/client/cscm" prefix="client" %>
<%@ taglib uri="http://www.bea.com/servers/portal/tags/netuix/render" prefix="render" %>
This is a sample of manipulating content using the client-classification tag library.
<p/>
<client:default>
   <img style="padding: 10;" align="Bottom" src="<render:jspUri/>images    /sunset-big.gif"/>
</client:default>
Different versions of the same image will be selected based on the client classification. For the "default" client, a large image will appear. For the "palm" and "pocketpc", a smaller version of the image will be used. For the "nokia" classification, a greyscale image will be used (purely as an example).
<p/>
<client:when client="palm,pocketpc"><img src="<render:jspUri/>images /sunset-small.gif"/><p/></client:when>
<client:when client="nokia"><img src="<render:jspUri/>images /sunset-small-greyscale.gif"/><p/></client:when>
Image placement is also altered slightly for the different classifications.
<client:when-not client="palm,nokia">
<p/>
This additional content is also included if the client is not a "nokia" or "palm" classification.
<p/></client:when-not>
The Look & Feels (skins and skeletons) provided with WebLogic Portal include support for a few mobile devices (Nokia, Palm, and Pocket PC).
You can develop your own skins and skeletons to support different devices. When a Look & Feel is selected for a desktop, the portal framework reads the client classification property in the DefaultRequestPropertySet.req file and uses the Look & Feel logic to find skin and skeleton directories matching the name of the client classification.
Any portal web project that you create includes a default set of multichannel Look & Feels located in skin and skeleton subdirectories (\framework\skins\default and \framework\skeletons\default).
For instructions on creating skins and skeletons for Look & Feels, refer to User Interface Development with Look & Feel Features.
Using the client classification name stored in the DefaultRequestPropertySet.req file, you can build and trigger personalization and campaigns for devices based on that property value.
For information on developing personalization and campaigns, refer to the Interaction Management Guide.


|