

| Download Docs | Site Map | Glossary | |
|
|
|||
| bea.com | products | dev2dev | support | askBEA |
 |
 |
|
|||||||
| e-docs > WebLogic Platform > WebLogic Portal > Development Guide > Implementing User Profiles |
|
Development Guide
|
Implementing User Profiles
In WebLogic Portal, users are represented by user profiles. User profiles provide flexibility in representing, storing, and accessing user attributes. In addition to supporting basic user profiles, WebLogic Portal provides a Unified User Profile (UUP) that can be used to create a virtual enterprise profile.This section includes information on the following subjects:
Creating a Unified User Profile
A Unified User Profile provides the capability to leverage user data from external sources such as LDAP servers, legacy systems and databases. This allows for the use of a single profile to access user data from many different sources.
To create a UUP to retrieve user data from external sources, complete the following tasks:
Create an EntityPropertyManager EJB to Represent External Data
To incorporate data from an external source, you must first create a stateless session bean that implements the methods of the com.bea.p13n.property.
EntityPropertyManager remote interface. EntityPropertyManager is the remote interface for a session bean that handles the persistence of property data and the creation and deletion of profile records.In addition, the stateless session bean should include a home interface and an implementation class. For example:
MyEntityPropertyManager
extends com.bea.p13n.property.EntityPropertyManager
MyEntityPropertyManagerHome
extends com.bea.p13n.property.EJBHome
Your implementation class can extend the EntityPropertyManagerImpl class. However the only requirement is that your implementation class is a valid implementation of the MyEntityPropertyManager remote interface. For example:
MyEntityPropertyManagerImpl extends
com.bea.p13n.property.internal.EntityPropertyManagerImpl
or
MyEntityPropertyManagerImpl extends
javax.ejb.SessionBean
Recommended EJB Guidelines
We recommend the following guidelines for your new EJB:
getDynamicProperties
getEntityNames
getHomeName
getPropertyLocator
getUniqueId
Before you deploy your JAR file, follow the steps in the next section.
Deploy a ProfileManager That Can Use the New EntityPropertyManager
A "user type" is a mapping of a ProfileType name to a particular ProfileManager. This mapping is done in the UserManager EJB deployment descriptor.
To access the data in your new EntityPropertyManager EJB, you must do one of the following:
ProfileManager is a stateless session bean that manages access to the profile values that the EntityPropertyManager EJB retrieves. It relies on a set of mapping statements in its deployment descriptor to find data. For example, the ProfileManager receives a request for the value of the DateOfBirth property, which is located in the PersonalData property set. ProfileManager uses the mapping statements in its deployment descriptor to determine which EntityPropertyManager EJB contains the data.
Modifying the Existing ProfileManager Deployment Configuration
If you use the existing UserProfileManager deployment to manage your user profiles, perform the following steps to modify the deployment configuration.
Under most circumstances, this is the method you should use to deploy your UUP. An example of this method is the deployment of the custom EntityPropertyManager for LDAP property retrieval, the LdapPropertyManager. The classes for the LdapPropertyManager are packaged in ldapprofile.jar. The deployment descriptor for the UserProfileManager EJB is configured to map the "ldap" property set to the LdapPropertyManager. The UserProfileManager is deployed in usermgmt.jar.
Listing 6-1 <env-entry> Element
<!-- map all properties in property set ldap to ldap server -->
<env-entry>
 <env-entry-name>PropertyMapping/ldap</env-entry-name>
  <env-entry-type>java.lang.String</env-entry-type>
  <env-entry-value>LdapPropertyManager</env-entry-value>
</env-entry>
and add an <env-entry> element after this to map a property set to your custom EntityPropertyManager, a shown in Listing 6-2:
Listing 6-2 Adding Another <env-entry> Element to Map a Property
<!-- map all properties in UUPExample property set to MyEntityPropertyManager -->
<env-entry>
  <env-entry-name>PropertyMapping/UUPExample</env-entry-name>
  <env-entry-type>java.lang.String</env-entry-type>
  <env-entry-value>MyEntityPropertyManager</env-entry-value>
</env-entry>
Listing 6-3 <ejb-ref> Element
<!-- an ldap property manager -->
<ejb-ref>
  <ejb-ref-name>ejb/LdapPropertyManager</ejb-ref-name>
  <ejb-ref-type>Session</ejb-ref-type>
  <home>com.bea.p13n.property.EntityPropertyManagerHome</home>
  <remote>com.bea.p13n.property.EntityPropertyManager</remote>
</ejb-ref>
and add a <ejb-ref> element after this to map a reference to an EJB that matches the name from the previous step with ejb/ prepended as shown in Listing 6-4:
Listing 6-4 <ejb-ref> Element Mapping a Reference to an EJB
<!-- an example property manager -->
<ejb-ref>
  <ejb-ref-name>ejb/MyEntityPropertyManager</ejb-ref-name>
  <ejb-ref-type>Session</ejb-ref-type>
  <home>examples.usermgmt.MyEntityPropertyManagerHome</home>
  <remote>examples.usermgmt.MyEntityPropertyManager</remote>
</ejb-ref>
The home and remote class names match the classes from your EJB JAR file for your custom EntityPropertyManager.
Listing 6-5 <env-entry> Element that Adds Creator and Remover Entries
<env-entry>
  <env-entry-name>Creator/Creator1</env-entry-name>
  <env-entry-type>java.lang.String</env-entry-type>
  <env-entry-value>MyEntityPropertyManager</env-entry-value>
</env-entry>
<env-entry>
  <env-entry-name>Remover/Remover1</env-entry-name>
  <env-entry-type>java.lang.String</env-entry-type>
  <env-entry-value>MyEntityPropertyManager</env-entry-value>
</env-entry>
This instructs the UserProfileManager to call your custom EntityPropertyManager when creating or deleting user profile records. The names "Creator1" and "Remover1" are arbitrary. All Creators and Removers will be iterated through when the UserProfileManager creates or removes a user profile. The value for the Creator and Remover matches the ejb-ref-name for your custom EntityPropertyManager without the ejb/ prefix.
Listing 6-6 weblogic-ejb-jar.xml Elements
<weblogic-enterprise-bean>
  <ejb-name>UserProfileManager</ejb-name>
  <reference-descriptor>
    <ejb-reference-description>
      <ejb-ref-name>ejb/EntityPropertyManager</ejb-ref-name>
      <jndi-name>${APPNAME}.BEA_personalization.
      EntityPropertyManager</jndi-name>
    </ejb-reference-description>
and add an ejb-reference-description to map the ejb-ref for your custom EntityPropertyManager to the JNDI name. This JNDI name must match the name you assigned in weblogic-ejb-jar.xml in the JAR file for your customer EntityPropertyManager. It should look like the example in Listing 6-7:
Listing 6-7 Showing the JNDI Name
<weblogic-enterprise-bean>
  <ejb-name>UserProfileManager</ejb-name>
  <reference-descriptor>
    <ejb-reference-description>
      <ejb-ref-name>ejb/EntityPropertyManager</ejb-ref-name>
      <jndi-name>${APPNAME}.BEA_personalization.
      EntityPropertyManager</jndi-name>
    </ejb-reference-description>
    <ejb-reference-description>
      <ejb-ref-name>ejb/MyEntityPropertyManager
      </ejb-ref-name>
      <jndi-name>${APPNAME}.BEA_personalization.
      MyEntityPropertyManager</jndi-name>
    </ejb-reference-description>
Note the ${APPNAME} string substitution variable. The WebLogic EJB container automatically substitutes the enterprise application name to scope the JNDI name to the application.
Listing 6-8 Adding an Entry for a Custom EntityPropertyManager EJB Module
<module>
  <ejb>UUPExample.jar</ejb>
</module>
Listing 6-9 Adding a <Cache> Tag to META-INF/application-config.xml
<Cache
  Name="UUPExampleCache"
  TimeToLive="60000"
/>
Your new Unified User Profile type is ready to use. You can use the WebLogic Portal Administration Tools to create a user of type "User," and it will use your UUP implementation when the "UUPExample" property set is being modified. When you call createUser("bob", "password") or createUser("bob", "password", null) on the UserManager, several things will happen:
Configuring and Deploying a New ProfileManager
If you are going to deploy a newly configured ProfileManager instead of using the default ProfileManager (UserProfileManager) to manage your user profiles, perform the following steps to modify the deployment configuration. In most cases, you will not have to use this method of deployment. Use this method only if you need to support multiple types of users that require different ProfileManager deployments—deployments that allow a property set to be mapped to different custom EntityPropertyManagers based on ProfileType.
An example of this method is the deployment of the custom CustomerProfileManager in customer.jar. The CustomerProfileManager is configured to use the custom EntityPropertyManager (CustomerPropertyManager) for properties in the "CustomerProperties" property set. The UserManager EJB in usermgmt.jar is configured to map the "WLCS_Customer" ProfileType to the custom deployment of the ProfileManager, CustomerProfileManager.
To configure and deploy a new ProfileManager, use this procedure.
In addition, you could extend the UserProfileManager home and remote interfaces with your own interfaces if you want to repackage them to correspond to your packaging (for example., examples.usermgmt.MyProfileManagerHome, examples.usermgmt.MyProfileManager).
However, it is sufficient to replace the bean implementation class:
You must create an <env-entry> element to map a property set to your custom EntityPropertyManager. You must also create a <ejb-ref> element to map a reference to an EJB that matches the name from the PropertyMapping with ejb/ prepended. The home and remote class names for your custom EntityPropertyManager match the classes from your EJB JAR file for your custom EntityPropertyManager.
Also, if your EntityPropertyManager implementation handles creating and removing profile records, you must also add Creator and Remover entries. This instructs your new ProfileManager to call your custom EntityPropertyManager when creating or deleting user profile records.
Listing 6-10 Adding an <ejb-ref> to the UserManager EJB Section
<ejb-ref>
  <ejb-ref-name>ejb/ProfileType/UUPExampleUser</ejb-ref-name>
  <ejb-ref-type>Session</ejb-ref-type>
  <home>com.bea.p13n.usermgmt.profile.ProfileManagerHome</home>
  <remote>com.bea.p13n.usermgmt.profile.ProfileManager</remote>
</ejb-ref>
The <ejb-ref-name> must start with ejb/ProfileType/ and must end with the name that you want to use as the profile type as an argument in the createUser() method of UserManager.
Listing 6-11 <weblogic-enterprise-bean> Tag for the UserProfileManager
<weblogic-enterprise-bean>
  <ejb-name>MyProfileManager</ejb-name>
  <reference-descriptor>
    <ejb-reference-description>
      <ejb-ref-name>ejb/EntityPropertyManager</ejb-ref-name>
        <jndi-name>${APPNAME}.BEA_personalization.
        EntityPropertyManager</jndi-name>
      </ejb-reference-description>
      <ejb-reference-description>
        <ejb-ref-name>ejb/PropertySetManager</ejb-ref-name>
        <jndi-name>${APPNAME}.BEA_personalization.
        PropertySetManager</jndi-name>
      </ejb-reference-description>
      <ejb-reference-description>
        <ejb-ref-name>ejb/MyEntityPropertyManager
        </ejb-ref-name>
        <jndi-name>${APPNAME}.BEA_personalization.
        MyEnitityPropertyManager</jndi-name>
      </ejb-reference-description>
  </reference-descriptor>
  <jndi-name>${APPNAME}.BEA_personalization.
  MyProfileManager</jndi-name>
</weblogic-enterprise-bean>
You must create an <ejb-reference-description> to map the <ejb-ref> for your custom EntityPropertyManager to the JNDI name. This JNDI name must match the name you assigned in weblogic-ejb-jar.xml in the JAR file for your custom EntityPropertyManager.
Note the ${APPNAME} string substitution variable. The WebLogic Server EJB container automatically substitutes the enterprise application name to scope the JNDI name to the application.
Listing 6-12 <transaction-isolation> Tag for the UserProfileManager
<transaction-isolation>
  <isolation-level>TRANSACTION_READ_COMMITTED
  </isolation-level>
  <method>
    <ejb-name>MyProfileManager</ejb-name>
    <method-name>*</method-name>
  </method>
</transaction-isolation>
Listing 6-13 Adding an Entry to a Custom EntityPropertyManager EJB Module
<module>
  <ejb>UUPExample.jar</ejb>
</module>
Listing 6-14 Adding a <Cache> Tag to a META-INF/application-config.xml
<Cache
  Name="UUPExampleCache" TimeToLive="60000"
/>
Creating a Property Set Definition
Property sets are the schemas for personalization attributes. They are a convenient way to give a name to a group of properties for a specific purpose. For example, in the sampleportal-project, the User Profile "Avitek" has a property set that defines properties for an e-commerce customer, such as First Name, Last Name, Home Phone, E-mail, and Customer Type. Use the E-Business Control Center to create property sets and define the properties that make up these property sets.
This section describes how to register a customer user profile:
Registering Custom User Profiles
The property set editor works the same way for all property sets. In this exercise, the E-Business Control Center will be used to create and modify User Profile properties. These examples can be used to register a custom user profile. You can follow the same procedures to create and modify property sets for Events, HTTP Requests, HTTP Sessions, and the Catalog Structure.
To register a custom user profile, complete the following steps:
Figure 6-2 E-Business Control Center Explorer with User Profiles Icon Selected
Figure 6-3 New Menu (Opened by Clicking New Icon)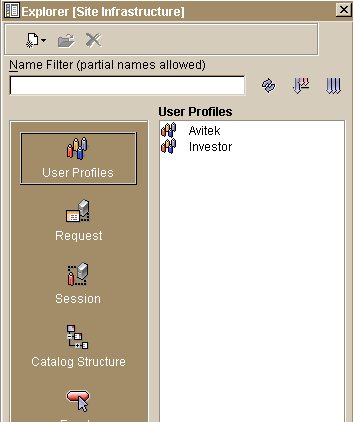
Properties with Boolean or a Single Value and Single Default
To enter the default value for Boolean property or a property with a single value and a single default (unrestricted), complete the following steps:
Properties with Multiple Values and Single, Multiple, or All Defaults
To enter multiple property values and set one or more defaults (unrestricted), complete the following steps:
The new values will appear in the Values list box, as shown in Figure 6-9, Figure 6-10, and Figure 6-11.
Figure 6-9 Enter Property Values—Multiple Values, Single Default
Figure 6-10 Enter Property Values—Multiple Values, Multiple Restricted Defaults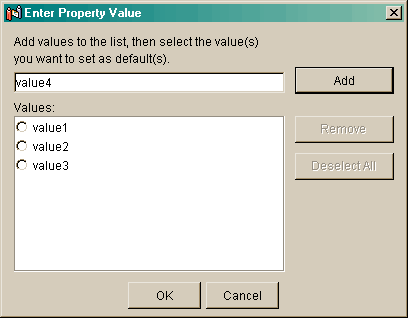
Figure 6-11 Enter Property Values—Multiple Values, Multiple Unrestricted Defaults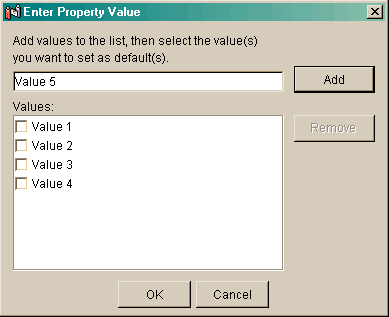
Properties with Date and Time Values
Properties with date and time values can use all Selection mode and Value range settings.
To enter date and time values and set one or more defaults, complete the following steps:
Figure 6-12 Date type Menu with Date/Time Selected
Updating a Registered Custom Event
Whenever you make changes to a custom event's code, you should update that event's registration. Updating the registration lets the E-Business Control Center know about the changes in the custom event and aids campaign developers using the E-Business Control Center to modify any scenario actions that refer to the event.
To update a custom event, complete the following steps.
Figure 6-18 Event Editor Window
Figure 6-20 Enter Property Value Window
Enabling Visitor Self-Registration
Visitors to Websites often need to register before they can proceed with using the site's features; for example, an online bookstore might require a visitor to register with them before they can actually buy books or other merchandise. Registration is valuable because it makes using a Website more convenient for the visitor because it stores pertinent information about them—called a customer profile—that is ncessary for each transaction, relieving the visitor of the need to re-enter this information whenever a transaction is made. It is convenient for your enterprise because it stores visitor data, which allows you to maintain information about people likely to use your service.
WebLogic Portal provides a set of JSP Webflow templates that create a customer profile as the visitor self-registers. You can use these components as is or tailor them for your specific needs. This section describes those JSPs and Webflow components and dicusses how they are used.
Implementing Customer Profile JSPs
WebLogic Portal provides a Login and Registration service comprised of five JSP templates you can use to enable visitor self-registration. You can use these templates as they are or you can modify them to meet your specific needs. This section describes those templates and shows you how to implement them.
This section discusses the following templates:
login.jsp
The login.jsp template provides customers who have not yet registered with your site an entry point into a page that allows them to register (create their initial customer profile) for subsequent use on the site. Since this page is the entry point to the checkout process, it also establishes mechanisms (such as sessions) that will allow customers to continue their shopping experience.
Description
Figure 6-21 shows an example of a Web page formatted with the login.jsp template.
Figure 6-21 login.jsp Formatted Web Page
How login.jsp Works If an unregistered customer clicks Create in the portlet, the next page loaded allows the customer to create a profile and a username/password combination (newuser.jsp). After the customer has registered, the customer is automatically logged in and forwarded to the newusercreation.jsp template, which allows customers to continue shopping, view their shopping carts, or check out. If the auto-login is unsuccessful, the login.jsp template is loaded for the customer to enter their username and password. If the customer's login attempt is unsuccessful, the badlogin.jsp is loaded. Notes: The option to proceed to checkout is only provided on the newusercreation.jsp template if there are items in the customer's shopping cart. Events The login.jsp template presents a customer with two buttons, only one of which is considered an event. The event triggers a particular response in the default Webflow that allows customers to continue. The other button is a standard HTML Submit button that posts the page back to the WebLogic Server for authentication. Table 6-1 provides information about the event and the business logic it invokes.
The Login button is not an event that would trigger a Webflow response. Rather, when a customer clicks the button, control is turned over to the WebLogic Server (specifically, the RDBMS realm of the WebLogic Portal). The WebLogic Server remembers the HTTP request, determines whether the customer's username and password combination is correct, and then reinvokes the Webflow using the request. badlogin.jsp The badlogin.jsp template (shown in Figure 6-22) informs a customer that they have entered an invalid username/password combination, and allows the customer to try logging into a site again by providing a valid username/password combination. Except for the error message, it behaves exactly as the login.jsp template previously described. Figure 6-22 badlogin.jsp Formatted Web Page
newuser.jsp The newuser.jsp template allows a new customer to register with your e-commerce site by creating their customer profile, which includes personal information, shipping address information, payment information (optional), and account information. Description xxx through xxx show an example of how a Web page formatted with newuser.jsp might appear in a browser. Figure 6-23 Web Page Formatted with newuser.jsp — Personal Information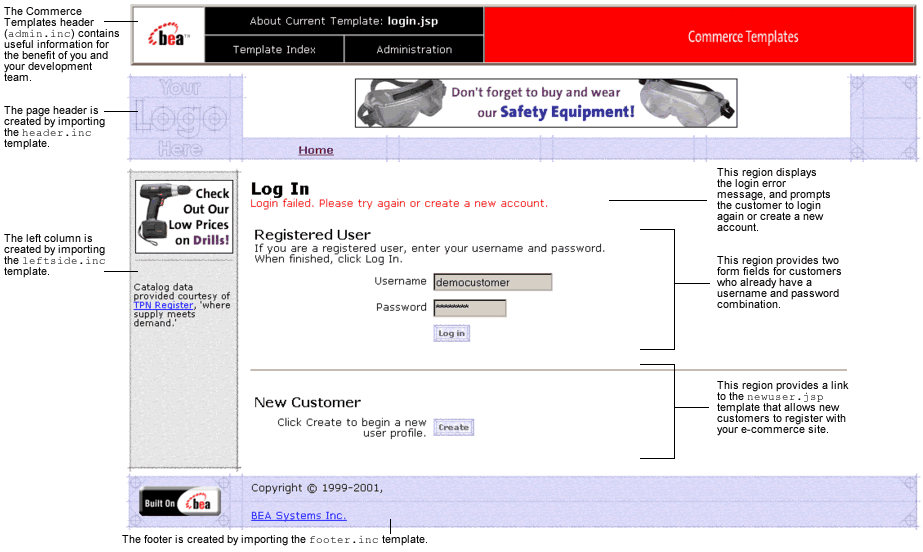
How newuser.jsp Works The page prior to newuser.jsp is the customer login page (login.jsp). If no errors are found after a customer enters their initial profile information, customers are auto-logged in and forwarded to a welcome page where they can select from the various links to continue shopping or check out (newusercreation.jsp). If errors are found, the newuser.jsp is reloaded with an appropriate message next to the invalid form fields. This template is part of the sampleapp_user namespace in the Webflow. JSP Templates Included by newuser.jsp newuser.jsp includes three additional JSP templates when it is implemented. These JSPs provides a standardized format for both the form presentation and error handling in all JSP templates that prompt customers for shipping address, credit card information, and demographic information. These templates are described in the following paragraphs. newaddresstemplate.inc This template provides a standardized format for both the form field presentation and error handling included in all JSP templates that prompt customers for a shipping address, except addaddress.jsp. The form fields are organized in a table, and upon form submission, the input processors associated with the newaddresstemplate.inc template will validate the form to ensure that all required fields contain values. If errors are detected, the newaddresstemplate.inc template will be redisplayed, with an error message at the top and the invalid field labels shown in a red (as opposed to the original black) font. Previously entered correct information will still be displayed in the form. The behavior described above is invoked on the newaddresstemplate.inc template by using the getValidatedValue JSP tag, as shown in Listing 6-15. Listing 6-15 Use of the getValidatedValue JSP Tag on newaddresstemplate.inc newcctemplate.inc This template provides a standardized format for both the form presentation and error handling in all JSP templates that prompt customers for credit card/payment information. The form fields are organized in a table, and upon form submission, the input processors associated with the newcctemplate.inc template will validate the form to ensure that all required fields contain values. If errors are detected, the newcctemplate.inc template will be redisplayed, with an error message at the top and the invalid field labels shown in a red (as opposed to the original black) font. Previously entered correct information will still be displayed in the form. The behavior described above is invoked on the newcctemplate.inc template by using the getValidatedValue JSP tag, as shown in Listing 6-16. Listing 6-16 Use of the getValidatedValue JSP Tag on newcctemplate.inc newdemographictemplate.inc This template provides a standardized format for both the form presentation and error handling in all JSP templates that prompt customers for demographic information. The radio buttons are organized in a table, and upon form submission, the input processors associated with the newdemographictemplate.inc template will validate the form to ensure that all required fields contain values. If errors are detected, the newdemographictemplate.inc template will be redisplayed, with an error message at the top of the including page and the invalid field labels shown in a red (as opposed to the original black) font. Previously entered correct information will still be displayed in the form. The behavior described above is invoked on the newdemographictemplate.inc template by using the getValidatedValue JSP tag, as shown in Listing 6-17. Listing 6-17 Use of the getValidatedValue JSP Tag on newdemographictemplate.inc Events The newuser.jsp template presents a customer with two buttons, each of which is considered an event. These events trigger a particular response in the default Webflow that allows customers to continue. While this response can be to load another JSP, it is usually the case that an input processor or pipeline component is invoked first. Table 6-2 describes the business logic these events invoke.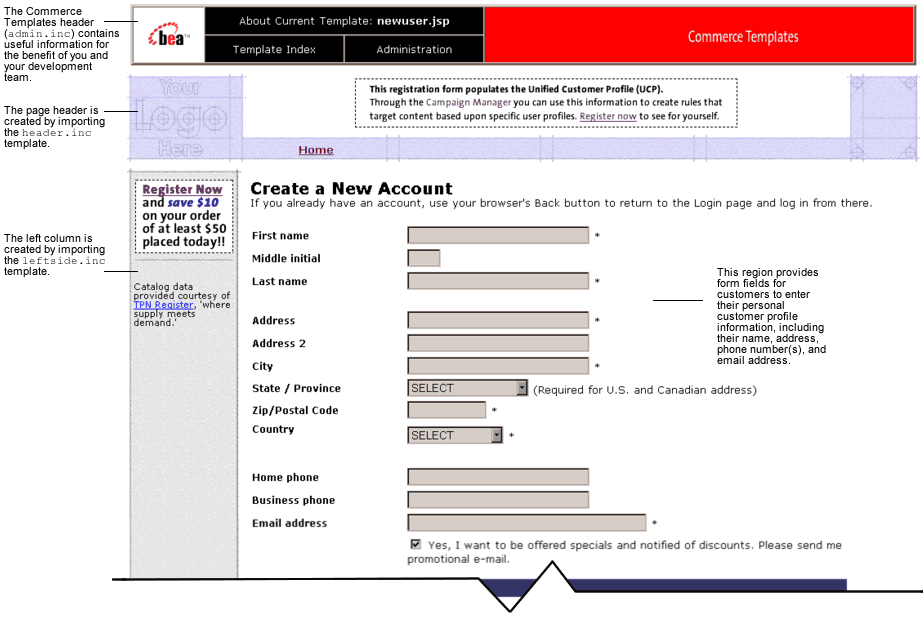
<!-- begin table with customer's shipping address information -->
<table width="90%" border="0">
   <tr>
      <td width="26%"><webflow:getValidatedValue
         fieldName="<%=HttpRequestConstants.CUSTOMER_SHIPPING_ADDRESS1%>"
         fieldValue="customerShippingAddress1" fieldStatus="status"
         validColor="black" invalidColor="red" unspecifiedColor="black"
         fieldColor="fontColor" />
         <div class="tabletext"><font color=<%= fontColor %>><b>Address </b>
            </font>
         </div>
      </td>
      <td width="74%"> <input type="text"
         name="<%=HttpRequestConstants.CUSTOMER_SHIPPING_ADDRESS1%>"
         value="<%=customerShippingAddress1%>" size="30" maxlength="30">*
      </td>
   </tr>
   .
   .
   .
</table><table>
.
.
.
<td width="27%"><webflow:getValidatedValue
fieldName="<%=HttpRequestConstants.CUSTOMER_CREDITCARD_HOLDER%>"
fieldValue="customerCreditCardHolder" fieldStatus="status"
validColor="black" invalidColor="red"
unspecifiedColor="black"
fieldColor="fontColor" />
<div class="tabletext">
<font color=<%= fontColor %>><b>Name on card</b>
</font>
</div>
</td>
<td width="73%"> <input type="text"
name="<%=HttpRequestConstants.CUSTOMER_CREDITCARD_HOLDER%>"
value="<%=customerCreditCardHolder%>" size="30" maxlength="50">*
</td>
.
.
.
</table><webflow:getValidatedValue fieldName="<%=HttpRequestConstants.CUSTOMER_GENDER%>"
fieldDefaultValue="<%=(String)currentPropertyValue%>"
fieldValue="genderValue" fieldStatus="status" validColor="black"
invalidColor="red" unspecifiedColor="black" fieldColor="fontColor" /> <td width="26%"><div class="tabletext"><b><font color=<%= fontColor %>>
Gender*</font></b></div>
</td>
<td width="74%">
<% // get the property values for Gender
propertyBean.setPropertyName(GENDER);
property = propertyBean.getPropertyObject();
if(property == null || property.getRestrictedValues() == null)
arr = new Object[0];
else arr = property.getRestrictedValues().toArray();%> <ps:getRestrictedPropertyValues propertySetName="Demographics"
propertySetType="USER" propertyName="<%= GENDER %>" id="arr"
result="foobar" /> <table width="100%" border="0" cellpadding="0"
cellspacing="0"><es:forEachInArray id="valueObject" array="<%= arr %>"
type="String">
<tr>
<td width="4%"><input type="radio" name="
<%= HttpRequestConstants.CUSTOMER_GENDER %>" value="<%= valueObject %>"
<% if ( valueObject.equals(genderValue) ) { %>CHECKED<% } %>></td>
<td><%= valueObject %></td>
</tr>
</es:forEachInArray>
</table>
Table 6-3 briefly describes each of the Pipeline components described Table 6-2.
newuser.jsp Form Fields The primary purpose of the newuser.jsp template is to allow customers to enter their profile information using various HTML form fields. It is also used to pass needed information to the Webflow. The form fields used in the newuser.jsp template, most of which are imported from other templates, and a description for each of these form fields are listed in Table 6-4. Note: If a form field is imported from another template, it is indicated in the description. Form fields without import information are in the newuser.jsp template.
Note: Parameters that are literals in the JSP code are shown in quotes, while non-literals will require scriptlet syntax (such as newusercreation.jsp The newusercreation.jsp template informs a customer who has just created a new user profile that they have been logged in and that registration was successful. It also provides the customer with the opportunity to return to their shopping experience through several navigation options. Description Figure 6-24 shows an example of a Web page formatted with newusercreation.jsp. Figure 6-24 Web Page Formatted with newusercreation.jsp
<%= HttpRequestConstants.USER_NAME %>) for use in the JSP.
The option to proceed to checkout is only provided on the newusercreation.jsp template if there are items in the customer's shopping cart. Otherwise, the newusercreation.jsp template will leave out this option as shown in Figure 6-25. Figure 6-25 Web Page Formatted with newusercreation.jsp When Shopping Cart is Empty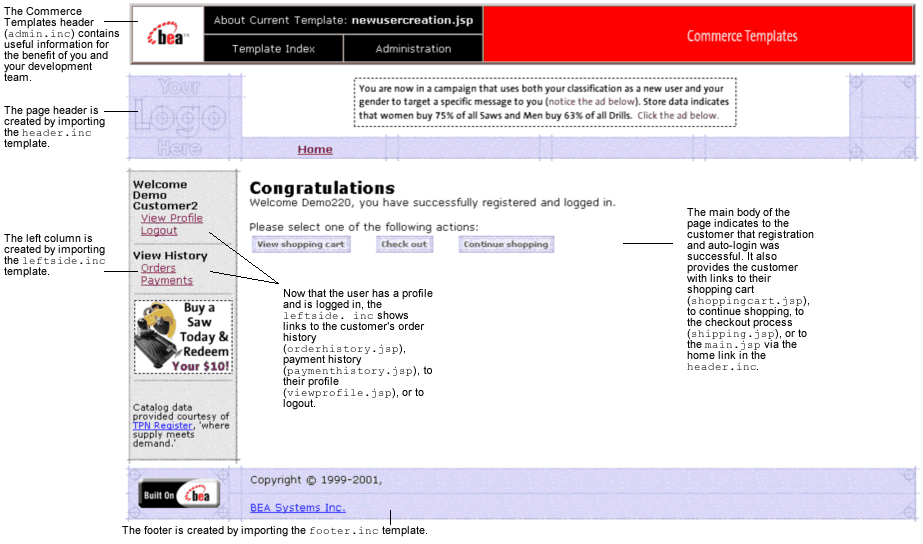
How newusercreation.jsp Works Customers arrive at the newusercreation.jsp template when they have successfully created a new user profile and the auto-login—using Java Authentication and Authorization Service (JAAS)—has completed. If the customer creates a new profile, but the auto-login does not complete successfully, the customer is routed back to the login.jsp template and will not see the newusercreation.jsp template. After manual login, the customer is routed to the main.jsp template. Note: If a customer had created a profile on a previous visit and logged in using the login.jsp template, the customer would simply be taken to the protected page the customer was trying to access. From the newusercreation.jsp template, the customer can return to their shopping cart (shoppingcart.jsp), continue shopping, continue to the checkout process (shipping.jsp), view their order history (orderhistory.jsp), view their profile (viewprofile.jsp), view their payment history (paymenthistory.jsp), logout, or return to the main catalog page (main.jsp). Note: The option to proceed to checkout is only provided on the newusercreation.jsp template if there are items in the customer's shopping cart. This template is part of the sampleapp_user namespace in the Webflow. Events Every time a customer clicks a button to view more detail about an order, it is considered an event. Each event triggers a particular response in the default Webflow that allows them to continue. While this response can be to load another JSP, it is usually the case that an input processor and/or Pipeline is invoked first. Table 6-5 provides information about these events and the business logic they invoke.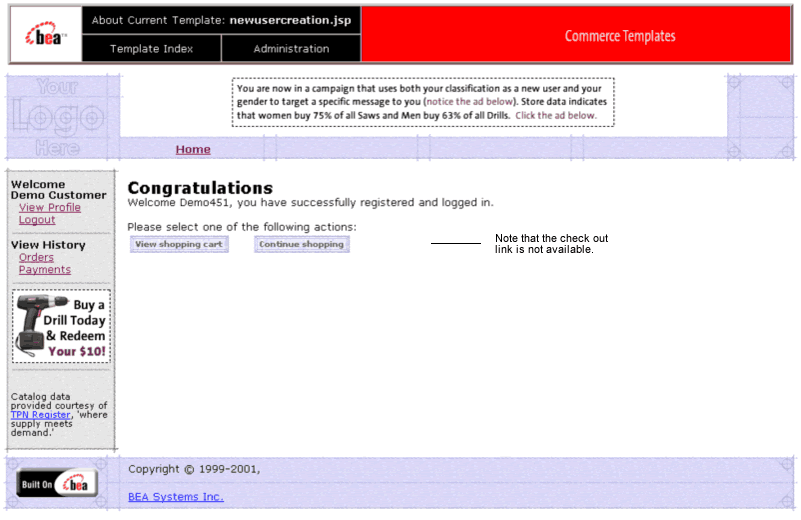
newuserforward.jsp The newuserforward.jsp template directs unregistered users to the newuser.jsp when that user clicks an ad placeholder that contains a static URI. This is necessary because dynamic URIs are not supported in placeholders. The newuserforward.jsp template then forwards the user to newuser.jsp. Additionally, the newuserforward.jsp bridges the transition from a non-secure to a secure connection (.http to .https). Description This template does not render a Web page or any other visible output. Its code is shown in Listing 6-18. Listing 6-18 newuserforward.jsp Code Table 6-6 shows the key template components.
<% String s = com.bea.p13n.appflow.webflow.WebflowJSPHelper.
   createWebflowURL(pageContext, "sampleapp_main", "login.jsp",
   "button.createUser", true); %>
<% response.sendRedirect(s) ; %>
How newuserforward.jsp Works The page prior to newuserforward.jsp can be any page that an anonymous user can access. However, this template is only needed if an unregistered user clicks the ad placeholder that prompts them to register. The static URI in the placeholder accesses the newuserforward.jsp which then forwards the user to the newuser.jsp template. This template is part of the sampleapp_main namespace in the Webflow. Events The newuserforward.jsp template has one event, which triggers a particular response in the default Webflow that allows customers to continue. While this response can be to load another JSP, it is usually the case that an input processor or Pipeline is invoked first. Table 6-7 provides information about this event and the business logic it invokes.
usercreationforward.jsp The usercreationforward.jsp template forwards new users to the newusercreation.jsp template after the registration and auto-login process using JAAS is completed by the Webflow. Once the user is created, the request must be flushed; the usercreationforward.jsp template allows that to happen. Description This template does not render a Web page or any other visible output. Its code is shown in Listing 6-19. Listing 6-19 usercreationforward.jsp Code The usercreationforward.jsp template uses Java classes in the com.bea.p13n.appflow.webflow.WebflowJSPHelper package and must include this import statement: How usercreationforward.jsp Works The page prior to usercreationforward.jsp is the newuser.jsp template. When new users save their profiles, they are auto-logged in using JAAS and if the login is successful, because the old request must be flushed, the usercreationforward.jsp is needed to redirect the user to the newusercreation.jsp template. This template is part of the sampleapp_user namespace in the Webflow. Events The usercreationforward.jsp template has one event. This event triggers a particular response in the default Webflow that allows customers to continue. While this response can be to load another JSP, it is usually the case that an input processor or Pipeline is invoked first. Table 6-8 provides information about this event and the business logic it invokes.
<% String s = WebflowJSPHelper.createWebflowURL(pageContext,
   "sampleapp_user", "usercreationforward.jsp",
   "forward.usercreation", true); %>
<% response.sendRedirect(s) ; %>
<%@ page import="com.bea.p13n.appflow.webflow.
   WebflowJSPHelper*" %>
Webflow Components Used in Visitor Self-Registration The templates described in Implementing Customer Profile JSPs use Webflow components called input processors and pipelines to execute much of the necessary business logic to enable visitor self-registration. This section describes the key Webflow components implemented. This section includes information on the following subjects:
Note: See Setting Up Portal Navigation for information about using, creating, or modifying a Webflow and using input processors and pipeline components.
Input Processors
The following input processors represent Java classes invoked to carry out more complex visitor regiatration tasks when invoked by the Webflow mechanism. These processors are:
For more information on input processors, see Types of Nodes.
CustomerProfileIP
CustomerProfileIP (all input processor names end in the letters "IP") processes the input of newuser.jsp and allows the customer to store their profile. It also creates and places a CustomerValue object into the Pipeline Processor session.
LoginCustomerIP LoginCustomerIP processes the input of login.jsp and allows the customer to access the secure pages of the site. It also creates and places a CustomerValue object into the Pipeline Processor session.
Pipeline Components This section provides a brief description of each pipeline component associated with the Customer Login and Registration Services JSP template(s). These Pipelines are processor nodes a Webflow invokes to initiate the execution of specific tasks related to visitor registration. Note: Some pipeline components extend other, base pipeline components. For more information on the base classes, see the Javadoc
For more information on pipeline components, see Types of Nodes.
This section contains information on these pipeline components:
RegisterUserPC
RegisterUserPC (all pipeline component names end in the letters "PC") retrieves the CustomerValue object and password from the Pipeline Processor session and creates a CUSTOMER attribute.
EncryptCreditCardPC EncryptCreditCardPC uses the CREDITCARD_KEY object to retrieve a customer credit card, encrypts the credit card number, and then adds the modified credit card back to the PipelineSession CustomerValue attribute.

|

|

|