|
|
The next task in the use case example is to define the service to be managed, and to create and assign deployment and runtime policies that ensure the application deploys and performs as required.
A service is a grouping of processes, and a process type is a sub-group of processes within a service. (A process type is referred to as a process group in the console.) The purpose of a service is to group a collection of processes that work together. The purpose of the process group is to define instances within the service that perform the same function and can be treated as equivalent when an action is taken.
For example, you might have a two tier application with a Web app in one tier and business logic in the other. If the instances of each tier are homogeneous, then each tier could be organized as a process group and the two process groups together could comprise a service.
The distinction between these two groupings becomes important when defining policies. Generally speaking, policies related to deployment are applied across the whole service whereas runtime policies are applied to a specific process group. Furthermore, process type actions, by default, will generally pick one member of the group to act on. For example if an action is to stop an instance, the instance that gets stopped is typically not be specified and the instance is chosen by the controller.
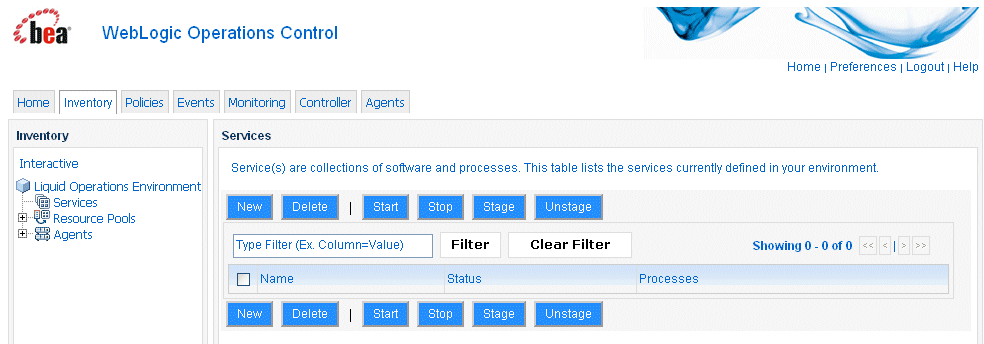
You configure services using the WLOC Administration Console, on the Inventory > Services page. A service’s configuration is persisted in an XML file named metadata-config.xml. By default, this service metadata configuration file is located in the BEA_HOME/user_projects/controller/config directory. It is possible to configure a service by modifying this service metadata configuration file. Note, however, that if you configure a service by modifying its metadata configuration file, you do not receive the benefits of validation and error checking that you get if you configure a service using the Administration Console.
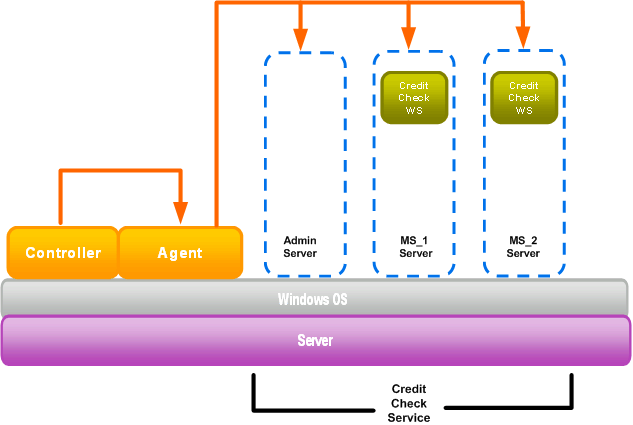
Figure 4-1 illustrates an example of a SOA application that consists of multiple client applications calling into a backend Web Service via a software load balancer. The back end Web Service can be hosted on WLS Managed Servers.
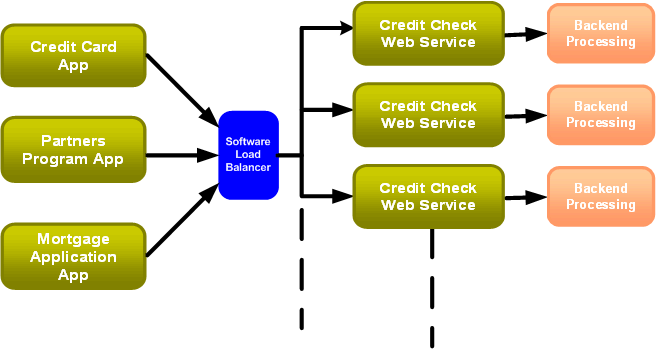
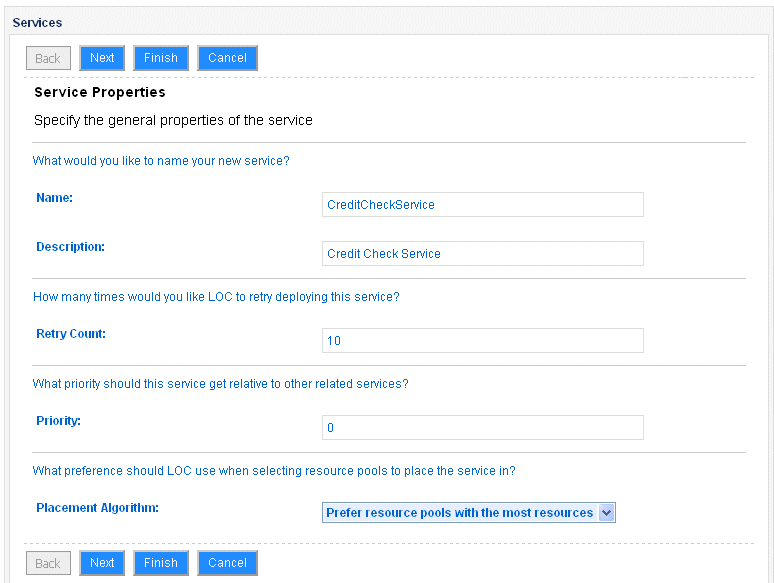
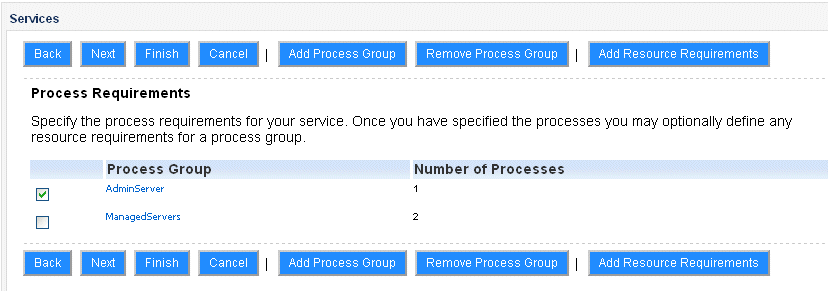
In this use case example, we will use the WLOC Administration Console to create a service named CreditCheckService that will manage the backend Managed Servers, and an Administration Server. The Managed Servers host the Credit Check Web Services as shown in Figure 4-2. We will create two process groups: an Administration Server process group and a Managed Server process group. We will specify a process requirement for each of the process groups that requires a minimum of one Admin Server and one Managed Server be started before the service is deployed. We will also define a runtime policy that executes only after the service is deployed, and will start the second Managed Server if the rule definition (constraint) is violated. Figure 4-2 illustrates the topology in this example. Note that we are using a Windows environment in this example, but other platforms are supported also. For a list of supported platforms, see BEA WebLogic Operations Control Supported Configurations.
The tasks in this topic include:
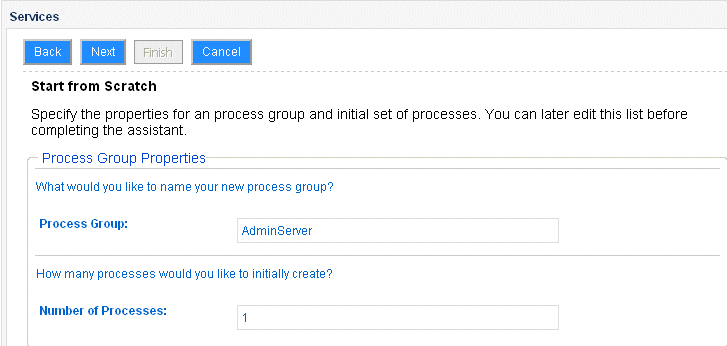
The first step in defining the service metadata is to define the general properties for the service, and then define the process groups that it will contain.
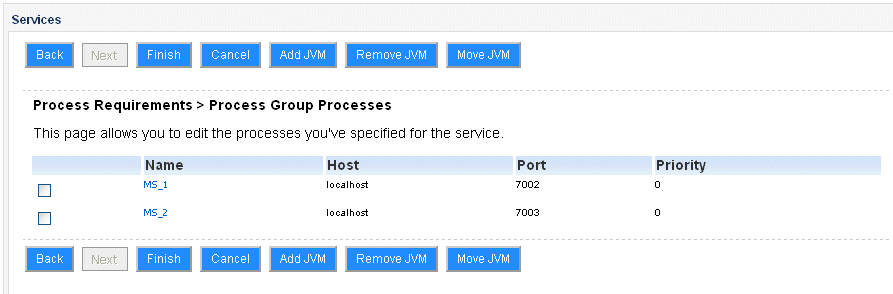
Our service will have two process groups, one that consists of a WebLogic Server Administration Server instance and one that consists of two Managed Server instances. In the WebLogic Server domain, these instances are named AdminServer, MS_1, and MS_2.
| Note: | Process groups are referred to as process types in the service metadata XML file. |
To define the service and process groups:
Because we have not defined any services yet, there are no services listed in the table.
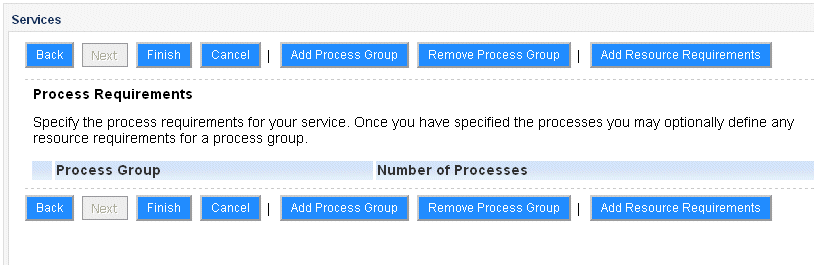
The Process Requirements page is displayed. We use this page as the starting point to add the process groups in the service.
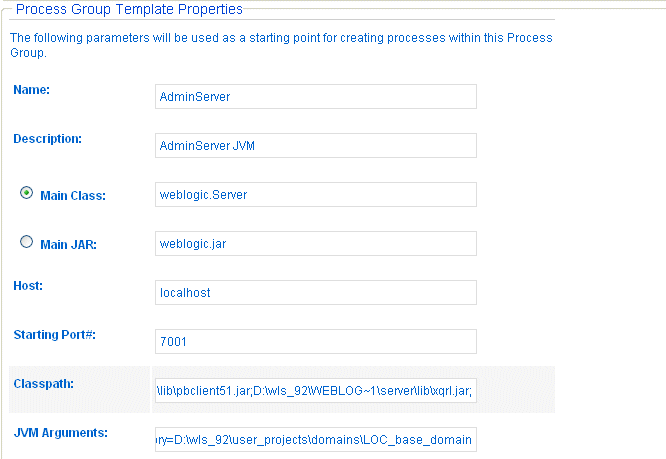
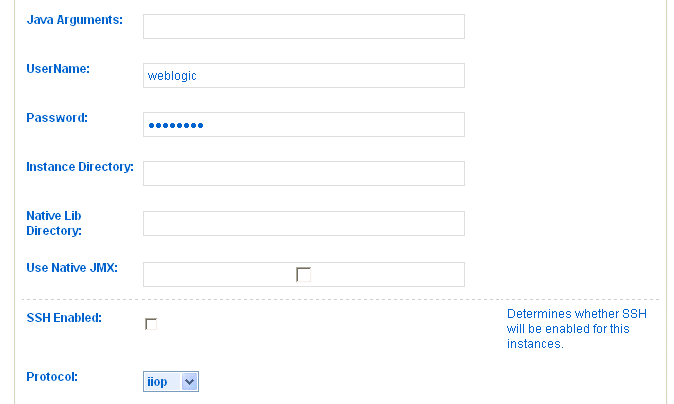
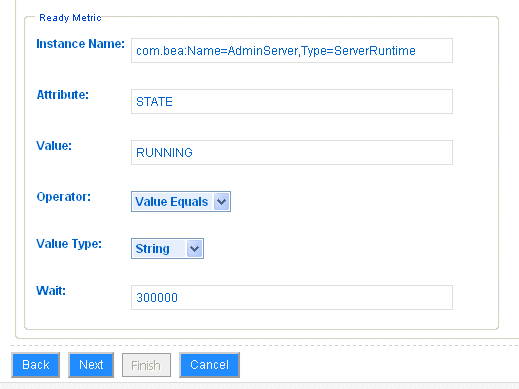
The following steps describe how to specify the properties and define a ready metric for the Administration Server process group.
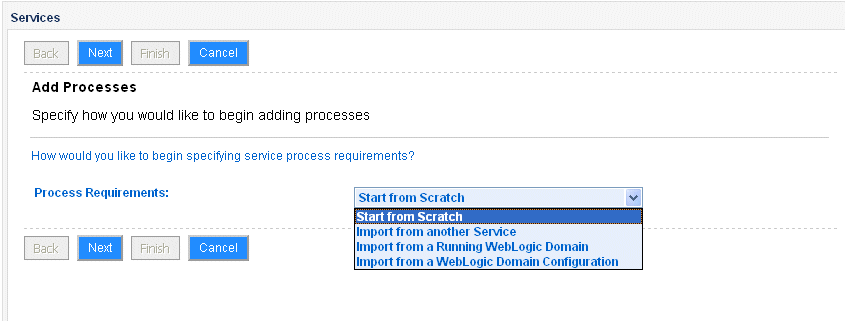
By selecting the Start from Scratch option, we are prompted on subsequent pages to supply properties for the process group, JVM parameters that are used when adding instances to the process group, and ready metrics that specify when an instance is available as a resource.
A ready metric indicates when a process has been started and is ready for work. For a WebLogic Server instance, the ServerRuntime MBean has a State attribute. When ServerRuntimeMbean.State=RUNNING, the WebLogic Server instance is ready.
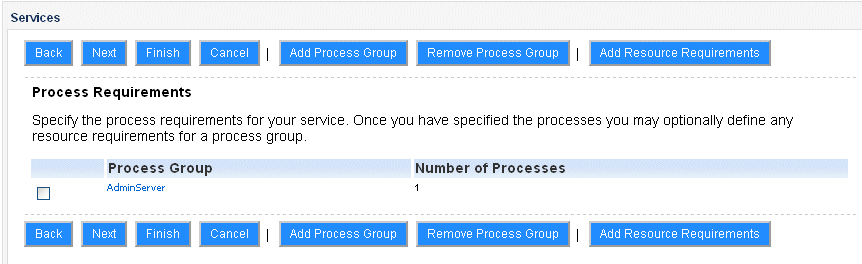
Note that the AdminServer process group is listed in the Process Group table.
In the next steps we will define the Managed Server process group.
The following steps describe how to specify the properties and ready metrics for both Managed Server instances.
Note that the values that are populated in the template are obtained from the values we provided for the AdminServer process group. We modify them as appropriate for the ManagedServers group.
The values that we specify on this page are duplicated for all the instances in the group. Therefore, in this example, both of the Managed Server instances will initially contain the same values.
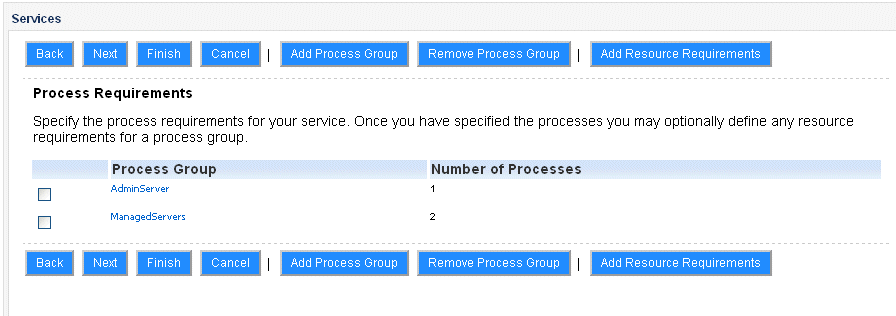
The Process Requirements page is displayed listing both the AdminServer and ManagedServers process groups in the table.
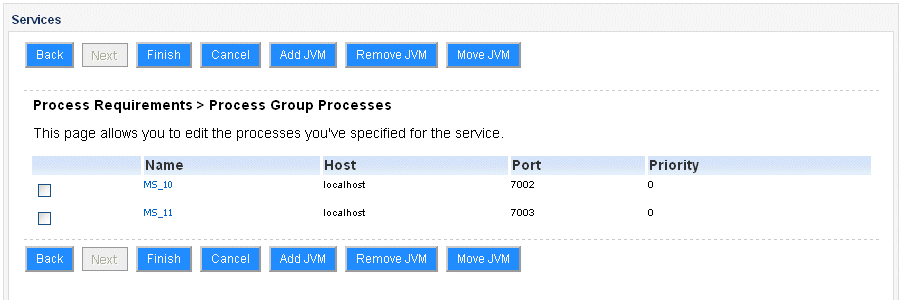
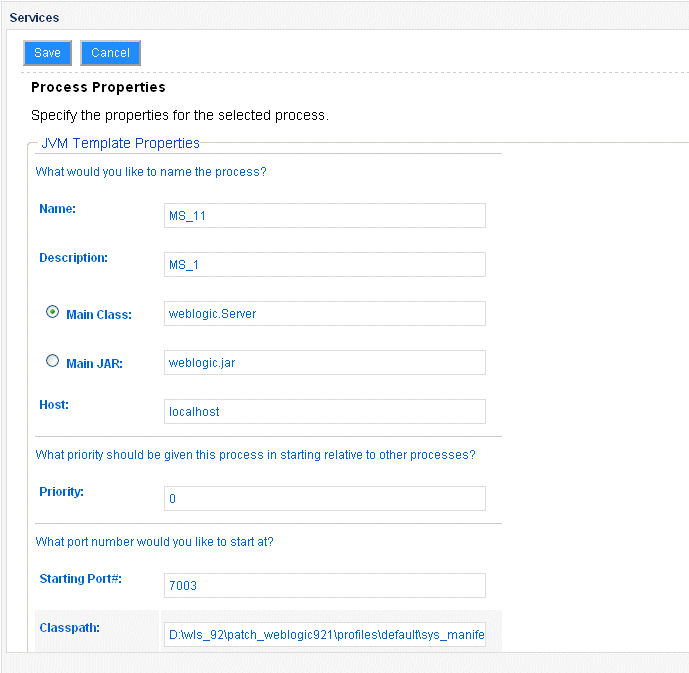
We now need to modify the properties for the second Managed Server instance, MS_2.
-Dweblogic.Name=MS_1 to -Dweblogic.Name=MS_2.com.bea:Name=MS_1,Type=ServerRuntime to com.bea:Name=MS_2,Type=ServerRuntime.To avoid confusion, we will also change the name of the first Managed Server from MS_10 to MS_1 to match the name of the Managed Server in the WLS domain.
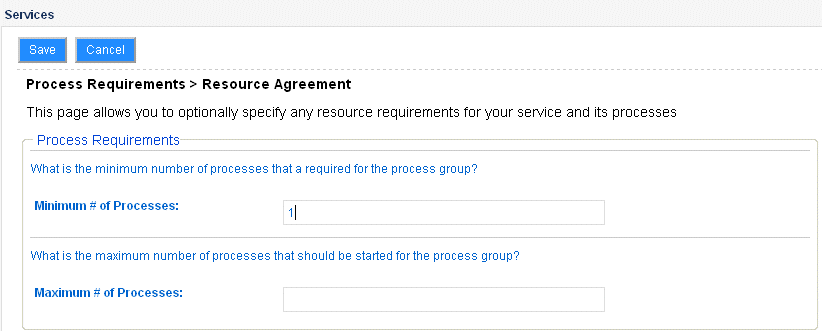
Before we finish creating the service, we need to define the resource requirements for each process group. When you define a resource requirement, you are creating a resource agreement. Resource agreements define requirements that are evaluated before starting a service or instance, which can occur both at deployment and runtime.
To define the resource requirements for the process groups in the CreditCheckService, we complete the following steps.
This value specifies the number of instances that will be started when the service is deployed. It will also generate a policy that ensures that the minimum number specified is maintained while the service is running.
We do not need to specify any other requirements for the AdminServer process group for this example.
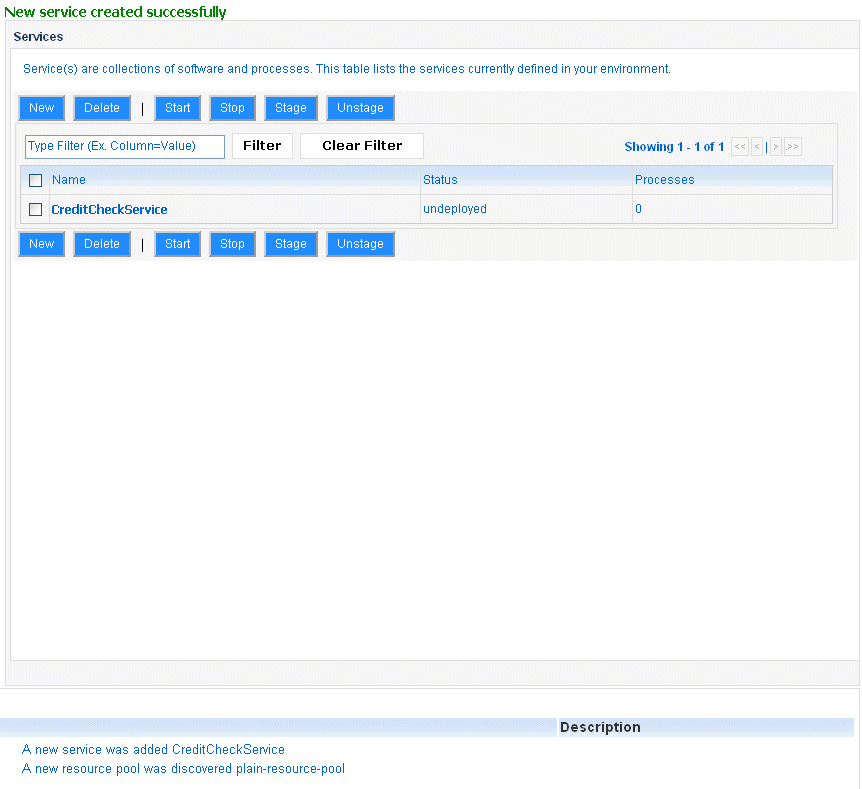
The CreditCheckService is now shown in the Services table and the Task and Events Viewer at the bottom of the Console indicates that the CreditCheckService was added.
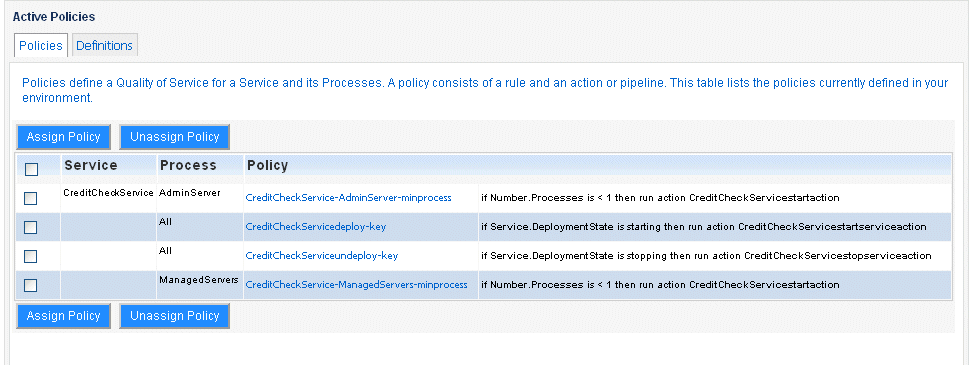
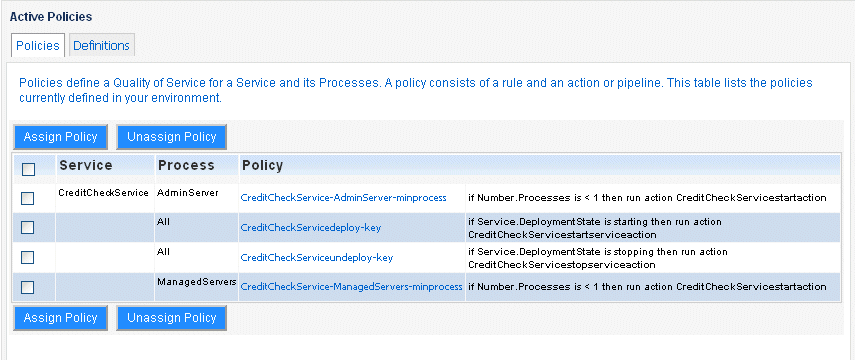
When you specify the resource requirements for the service, the deployment policy for the service is created automatically. A policy consists of a constraint and an action to take when the constraint is violated. In this example, we set the minimum number of processes to 1 which indicates that there must be one running instance in both the AdminServer and ManagedServers process groups. This constraint is automatically bound to the StartJavaInstanceAction
To view the deployment policy, select the Policies tab.
In this example, we created the service using the Start from Scratch option to demonstrate the complete method for defining process requirements. However, the WLOC Administration Console provides efficient helper methods that simplify this process by importing the information from the WLS domain. These helper methods include:
If you had selected one of these options in step 5 above, much of the information that we provided manually could have been captured from the config.xml file for the domain.
When you create the service, the associated constraints, actions, and bindings are created automatically. Listing 4-1 shows how the CreditCheckService service configuration is represented in the metadata-config.xml file.
<ns2:services>
        <ns2:service>
            <ns2:name>CreditCheckService</ns2:name>
            <ns2:description>Credit Check Service</ns2:description>
            <ns2:state>undeployed</ns2:state>
            <ns2:priority>0</ns2:priority>
            <ns2:constraint-bindings>
                <ns2:constraint-binding>
                    <ns2:constraint-key>CreditCheckServicedeploy-key</ns2:constraint-key>
                    <ns2:action-key>CreditCheckServicestartserviceaction</ns2:action-key>
                </ns2:constraint-binding>
                <ns2:constraint-binding>
                    <ns2:constraint-key>CreditCheckServiceundeploy-key</ns2:constraint-key>
                    <ns2:action-key>CreditCheckServicestopserviceaction</ns2:action-key>
                </ns2:constraint-binding>
            </ns2:constraint-bindings>
            <ns2:process-types>
                <ns2:process-type>
                    <ns2:constraint-bindings>
                        <ns2:constraint-binding>
                            <ns2:constraint-key>CreditCheckService-ManagedServers-minprocess</ns2:constraint-key>
                            <ns2:action-key>CreditCheckServicestartaction</ns2:action-key>
                        </ns2:constraint-binding>
                    </ns2:constraint-bindings>
                    <ns2:name>ManagedServers</ns2:name>
                    <ns2:description>ManagedServers-description</ns2:description>
                    <ns2:metadata-key>CreditCheckService-ManagedServersmetakey</ns2:metadata-key>
                </ns2:process-type>
                <ns2:process-type>
                    <ns2:constraint-bindings>
                        <ns2:constraint-binding>
                            <ns2:constraint-key>CreditCheckService-AdminServer-minprocess</ns2:constraint-key>
                            <ns2:action-key>CreditCheckServicestartaction</ns2:action-key>
                        </ns2:constraint-binding>
                    </ns2:constraint-bindings>
                    <ns2:name>AdminServer</ns2:name>
                    <ns2:description>AdminServer-description</ns2:description>
                    <ns2:metadata-key>CreditCheckService-AdminServermetakey</ns2:metadata-key>
                </ns2:process-type>
            </ns2:process-types>
            <ns2:max-failed-event-retry-count>10</ns2:max-failed-event-retry-count>
        </ns2:service>
    </ns2:services>
<ns2:connection-factories/>
    <ns2:connection-infos/>
    <ns2:constraints>
        <ns2:deployment-state-constraint>
            <ns2:name>CreditCheckService-service-deploy</ns2:name>
            <ns2:key>CreditCheckServicedeploy-key</ns2:key>
            <ns2:priority>0</ns2:priority>
            <ns2:state>starting</ns2:state>
            <ns2:evaluation-period>0</ns2:evaluation-period>
        </ns2:deployment-state-constraint>
        <ns2:deployment-state-constraint>
            <ns2:name>CreditCheckService-service-undeploy</ns2:name>
            <ns2:key>CreditCheckServiceundeploy-key</ns2:key>
            <ns2:priority>0</ns2:priority>
            <ns2:state>stopping</ns2:state>
            <ns2:evaluation-period>0</ns2:evaluation-period>
        </ns2:deployment-state-constraint>
        <ns2:min-process-constraint>
            <ns2:name>CreditCheckService-AdminServer-minprocess</ns2:name>
            <ns2:key>CreditCheckService-AdminServer-minprocess</ns2:key>
            <ns2:priority>0</ns2:priority>
            <ns2:state>deployed</ns2:state>
            <ns2:evaluation-period>0</ns2:evaluation-period>
            <ns2:value>1</ns2:value>
        </ns2:min-process-constraint>
        <ns2:min-process-constraint>
            <ns2:name>CreditCheckService-ManagedServers-minprocess</ns2:name>
            <ns2:key>CreditCheckService-ManagedServers-minprocess</ns2:key>
            <ns2:priority>0</ns2:priority>
            <ns2:state>deployed</ns2:state>
            <ns2:evaluation-period>0</ns2:evaluation-period>
            <ns2:value>1</ns2:value>
        </ns2:min-process-constraint>
</ns2:constraints>
    <ns2:notifications/>
    <ns2:pipelines/>
    <ns2:actions>
        <ns2:action>
            <ns2:name>CreditCheckServicestartserviceaction</ns2:name>
            <ns2:key>CreditCheckServicestartserviceaction</ns2:key>
            <ns2:impl-class>com.bea.adaptive.actions.internal.StartServiceAction</ns2:impl-class>
            <ns2:adjudicate>false</ns2:adjudicate>
            <ns2:properties/>
        </ns2:action>
        <ns2:action>
            <ns2:name>CreditCheckServicestopserviceaction</ns2:name>
            <ns2:key>CreditCheckServicestopserviceaction</ns2:key>
            <ns2:impl-class>com.bea.adaptive.actions.internal.StopServiceAction</ns2:impl-class>
            <ns2:adjudicate>false</ns2:adjudicate>
            <ns2:properties/>
        </ns2:action>
        <ns2:action>
            <ns2:name>CreditCheckServicestartaction</ns2:name>
            <ns2:key>CreditCheckServicestartaction</ns2:key>
            <ns2:impl-class>com.bea.adaptive.actions.internal.StartJavaInstanceAction</ns2:impl-class>
            <ns2:adjudicate>false</ns2:adjudicate>
            <ns2:properties/>
        </ns2:action>
        <ns2:action>
            <ns2:name>CreditCheckService-ManagedServers-defaultaction</ns2:name>
            <ns2:key>CreditCheckService-ManagedServers-defaultaction</ns2:key>
            <ns2:impl-class>com.bea.arc.ui.actions.ConsoleNotificationAction</ns2:impl-class>
            <ns2:adjudicate>false</ns2:adjudicate>
            <ns2:properties/>
        </ns2:action>
        <ns2:action>
            <ns2:name>CreditCheckService-AdminServer-defaultaction</ns2:name>
            <ns2:key>CreditCheckService-AdminServer-defaultaction</ns2:key>
            <ns2:impl-class>com.bea.arc.ui.actions.ConsoleNotificationAction</ns2:impl-class>
            <ns2:adjudicate>false</ns2:adjudicate>
            <ns2:properties/>
        </ns2:action>
</ns2:actions>
Listing 4-2 shows how the AdminServer process group configuration is represented in the metadata-config.xml file. The ready metric configuration is shown in bold type.
<ns2:metadata-group>
            <ns2:name>CreditCheckService-AdminServermeta1</ns2:name>
            <ns2:key>CreditCheckService-AdminServermetakey</ns2:key>
            <ns2:instances>
                <ns2:jvm-instance>
                    <ns2:name>AdminServer</ns2:name>
                    <ns2:description>AdminServerJVM</ns2:description>
                    <ns2:main-class>weblogic.Server</ns2:main-class>
                    <ns2:ready-information>
                        <ns2:check-type>ValueEquals</ns2:check-type>
                        <ns2:max-wait-period>300000</ns2:max-wait-period>
                        <ns2:instance>com.bea:Name=AdminServer,Type=ServerRuntime</ns2:instance>
                        <ns2:attribute>State</ns2:attribute>
                        <ns2:value>RUNNING</ns2:value>
                        <ns2:value-type>java.lang.String</ns2:value-type>
                    </ns2:ready-information>
                    <ns2:jvm-args>
                        <ns2:arg>-Xmx128m</ns2:arg>
                        <ns2:arg>-Xms64m</ns2:arg>
                        <ns2:arg>-da</ns2:arg>
                       <ns2:arg>-Dwls.home=D:\wls_92\weblogic92\server</ns2:arg>
                        <ns2:arg>-Dweblogic.management.discover=true</ns2:arg>
                        <ns2:arg>-Dweblogic.Name=AdminServer</ns2:arg>
                        <ns2:arg>-Dweblogic.management.username=weblogic</ns2:arg>
                        <ns2:arg>-Dweblogic.management.password=weblogic</ns2:arg>
                        <ns2:arg>-Djava.security.policy=D:\wls_92\weblogic92\server\lib\weblogic.policy</ns2:arg>
                        <ns2:arg>-Dweblogic.RootDirectory=D:\wls_92\user_projects\domains\LOC_base_domain</ns2:arg>
                        <ns2:arg>-cp</ns2:arg>
                        <ns2:arg>D:\wls_92\patch_weblogic921\profiles\default\sys_manifest_classpath\weblogic_patch.jar;
D:\wls_92\JDK150~1\lib\tools.jar;D:\wls_92\WEBLOG~1\server\lib\weblogic_sp.jar;
D:\wls_92\WEBLOG~1\server\lib\weblogic.jar;D:\wls_92\WEBLOG~1\server\lib\webservices.jar;
D:\wls_92\WEBLOG~1\common\eval\pointbase\lib\pbclient51.jar;D:\wls_92\WEBLOG~1\server\lib\xqrl.jar;</ns2:arg>
                    </ns2:jvm-args>
                    <ns2:java-args/>
                    <ns2:native-lib-dir></ns2:native-lib-dir>
                    <ns2:instance-dir></ns2:instance-dir>
                    <ns2:native-jmx>false</ns2:native-jmx>
                    <ns2:protocol>iiop</ns2:protocol>
                    <ns2:host>localhost</ns2:host>
                    <ns2:port>7001</ns2:port>
                    <ns2:username>weblogic</ns2:username>
                    <ns2:password>{Salted-3DES}W0v+mTzrr9u/PRD30V1XGw==</ns2:password>
                    <ns2:ssh-enabled>false</ns2:ssh-enabled>
                    <ns2:wait-for-ssh>false</ns2:wait-for-ssh>
                    <ns2:priority>0</ns2:priority>
                    <ns2:copies-at-create/>
                    <ns2:copies-at-shutdown/>
                </ns2:jvm-instance>
            </ns2:instances>
        </ns2:metadata-group>
Now that we have defined the service and the initial deployment policies, we need to define the runtime policies.
WLOC policies specify runtime requirements (constraints or rules) for a service and actions to take when the service operates outside of the constraints. These policies define service level agreements (SLAs) for your services. For example, you can define a policy that increases the amount of memory available if the memory requirements for a specific JVM grow beyond a specified number of MBs.
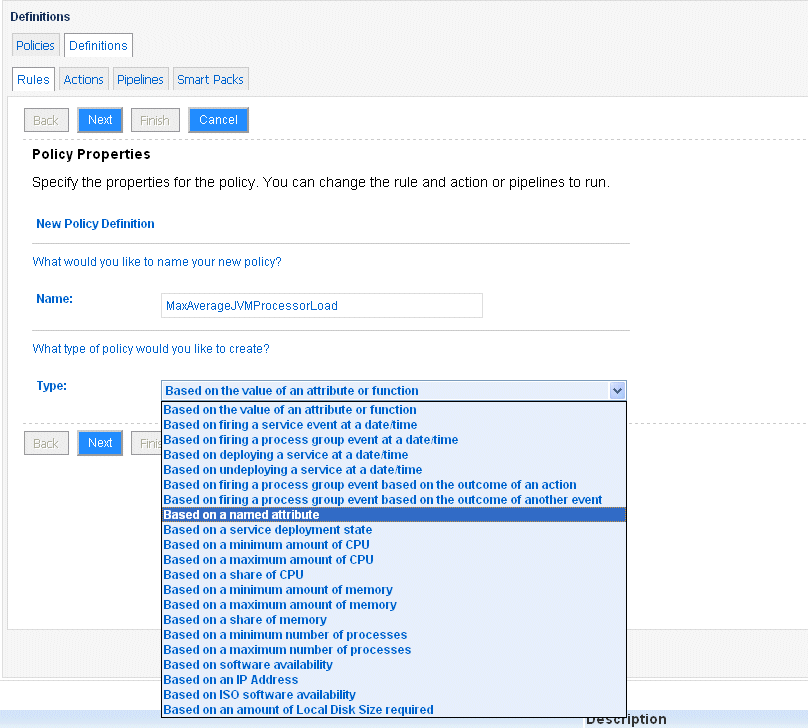
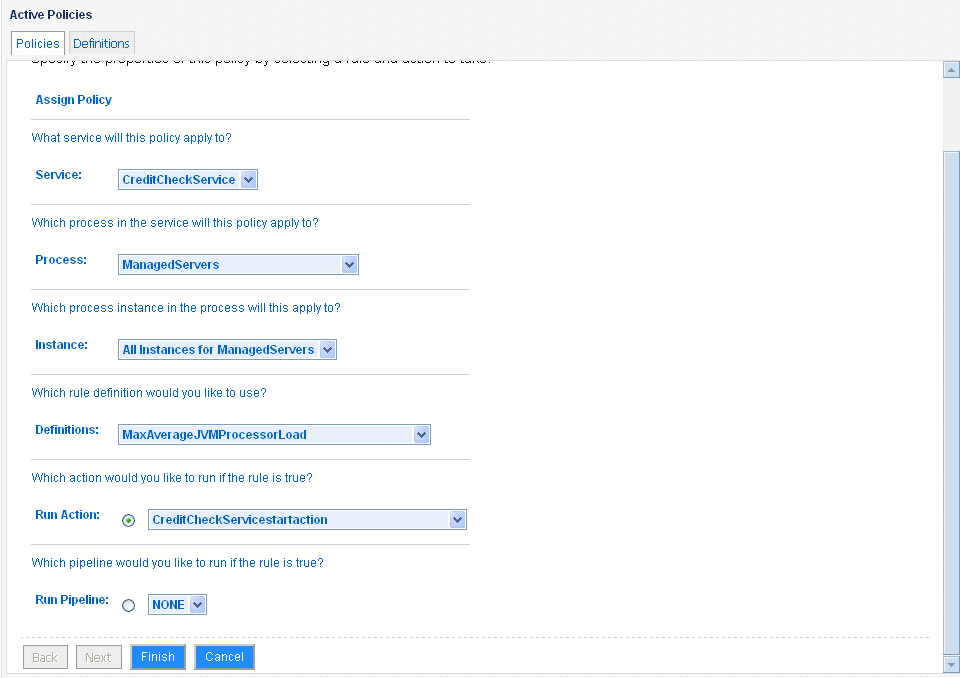
WLOC contains a set of predefined constraints, called SmartPacks, that you can use to place requirements on some common measurements of service health and performance. In this example, we will define a runtime policy for the ManagedServers process group using the MaxAverageJVMProcessorLoad constraint that is provided as part of the Smart Pack constraints.
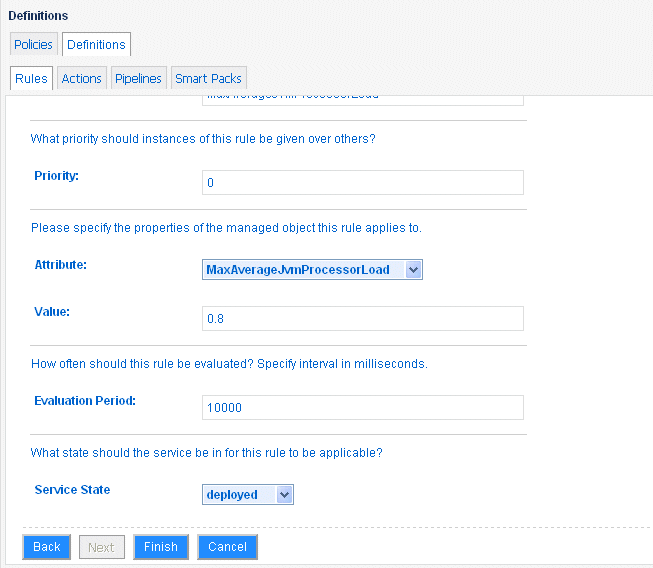
For the runtime policy, we will define a rule (constraint) in which we specify a value of 0.8 for the MaxAverageJVMProcessorLoad constraint. This value indicates that when the average JVM processor load exceeds 80%, an action must occur. In this example, a second Managed Server instance will be started.
To create the runtime policy and assign it to the ManagedServers process group:
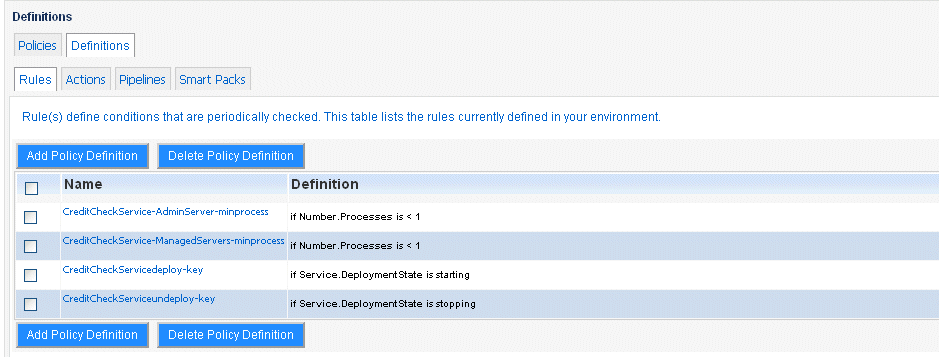
The list of the process constraint deployment polices are shown in the table.
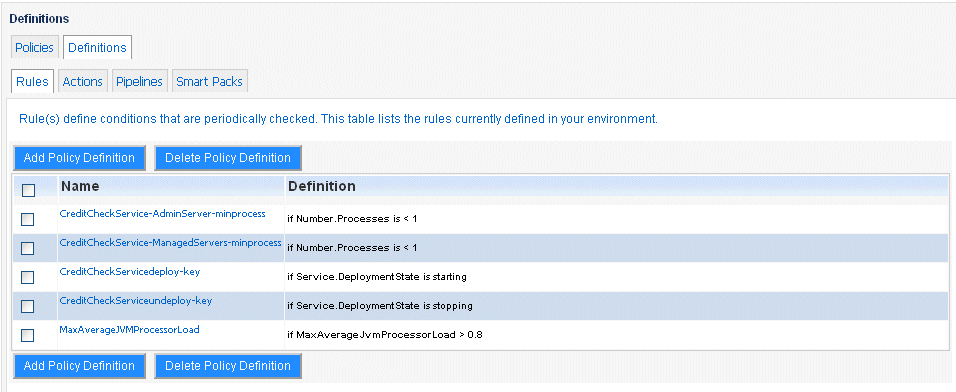
The new policy rule is added to the Definitions table.
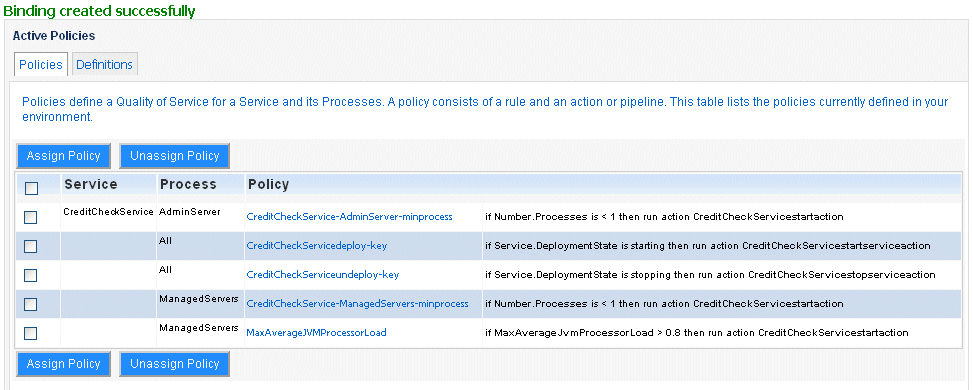
The policy assignment is created and the Binding created successfully confirmation message is displayed.
Note that the MaxAverageJVMProcessorLoad policy is now assigned to the ManagedServers process group in the Active Policies table.
Listing 4-3 shows how the MaxAverageJVMProcessorLoad configuration for the constraint binding, custom constraint, and associated action is represented in the metadata-config.xml file.
.
.
.
<ns2:process-types>
                <ns2:process-type>
                    <ns2:constraint-bindings>
                        <ns2:constraint-binding>
                            <ns2:constraint-key>CreditCheckService-ManagedServers-minprocess</ns2:constraint-key>
                            <ns2:action-key>CreditCheckServicestartaction</ns2:action-key>
                        </ns2:constraint-binding>
                        <ns2:constraint-binding>
                            <ns2:constraint-key>MaxAverageJVMProcessorLoad</ns2:constraint-key>
                            <ns2:action-key>CreditCheckServicestartaction</ns2:action-key>
                        </ns2:constraint-binding>
                    </ns2:constraint-bindings>
                    <ns2:name>ManagedServers</ns2:name>
                    <ns2:description>ManagedServers-description</ns2:description>
                    <ns2:metadata-key>CreditCheckService-ManagedServersmetakey</ns2:metadata-key>
                </ns2:process-type>
.
.
.
<ns2:custom-constraint>
            <ns2:name>MaxAverageJVMProcessorLoad</ns2:name>
            <ns2:key>MaxAverageJVMProcessorLoad</ns2:key>
            <ns2:priority>0</ns2:priority>
            <ns2:state>deployed</ns2:state>
            <ns2:evaluation-period>10000</ns2:evaluation-period>
            <ns2:constraint>MaxAverageJvmProcessorLoad</ns2:constraint>
            <ns2:value>0.8</ns2:value>
        </ns2:custom-constraint>
.
.
.
<ns2:action>
            <ns2:name>CreditCheckServicestartaction</ns2:name>
            <ns2:key>CreditCheckServicestartaction</ns2:key>
            <ns2:impl-class>com.bea.adaptive.actions.internal.StartJavaInstanceAction</ns2:impl-class>
            <ns2:adjudicate>false</ns2:adjudicate>
            <ns2:properties/>
        </ns2:action>
Now that we have defined the service to be managed and assigned deployment and runtime policies, we need to deploy the service as described in Deploy the Service Against Available Resources.


|