

|
|
|
|
|
|
Post-Installation Considerations
After you install the software for the Campaign Manager for WebLogic 1.1, WebLogic Commerce Server 3.5, and WebLogic Personalization Server 3.5, and the E-Business Control Center tool, the software uses a default configuration that includes a Cloudscape database and sample data. When you need to use a database other than Cloudscape, and when you need to adjust configuration values for resources such as connection pools, servlets, and security parameters, read the Deployment Guide. It explains how to move beyond the initially installed product configuration.
This chapter contains the following post-installation considerations:
Licensing the Product Package(s)
Campaign Manager for WebLogic 1.1, WebLogic Commerce Server 3.5, and WebLogic Personalization Server 3.5 share a common server installation procedure. After the installation completes and before you start the server the first time, you must apply the license file that you downloaded or purchased for Campaign Manager for WebLogic 1.1, WebLogic Commerce Server 3.5, or WebLogic Personalization Server 3.5 to the centralized license.bea file.
The license.bea file resides in the BEA_HOME directory. It is an XML-format file. This license file is checked at run time and determines which features of Campaign Manager for WebLogic 1.1, WebLogic Commerce Server 3.5, or WebLogic Personalization Server 3.5 you can use.
If you installed the E-Business Control Center client tool on a system that does not also have the server software (Campaign Manager for WebLogic 1.1, WebLogic Commerce Server 3.5, or WebLogic Personalization Server 3.5), copy the updated license file from your server system to the BEA_HOME directory on the client system. Before you save or copy the license file into BEA_HOME on the client, check that you are not overwriting an existing license.bea file.
The three types of licenses are:
For example, if you purchased the WebLogic Personalization Server license, attempts to use WebLogic Commerce Server features results in:
<T3Services> COMMERCE_SERVER_FRAMEWORK,LOG_FATAL,
"BEA WebLogic Commerce Server license exception.com.beasys.commerce.licensing.
LicenseException: A License for BEA product <BEA WebLogic Commerce
Server> has NOT been found."
When you register to download Campaign Manager for WebLogic 1.1, WebLogic Commerce Server 3.5, and WebLogic Personalization Server 3.5 on the BEA Download Center Web site, you should also download a current evaluation license. The evaluation license is always a full license, enabling campaign, commerce, personalization features for a limited time. If you received the product on a CD, you will receive a license file via e-mail to the e-mail account specified on the purchase order.
If you need a new evaluation license, revisit http://commerce.bea.com/downloads/products.jsp, go through the download process, and download only the evaluation license.
Note: Do not apply a pre-3.5 WebLogic Commerce Server license file to the license.bea file. Instead, you must first upgrade any existing pre-3.5 license, and then proceed with the following steps.
To apply your license file to license.bea, read the following steps carefully:
license_update_file is the name to which you saved the license update file that you received via e-mail or download. On the BEA Download Web site, the default name for the license update file is license_wlcsps35.bea. Running the UpdateLicense script updates your license.bea file.
Starting the Server
Follow these steps to start the server the first time and verify that the software was properly installed.
On Windows systems, another way to start the server is via the icon placed on the desktop, or by using the Start menu. For example:
Start
The server opens a console window. Note that the fist time you start the server, this process will take several minutes. This happens because many EJBs are being pre-compiled. Subsequent server startups should be faster.
By default, Campaign Manager for WebLogic 1.1, WebLogic Commerce Server 3.5, and WebLogic Personalization Server 3.5 are configured to use a Cloudscape database that is already built and loaded with sample data. If you configure the server to use another database type such as Oracle, or you recreate a database, the console output includes a prompt for creating credit card encryption/decryption keys. For information about this prompt, see the Deployment Guide.
When the server completes its startup process, it displays the following message in the console output:
date stamp:<I> <WebLogicServer> WebLogic Server started
For example:
   .
   .
   .
=============== Initializing Logger ======================
<Apr 3, 2001 12:10:44 PM EDT> <Notice> <WebLogicServer> <WebLogic Server started
<Apr 3, 2001 12:10:44 PM EDT> <Notice> <WebLogicServer> <ListenThread listening on port 7501>
<Apr 3, 2001 12:10:44 PM EDT> <Notice> <WebLogicServer> <SSLListenThread listening on port 7502>
Notes: The first time you start the server, the startup may appear to stall when you see the "Initializing Logger" section. During this portion of the server startup, all the Enterprise Java Beans are being compiled (by default). The next time you start the server, this portion of the startup will be faster.
If you have problems starting the server, make sure that WL_COMMERCE_HOME is set to the directory that contains the installed Campaign Manager for WebLogic 1.1, WebLogic Commerce Server 3.5, and WebLogic Personalization Server 3.5 software. Also ensure the WEBLOGIC_HOME property points to your database drivers (for Cloudscape) and the JDK_HOME points to your JDK. All other settings should work as shipped. For details, see the Deployment Guide, which describes how the variables should be defined.
Starting the Sample Web Applications
Using a browser, try the sample WLCS Web application to make sure the server is working correctly. The example applications use the Cloudscape database that ships with the system; therefore, you should not have to make any configuration changes to test the system. All you need to do is point your browser to the correct URL listed for the application.
Note: Each page loads slowly the first time you access it because the Java compiler has to compile the JSP page source code. Subsequent loads and refreshes of the page go much faster than the initial load.
The examples are deployed as Web applications, sometimes referred to as "Webapps." With the server running, the format of the URLs on the local machine are as follows:
http://localhost:7501/wlcs
http://localhost:7501/exampleportal
The WLCS Webapp includes a set of JSP templates and associated files that you can customize to match the branding and business logic requirements of your site. The JSPs present an electronic store catalog, order processing features, and user registration features. You can start your exploration of this application by reading the JSP Commerce and Campaign Tour.
The Acme Portal Webapp is included as a simple example of the WebLogic Personalization Server features. A tour document walks you through the steps required to use personalization services provided by the WebLogic Personalization Server. The tour builds upon the Acme Demo example portal that ships with the product. To start the tour, see the Personalization Server Tour..
Starting the JSP-based Administration Tool
Using a browser, start the Administration Tool. WebLogic Commerce Server and WebLogic Personalization Server share a common, browser-based administration tool. On Windows systems, you can access it when the server is running by selecting the following from the Start menu:
Start—> Programs—> BEA WebLogic E-Business Platform—> BEA WebLogic Commerce Server 3.5—> Administration Tools (Server must be running)
Or you can start the Administration Tool by opening the following URL in your browser:
http://<wl-host>:7501/tools
If you are running the Administration Tool on your local machine, use the URL:
http://localhost:7501/tools
If you are running the JSP-based Administration Tool on your remote machine, for example on a node named "trixie," use the URL:
http://trixie:7501/tools
When you attempt to open the tools Web application, you are prompted for a user name and password. The new default login for the JSP-based Administration Tool is as follows:
Note: Do not confuse this administrator password with the password you set during the installation to start the server itself.
The following figure shows the sample login screen.
Figure 7-1
If the password you used does not work, please see the system administrator. It is possible that the system administrator changed the default password. When you enter the correct account name and password, the tools Web application opens in the browser, as shown in the next sample screen. Figure 7-2 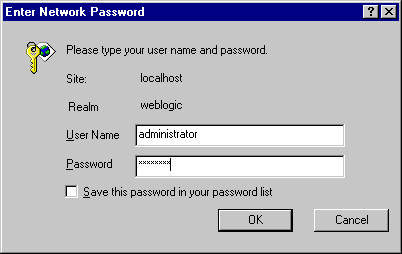
Starting the E-Business Control Center
The E-Business Control Center is a graphical client tool that you can use to define and manage promotional campaigns, campaign discounts, stand-alone discounts, customer segments, content selectors, ad placeholders, and custom events. If you have not already done so, see Installing the E-Business Control Center, for the installation details.
Follow these steps to start the E-Business Control Center the first time and verify that the software was properly installed.
Start
Solaris 8: On a supported client Solaris 8 system, run the following command:
$ <BEA_HOME>/E-BusinessControlCenter/bin/ebcc.sh
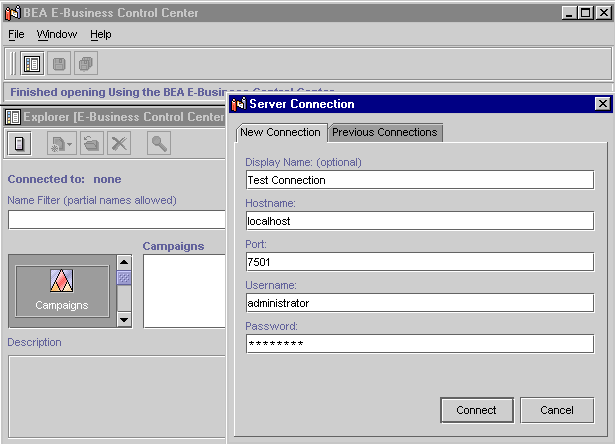
The following diagram shows the set of initial screens. In the top Server Connection window, the E-Business Control Center client has prompted the user for server connection information on the New Connection tab. In this example, we have entered:
Username: system
Password: weblogic
(Previous example assumes that the person who did the installation entered weblogic as the password for the system account.)
Or:
Username: administrator
Password: password
Figure 7-3
A copy of this online Help is included in the documentation kit and on the BEA e-docs Web site at http://download.oracle.com/docs/cd/E13210_01/wlcs/docs35/campusr/index.htm and is primarily for the convenience of business analysts and marketing professionals who have not yet installed the E-Business Control Center client tool.
Business analysts, marketing professionals, and Commerce Business Engineers (CBEs) should also follow the JSP Commerce and Campaign Tour. CBEs should also read the Guide to Developing Campaign Infrastructure and the Guide to Events and Behavior Tracking.
Using the Backup Copy of the Database
If the Cloudscape version of the Commerce database becomes corrupted, you can use the backup database copy that was created for you. The backup is located in the following directory:
WL_COMMERCE_HOME/db/data/CommerceBackup (UNIX)
WL_COMMERCE_HOME\db\data\CommerceBackup (Windows)
The backup Cloudscape database contains the initial set of sample data that was loaded when you either:
Using the backup copy of the database is simply a convenience feature and saves you the step of recreating the database by running the create_all.bat (Windows) or create_all.sh (UNIX) script in the WL_COMMERCE_HOME/db/cloudscape/<version>/ directory.
Recreating the Cloudscape Database
This section explains how to recreate the sample Cloudscape database.
Note: If you recreate a database, refer to the Deployment Guide for information about the credit card encryption/decryption prompt seen on the console window during the server startup.
You might need to recreate the default Cloudscape database if your Cloudscape database becomes corrupted or to reset the data in the tables. To recreate the database, run create_all.bat (Windows) or create_all.sh (UNIX) in the WL_COMMERCE_HOME/db/cloudscape/<version>/ directory.
Configuring Other Databases
When you need to use a supported database other than Cloudscape, and when you need to adjust configuration values for resources such as connection pools, servlets, and security parameters, read the Deployment Guide. It explains how to move beyond the initially installed product configuration.

|

|
|
|
|
Copyright © 2001 BEA Systems, Inc. All rights reserved.
|
