

|
This section describes how to use the edgeflow APIs to write and deploy custom edgeflow modules.
The following topics are described in this section:
Sample custom workflow modules are available in the samples directory (RFID_EDGE_HOME\samples\EdgeFlows\CustomModules) in the Edge Server installation hierarchy. In order to use the custom modules, they must be deployed to the Edge Server. See Building and Deploying the Sample.
The Edge Server installation creates a standard set of edgeflow modules, as described in Edgeflow Module Reference.
You may want to write custom modules to satisfy specific use cases not handled by the standard set of modules. Java docs for the interfaces used within the edgeflow engine are available for your use. This section, when used along with the Java docs, describes how to write and deploy custom edgeflow modules.
Different edgeflow modules carry out different tasks, which are defined by the module's implementation. At run time, instances of workflow modules may be created, configured, and wired together to carry out an overall use case. Table 4-1 shows design time vs. run time tasks:
Table 4-1The sequence of calls that occur when the edgeflow engine receives a request to create a new edgeflow module (initiated by definePlugin on WorkflowManager by the Edge Server when you create a new instance in the console) is as follows:
As described in Configuring and Using Edgeflows, an edgeflow module instance can receive data from, and send data to, other module instances. It sends data to other module instances through output ports and receives data from other module instances through input ports. A module may have multiple input ports and multiple output ports.
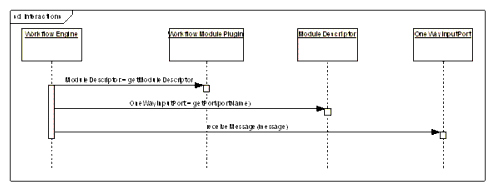
The sequence of calls that occur when the edgeflow engine sends a message to a module's port is shown in Figure 4-1.
As described in Extend the AbstractWorkflowModulePlugin Class, your custom module should extend the AbstractWorkflowModulePlugin class, including providing an implementation for the abstract method createModuleDescriptor. This method should return a ModuleDescriptor that contains com.bea.rfid.edge.api.workflow.OneWayInputPort for all the input ports of the module and com.bea.rfid.edge.api.workflow.Port for all the output ports.

When you create a custom module, you must:
These tasks are described in the sections that follow.
At the very high level, a custom module class must satisfy the following requirements:
The configuration framework uses a static method getPluginMeta() to get the PluginMeta object with the configuration parameter names and other configuration parameters of the module.
The abstract base class, com.bea.rfid.edge.toolkit.workflow.AbstractWorkflowModulePlugin implements WorkflowModulePlugin.
Your module should extend the AbstractWorkflowModulePlugin class.
The abstract base class provides the following:
Perform the following steps to implement an edgeflow module using this abstract base class:
This section provides an example of extending the AbstractWorkflowModulePlugin class.
The example code is from the ProvisioningSerialRangeModule.java file in the samples directory (EDGE_SERVER_HOME\samples\EdgeFlows\CustomModules\).
| Note: | Only code fragments are shown here for example purposes; see the actual samples for complete code. |
The example uses the default zero-argument constructor provided by Java.
// interface method implementation
public void configure(PluginConfig config)
throws PluginException
{long rangeStart = Long.parseLong(getStringValue(config, RANGE_START_PARAM));
long rangeEnd = Long.parseLong(getStringValue(config, RANGE_END_PARAM));
if (rangeEnd < rangeStart)
throw new PluginException("Range end cannot be less than range start"); m_rangeBO.setBegin(rangeStart);
m_rangeBO.setEnd(rangeEnd);
// output connections
m_outModules = getOutputModulesList(config, OUT_PORT_KEY);
setupErrorOutputs(config);
}
// abstract method implementation
protected ModuleDescriptor createModuleDescriptor()
{List <Port> inPorts = new ArrayList <Port> (1);
inPorts.add(new EPCStringInputPort());
return new ModuleDescriptorImpl(inPorts, getOutputPorts());
}
:
private static List<Port> getOutputPorts()
{List<Port> outPorts = new ArrayList(2);
outPorts.add(new PortImpl(OUT_PORT_KEY,
"Replenishment",
ListOneWayPortType.URI_STRING_LIST));
outPorts.add(ERROR_OUT_PORT);
return outPorts;
}
The example does not use the doStartup method.
/**
* Implementation for the object input port.
*/
private class EPCStringInputPort
extends OneWayInputPortImpl
{public EPCStringInputPort()
{super(IN_PORT);
}
public void processMessage(Object msg)
throws Exception
{String inStr = (String)msg;
log(Level.FINE, "processing message: " + inStr);
// get EPC range for this EPC string
List<String> ranges = m_rangeBO.getRanges(inStr);
// get EPC range for this EPC string
log(Level.FINE, "retrieved EPC ranges: " + ranges.toString());
// send it out
if ((m_outModules!=null && m_outModules.size()>0))
{sendToModules(ranges, m_outModules);
}
}
}
Your custom module needs to implement a static method to get the PluginMeta.
Every module has configuration parameters that determine the behavior of the module instance. For example, the External Sender module has parameters that let the user specify an XSLT file, destination URI(s), input data connections, and error output connections for a given instance of that module.
The configuration framework uses the static getPluginMeta() method to get the PluginMeta object with the configuration parameter names and other configuration parameters of the module.
The PluginMeta object contains a list of PluginParameterMeta objects with the details of its configuration parameters. The order of the PluginParameterMeta objects in the list is the order in which the administration console will display the parameters.
You use the com.connecterra.ale.dynamicconfig.bean.DynamicConfigBeanFactory(); constructor to create an instance of the com.connecterra.ale.dynamicconfig.api.DynamicConfigFactory interface (DynamicConfigBeanFactory implements DynamicConfigFactory), and then use the resulting DynamicConfigFactory.createPluginMeta() method to create an instance of PluginMeta. This sequence is shown in Listing 4-4.
When adding parameters to the PluginMeta object you created, you need to define all the output ports under the sub-configuration Module Outputs and all the input ports under sub-configuration Module Inputs.
To do this, the AbstractWorkflowModulePlugin class has utility methods, createOutputPortsSubConfig() and createInputPortsSubConfig(), to create the sub-configuration entries from a given list of ports. These utility methods create the ports under the appropriate sub-configuration entries and add constraints to enable correct wiring with other module instances. All of the required information is extracted from the ports that are passed in.
private static com.connecterra.ale.dynamicconfig.api.PluginMeta s_pluginMeta;
public static com.connecterra.ale.dynamicconfig.api.PluginMeta getPluginMeta()
throws PluginException
{if (s_pluginMeta != null)
return s_pluginMeta;
com.connecterra.ale.dynamicconfig.api.DynamicConfigFactory factory =
new com.connecterra.ale.dynamicconfig.bean.DynamicConfigBeanFactory();
s_pluginMeta = factory.createPluginMeta(
ProvisioningSerialRangeModule.class.getName(),
MODULE_NAME,
I18N_MODULE_NAME,
com.connecterra.ale.dynamicconfig.api.PluginMeta.Role.WORKFLOW_MODULE);
s_pluginMeta.setDescription("Provisioning Serial Range Module");// range start
s_pluginMeta.addParameterMeta(factory.createRequiredNumericMeta(
RANGE_START_PARAM, // key name
I18N_RANGE_START_PARAM, // display name
"EPC range start", // desc
0,
Long.MAX_VALUE));
// range end
s_pluginMeta.addParameterMeta(factory.createRequiredNumericMeta(
RANGE_END_PARAM, // key name
I18N_RANGE_END_PARAM, // display name
"EPC range end", // desc
0,
Long.MAX_VALUE));
// Output ports
s_pluginMeta.addParameterMeta(createOutputPortsSubConfig(factory,
getOutputPorts()));
// Input ports
List<Port> inPorts = new ArrayList(1);
inPorts.add(IN_PORT);
s_pluginMeta.addParameterMeta(createInputPortsSubConfig(factory, inPorts));
return s_pluginMeta;
}
private static List<Port> getOutputPorts()
{List<Port> outPorts = new ArrayList(2);
outPorts.add(new PortImpl(OUT_PORT_KEY,
"Replenishment",
ListOneWayPortType.URI_STRING_LIST));
outPorts.add(ERROR_OUT_PORT);
return outPorts;
}
Edge flow modules may accept XML or string messages from outside the edgeflow system. These messages must be converted to the corresponding Java type before they are sent to the modules.
Edge flow messages can also be sent out externally (via HTTP or JMS, for example). The messages will be serialized to their XML or String over-the-wire format before they are sent outside.
Custom modules may have their own data types that need to be passed over the wire and sent to and from the custom modules using the standard framework mechanisms.
To do this, you need to write serializers that implement the com.bea.rfid.workflow.api.MessageSerializer interface, and deserializers that implement the com.bea.rfid.workflow.api.MessageDeserializer interface.
You then need to register these classes with the naming service (described in the Edgeflow API Overview section).
The com.bea.rfid.edge.plugin.workflow.epcis.encoding.EPCISDocumentSerializer class, which is shown in Listing 4-5, implements both the com.bea.rfid.workflow.api.MessageSerializer and com.bea.rfid.workflow.api.MessageDeserializer interfaces.
Once the serializers and deserializers are created and registered, the framework will look up the appropriate serializer based on the Java type, and the appropriate deserializer based on the XML namespace and root element name, and perform the conversion.
Listing 4-5 shows an example of registering serializers and deserializers.
import com.bea.rfid.edge.plugin.workflow.epcis.encoding.EPCISDocumentSerializer;
:
private static void registerSerializers(WorkflowNamingService ns)
{if (s_serializersRegistered)
return;
EPCISDocumentSerializer ser = new EPCISDocumentSerializer();
ns.registerDeserializer(ser);
ns.registerSerializer(ser);
s_serializersRegistered = true;
}
registerSerializers(getWorkflowManager().getWorkflowNamingService());
Use the following steps to build and deploy the your custom modules:
The Edge Server Administration Console should now list the custom module.
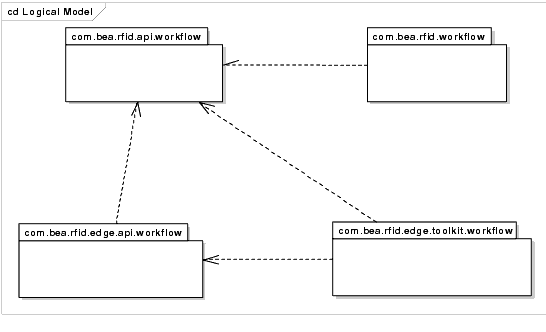
Figure 4-2 shows the high level packages in edgeflow API and the dependencies between the packages. More details of the packages and the classes in them are in the sections that follow.

This package defines public interfaces that may be used on the client side or the server side of the edgeflow system.
The types sub-package contains the data types used by various BEA-provided modules. This package defines interfaces and classes for common message data types sent or received by edge flow modules and messaging framework. The following interfaces and classes are defined:
WORKING: A module that is actively processing inputs that it receives is in this state.
IDLE: A module that is not processing its inputs is in this state.
Most modules have an error output port, which is used to send the details of errors during message processing. The ErrorOutput interface defines a type for the error output data. Similarly, an interface is defined for trigger output, and a class for module state.
The encoding sub-package contains interfaces for encoding and decoding edge flow message types.
Custom module developers must write serializers and deserializers for custom message types if you want the serialization and deserialization to be handled transparently by the system. These serializers and deserializers must implement the interfaces and must be registered with the edgeflow naming service (described in the Edgeflow API Overview section).
For example, an External Sender will try to find a serializer for any message type that it receives by looking at the serializers registered with the system.
The following interfaces are defined:
Edgeflow modules may accept XML or other messages from outside the edgeflow system. These messages must be converted to the corresponding Java type before they are sent to the modules. Classes that convert messages from their over-the-wire format to the Java types must implement the MessageDeserializer interfaces.
Edge flow messages can be sent externally (via HTTP or JMS, for example). The messages will be serialized to their XML or other over-the-wire format, before they are sent outside. Classes that serialize the Java types must implement the MessageSerializer interfaces.
The Config sub-package defines constants for the dynamic set types handled by the edgeflow framework. You should use the interface and class in this package when creating configuration parameters whose values come from a dynamically computed set.
For example, the DynamicSetConstants.DynamicSetID.LOGICAL_READER constant should be used as the set ID for a parameter whose value must be one of the logical readers defined in the system.
The following interface and class are defined:
The interface for an edgeflow module and its properties as required by the edgeflow engine is defined here. These interfaces are used by the edgeflow engine to create a module instance or to get to an input port of a module and send a message to it.
| Note: | You do not need to implement these interfaces. Implementations are provided for your convenience in the com.bea.rfid.edge.toolkit.workflow package. |
The following interfaces are defined in this package:
This package defines a set of abstract classes and utility classes to assist in writing custom modules. The modules provided with the Edge Server installation are implemented using these classes.
The following classes are provided:
This package defines a set of Java classes that do not rely on any edgeflow framework classes. Many of the modules provided with the Edge Server installation use these POJO classes. These classes isolate the core tasks of the module from the edgeflow framework. This means that if a custom module is to be written that behaves slightly differently from a standard module, it can be done easily by making use of these Java classes. Similarly, these classes make it easy to create similar modules in some other workflow framework outside of the Edge Server.
Three sub-packages are provided:
The object and aggregation event generators include Java classes that generate EPCIS Object or Aggregation events for tag read inputs.
The following classes are provided:
This is the Java class for programming tags. The following interface and class are provided:
The following interfaces and classes are defined:
The RFID Edge Server 3.0 software includes a custom module sample in the following directory: EDGE_SERVER_HOME\samples\EdgeFlows\CustomModules
The sample includes Java files that demonstrate how to write custom modules. These files include:
All of the source code for the example is provided.
Use the following steps to build and deploy the sample modules:
The Edge Server Administration Console should now list the custom modules, with names that begin with "Sample".


|