| Download Docs | Site Map | Glossary | |
|
|
|||
| bea.com | products | dev2dev | support | askBEA |
|
|
|
||||||||
| e-docs > WebLogic Platform > Tour of the WebLogic Platform Sample Application > Avitek Purchasing Agents Connect with Suppliers |
|
Tour of the WebLogic Platform Sample Application
|
Avitek Purchasing Agents Connect with Suppliers
The business-to-business (B2B) portal tour describes a fictitious intranet site that Avitek purchasing agents use to get quotes from suppliers, and to submit purchase orders and get acknowledgements from suppliers. The business processes are managed by WebLogic Integration.
Note: The information that is presented in this online book is also available in a context-sensitive tour guide portlet that runs as part of the application.
This business-to-business (B2B) portal tour contains the following sections:
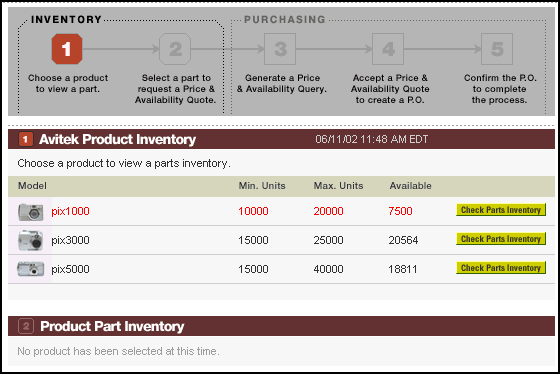
The B2B portal sample application starts on the Avitek intranet's Inventory page. A graphic, processStep1.gif, has been loaded to help logged-in user Jason Tang understand the sequence of steps in this process. If this is your initial visit to the page, the Product Inventory portlet contains preloaded data for some of the products sold by Avitek. If the inventory for any product is below its minimum level, the data is shown in red.
Technical Details for the Product Inventory Portlet
This section provides details about the processing that occurs on this page.
The b2bPortal is a sample business-to-business site used by the fictitious company Avitek Digital Imaging. Avitek purchasing agents use the site to get quotes for parts from external suppliers, and to submit purchase orders.
The b2bPortal is part of the e2eApp enterprise application. The enterprise application's name includes e2e an abbreviation for "end-to-end," meaning a sample that shows a full range of key features in WebLogic Platform.
On this Inventory page, the Product Inventory portlet contains preloaded data for some of the products sold by Avitek. If the inventory for any product is below its minimum level, the data is shown in red. To get current inventory levels, an Inventory table in the database has been accessed in read-only mode via the Application Integration (AI) framework. The AI framework is provided by WebLogic Integration.
In our sample scenario, Avitek Digital Imaging wanted to reduce costs by making its supply chain more efficient through automation, compressed cycle times, and lower inventory levels. To track and replenish inventory levels, Avitek implemented a business-to-businesses solution with a portal user interface for sell-side B2B exchanges, partner collaboration, and supply chain management.
If you have used the business-to-consumer b2cPortal portal in this sample application, you know that the Technical Details sections included explanations about the portlets and Webflow processing. Although they are still integral parts of this b2bPortal, the explanations in this part of the sample tour focus more on the supply-chain solution implemented for Avitek purchasing agents. This section, however, covers some portlet and Webflow details.
This WebLogic Platform b2bPortal sample scenario involves three business partners: a buyer (Avitek Digital Imaging) and two suppliers. For each business partner, a trading partner is configured in the BulkLoaderData.xml file. The following trading partners are defined for the sample: E2E_Buyer, E2E_SupplierOne, and E2E_SupplierTwo.
Because these trading partners communicate using the XOCP business protocol, Avitek must define its WebLogic Integration system as a hub-and-spoke configuration. To that end, the BulkLoaderData.xml file defines a fourth trading partner: E2E_Hub. (See the topic Getting Started with B2B Integration in the document Introducing B2B Integration for details about configuring B2B integration.)
The E2E_Hub trading partner acts as an intermediary. It is responsible for mediating messages between the spoke trading partners: E2E_Buyer, E2E_SupplierOne, and E2E_SupplierTwo. The E2E_Hub trading partner is not the sender or receiver of a business message, but it acts as the proxy buyer and proxy supplier, at different times during the transaction.
Each of the three trading partners—E2E_Buyer, E2E_SupplierOne, and E2E_SupplierTwo—has a collaboration agreement with the E2E_Hub trading partner. The E2E_Hub trading partner is responsible for linking collaboration agreements. Such linking is essential, for example, when a message arrives as part of one collaboration agreement and must be routed to another trading partner as part of another collaboration agreement. Collaboration agreements that use the same delivery channel—the channel defined for the E2E_Hub trading partner—are linked.
Each trading partner element is characterized by various attributes and subelements, some of which contain simple identification information, such as name, e-mail, phone, and fax.
The following table summarizes the role of each trading partner.
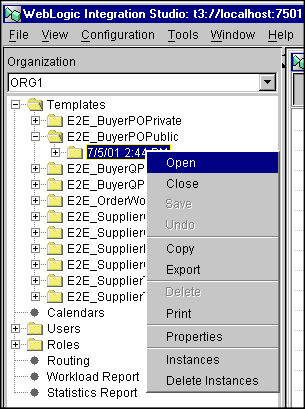
Using the WebLogic Integration Studio
The WebLogic Integration Studio allows you to design new workflows and monitor running workflows using a familiar flowchart paradigm. You are not required to run the Studio when you run this b2bPortal sample, but you may find it useful for viewing the details of any workflow or workflow node, and for learning how nodes are defined and configured for this sample. You can also use the Studio to monitor the workflows as you run the sample.
On a Windows system, choose Start
Viewing Workflow Templates in the Studio
To view a workflow template and its properties in the Studio, complete the following steps:
weblogic700\samples\integration\samples\e2e\workflows
Double-click any node in the Studio to display the Properties dialog box for that node. See Using the WebLogic Integration Studio in the WebLogic Integration documentation for complete details about the Studio tools and functionality.
Business Process and Workflow Modeling
This section presents a brief introduction to the business process management (BPM) functionality provided by WebLogic Integration.
Workflows that implement the roles assigned to trading partners in a conversation definition are referred to as collaborative workflows.
A workflow template represents a workflow, and combines various workflow template definitions (versions) of its implementation. Workflow templates are designed and edited in the WebLogic Integration Studio. Several BPM plug-ins extend the functionality of the Studio:
In this sample scenario, trading partners implement both private and collaborative workflows. Private workflows work in conjunction with the collaborative workflows, and implement local processes for the trading partners. Local and private processes are not necessarily dictated by the conversation definition. For example, when a trading partner starts a conversation, that trading partner's private workflow can start the collaborative workflow to initiate the conversation.
Please see the WebLogic Integration documentation for complete descriptions. In this sample, the Technical Details sections for subsequent portal pages will describe the two business processes implemented by this sample application: Query Price and Availability (QPA) and Purchase Order (PO).
The Inventory page is one of three tabbed pages in the b2bPortal. In the BEA_HOME directory where you installed WebLogic Platform, you will find the files that comprise the e2eApp in the following locations:
weblogic700\samples\platform\e2eDomain\beaApps\e2eApp\...
weblogic700\samples\platform\e2eDomain\beaApps\e2eApp-project\...
This Inventory page can include the following portlets:
All of the portlets that comprise the Inventory page are identified in the following file:
weblogic700\samples\platform\e2eDomain\beaApps\e2eApp-project
\application-sync\webapps\b2bPortal\b2bPortal.portal
<page-name>Inventory</page-name>
...
	<portlet-pool>
		<portlet-name>login</portlet-name>
		<portlet-name>partinventory</portlet-name>
		<portlet-name>productinventory</portlet-name>
		<portlet-name>purchasingprocess</portlet-name>
		<portlet-name>b2b-tourguide</portlet-name>
		<portlet-name>debug</portlet-name>
		<portlet-name>anonUser</portlet-name>
	</portlet-pool>
During the development cycle, these portlets were added to the Inventory page using the E-Business Control Center. The EBCC is a Java client-based tool suite. It provides graphical interfaces that simplify complex tasks such as rule definitions, Webflow editing, and portal creation and management. As users of the E-Business Control Center work with its point-and-click interface, it generates XML files that are synchronized with the server. In addition to the EBCC, the browser-based Portal Administration tools were used for administering and managing the portal at runtime.
Portal developers are primarily interested in the portlet JSP code before it was rendered by the browser. That's why the code fragments in this section, and the View Code link, describe and show you the pre-rendered JSP file for a particular portlet.
You can find the b2bPortal's portlet JSP files in:
weblogic700\samples\platform\e2eDomain\beaApps\e2eApp\b2bPortal
\portlets\...
For this Inventory page, the View Code link opens the source for the \productinventory\content.jsp portlet file. It presents the Avitek Product Inventory (1) portlet. This content.jsp resides in the productinventory subdirectory under the path shown above.
Outline of Initial Portal Processing
When you started the sample application, what happened that resulted in the server startup and then the initial display of the Introduction or "splash" page? First, there were several ways you could have invoked the sample application, such as from the WebLogic Platform Quick Start Application or directly by running a startE2E script.
Regardless of which option you used, the startE2E.bat (Windows) or startE2E.sh (UNIX) script was invoked. It started a WebLogic Server instance for the application, which runs in a domain named e2eDomain. The word "domain" has many meanings in the computing industry. BEA products use domain to mean a collection of servers, services, interfaces, machines, and associated resource managers, all defined by a single configuration file.
When the startE2E script runs, it reads configuration information from the enterprise application's config.xml file. By default this configuration file resides in the following BEA_HOME installed directory:
weblogic700/samples/platform/e2eApp/config
The config.xml file includes the following definition, setting splashPage as the default Web application in the domain:
<WebServer
	DefaultWebApp="splashPage"
	LogFileName="./logs/access.log"
	LoggingEnabled="true"
	Name="e2eServer"
	/>
With the e2eServer running, specifying a URL such as http://localhost:7501 in a browser results in running the splashPage Web application (or "webapp") in:
weblogic700\samples\platform\e2eDomain\beaApps\e2eApp\splashPage
The splashPage webapp's web.xml configuration file designated index.jsp in the <welcome-file-list> definition. This web.xml resides in:
weblogic700\samples\platform\e2eDomain\beaApps\e2eApp\splashPage\WEB-INF
On the splash page, you clicked the "AUTO LOGIN as purchasing agent Jason Tang" button graphic to arrive on this Inventory page. That resulted in the splash page passing in the URL for the portal application, plus predefined login credentials.
The splash page sets up requests that allow you to automatically log into the b2bPortal or b2cPortal. This is done to help simplify this sample application. You would not want to embed usernames and passwords in a JSP page.
The form results in opening the URL constructed as:
<%
	String b2bUrl = "http://" +
		request.getServerName() + ":" +
		request.getServerPort() + "/" +
		B2B_PORTAL_NAME + "/application";
...
For this WebLogic Platform sample application, we elected to automatically log in an existing user, in order to focus the sample on the most important features. WebLogic Portal provides other samples that demonstrate login authentication code, plus techniques to gather demographic information via Web applications. For details, please refer to the WebLogic Portal Developer Guide.
Once the URL was passed to the browser for the b2bPortal application, why was the Inventory page the first page displayed? This property was set in the WebLogic Portal Administration Tools. In the Portal Management section of that tool, under Pages and Portlets, we set the b2bPortal's default page on the Select and Order Pages screen. This value is stored in the database, in the INDEX_NUMBER column of the PORTAL_PAGE_P13N table.
When a customer clicks a link or button on a JSP, it is considered an event. Events trigger particular responses in the default Webflow that allow customers to continue. While this response can be to load another JSP, it is usually the case that an Input Processor and/or Pipeline is invoked first.
When you are on a Purchasing or Order History page and then click the Inventory tab, you will notice a resulting URL similar to the following (shown here on several lines to improve readability).
http://<host>/<port>/b2bPortal/application?
origin=hnav_bar.jsp&event=bea.portal.framework.internal.refresh
&pageid=Inventory
The refresh event causes any page to be displayed again with the latest data. The Avitek Product Inventory portlet has its data refreshed.
The page tabs are provided via the hnav_bar.jsp file, which resides in:
weblogic700\samples\platform\e2eDomain\beaApps\e2eApp\b2bPortal
\framework
The hnav_bar.jsp file imports two JSP Tag libraries:
<%@ taglib uri="webflow.tld" prefix="wf" %>
<%@ taglib uri="portal.tld" prefix="ptl" %>
When you click the Inventory tab from another page in the application, the hnav_bar.jsp uses the following JSP tag in the link for the target tab:
<a href="<ptl:createPortalPageChangeURL
pageName='<%= portalPageName %>'/>"><%=portalPageName%></a>
The (portal) ptl:createPortalPageChangeURL JSP tag generates a webflow URL for a page change event.
Dynamic Portlet Display and Inventory Checks Via WebLogic Integration AI
On the Inventory page, let's look at one of the dynamic portlets, \productinventory\content.jsp, shown as #2, "Avitek Product Inventory" on the Inventory page.
The webflow namespace file for this portlet is:
weblogic700\samples\platform\e2eDomain\beaApps\e2eApp-project\app
lication-sync\webapps\b2bPortal\product.wf
<presentation-origin node-name="product" node-type="jsp">
	<node-processor-info page-name="content.jsp"
	page-relative-path="/portlets/productinventory"/>
</presentation-origin>
The content.jsp file is located in:
weblogic700\samples\platform\e2eDomain\beaApps\e2eApp\b2bPortal
\portlets\productinventory\content.jsp
The content.jsp file includes the following import statement:
<%@ page import="examples.e2e.common.Inventory" %>
In a scriptlet in content.jsp, we iterate through the product data in the database to get current inventory levels. When levels are below the defined minimum, we use a CSS_INV_BELOW_MIN setting from the CSS file, displaying the inventory problem in red. For example:
<%
	Iterator it = rState.getProducts().iterator();
	Inventory prod = null;
	String rowCssClass = null;
	String extraParams = null;
	int i = 0;
	for ( ; it.hasNext(); i++ ) {
	prod = (Inventory) it.next();
	if ( prod.isBelowMinimum() ) {
		rowCssClass = CSS_INV_BELOW_MIN;
	}
	else {
		rowCssClass = CSS_PRODUCT_ROW;
	}
	extraParams = PRODUCT_PARAM_EQUALS + prod.id();
	// skip the row divider the first time through
	if ( i != 0 ) {
%>
For the b2cPortal and this b2bPortal application, we created a service provider interface (SPI) named InventoryProvider. It is implemented as a stateless session EJB and has three methods:
The InventoryProvider SPI is common between the b2bPortal and b2cPortal. Its source files are in the following location:
weblogic700\samples\platform\e2eDomain\beaApps\e2eApp\src\examples\e2e\common\inventory\spi\*.java
For the b2bPortal, the inventory check is implemented by:
The Java source files for these programs are in the following location:
weblogic700\samples\platform\e2eDomain\beaApps\e2eApp\src\examples\e2e\common\inventory\ref\*.java
These programs use the getProductInventory() and getProductPartInventory() methods provided in the EJB. To simplify this sample application, when using the getProductInventory( List SKUs ) method, the List of SKUs will be hardcoded in the pipeline component.
In the productinventory\content.jsp portlet, we then display the data returned. For example:
<!-- model number -->
	<td width="187" class="<%= rowCssClass %>"><%= prod.id() %></td>
<!-- minimum # of units -->
	<td width="75" class="<%= rowCssClass %>"><%= prod.min() %></td>
<!-- maximum # of units -->
	<td width="75" class="<%= rowCssClass %>"><%= prod.max() %></td>
<!-- available # of units -->
	<td width="67" class="<%= rowCssClass %>"><%= prod.available() %></td>
To continue the tour, click the Check Parts Inventory button for the pix1000 camera.
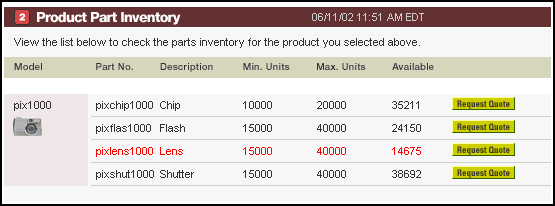
The Product Parts Inventory Portlet
You may need to scroll down to see all of the Product Part Inventory portlet (Step 2), which lists the parts that comprise the Avitek product you selected in Step 1. Inventory levels are shown for each part. Data for any individual parts that are below minimum inventory levels are shown in red.
Technical Details for the Product Parts Inventory Portlet
The processing for the Product Part Inventory portlet, Step 2 in our inventory process, is similar to the Product Inventory portlet. If the inventory for any product part is below its minimum level, the data is shown in red. To get current inventory levels, an Inventory table in the database has been accessed in read-only mode via the Application Integration (AI) framework. The AI framework is provided by WebLogic Integration. In this case, the getProductPartInventory() method provided by the InventoryProvider SPI was used.
Product Part Inventory Check Via WebLogic Integration AI
On the Inventory page, let's look at one of the dynamic portlets, \partinventory\content2.jsp, shown as #2, "Avitek Product Inventory" on the Inventory page. The content2.jsp file is active after a product was selected in the Product Inventory portlet. (The \partinventory\content.jsp portlet is the inactive version, used when no product has been selected yet on the Inventory page.)
The webflow namespace file for this portlet is:
weblogic700\samples\platform\e2eDomain\beaApps\e2eApp-project
\application-sync\webapps\b2bPortal\part.wf
<presentation-origin node-name="product" node-type="jsp">
	<node-processor-info page-name="content2.jsp"
	page-relative-path="/portlets/productinventory"/>
</presentation-origin>
The content2.jsp file is located in:
weblogic700\samples\platform\e2eDomain\beaApps\e2eApp\b2bPortal
\portlets\partinventory\content2.jsp
The content2.jsp file includes the following import statement:
<%@ page import="examples.e2e.common.Inventory" %>
In a scriptlet in content2.jsp, we iterate through the product and part data in the database to get current inventory levels. When levels are below the defined minimum, we use a CSS_INV_BELOW_MIN setting from the CSS file, displaying the inventory problem in red. For example:
<%
	String rowCssClass = null;;
	String extraParams = null;
	int i = 0;
	for ( ; parts.hasNext(); i++ ) {
part = (Inventory) parts.next();
		if ( part.isBelowMinimum() ) {
			rowCssClass = CSS_INV_BELOW_MIN;
		}
		else {
rowCssClass = CSS_PART_ROW;
}
extraParams = PART_PARAM_EQUALS + part.id();
%>
For the b2cPortal and this b2bPortal application, we created a service provider interface (SPI) named InventoryProvider. It is implemented as a stateless session EJB and has three methods:
The InventoryProvider SPI is common between the b2bPortal and b2cPortal. Its source files are in the following location:
weblogic700\samples\platform\e2eDomain\beaApps\e2eApp\src\examples\e2e\common\inventory\spi\*.java
For the b2bPortal, the inventory check is implemented by:
The Java source files for these programs are in the following location:
weblogic700\samples\platform\e2eDomain\beaApps\e2eApp\src\examples\e2e\common\inventory\ref\*.java
These programs use the getProductInventory() and getProductPartInventory() methods provided in the EJB. To simplify this sample application, when using the getProductInventory( List SKUs ) method, the List of SKUs will be hardcoded in the pipeline component.
In the partinventory\content2.jsp portlet, we then display the data returned. For example:
<td class="<%= rowCssClass %>" width="64"><%= part.id() %></td>
<td class="<%= rowCssClass %>" width="83"><%= part.description() %></td>
<td class="<%= rowCssClass %>" width="74"><%= part.min() %></td>
<td class="<%= rowCssClass %>" width="75"><%= part.max() %></td>
<td class="<%= rowCssClass %>" width="60"><%= part.available() %></td>
To continue the tour, in the #2 Product Part Inventory portlet, click the Request Quote button next to a part that is shown in red.
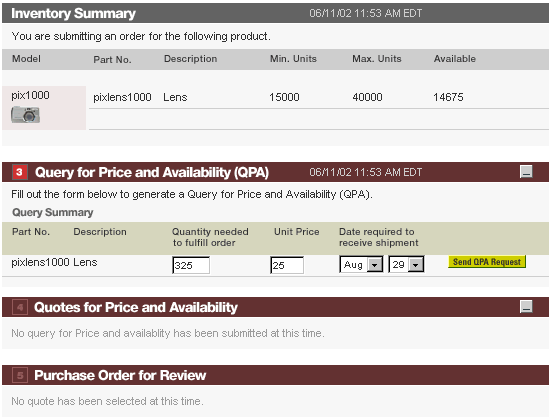
The Query for Price and Availability Portlet
You may need to scroll down to see the Query for Price and Availability (QPA) portlet (Step 3). It provides a form to generate a QPA. To make it easier for the purchasing agent to focus on data needed for the QPA request, the Product Inventory and Product Part Inventory portlets have been replaced by an Inventory Summary portlet. Be sure to see the Next Steps section below for information about filling in the requested input on this form.
Technical Details for the Query for Price and Availability Portlet
The Query for Price and Availability (QPA) portlet simply provides a form to generate a QPA. The QPA business process, which starts when you click the Send QPA Request button on this Step 3 portlet, is described in the section The Quotes for Price and Availability Portlet, and the QPA Business Process.
On this Query for Price and Availability portlet, to make it easier for the purchasing agent to focus on data needed for the QPA request, the Product Inventory and Product Part Inventory portlets have been replaced by an Inventory Summary portlet.
When you return to the sample application, be sure to follow the advice in the Next Steps section of the Tour Guide. It is worth repeating here.
On this Query for Price and Availability portlet:
Then click the Send QPA Request button.
If you see the following errors, enter the values again, and then click the Send QPA Request button:
If you have not already done so, enter the quantity needed to fulfill the order. Then enter a unit price for the product part; for example, enter 50. Also enter the date that is required to receive the shipment; for example, enter a date one week from today. Then click the Send QPA Request button to continue the tour.
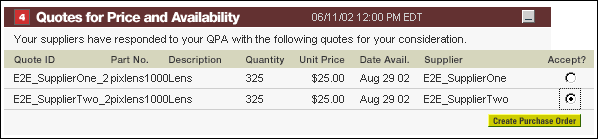
The Quotes for Price and Availability Portlet, and the QPA Business Process
Initially the Step 4 portlet, Quotes for Price and Availability, presents a message that it may take some time to get quotes back from suppliers.
After you select the Check for Quotes button one or more times, the portlet will eventually be refreshed with quotes from suppliers. This processing demonstrates integration between the portal framework in WebLogic Portal and the business-to-business interaction managed by WebLogic Integration.
Technical Details for the QPA Business Process
This section focuses on the Query for Price and Availability (QPA) business process, which was started when you clicked the Send QPA Request button on the prior Step 3 portlet.
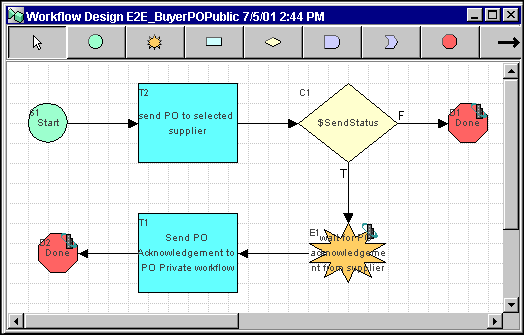
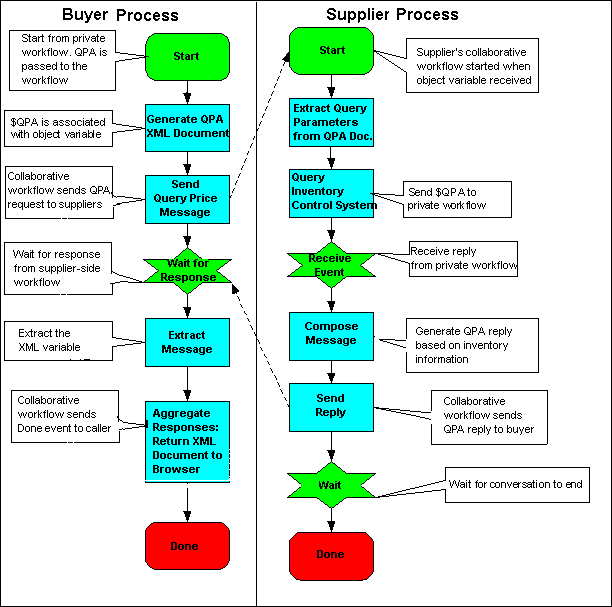
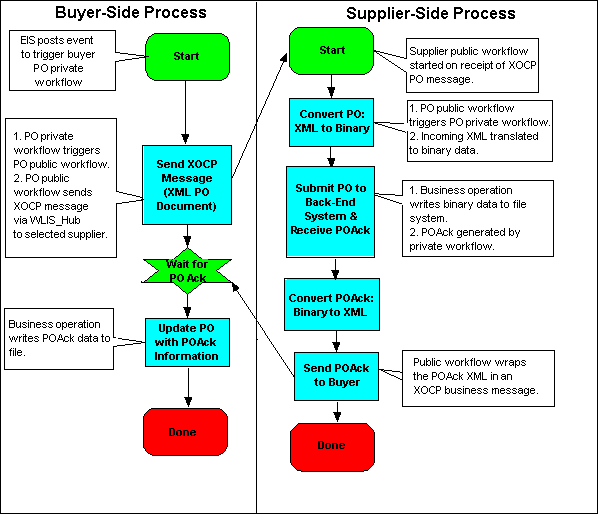
Due to the shortage of the pixlens1000 part for the pix1000 camera, the Avitek purchasing agent sent a QPA message for this part to selected suppliers. The following diagram illustrates the flow of events for the QPA business process:
Process Flow in the QPA Business Process
The following sequence summarizes the events illustrated in the preceding figure:
Note: The preceding figure shows a high-level view of the QPA business process. Each side of the process is implemented by a public (collaborative) and a private workflow.
The workflow templates listed in the following table are used in this sample's QPA process.
|
Note: Both suppliers in the scenario use the same public workflow. |
||
WebLogic Integration manages the business conversations and collaboration agreements between business partners, and it automates the business message exchange between the buyer and suppliers. The workflows are referenced in the collaboration agreements and conversations.
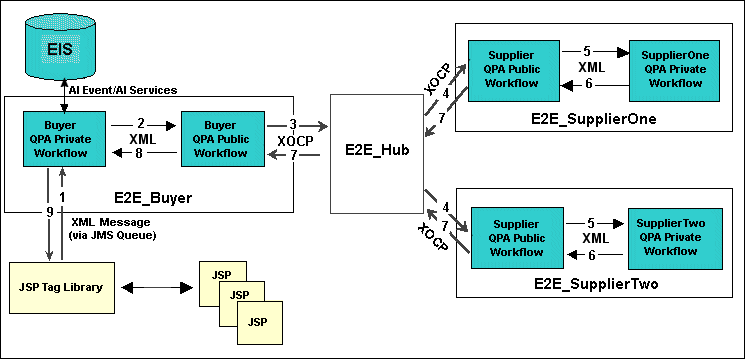
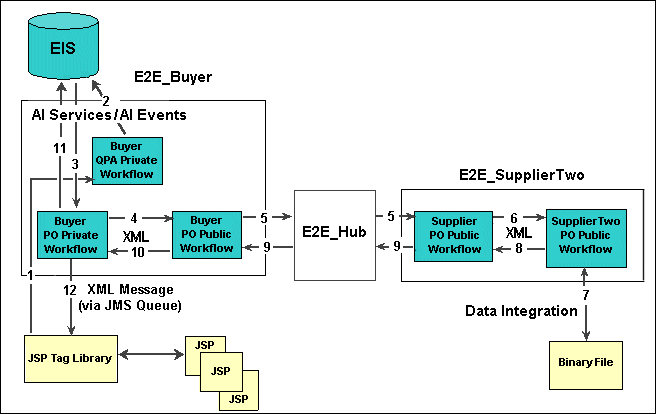
This sample uses JSPs and JSP tag libraries to initiate the QPA process and display QPA request and response data. The following figure illustrates the data flow among the trading partners involved in the QPA business transaction.
Data Flow in the QPA Business Process
The following sequence of events summarizes the data flow among trading partners and workflows:
Note that the E2E_Hub trading partner acts as a routing proxy for E2E_Buyer. When the supplier trading partners send response messages to E2E_Hub (based on collaboration agreements between E2E_Hub and each supplier trading partner), E2E_Hub acts as the proxy buyer.
E2E_Hub then changes roles to that of proxy supplier, and routes the response messages to the buyer (E2E_Buyer), based on the collaboration agreement between E2E_Hub and E2E_Buyer.
For more detailed information about this process, see the WebLogic Integration documentation.
On the Quotes for Price and Availability portlet, if you have not received quotes back from the suppliers yet, click the Check for Quotes button again. When quotes have been returned, accept one of the quotes and then click the Create Purchase Order button to continue the tour.
The Purchase Order for Review Portlet and PO Business Process
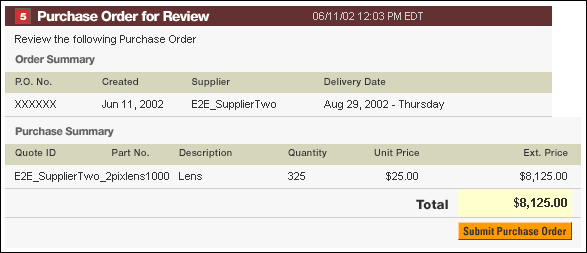
You may need to scroll down to see the Purchase Order for Review portlet (Step 5). It lists an order summary and purchase summary.
Technical Details for the PO Business Process
This section focuses on the Purchase Order business process, which will start once you (acting as an Avitek purchasing agent) click the Submit Purchase Order button on the Purchase Order for Review portlet. It lists an order summary and purchase summary.
Process Flow in the Purchase Order Business Process
The following sequence summarizes the events illustrated in the preceding figure:
Note: The preceding figure shows a high-level view of the PO business process. Each side of the process is implemented by a public and a private workflow.
The workflow templates listed in the following table are used in this sample's QPA process.
|
Note: Both suppliers in the scenario use the same public workflow. |
||
The PO implementation for this sample requires WebLogic Integration support for application integration, data integration, and management of business processes. This section describes the PO workflows, including their integration with back-end applications and heterogeneous data formats.
The following figure illustrates the data flow among the trading partners involved in the PO business process.
Data Flow in the PO Business Process
The following sequence of events summarizes the data flow among trading partners, workflows, and back-end systems:
The E2E_BuyerQPAPrivate workflow invokes the insertPO service on the E2EAppView.sav application view to insert the PO information into the Enterprise Information System (EIS). The EIS is simulated by an RDBMS in this sample. (The E2EAppView.sav application view, together with its services and events, is configured and deployed in WebLogic Integration when you set up the sample.)
For more detailed information about this process, see the WebLogic Integration documentation.
To continue the tour, click the Submit Purchase Order button to send the purchase order to the supplier.
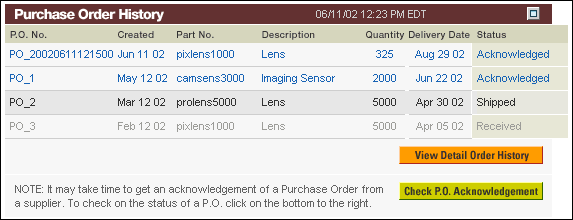
The Purchase Order History Portlet
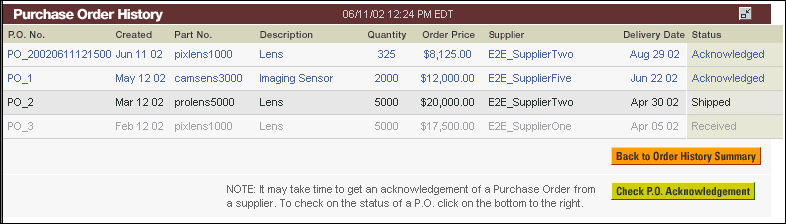
The Order History page initially presents a summary view of the Purchase Order History portlet. The sample application's data includes a few existing purchase orders. A more detailed view of the same portlet is available by clicking the View Detail Order History button.
You can click the Check P.O. Acknowledgement button to check for acknowledgements back from suppliers on the purchase order. Initially your screen might look similar to the following:
After clicking the Check P.O. Acknowledgement button a few minutes later, the following screen shows an updated view with our purchase order and its delivery date of August 29, 2002.
Technical Details for the Purchase Order History Portlet
The Purchase Order History portlet on this Order History page displays the Acknowledged, Shipped, or Received status and related information for each purchase order (P.O.). A P.O. that you just submitted might not be shown in this portlet until the acknowledgement has been received back from the supplier and you clicked the Check P.O. Acknowledgement button.
If you just submitted a purchase order and it is not yet listed in the Purchase Order History portlet (its status is pending), click the Check P.O. Acknowledgement button.
Receiving the acknowledgement back from the supplier is, at a high level, the next to last step in the Purchase Order business process. The final step is for the buyer (Avitek) to update the P.O. information based on the P.O. acknowledgement. This Purchase Order business process is illustrated and described in the Technical Details section for the Purchase Order Review portlet.
On this Order History page, you can also click the View Detail Order History button to see more details about purchase orders and their status. On the detailed view of the portlet, you can click the Check P.O. Acknowledgement button to check the status. If it is still pending, the portlet returns the message: "No acknowledgement has been received for your purchase order."
On the detailed Purchase Order History portlet, click the Back to Order History Summary button to return to this view of the portlet.
Final Step for the B2B Portal Tour
This concludes the B2B tour. In the online tour, you can click the Logout button to return to the sample's Introduction page. Note that when you log out, any purchase orders you placed in this session are not stored in the database. That is, the inventory levels are reset to their original values when you log back in as Jason Tang.

|

|

|