

|
|
|
|
|
|
Integrating eAM with Crossplex
BEA eLink for Mainframe products use Intersystem Communications Distributed Program Link to access CICS applications passing a COMMAREA in the buffer between the ATMI platform and the CICS application. Applications need to be architected to separate the business logic from the presentation logic. The ATMI application will "fill in" the required information that was once done by the CICS 3270 terminal input and link to the program defined in the eAM configuration file. The eAM software also has the ability to support conversations (DTP). All products are bidirectional, also supporting requests originating from CICS or IMS.
Integrating eAM with CrossPlex by SofTouch allows you to address the following concerns:
The eAM gateway can be easily configured to link (DPL) to CrossPlex instead of the original intended application, passing CrossPlex all control information necessary to dynamically initiate the CICS transaction through a FEPI virtual terminal defined by CrosssPlex. This scenario requires no host code modification.
CrossPlex Architecture
CrossPlex offers a complete development and runtime tool kit for re-engineering host-based applications, quickly transforming them into applications for today's technology. CrossPlex leverages applications that already work, eliminating the risk and expense of re-programming. CrossPlex offers the following features:
With CrossPlex, traditional systems can be converted to web applications, Java applications, or simply integrate existing online systems with distributed environments. These applications, referred to as legacy, work extremely well. Their only drawback is the customer interface. Users may need to pass through as many as 17 different screens to activate a transaction. CrossPlex allows you to take these screens, convert them into one HTML or Java screen, and point and click.
CrossPlex provides definition tools to capture screen datastreams and create CrossPlex Object Definitions. These object definitions are used in script creation and execution. They define the 3270 datastream.
A Command Stream or script is a navigation path and data extraction directive for existing applications. This method is used when eAM makes a request that requires information contained on several application screens. A single request sent to CrossPlex invokes several 3270 transactions through the use of a script and collects the information to fulfill the front-end request (referred to as "many-to-one").
For example, an existing 3270 type on-line application may start with a menu screen, followed by a screen which accepts the input of a client key, which is followed by a series of three screens that are invoked by PF keys, each displaying specific information about the client. Using the command stream method, CrossPlex processes all the interactions of the on-line application and gathers all information in the process. Only one complete data packet is sent to eAM.
The CrossPlex Visual Application Developer (VAD) is a Java application that allows you to create and maintain CrossPlex command streams. Visual Application Developer starts with a recorded queue of legacy 3270 screen objects and provides the capability to create a CrossPlex Script from these screen objects using a user-friendly GUI interface.
The Visual Application Developer allows the developer to visually see the flow of a series of 3270 transactions that will be driven by a script. The developer views the 3270 transaction flow, selects fields to be captured or used for subsequent input, adds any required conditional logic, or comments, and then requests VAD to generate a completed script, which is saved on the mainframe.
The end result is an executable CrossPlex command stream, ready for testing. This generated script can be reloaded with VAD for changes and alterations, or it can be edited with the 3270-based script editor.
CrossPlex also offers advantages that involve 3270 transaction execution. With CrossPlex, all 3270 transactions execute data transmissions "in memory." No network communication is involved while the 3270 application is operating, no matter how many transactions are executed. The only transmission on the network is the final result sent as a single response. The result is that network traffic and bandwidth usage is reduced with CrossPlex. The 3270 transactions respond to CrossPlex faster than they do when a user is executing them at a terminal.
This ability of CrossPlex to suppress network traffic is one reason the two-tiered approach is preferable to a three-tiered alternative. With a three-tiered solution, a server computer must communicate with the mainframe, individually executing 3270 transactions one at a time, transmitting each across the network to the server computer. With CrossPlex, all sending and receiving of 3270 datastreams is maintained on the mainframe, before anything is placed on the network or sent back to eAM.
The combination of eAM and CrossPlex enables customers to efficiently create, test, and deploy transactional e-business applications that can be scaled as business needs demand.
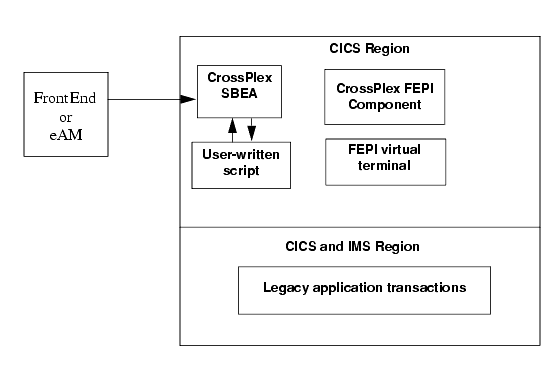
CrossPlex installs and operates on the OS/390 mainframe. It runs in a CICS region but has the ability to make VTAM connections to other systems, such as IMS. It makes this connections by creating a virtual terminal, using an IBM component of CICS called Front End Programming Interface (FEPI). Figure 8-1 illustrates the process.
Figure 7-1 CrossPlex Architecture
This section contains a scenario that shows how to develop an ATMI client that invokes a CrossPlex script on the mainframe. Similar techniques may be used to interface to other third-party products.
Note: Although the sample code in this section represents typical applications, it is intended for example only and is not supported for actual use.
Note: All discussions of ATMI files, functions, and documentation apply to Tuxedo, eLink Platform, and WebLogic Enterprise files, functions, and documentation.
The following tasks are required to invoke a CrossPlex script on the mainframe:
Task 1: Create a CrossPlex script.
A CrossPlex script provides the business logic to execute one or more 3270 transactions running on the mainframe. Transactions in any VTAM system, such as CICS or IMS, can be accessed. When a script executes in CrossPlex, it usually requires some input data, such as customer number, or part number. This inbound data is passed from the application in a container called a record definition.
During execution, a script will select and optionally reformat data from the screen displays of the executed 3270 transactions. This selected data will be returned to the application in an outbound record definition.
Note: Record definitions do not necessarily conform to any known data record in a file. A record definition is simply a description of a series of data fields being passed to and from a script.
Record definitions are created with the CrossPlex development system. An online editor is used to define each field in the record, along with its length and type (alpha, numeric, binary, packed). A single record definition may be used for both inbound and outbound data, or two definitions may be used.
Another of the CrossPlex development tools will create a COBOL copybook, using a record definition as input. The generated copybook is stored in a PDS member, where it can be copied into your application program as needed.
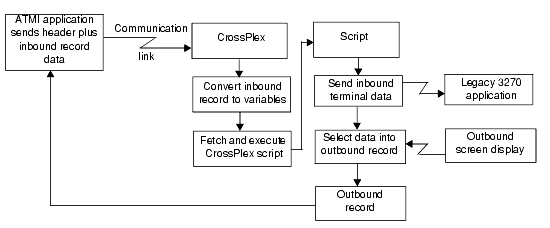
Figure 7-2 illustrates the processing flow from the eAM front end to retrieve data from one or more mainframe transactions.
Figure 7-2 Processing Flow from eAM to Mainframe Transactions
Step 1: Prepare Inbound Record Definition
Assign a record name and description, then define each data field to be passed to the CrossPlex script. The process of defining a record definition is described in detail in the CrossPlex Middleware Programmer's Guide.
To illustrate, assume the mainframe application is a simple name/address display, which requires a customer number and company number as input. For this example, the inbound and outbound record definition will be different, though the same record definition can be used for both. Figure 7-3 shows how the inbound record would appear.
Figure 7-3 Inbound record illustration
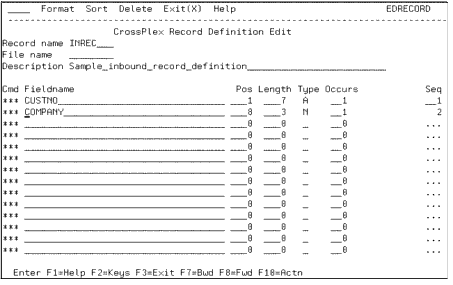
The inbound data required by the mainframe transaction is CUSTNO, a seven-byte alphanumeric field beginning in position one of the record, and COMPANY, a three-byte numeric field beginning in position eight.
Step 2: Create a Copybook of the Inbound Record Definition
Store the generated copybook in a PDS member where you can easily copy it to your development system. For a complete description of the process of creating a COBOL Copybook from a record definition, refer to the CrossPlex Middleware Programmer's Guide.
Continuing with the same example, a COBOL copybook generated from the previously illustrated record definition, INREC, would appear as follows:
*****************************************************************
*	INREC		- Sample inbound record definition		*
*****************************************************************
  01	INREC-START.
	05	INREC-CUSTNO		PIC X(007).
	05	INREC-COMPANY		PIC 9(003).
Step 3: Create an Outbound Record Definition and Copybook
If the outbound data is to use a different record format from the inbound, repeat steps 1 and 2 to prepare the outbound record definition and copybook.
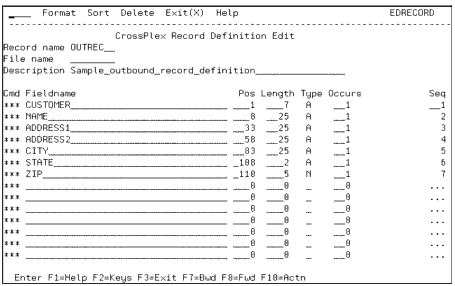
For this example, the outbound record definition and copybook would appear as in Figure 7-4.
Figure 7-4 Outbound Record Definition
*****************************************************************
*	OUTREC		- Sample outbound record definition		*
*****************************************************************
  01	OUTREC-START.
	05	OUTREC-CUSTOMER			PIC X(007).
	05	OUTREC-NAME			PIC X(025).
	05	OUTREC-ADDRESS1			PIC X(025).
	05	OUTREC-ADDRESS2			PIC X(025).
	05	OUTREC-CITY			PIC X(025).
	05	OUTREC-STATE			PIC X(002).
	05	OUTREC-ZIP			PIC 9(005).
Step 4: Prepare the CrossPlex Script
Scripts can be coded using the CrossPlex script editor, or they may be coded on any external editor and imported into the CrossPlex control file. The CrossPlex script language and the process of creating a script are described in the CrossPlex Middleware Programmer's Guide.
Note: In the CrossPlex documentation, scripts are also known as command streams and stream objects.
Prepare a script that will navigate through a series of 3270 transactions in the same manner as a terminal operator. The script acts as a virtual operator, performing a log-on to the OLTP system, sending inbound terminal data as if keyed on a keyboard, examining the returned screen display for correct execution, and selecting data from the screen if needed. Any number of transactions may be executed. The script language also provides a method of linking to a user program on the mainframe in order to perform direct retrieval of data that may not be available in a 3270 transaction display.
Continuing with the example of name/address data retrieval, the script might appear as Listing 7-1.
Listing 7-1 CrossPlex Script
CALLCPX MSGAREA(NMAD)					Initiate transaction NMAD.
CALLCPX ROWCOL(05023) DATA(&CUSTNO)					Send CUSTNO to row 5 col 23.
IF ROWCOL(24021) EQ DATA(NOT ON FILE)-					Verify customer record found
	GOTO(NOTFOUND)
SELECT RECORD(OUTREC) -					Select data from outbound
	ROWCOL(05023) RFIELD(CUSTNO) -					screen into remaining
	ROWCOL(06023) RFIELD(NAME) -					record fields.
	ROWCOL(07023) RFIELD(ADDR1) -
	ROWCOL(08023) RFIELD(ADDR2) -
	ROWCOL(09023) RFIELD(CITY) -
	ROWCOL(10023) RFIELD(STATE) -
	ROWCOL(11023) RFIELD(ZIP)
GOTO(ENDJOB)					Skip following error routine
NOTFOUND					Enter if customer not found
	SELECT RECORD(OUTREC) -				Move zeros to customer number
		DATA(0000000) RFIELD(CUSTNO)
ENDJOB					Enter or fall through
	CALLCPX AID(PF3)				Terminate NMAD transaction
Note: This example illustrates row/column addressing of screen data. CrossPlex also provides a method of assigning screen field names to avoid specific row/column references
Step 5: Test and Debug the Script
You can fully test and debug the script that will execute on the mainframe without connecting it to your front-end application. CrossPlex provides a variety of execution and debugging tools to ensure the back-end portion of your application is operating properly.
Once you are satisfied that the script is doing what you want and the returned data is correct, proceed to prepare the front-end of your application and connect the two together.
The process of testing and debugging a script is described in the CrossPlex Middleware Programmer's Guide.
Handling the Mainframe Sign-on
Most VTAM systems require the user to sign-on in the target region when first connecting. This procedure is also true when connecting to a target region with CrossPlex. This sign-on requirement can be handled in any one of the following ways:
The most common situation, especially for CICS, requires that your script handle the sign-on. Many users have CICS configured so that upon the first connection, the terminal is presented with a sign-on panel that may have been customized for the installation. If this is the case, the first CALLCPX command of the script returns the sign-on screen to the script and a subsequent CALLCPX must send a valid user ID and password. The mainframe sign-in is discussed in the CrossPlex Middleware Programmer's Guide.
Supplying a valid user ID and password in the CrossPlex header will cause CrossPlex to perform a short-form sign-on before sending the first transaction data from the script.
Note: This method is valid for CICS systems only, and is installation dependent.
The short-form CICS sign-on may be disabled, depending on the user's CICS configuration. This is discussed in the CrossPlex Middleware Programmer's Guide.
With this technique, several FEPI virtual terminals are logged-on when CICS is first started and they remain active until CICS is recycled. If this is done, scripts do not need to be concerned with doing a sign-on at all. See the CrossPlex Web Enabling Guide for further discussion.
Task 2: Create a view definition that describes the application data.
This view definition will need to include both the CrossPlex header and your application data. It may be necessary to create two such views, one for the request data and the other for the response. In this example, the user data is all of type character and thus a combined view is usable. The following view file describes the CrossPlex header.
Listing 7-2 CrossPlex Standard Commarea (Tuxedo VIEW)
#
#    compiled using "viewc -n cpxview.v"
VIEW CPXVIEW
# type   cname      fbname  count   flag   size   null  comment
char   xpcmd      -       4       -      -      -
long   xpexcep    -       1       -      -      -
short  xpexrc     -       1       -      -      -
short  xpextl     -       1       -      -      -
short  xpexmsg    -       1       -      -      -
short  xpexmof    -       1       -      -      -
char   xpexxp1    -       4       -      -      -
long   xpexxp2    -       1       -      -      -
long   xpexxp3    -       1       -      -      -
long   xpoptpl    -       1       -      -      -
char   xptarg     -       8       -      -      -
char   xpfpool    -       8       -      -      -
char   xpaid      -       6       -      -      -
char   xpinsc     -       8       -      -      -
char   xpotsc     -       8       -      -      -
short  xpcrow     -       1       -      -      -
short  xpccol     -       1       -      -      -
char   xpuser     -       8       -      -      -
char   xppass     -       8       -      -      -
char   xpfnode    -       8       -      -      -
short  xpfconv    -       4       -      -      -
char   xpdbugq    -       8       -      -      -
char   xpassoc    -       8       -      -      -
char   xpmode     -       4       -      -      -
char   xpxlate    -       8       -      -      -
short  xpilng     -       1       -      -      -
short  xpalng     -       1       -      -      -
short  xpolng     -       1       -      -      -
char   xptermop   -       1       -      -      -
char   xpusd      -       1       -      -      -
short  xpusdwt    -       1       -      -      -
char   xpprofa    -       8       -      -      -
char   xpprofk    -       16      -      -      -
char   xpprog     -       8       -      -      -
short  xprows     -       1       -      -      -
short  xpcols     -       1       -      -      -
char   xpstrm     -       8       -      -      -
short  xptimot    -       1       -      -      -
char   xpxltyp    -       1       -      -      -
char   xpdbugs    -       1       -      -      -
long   xpmaptr    -       1       -      -      -
long   xpmalng    -       1       -      -      -
long   xpmdlng    -       1       -      -      -
char   xpmause    -       1       -      -      -
char   xprecnm    -       8       -      -      -
char   xpecho     -       1       -      -      -
char   xpctyp     -       1       -      -      -
char   reserved99 -       41      -      -      -
char   xpmarea    -       1000    -      -      -
END
In this view, the field named xpmarea is the generic character block that will contain the application data, and may be replaced with specific field definitions for your application.
Process this view with the view compiler using a command such as:
viewc -n cpxview.v
This command will produce a C header file, cpxview.h, that will be used to construct the client program.
Task 3: Code your client program.
The following sample program calls CrossPlex in CICS through eAM SNA. CrossPlex then executes several application transactions while gathering data from them. The data is then returned for this program to display.
Listing 7-3 CrossPlex MiddleWare Demo for eLink TCP using a Tuxedo View.
#include <stdio.h>
#include <string.h>
#include "atmi.h"    /* TUXEDO Header File */
#pragma pack(1)
#include "cpxview.h" /* Crosslex Header File (as generated by VIEWC)*/
#include "xplxc.h"   /* CrossPlex Header File (as distributed)      */
#include "mwdrec.h"  /* CrossPlex MiddleWare Demo Record Definition */

/* ====================================================================
* cpxError() - determine if CrossPlex returned an error condtion,
*    if so, return xpexcep after printing error message(s) to stderr
*    else,  return 0
*================================================================== */

int cpxError(struct CPXVIEW * xptr) {
	int i, j;
	int rc;

	rc = (int) xptr->xpexcep;  /* Get the exception code */
	if (rc == XPENTIO) {       /* if last screen was clear screen... */
		rc = 0;                 /* ...we don't care (for this usage)  */
	}
	if (rc) {
		fprintf(stderr, "CrossPlex Exception code %i\n", rc);
		if (rc <= CPXERRTBLCOUNT) {
			fprintf(stderr, "   %s\n", cpxerrtbl[rc]);
	}

	/* Print error messages returned from CrossPlex (if any) */
	j = xptr->xpolng;
	for (i = 0; j > 0 && i < 5; i++, j -= 72) {
		fprintf(stderr, "%.72s\n", &xptr->xpmarea[i*72]);
	}
			/* Display more information for XSCP errors */
			if (rc == XPECONX) {
				fprintf(stderr, "\nSupplemental messages:\n");
				fprintf(stderr, "   XSCP Function %.4s\n", xptr->xpexxp1);
				j = (int) xptr->xpexxp2;
				fprintf(stderr, "   XSCP EIBRESP   code %i\n", j);
				i = (int) xptr->xpexxp3;
				fprintf(stderr, "   XSCP EIBRESP2  code %i\n", i);

				/* Show descriptive message of common FEPI errors    */
				/* See the IBM CICS Library for FEPI EIBRESP2 values */
				if (j == 16) {          /* EIBRESP(16) = FEPI ERROR  */
					if (i == 30)
						fprintf(stderr, "   FEPI POOL %.8s is not known\n",
							xptr->xpfpool);
					else if (i == 32)
						fprintf(stderr, "   FEPI TARGET %.8s is not known\n",
							xptr->xptarg);
					else if (i == 213)
						fprintf(stderr, "   FEPI request timed out\n");
					else if (i == 215)
						fprintf(stderr, "   FEPI session lost\n");
				} /* end if FEPI Exception */
		} /* End if XSCP Exception */
	}/* end if rc */
	return rc;
} /* end cpxError() */

/* ********************************************************************
*  main()
******************************************************************* */
#if defined(__STDC__) || defined(__cplusplus)
main(int argc, char *argv[])
#else
main(argc, argv)
int argc;
char *argv[];
#endif
{
struct CPXVIEW * sbuf; // Pointer to XPCOMM send buffer
struct CPXVIEW * rbuf; // Pointer to XPCOMM receive buffer
XPCOMM xpcomm_init = {XPCOMM_INIT}; // To init. the storage area
MWDREC * mwdrec; // To address returned record
long rcvlen; // Length of data returned from tpcall()
int ret;
int i;
char c;
char* eLinkService = "CPXSTREAM";
/* Input parameter defaults */
char* target = "THISCICS";
char* fpool = "POOLM2";
char* cust = "S000001";
char* userid = "VIS01";
char* password = "VIS01";
char* debugQueue = " ";
char* debugSwitch = ""; // Normal Operation
// char* debugSwitch = "offline"; // for testing when eLink not available
/* ----------------------------------------------------------------
If help was requested, display it then exit
---------------------------------------------------------------- */
if (argc > 1) {
if (strcmp(argv[1], "?") == 0 ||
strcmp(argv[1], "-?") == 0 ||
strcmp(argv[1], "/?") == 0 )
{
fprintf(stdout, "Usage: mwdemo -c customer -t "\
"target -f pool -u userid -p password\n");
fprintf(stdout, "Defaults: mwdemo -c %s -t %s -f %s -u %s "\
"-p %s\n", cust, target, fpool, userid, password);
exit(1);
}
} /* end if input parameters are present */
/* ----------------------------------------------------------------
Parse input parameters to override the defaults
---------------------------------------------------------------- */
for (i=1; i < argc; i++) {
/* If this is a switch and there is a following parameter... */
if (argv[i][0] == '-' && strlen(argv[i]) == 2 && i != argc-1) {
c = tolower(argv[i][1]);
if (c == 't') { // CrossPlex FEPI Target
i++;
target = argv[i];
} else if (c == 'f') { // CrossPlex FEPI Pool
i++;
fpool = argv[i];
} else if (c == 'c') { // Customer Number
i++;
cust = argv[i];
} else if (c == 'd') { // Debug Queue Name
i++;
debugQueue = argv[i];
} else if (c == 'u') { // Userid
i++;
userid = argv[i];
} else if (c == 'p') { // Password
i++;
password = argv[i];
} else {
fprintf(stderr, "%s is not a valid switch\n", argv[i]);
exit(1);
}
} else {
fprintf(stderr, "Input parameter %s is not valid\n", argv[i]);
exit(1);
} /* end if this is a switch */
} /* end for */
fprintf(stdout, "Using: mwdemo -c %s -t %s -f %s -u %s -p %s\n",
cust, target, fpool, userid, password);
/* ----------------------------------------------------------------
Attach to System/T as a Client Process
---------------------------------------------------------------- */
if (strcmp(debugSwitch, "offline") != 0) {
if (tpinit((TPINIT *) NULL) == -1) {
fprintf(stderr, "Tpinit failed\n");
exit(1);
}
} /* end if not offline testing */
/* ----------------------------------------------------------------
Allocate request & response buffers
---------------------------------------------------------------- */
sbuf = (struct CPXVIEW*) tpalloc("VIEW", "CPXVIEW", sizeof(struct CPXVIEW));
if(sbuf == NULL) {
fprintf(stderr,"Error allocating send buffer of size %i\n",
sizeof(struct CPXVIEW));
tpterm();
exit(1);
}
if (sizeof(MWDREC) > sizeof(sbuf->xpmarea)) {
fprintf(stderr,"sizeof(MWDREC) exceeds sizeof(CPXVIEW->xpmarea)\n");
tpfree((char *) sbuf);
tpterm();
exit(1);
}
rbuf = (struct CPXVIEW*
Task 4: Configure eAM to talk to the CrossPlex installation on your mainframe.
BEA eLink Adapter for Mainframe must be configured to communicate with the CICS region that hosts your CrossPlex installation. Refer to the "Configuring the System" section for details of configuring eAM. Listing 7-4 is a fragment of an eAM DMCONFIG file that illustrates the remote service entries that are needed for this example. These entries must be modified to reference the actual local and remote domains in your configuration.
Listing 7-4 Sample DMCONFIG File Fragment
#------------------
*DM_REMOTE_SERVICES
CPXSTREAM AUTOTRAN=N
LDOM=LOCAL1
RDOM=REMOTE1
CONV=N
RNAME="CPXSTREAM"
INBUFTYPE="VIEW:CPXVIEW"
OUTBUFTYPE="VIEW:CPXVIEW"
CPXTEXT AUTOTRAN=N
LDOM=LOCAL1
RDOM=REMOTE1
CONV=N
RNAME="CPXTEXT"
INBUFTYPE="STRING"
OUTBUFTYPE="STRING"
Task 5: Use the Application
To use the application, complete the following steps:
Step 1: Start Your ATMI System.
Use the tmboot command to start the ATMI application containing the eAM gateway. Verify that the gateway starts successfully and that connection to your mainframe is established.
Step 2: Run the Client Program.
The syntax for invocation of the sample client program is:
mwdemo {options..}
In this argument, options may be defined in one or more of the following ways:
-c customer
Specifies the number of the customer to access from the mainframe application. -t target
Specifies the CrossPlex FEPI target to access. -f pool
Specifies the CrossPlex FEPI pool to access. -u userid
Specifies the user ID to use for mainframe access. -p password
Specifies the password to use for mainframe access. When the program runs successfully, it will print a report similar to the following example:
Consolidated Customer Inquiry
Customer Number: 1234567
Customer Name: Acme
Street Address: 123 Main St.
Main Address: PO Box 500
City, State Zip: Plano, TX 75093
Home Phone: 555-1234
Business Phone: 555-4321
Start date: 08/12/61
Initial Deposit: $ 5200.00
Total Amout due: $ 125.00Payment history for previous six months:
Month Amount Date Amount due
Jan 100.00 01/12/00 $ 625.00
Feb 100.00 02/10/00 $ 525.00
Mar 100.00 03/14/00 $ 425.00
Apr 100.00 04/12/00 $ 325.00
May 100.00 05/12/00 $ 225.00
Jun 100.00 06/13/00 $ 125.00


Copyright © 2001 BEA Systems, Inc. All rights reserved.
Required browser: Netscape 4.0 or higher, or Microsoft Internet Explorer 4.0 or higher.