Installation Locate
This section describes the standalone installation of BEA AquaLogic Service Registry and all settings.
To install the registry, type the following at a command prompt:
java -jar BEA-aqualogic-service-registry-2.0.jar
and follow the wizard panels. If you have associated javaw with *.jar files on Windows, just double-click the icon for the file BEA-aqualogic-service-registry-2.0.jar.
Command-line Options Locate
Installation may be launched with following optional arguments:
java -jar BEA-aqualogic-service-registry-2.0.jar [[--help] | [-h] | [--gui] | [-g]] [[-u configfile ] | [--use-config configfile ]] [[-s configfile ] | [--save-config configfile ]] [--debug]
-g | --gui starts the installation in gui mode (default).
-c | [--console] runs command-line installation
-h | [--help] shows help messages
-s configfile | --save-config configfile saves the installation settings into the configuration file without actually installing the registry.
-u configfile | --use-config configfile installs the registry using the settings contained in the configuration file.
--debug the installation produces more information to localize problems or errors.
Installation Panels Locate
This section discusses the content of the installation wizard. It goes through installation panels using default settings.
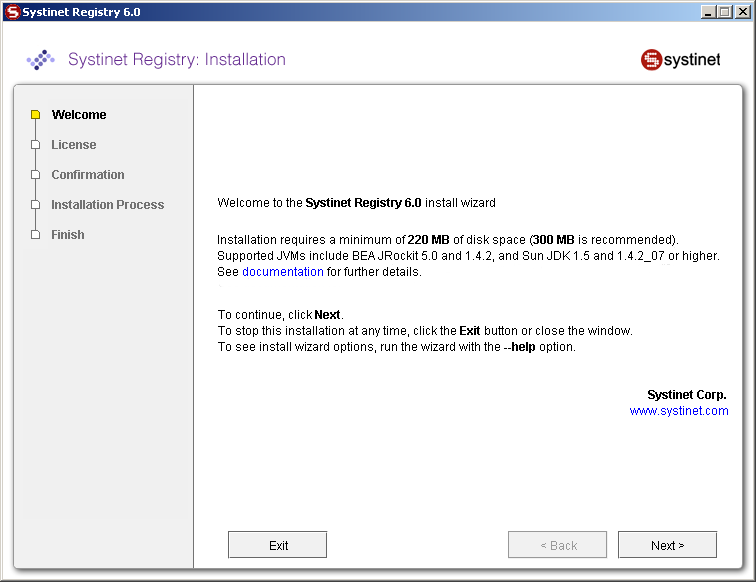
Figure 1 shows the first panel of the installation wizard. The installation wizard helps you to install BEA AquaLogic Service Registry on a local computer. To continue, click Next. To stop this installation at any time, click Exit. To return to a previous panel, click Back.
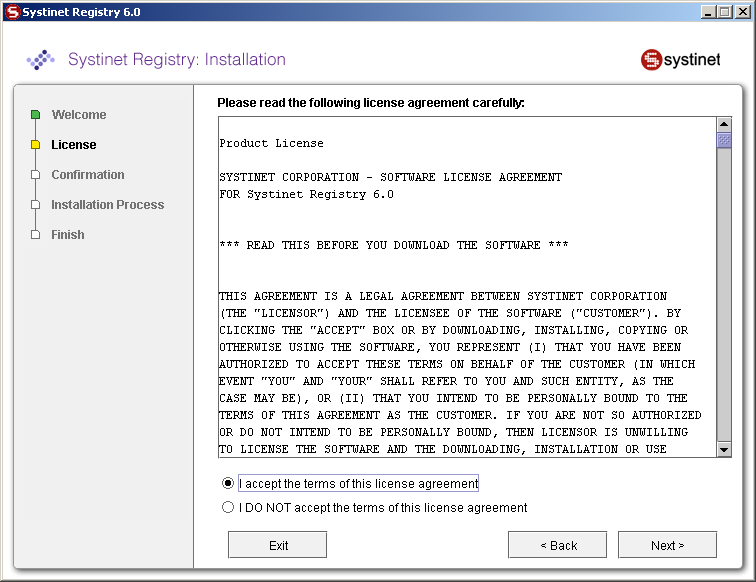
Figure 2 shows the BEA AquaLogic Service Registry license. To continue with the installation of the registry, read the license agreement and agree to it. To accept the license agreement, select the radio button labeled I accept the terms of the license agreement and click Next.
If you do not accept the terms of the license agreement, select the radio button labeled I DO NOT accept the terms of the license agreement, and click Exit.
Until you agree to the license, only the Exit button is enabled. You cannot proceed with the installation without agreeing to the license.
Evaluation Key Locate
If you are installing the evaluation version of BEA AquaLogic Service Registry, you must provide your user name and key. If you have the full version, skip to Installation Type.
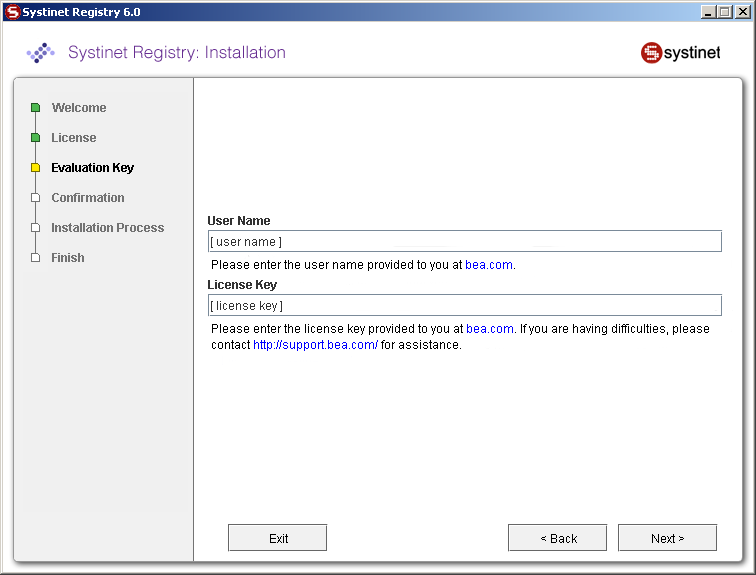
- User name
Enter the user name provided to you at bea.com.
- License Key
Enter the license key provided to you at bea.com. If you are having difficulties, please contact http://support.bea.com/ for assistance.
You must provide a valid user name and license key to continue the installation.
Installation Type Locate
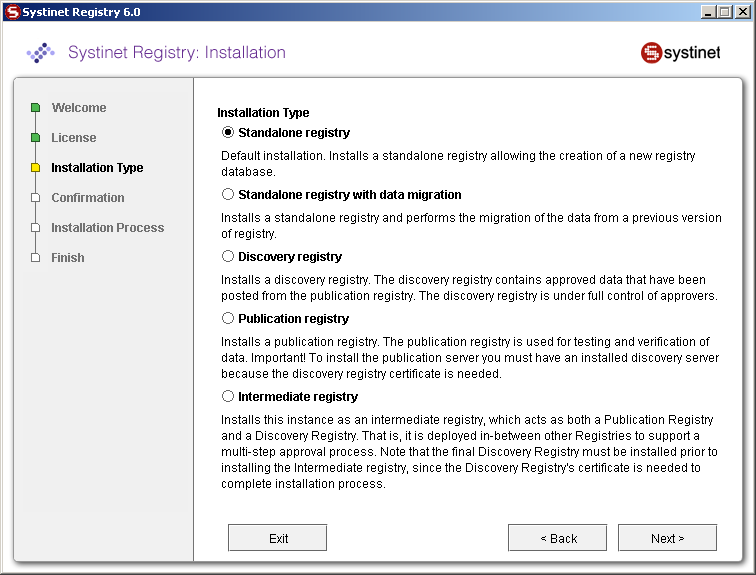
Figure 4 shows several installation scenarios. Select one.
- Standalone registry
Default installation. Installs a standalone registry and enables the creation of a new registry database.
- Standalone registry with data migration
Installs standalone registry with migration of data from a previous installation of the registry. For more information, please see Migration.
- Discovery registry
Installs the discovery registry. This is the second part of the approval process registry installation. The discovery registry allows users to query BEA AquaLogic Service Registry. For more information, please see Discovery Registry Installation.
- Publication registry
Installs the publication registry of the approval process. The publication registry is one part of the approval process registry installation. The publication registry is a space for users to publish and test data prior to its approval for promotion to the discovery server. For more information, please see Publication Registry Installation.
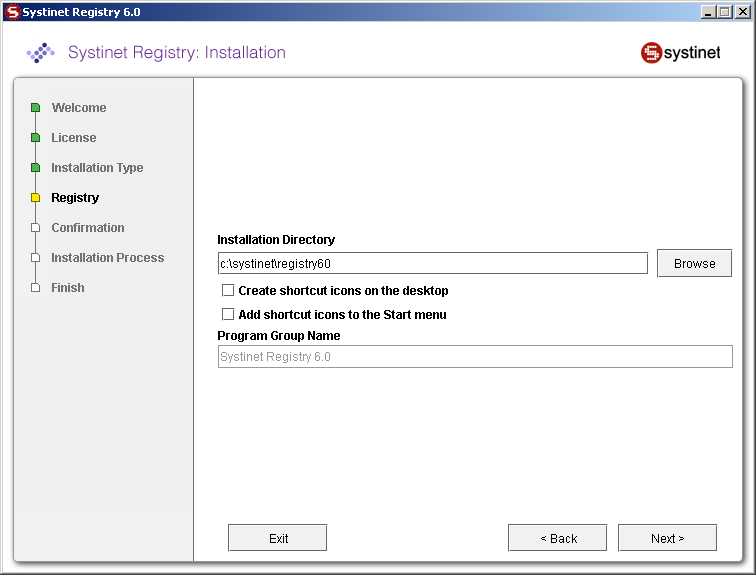
On the panel shown in Figure 5, type the path to the installation directory where BEA AquaLogic Service Registry will be installed. The default directory is the current working directory.
If you are installing on a Windows platform you can selected from the following:
- Create shortcut icons on the desktop
If selected, icons for accessing the Registry Console and for starting and stopping the registry will be created on the desktop.
- Add shortcut icons to the Start menu
If selected, the icons noted above are added to the Start menu.
- Program group name
Group name created in the Start menu where shortcut icons will be placed.
![[Note]](../images/note.gif) | Note |
|---|---|
You must have read and write permissions on the installation directory. | |
Server Settings Locate
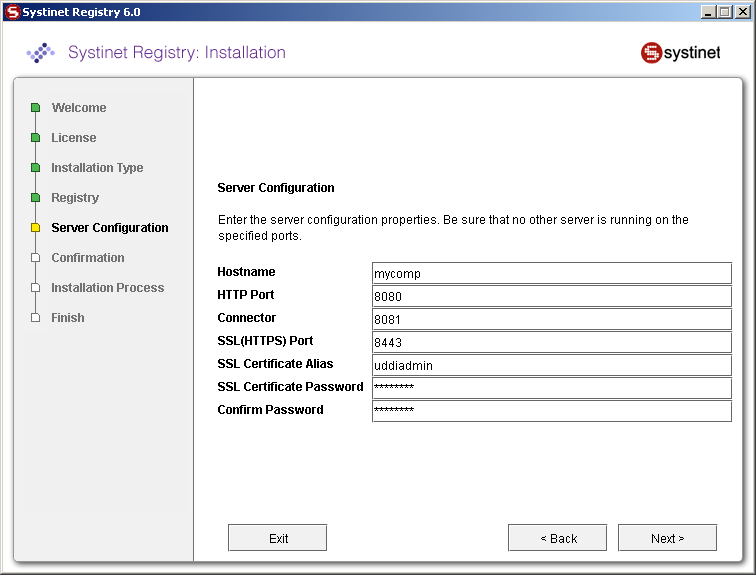
Figure 6 shows the server configuration settings. These settings will be used for the HTTP and HTTPS servers. The default recommended settings are filled in the text fields.
- Host name
The host name of this computer; change the auto-completed entry if it is different.
- HTTP Port
The nonsecure port for accessing the Registry Console (default value: 8080)
- SSL (HTTPS) Port
Secure port for accessing the Registry Console (default value: 8443)
- Connector
The connector port is used by standalone server to listen for control signals. Note that no other application may use this port (default value: 8081).
- SSL Certificate Alias
Alias used to identify the SSL private key in protected store management. See more information on The PStore Tool - Command-line Version. (default value: uddiadmin)
- SSL Certificate Password
Password to encrypt SSL private key. (default value: changeit)
- Confirm Password
Retype the same password. Note that if it is not same as previous, you cannot continue.
The host name, SSL Certificate Alias, and SSL password are used to create a new security identity in the local protected store. It creates a certificate and adds this certificate to REGISTRY_HOME/conf/clientconf.xml, REGISTRY_HOME/conf/pstore.xml, and also exports it to the certificate file REGISTRY_HOME/doc/registry.crt. This certificate file is used in several situations including the approval process registry scenario. See The PStore Tool - Command-line Version for instructions in how to operate the protected security store.
| Note |
|---|---|
The server configuration may be changed after install. See Reconfiguring After Installation. | |
SMTP Configuration Locate
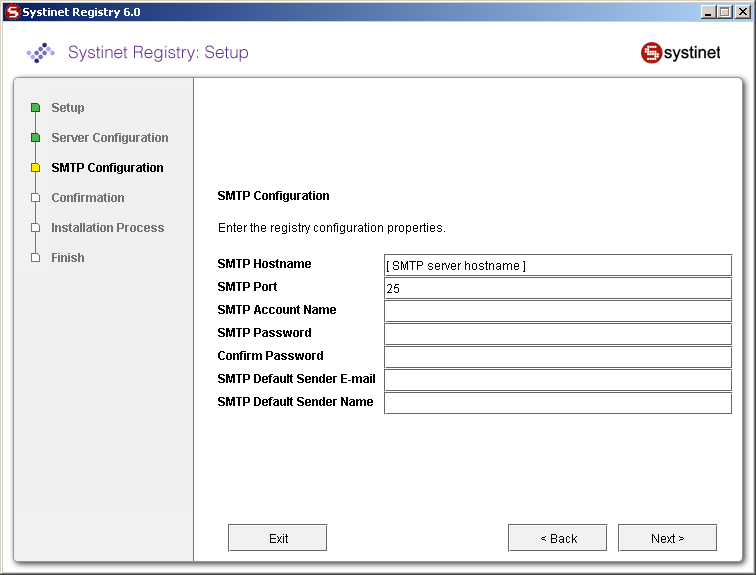
Figure 7 shows SMTP configuration. The SMTP configuration is important when users needs to receive email notification from subscriptions and from the approval process.
- SMTP Host Name
Host name of the SMTP server associated with this installation of BEA AquaLogic Service Registry
- SMTP Port
Port number for this SMTP server
- SMTP Password
Self explanatory
- Confirm password
Retype the same password. Note that if it is not same as the password in the previous box, you cannot continue.
- SMTP Default Sender E-mail, Name
BEA AquaLogic Service Registry will generate email messages with this identity.
Setup Administrator Account Locate

Database Settings Locate
The registry requires a database which may be created during installation. During installation you can create a new database, create schema in an existing empty database or connect to an existing database with created schema. Using the Setup tool, you can also drop the database or database schema. Select your database creation method on the following panel.
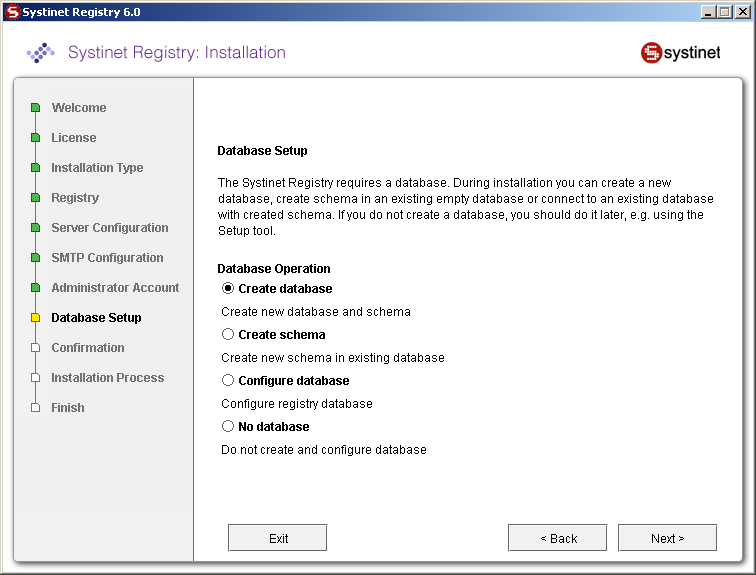
- Create database
Create new database/users/tablespaces (depending on the type of the database server) and database schema. This is the most comfortable way, but please note that you must know the credentials of the database administrator.
- Create schema
Create a new schema in an existing database. Use this option if you have access to an existing empty database and the ability to create tables and indexes. This option is suitable when you do not know the administrator's credentials. We assume admin has already created a new database/users/tablespaces for this option.
Note See Database Installation, for more information.
- Configure database
Configure registry database. Use this option if the registry database already exists (For example, from a previous installation) and fill in only the connection parameters.
- No database
Choose it if you intend to create a registry database later. Note that BEA AquaLogic Service Registry cannot be started without a database.
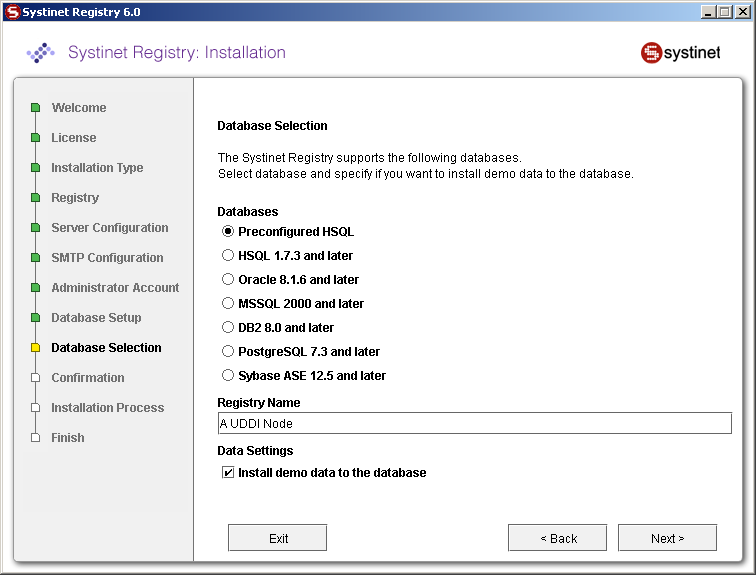
Figure 10 shows the supported database engines that can be prepared for BEA AquaLogic Service Registry.
You can specify the name of BEA AquaLogic Service Registry installation. The name is saved to the operational business entity. The registry name appears in the upper left corner of Registry Console and Business Service Console.
Select Install demo data if you want to evaluate the provided BEA AquaLogic Service Registry demos after installation.
The default database to create is the Preconfigured HSQL (HSQL). This database is recommended for evaluation purposes.
Note that it is possible to change the database after installation, using the Setup tool.
Please see Database Installation for more information on database installation.
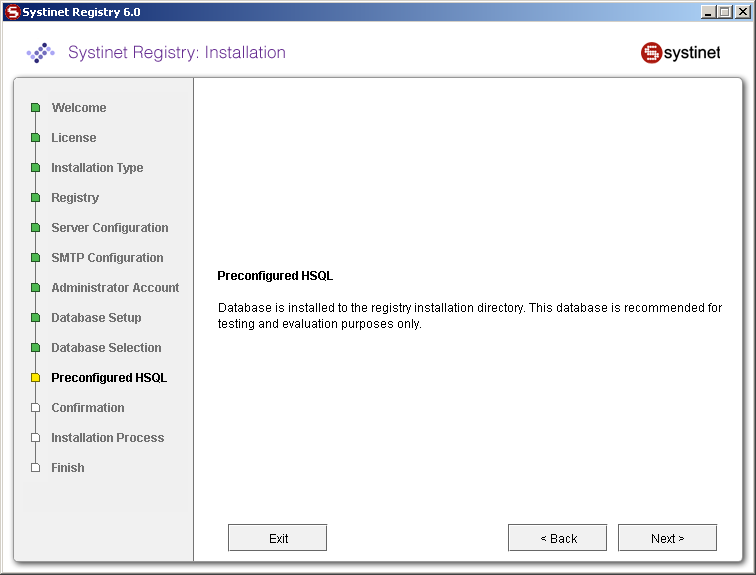
On the panel displayed in Figure 8 you are only required to provide administrator account settings. The database files will be installed into the REGISTRY_HOME/hsqldb/uddinode directory. The database user is uddiuser and the password is uddi.
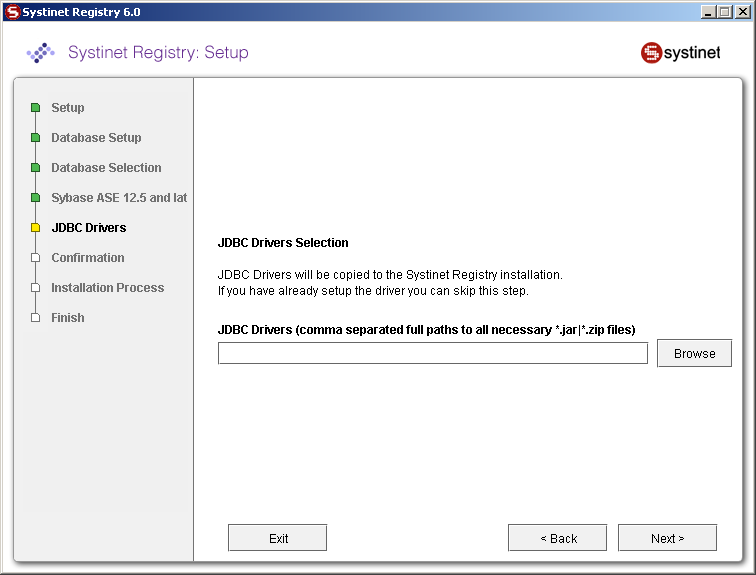
Enter path to JDBC Drivers on the panel shown in Figure 12. It is not necessary to configure this path for the HSQL and PostgreSQL databases as the JDBC drivers for these databases are installed in the distribution.
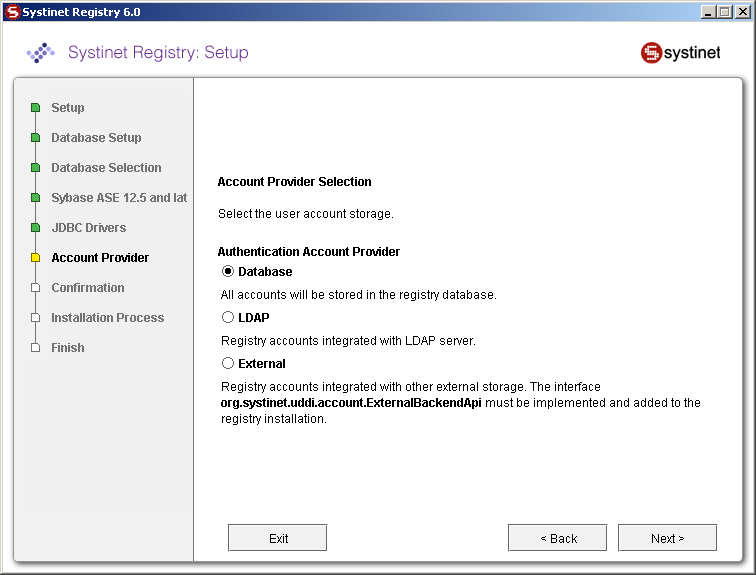
Figure 13 allows you to select an authentication provider.
- Database
All accounts will be stored in the registry database.
- LDAP
Registry accounts integrated with LDAP server.
- External
Registry accounts integrated with other external storage. The the interface com.systinet.uddi.account.ExternalBackendApi must be implemented and added to the registry installation.
Confirmation and Installation Process Locate
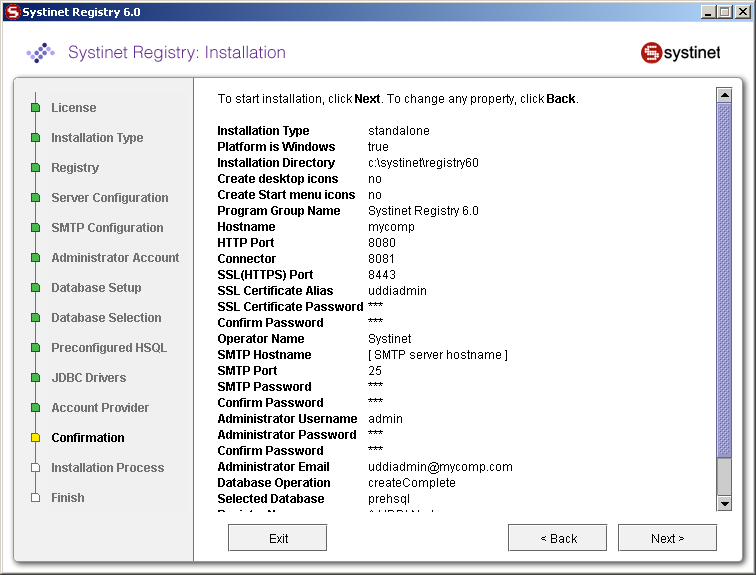
Figure 14 shows a summary of installation information. All required and optional properties are set. If you want to continue with the installation, click Next and the install process will start. If you want to change any property click Back.
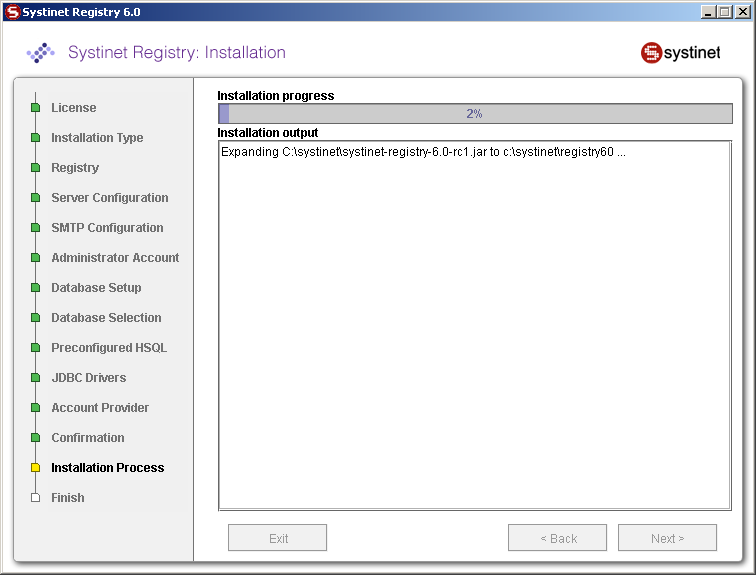
Figure 15 shows the installation output and progress. Installation consists of copying files, configuring the server, and installing the database. When the installation has completed successfully, the Next button is enabled. If there is a problem, an error message and Recovery button will appear on the screen.
For more information on recovery, see Troubleshooting
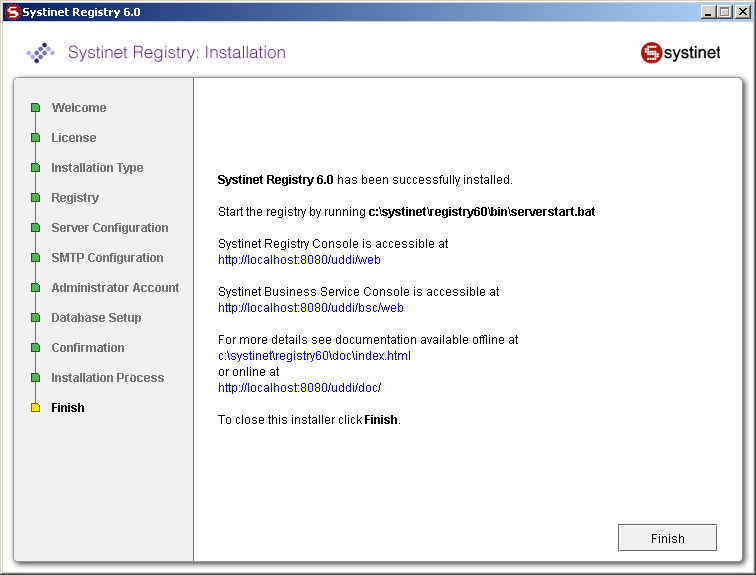
On this panel, click Finish to conclude the installation.
Installation Summary Locate
Directory Structure Locate
The installation directory structure contains the following directories:
- app
Contains BEA AquaLogic Service Registry deployed as Web services in Systinet Server for Java.
- bin
Contains command-line scripts for running BEA AquaLogic Service Registry. See Command-line Scripts.
- conf
Contains the BEA AquaLogic Service Registry configuration files
- demos
Contains demos of BEA AquaLogic Service Registry functionality. For more information, please see Demos.
- dist
Contains BEA AquaLogic Service Registry client packages.
- doc
Contains the BEA AquaLogic Service Registry documentation.
- etc
Contains additional data and scripts.
- hsqldb
Contains the preconfigured HSQL database with registry data.
- lib
Contains the BEA AquaLogic Service Registry libraries
- log
Contains logs of installation, setup, and server output. See Logs.
- work
This directory is available after the first launch of the server; it is a working image of the app directory.
Registry Endpoints Locate
BEA AquaLogic Service Registry is configured as follows. The <host name>, <http port> and <ssl port> are specified during installation. For more information, please see Server Settings in Server Settings. For each endpoint you can use either http or ssl port.
Business Service Console home page: http://<host name>:<http port>/uddi/bsc/web
Registry Console home page: http://<host name>:<http port>/uddi/web
UDDI Inquiry API endpoint - http://<host name>:<port>/uddi/inquiry
See Developer's Guide, UDDI Version 1, UDDI Version 2, UDDI version 3.
UDDI Publishing API endpoint - http://<host name>:<port>/uddi/publishing
See Developer's Guide, UDDI Version 1, UDDI Version 2, UDDI version 3.
UDDI Security Policy v3 API endpoint - http://<host name>:<port>/uddi/security
See Developer's Guide, UDDI version 3.
UDDI Custody API endpoint - http://<host name>:<port>/uddi/custody
See Developer's Guide, UDDI version 3.
UDDI Subscription API endpoint - http://<host name>:<port>/uddi/subscription
See Developer's Guide, UDDI version 3.
Taxonomy API endpoint - http://<host name>:<port>/uddi/taxonomy
See Developer's Guide, Taxonomy.
Category API endpoint - http://<host name>:<port>/uddi/category
See Developer's Guide, Category.
Administration Utilities API endpoint - http://<host name>:<port>/uddi/administrationUtils
See Developer's Guide, Administration Utilities.
Replication API endpoint - http://<host name>:<port>/uddi/replication
See Developer's Guide, Replication.
Statistics API endpoint - http://<host name>:<port>/uddi/statistics
See Developer's Guide, Statistics.
WSDL2UDDI API endpoint - http://<host name>:<port>/uddi/wsdl2uddi
See Developer's Guide, WSDL Publishing.
XML2UDDI API endpoint - http://<host name>:<port>/uddi/xml2uddi
See Developer's Guide, XML Publishing.
XSD2UDDI API endpoint - http://<host name>:<port>/uddi/xsd2uddi
See Developer's Guide, XSD Publishing.
XSLT2UDDI API endpoint - http://<host name>:<port>/uddi/xslt2uddi
See Developer's Guide, XSLT Publishing.
Extended Inquiry API endpoint - http://<host name>:<port>/uddi/inquiryExt
Extended Publishing API endpoint - http://<host name>:<port>/uddi/publishingExt
Configurator API endpoint - http://<host name>:<port>/uddi/configurator
Account API endpoint - http://<host name>:<port>/uddi/account
See Developer's Guide, Account.
Group API endpoint - http://<host name>:<port>/uddi/group
See Developer's Guide, Group.
Permission API endpoint - http://<host name>:<port>/uddi/permission
See Developer's Guide, Permission.
Pre-installed Data Locate
BEA AquaLogic Service Registry contains the following data:
Operational business - This entity holds miscellaneous nodes' registry settings such as the validation service configuration.
Built in tModels - tModels required by the UDDI specification.
Demo data - Data required by the BEA AquaLogic Service Registry demos. For more information, please see Demos.
Command-line Scripts Locate
The bin subdirectory contains scripts, including those for launching the server, installing Windows services, and changing configuration.
serverstart Locate
| Windows: | serverstart.bat |
| UNIX: | ./serverstart.sh |
Starts the standalone registry server.
serverstop Locate
| Windows: | serverstop.bat |
| UNIX: | ./serverstop.sh |
Stops the standalone registry server.
server Locate
| Windows: | server.bat |
| UNIX: | ./server.sh |
Helper script to manipulate the standalone BEA AquaLogic Service Registry server. To start and stop the registry, use serverstart or serverstop without parameters instead of server with parameters. For more information, please see Server Properties.
Setup Locate
| Windows: | setup.bat |
| UNIX: | ./setup.sh |
Setup may be launched with the following optional arguments:
setup.sh (.bat) [[--help] | [-h] | [--gui] | [-g] | [-u file ] | [--use-config file ]] [[-s file ] | [--save-config file ]] [--debug]
-h | --help shows help message
-g | --gui starts the setup wizard. The wizard is the default mode.
-u | --use-config file starts setup in non-interactive mode; it reads all properties from the specified file.
-s | --save-config file starts the setup wizard. All configuration will be saved into specified file instead of execute configuration. The file may be used later in a non-interactive installation.
--debug the setup produces more information to localize problems or errors.
To change the BEA AquaLogic Service Registry configuration after installation follow Reconfiguring After Installation.
Signer Locate
| Windows: | signer.bat |
| UNIX: | ./signer.sh |
The Signer is a graphical application that can be used to add, remove, and verify the signatures of UDDI structures you have published. Follow Signer Tool.
register Locate
| Windows: | register.bat |
| UNIX: | ./register.sh |
Registers evaluation version of BEA AquaLogic Service Registry. Follow Licensing and Evaluation.
SoapSpy Locate
| Windows: | SoapSpy.bat |
| UNIX: | ./SoapSpy.sh |
Debugging tool to control low level soap communication. Follow How to Debug.
PStoreTool Locate
| Windows: | PStoreTool.bat |
| UNIX: | ./PStoreTool.sh |
Protected security storage manipulation tool. Follow The PStore Tool - Command-line Version.
env Locate
| Windows: | env.bat |
| UNIX: | ./env.sh |
Helper script to set system variables. We recommend not to use it directly.
Reconfiguring After Installation Locate
All settings may be changed after installation using the Setup tool.
The Setup tool also facilitates other functions such as porting to application server (described in Porting to Application Server) and data migration from previous installation (described in Migration).
The Setup tool contains similar panels to those in the installation tool. To run this tool, execute the following script from the bin subdirectory of your installation:
| Windows: | setup.bat |
| UNIX: | ./setup.sh |
See command-line parameters in Setup.
By default setup starts in wizard mode as shown here:
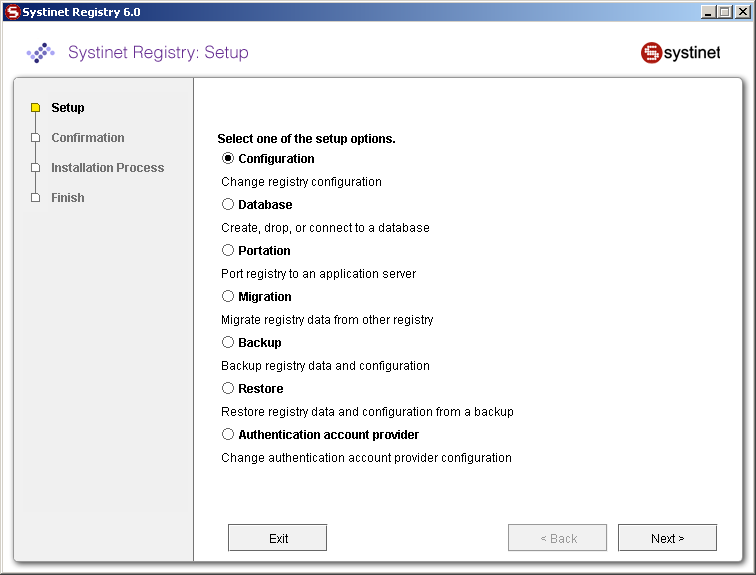
The following topics may be configured:
- Configuration
Change server and registry configuration. Follow Server Configuration.
- Database
Create, drop, or connect to a database. Follow Database Installation.
- Portation
Port registry to an application server. Follow Porting to Application Server.
- Migration
Migrate registry data from other registry. Follow Migration.
- Backup and Restore
Backup and restore BEA AquaLogic Service Registry. Follow Backup
- Authentication account provider
Change account backend configuration. Follow External Accounts Integration.
Server Properties Locate
System properties are the main means of configuring BEA AquaLogic Service Registry as deployed into Systinet Server for Java. Default values for these properties are in the resource META-INF/wasp.properties, which is located in lib/runner.jar.
There are two ways to alter system properties, for the two different types of BEA AquaLogic Service Registry installation:
Standalone Installation: Set the property from the command line when starting the server from either the REGISTRY_HOME/bin/server.bat or server.sh script. The syntax is:
server(.sh) [-Dname of property=value ] {[start] | [stop]}
For example:
server -Didoox.debug.level=4 startBEA AquaLogic Service Registry Ported as a Servlet: Default property values can be overridden in the init-param elements in the web application deployment descriptor, web.xml.
The following properties are checked when BEA AquaLogic Service Registry is initialized:
Windows Services Locate
Use the following scripts to install, uninstall, start, and stop BEA AquaLogic Service Registry as a Windows service:
- InstallService
InstallService.bat
Installs BEA AquaLogic Service Registry into system services
- UnInstallService
UnInstallService.bat
Uninstalls BEA AquaLogic Service Registry from system services.
- StartService
StartService.bat
Starts the already installed BEA AquaLogic Service Registry service.
- StopService
StopService.bat
Stops the started BEA AquaLogic Service Registry service.
Follow NT Service Support.
Logs Locate
There are four log files in REGISTRY_HOME/log directory.
These two log files are produced by the Installation and Setup processes:
- install.log
This log contains installation output information including all properties set during installation, and output from the installation process. If an error occurs during installation, see this log for details.
- setup.log
The log of the Setup tool. Any execution of the Setup tool writes the set properties and output from setup processes here. Errors occurring during setup are written to this log.
The default server logs are:
- logEvents.log
The standard server output contains informative events which occur on the BEA AquaLogic Service Registry server.
- errorEvents.log
This file contains detailed logs of error events which occur on the BEA AquaLogic Service Registry server.
- replicationEvents.log
Replication process logs can be found in the REGISTRY_HOME/log/replicationEvents.log file.
- configuratorEvents.log
Cluster configuration events are logged in the REGISTRY_HOME/log/configuratorEvents.log file
- wasp_NTService.log
Events of the server are written into the REGISTRY_HOME\log\wasp_NTService.log file.
The server logs may be configured by one of two logging systems, the in-house waspLogger and log4j. By default, log4j is used. The default log4j configuration file is located in REGISTRY_HOME/conf/log4j.config.
| Note |
|---|---|
An explanation of using log4j is outside the scope of this documentation; please see the Apache log4j documentation for more information. | |
Troubleshooting Locate
If errors occur during the installation process, the installer displays a message and a Recovery button.
Execution of Task fails. You can click Recovery and correct erroneous selections or click Exit to exit the installation.
If you click Recovery, the installation returns to the step that should be corrected. For example, if the installation fails during copying files, it will return to the installation type panel. If the process fails during configuring database it will return to the database panels.
If errors occur when using the Setup tool, only the error message is displayed, you can continue by clicking Next.
The following general problems may occur:
- Installation backend timeout
If the task does not respond for a long time, a timeout error is thrown and the task is stopped. The default timeout is 30 minutes. If you have a slow machine, try to redefine the timeout system property for a greater value in minutes at a java command line.
For 60 minutes, run installation by following command: java -Dtimeout=60 -jar BEA-aqualogic-service-registry-2.0.jar
For 60 minutes, edit the setup.sh (setup.bat) file; add the -Dtimeout=60 option into the java command line so it looks like:
Windows: "%JAVA_CMD%" -Dtimeout=60 UNIX: "$JAVA_CMD" -Dtimeout=60 - Cannot find JDBC driver, java.lang.ClassNotFoundException
Some external classes cannot be found. Usually the path to JDBC driver does not contain the needed *.jar or *.zip files. Another reason this error may be thrown is that the JDBC driver is not supported by BEA AquaLogic Service Registry. See Database Installation for more information about supported databases.
- Cannot access database, java.sql.SQLException
This usually happens during the creation of database which already exists. To resolve this error, try to connect or drop this database first.
This error is also thrown when trying to drop a database which is currently in use, or does not exist. Note that some set properties must exist on the database engine and some of them are optional. Please see Database Installation for more information about supported databases.
- Couldn't create or access important files. Wrong path
This error is displayed when the installation directory specified is bad or the user does not have read and write permissions for it. Try to install to another directory or reset the read and write permissions.