Elastic Pool Operations
When you create an elastic pool in Autonomous AI Database, your instance becomes the pool leader. Instances that you add to an existing pool become pool members. The operations you can perform depend on your role as a leader or member.
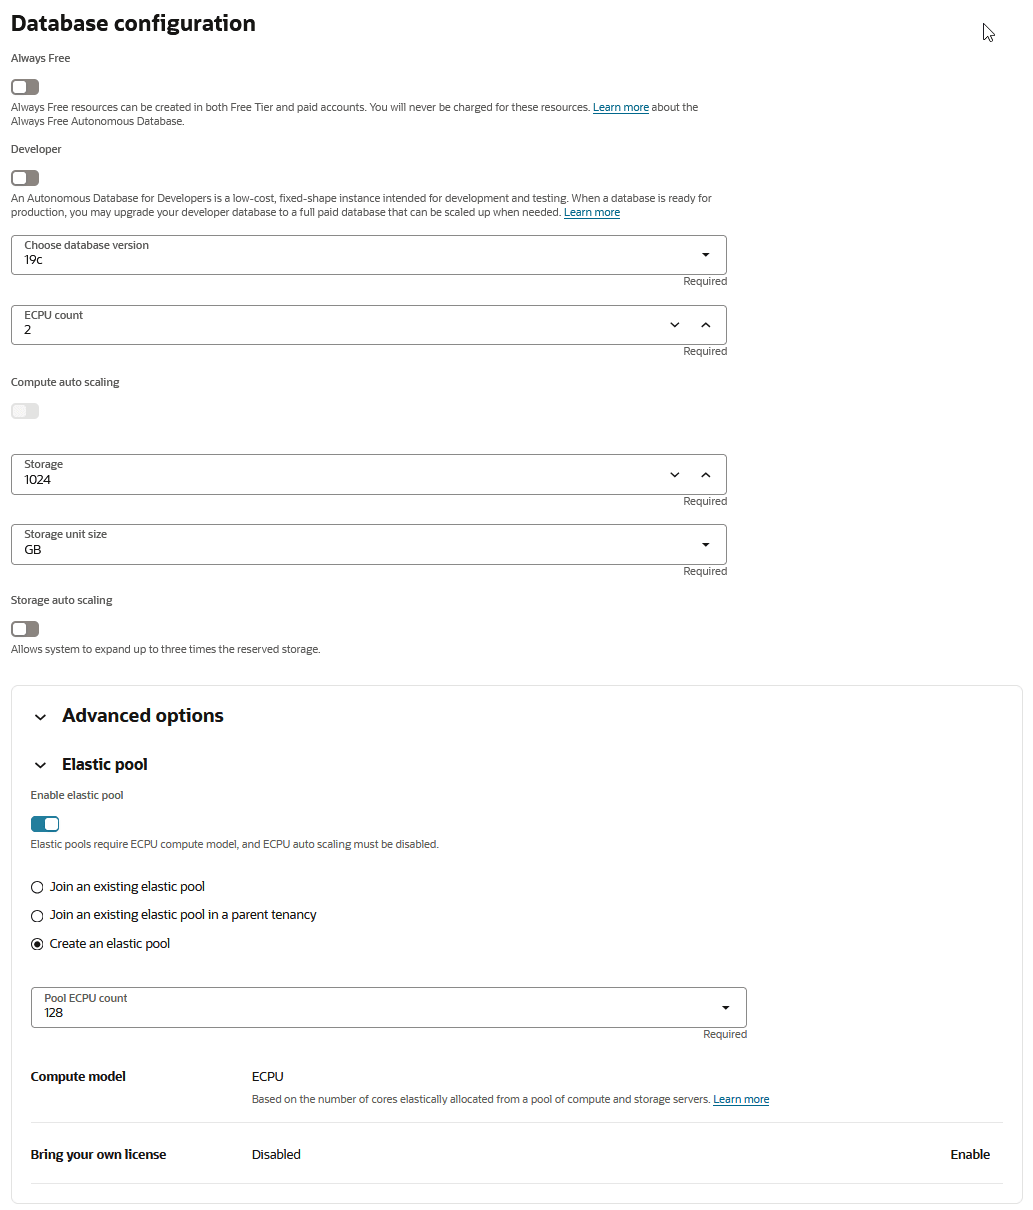
Create an Elastic Pool
Shows the steps to create an elastic pool in an existing Autonomous AI Database instance.
Note
Note: To create an elastic pool the instance must use the ECPU compute model.
-
Open the Oracle Cloud Infrastructure Console by clicking the
 next to Cloud.
 -
From the Oracle Cloud Infrastructure left navigation menu click Oracle AI Database and then click Autonomous AI Database.
-
On the Autonomous AI Databases page select an Autonomous AI Database from the links under the Display name column.
To create an elastic pool:
-
On the Autonomous AI Database Details page click More actions and select Manage resource allocation.
If Compute auto scaling switch is on:
-
Switch off Compute auto scaling.
-
Click Apply.
The Lifecycle state changes to Scaling in Progress. After some time the Lifecycle state changes to Available.
-
On the Autonomous AI Database Details page click More actions and select Manage resource allocation to display the Manage resource allocation area.
-
-
In the Manage resource allocation area expand Advanced options.
-
Switch Enable elastic pool on.
-
Select Create an elastic pool.
-
Choose a pool size in the Pool ECPU count field.
Select a pool size from the list of pool shapes: 128, 256, 512, 1024, 2048, or 4096.
By default each instance in an elastic pool is automatically assigned a maintenance window. By selecting a Pool ECPU count that is 1024 greater, you have the option of assigning a custom 2-hour maintenance window during which the leader and all elastic pool members are patched together. To select a custom maintenance window for your elastic pool, file a Service Request at Oracle Cloud Support.
See About Scheduled Maintenance and Patching for more information.
-
Click Apply to create the elastic pool.
When you click Apply the Lifecycle state changes to Updating. After the Lifecycle state changes to Available the changes apply immediately.
After you create an elastic pool, click More actions and select Manage resource allocation to display the elastic pool information. In the Manage resource allocation area, the Elastic pool field shows Enabled, the Pool role field shows Leader, and the Pool ECPU count field shows the pool size you selected. It also displays the Total compute capacity and the Available compute capacity fields.

Description of the illustration adb_elastic_pool_leader.png
Create an Elastic Pool While Provisioning or Cloning an Instance
You can create or join an elastic pool when you provision or clone an Autonomous AI Database instance.
See Provision an Autonomous AI Database Instance for details on how to create an Autonomous AI Database for your workload type using the Create Autonomous AI Database dialog.
See Clone an Autonomous AI Database Instance or Clone an Autonomous AI Database from a Backup for details on cloning.
See Join an Elastic Pool While Provisioning or Cloning an Instance for details on joining an elastic pool while provisioning or cloning.
Note
Note: To create an elastic pool the instance must use the ECPU compute model.
To create an elastic pool while provisioning or cloning:
-
In the Database configuration area, switch off Compute auto scaling.
-
In the Database configuration area, expand Advanced options.
-
Switch on Enable elastic pool.
-
Select Create an elastic pool.
-
In the Pool ECPU count field, select a pool size from the list of pool shapes.
The valid values that you can select are: 128, 256, 512, 1024, 2048, or 4096.
By default each instance in an elastic pool is automatically assigned a maintenance window. By selecting a Pool ECPU count that is 1024 greater, you have the option of assigning a custom 2-hour maintenance window during which the leader and all elastic pool members are patched together. To select a custom maintenance window for your elastic pool, file a Service Request at Oracle Cloud Support.
See About Scheduled Maintenance and Patching for more information.
For example:
-
If applicable, enable the Bring your own license option.
See Choose Bring Your Own License Option While Provisioning or Cloning for more information.
-
Complete the remaining provisioning or cloning steps, as specified in Provision an Autonomous AI Database Instance, Clone an Autonomous AI Database Instance, or Clone an Autonomous AI Database from a Backup.
Create a Dedicated Elastic Pool
Shows the steps to create a dedicated elastic pool using an existing Autonomous AI Database instance.
The database used to create the dedicated elastic pool will become the pool leader.
Note
Note: To create an elastic pool the instance must use the ECPU compute model.
See Dedicated Elastic Pool Requirements to know the prerequisites to create a dedicated elastic pool.
To create a dedicated elastic pool:
-
Click Oracle AI Database, and then click Autonomous AI Database.
-
On the Autonomous AI Databases page select an Autonomous AI Database from the links under the Display name column.
-
On the Autonomous AI Database details page, expand More actions and click Manage resource allocation.
-
Switch Compute auto scaling and Storage auto scaling off, if they are already on.
-
Click Apply.
The lifecycle state changes to Scaling in Progress.
-
After the lifecycle state changes to Available, launch the Manage resource allocation dialog again by clicking Manage resource allocation under More actions from the Autonomous AI Database details page.
-
On the Manage resource allocation dialog, expand Advanced options.
-
Switch Enable elastic pool on, and select Create an elastic pool.
-
Switch Enable dedicated elastic pool on.
-
Choose a Pool ECPU count and Pool storage (TB) from the available options.
At a minimum, you must select 256 ECPUs and 256 TB for compute and storage size.
Note
Note: Creating a dedicated elastic pool can take some time depending on resource availability. The work request associated with this operation will be paused until the requested resource is available. You can create a Service Request to inquire about the status of the request. -
Choose a maintenance window by selecting a Day and Time (UTC) from the available options.
Once you set maintenance window, this cannot be changed after the dedicated elastic pool is created.
Note
Note: If a dedicated elastic pool already exists in a specific region of your tenancy, any additional dedicated elastic pools you create in the same region and tenancy cannot have custom maintenance windows. Instead, these pools automatically inherit the maintenance window of the first dedicated elastic pool created in that region and tenancy. This restriction does not apply if you create a dedicated elastic pool in a different region within your tenancy or in a different tenancy within the same region. -
Click Apply.
The lifecycle state changes to Updating. After the lifecycle state changes to Available,the changes apply immediately.
Once the dedicated elastic pool is created, you can view its details from the Manage resource allocation dialog, after the database lifecycle state changes to Available. In the Elastic pool section, Elastic pool shows Enabled with Pool role as Leader.
You can also see the Pool ECPU count and Pool Storage (TB) values along with the Total compute capacity and the Available compute capacity values.
Create a Dedicated Elastic Pool While Provisioning or Cloning an Instance
You can create or join an elastic pool when you provision or clone an Autonomous AI Database instance.
Note
Note: To create an elastic pool the instance must use the ECPU compute model.
See Dedicated Elastic Pool Requirements to know the prerequisites to create a dedicated elastic pool.
To create a dedicated elastic pool while provisioning or cloning:
-
Launch the Create Autonomous AI Database or Clone Autonomous AI Database page, depending on whether the database is being provisioned or cloned.
-
In the Database configuration section:
-
Ensure to switch Compute auto scaling and Storage auto scaling off.
-
Expand Advanced options.
-
Switch Enable elastic pool on.
-
Select Create an elastic pool.
-
Switch Enable dedicated elastic pool on.
-
Choose a Pool ECPU count and Pool storage (TB) from the available options.
At a minimum, you must select 256 ECPUs and 256 TB for compute and storage size.
Note
Note: Creating a dedicated elastic pool can take some time depending on resource availability. The work request associated with this operation will be paused until the requested resource is available. You can create a Service Request to inquire about the status of the request. -
Choose a maintenance window by selecting a Day and Time (UTC) from the available options.
Once you set maintenance window, this cannot be changed after the dedicated elastic pool is created.
Note
Note: If a dedicated elastic pool already exists in a specific region of your tenancy, any additional dedicated elastic pools you create in the same region and tenancy cannot have custom maintenance windows. Instead, these pools automatically inherit the maintenance window of the first dedicated elastic pool created in that region and tenancy. This restriction does not apply if you create a dedicated elastic pool in a different region within your tenancy or in a different tenancy within the same region. -
-
Complete the remaining provisioning or cloning steps, as specified in Provision an Autonomous AI Database Instance, Autonomous AI Database, or Clone an Autonomous AI Database Instance, as appropriate.
Enable a Dedicated Elastic Pool
Shows the steps to convert an elastic pool into a dedicated elastic pool.
Only the pool leader can convert an elastic pool into a dedicated elastic pool.
See Dedicated Elastic Pool Requirements to know the prerequisites to create a dedicated elastic pool.
To enable a dedicated elastic pool:
-
Go to the Autonomous AI Database details page from the Oracle Cloud Infrastructure (OCI) console.
Note
Note: You must go the details page of the Autonomous AI Database instance that is the pool leader of the elastic pool you want to convert into a dedicated elastic pool. -
On Autonomous AI Database information, locate Resource allocation.
-
Click the Actions icon next to Elastic pool, and click Edit.
-
Once the Manage resource allocation dialog opens, expand Advanced options.
-
Switch Enable dedicated elastic pool on.
-
Choose a Pool ECPU count and Pool storage (TB) from the available options.
At a minimum, you must select 256 ECPUs and 256 TB for compute and storage size.
Note
Note: Converting an elastic pool into a dedicated elastic pool can take some time depending on resource availability. The work request associated with this operation will be paused until the requested resource is available. You can create a Service Request to inquire about the status of the request. -
Choose a maintenance window by selecting a Day and Time (UTC) from the available options.
Once you set maintenance window, this cannot be changed after the dedicated elastic pool is created.
Note
Note: If a dedicated elastic pool already exists in a specific region of your tenancy, any additional dedicated elastic pools you create in the same region and tenancy cannot have custom maintenance windows. Instead, these pools automatically inherit the maintenance window of the first dedicated elastic pool created in that region and tenancy. This restriction does not apply if you create a dedicated elastic pool in a different region within your tenancy or in a different tenancy within the same region. -
Click Apply.
The lifecycle state changes to Updating. After the lifecycle state changes to Available,the changes apply immediately.
Once the dedicated elastic pool is created, you can view its details from the Manage resource allocation dialog, after the database lifecycle state changes to Available.
In the Elastic pool section, Elastic pool shows enabled with Pool role as Leader.
You can also see Pool ECPU count and Pool Storage (TB) values along with Total compute capacity, Available compute capacity, Total pool storage (TB) and Available pool storage (TB).
Join an Existing Elastic Pool
Shows the steps to join an existing elastic pool.
To join an elastic pool, the following is required for the Autonomous AI Database instance:
-
The instance must use the ECPU compute model.
See Compute Models in Autonomous AI Database for more information.
-
Auto scaling must be disabled.
-
The instance must not be a member of an elastic pool.
To join an elastic pool:
-
On the Autonomous AI Database Details page click More actions and select Manage resource allocation.
If Compute auto scaling is on, switch this option off.
-
Switch Compute auto scaling off.
-
Click Apply.
The Lifecycle state changes to Scaling in Progress. After some time the Lifecycle state changes to Available.
-
On the Autonomous AI Database Details page click More actions and select Manage resource allocation.
-
-
In the Manage resource allocation area, expand Advanced options.
-
Switch Enable elastic pool on.
-
Select one of the following:
-
Join an existing elastic pool: Select this option when you want to join an elastic pool leader and the pool leader is in the same tenancy as the instance that is joining the elastic pool.
In the Compartment field choose a compartment.
In the Select pool leader field select the pool leader.
You can view Available compute capacity field that displays the ECPU capacity available in the selected elastic pool.
The individual ECPU allocation of the instance that is joining the elastic pool must be less than or equal to the available compute capacity.
-
Join an existing elastic pool in a parent tenancy: Select this option when your tenancy is a child tenancy and you want to join an elastic pool leader in the parent tenancy.
In the text field enter the OCID of the elastic pool leader.
See Elastic Pools Across Parent and Child Tenancies for details on the required policies.
Tip: To join a dedicated elastic pool, you must enter the OCID of an Autonomous AI Database that is a pool leader of a dedicated elastic pool.
-
-
Click Apply to add the instance to the elastic pool.
When you click Apply the Lifecycle state changes to Updating. After the Lifecycle state changes to Available the changes apply immediately.
After you create an elastic pool, click More actions and select Manage resource allocation to see the elastic pool details. In the Manage resource allocations area, under Elastic pool, the Elastic pool field shows Enabled, the Pool role field shows Member, and the Elastic pool leader field shows a link to the pool leader. It also displays the Total compute capacity and the Available compute capacity fields.
Join an Elastic Pool While Provisioning or Cloning an Instance
You can create or join an elastic pool when you provision or clone an Autonomous AI Database instance.
See Provision an Autonomous AI Database Instance for details on how to create an Autonomous AI Database for your workload type using the Create Autonomous AI Database dialog.
See Clone an Autonomous AI Database Instance or Clone an Autonomous AI Database from a Backup for details on cloning.
See Create an Elastic Pool While Provisioning or Cloning an Instance for details on creating an elastic pool while provisioning or cloning.
Note
Note: To join an elastic pool the instance must use the ECPU compute model.
To join an existing elastic pool while provisioning or cloning:
-
In the Database configuration area, switch off Compute auto scaling.
-
In the Database configuration area, expand Advanced options.
-
Switch Enable elastic pool on.
-
Select one of the following:
-
Join an existing elastic pool When you want to join an elastic pool leader in the same tenancy:
In the Compartment field choose a compartment.
In the Select pool leader field select a pool leader.
You can view Available compute capacity field that displays the ECPU capacity available in the selected elastic pool.
The individual ECPU allocation of the instance that is joining the elastic pool must be less than or equal to the available compute capacity.
-
Join an existing elastic pool in a parent tenancy: When your tenancy is a child tenancy and you want to join an elastic pool leader in the parent tenancy.
In the text field enter the OCID of the elastic pool leader in the parent tenancy.
See Elastic Pools Across Parent and Child Tenancies for the required policies.
Tip: To join a dedicated elastic pool, you must enter the OCID of an Autonomous AI Database that is a pool leader of a dedicated elastic pool.

Description of the illustration adb_elastic_pool_join.png
Complete the remaining provisioning or cloning steps, as specified in Provision an Autonomous AI Database Instance, Clone an Autonomous AI Database Instance, or Clone an Autonomous AI Database from a Backup.
-
Change the Elastic Pool Shape
Shows the steps for the pool leader to change the elastic pool shape for an existing elastic pool.
Note
Note: Only a pool leader can modify the pool shape.
To change the shape of an elastic pool (update the pool size):
-
On the Autonomous AI Database Details page click More actions and select Manage resource allocation to display the Manage resource allocation panel.
-
Under Advanced options, in the Pool ECPU count field, select a value that is different than the current value.
Note
Note: By default each instance in an elastic pool is automatically assigned a maintenance window.By selecting a Pool ECPU count that is 1024 greater, you have the option of assigning a custom 2-hour maintenance window during which the leader and all elastic pool members are patched together. To select a custom maintenance window for your elastic pool, file a Service Request at Oracle Cloud Support.
See About Scheduled Maintenance and Patching for more information.
The console shows values for:
-
Total compute capacity (ECPU): Displays the total ECPU capacity of an elastic pool. It is defined as four times the configured pool size. For example, if the pool size is set to 128 ECPUs, the total ECPU capacity available in the pool is 512 ECPUs.
-
Available compute capacity (ECPU): Displays the ECPU capacity available in the selected elastic pool.
-
-
Click Apply.
When you click Apply, the Lifecycle state changes to Updating. After the Lifecycle state changes to Available the changes apply immediately.
Note
Note: Decreasing the CPU allocation, Pool ECPU count, to a value that cannot accommodate all the members of the elastic pool is not allowed.
For example, for an elastic pool with a Pool ECPU count of 256 ECPUs and a pool capacity of 1024 ECPUs: If the elastic pool contains eight (8) Autonomous AI Database instances with 80 ECPUs each for a total of 640 ECPUs, the elastic pool leader cannot decrease the Pool ECPU count to 128 ECPUs. In this case, if the pool size were reduced to 128 ECPUs, the pool capacity would be 512 ECPUs, which is less than the total allocation for the pool members (640 ECPUs).
Change a Dedicated Elastic Pool Storage
Shows steps to modify the pool storage (TB) of a dedicated elastic pool.
Note
Note: Only a pool leader can modify the dedicated elastic pool storage (TB).
Changing Pool storage (TB) requires that:
-
The new value of Pool storage (TB) is not greater than the storage already used by the pool members, while scaling down.
-
The new value of Pool storage (TB) is within the tenancy limits.
-
The dedicated elastic pool's patching is not in a paused state.
To change a dedicated elastic pool storage:
-
On the Autonomous AI Database details page, click More actions and select Manage resource allocation to display the Manage resource allocation dialog.
-
Under Advanced options, in the Pool storage (TB) field, select a value that is different than the current value.
The console shows values for:
-
Pool storage capacity: Displays the dedicated elastic pool's storage capacity. It is the same as the pool storage (TB) allocated while creating the dedicated elastic pool.
-
Available storage capacity: Displays the available storage (TB) in the dedicated elastic pool, that is, the difference between the pool’s total storage capacity and the storage currently used by all pool members.
-
-
Click Apply.
When you click Apply, the Lifecycle state changes to Updating. After the Lifecycle state changes to Available the changes apply immediately.
Manage Dedicated Elastic Pool Patching
Shows steps to patch and resume a dedicated elastic pool patching.
A dedicated elastic pool leader can:
-
Pause the pool's patching for up to four (4) weeks, except for the security patches.
-
Resume a previously paused patching for a dedicated elastic pool, at any time from the OCI console. Once resumed, the subsequent patching occurs in your scheduled window.
See How Dedicated Elastic Pools Affect Standard Management Operations for requirements and limitations for pausing and resuming dedicated elastic pool patching.
-
On the Autonomous AI Database details page, locate Maintenance.
-
Check if Scheduled patching shows Active.
-
Click Pause next to Scheduled patching.
-
Select a value for Pause duration (week), and click Pause.
The status of Scheduled patching under Maintenance on the Autonomous AI Database details page changes to Paused.
-
To resume patching, click Resume next to Scheduled patching.
-
Confirm by clicking Resume on the Resume maintenance dialog.
Note
Note: Except for security patches, you can pause and resume maintenance for a dedicated elastic pool multiple times, but each dedicated elastic pool must receive a patch at least once every 30 days (4 weeks). Maintenance cannot be deferred beyond this period.The status of Scheduled patching under Maintenance on the Autonomous AI Database details page changes to Active.
List Elastic Pool Members
Shows the steps for the pool leader to list elastic pool members.
To list elastic pool members:
-
On the elastic pool leader's Autonomous AI Database details page, select the Elastic pool members tab.
-
The Elastic pool members tab shows a list of elastic pool members.
Note
Note: When you list pool members for an elastic pool in a parent tenancy, the listing includes all the pool members in the parent tenancy and the members in all child tenancies. See Elastic Pools Across Parent and Child Tenancies for more details.
This shows the list of elastic pool members for the leader Autonomous AI Database instance.
If you click ![]() at the end of a row in the list, you can select an action to perform for the member. The possible actions are:
at the end of a row in the list, you can select an action to perform for the member. The possible actions are:
-
View details: Shows the member's Oracle Cloud Infrastructure Console
-
Copy OCID: Copies the member's Autonomous AI Database instance OCID.
-
Remove from pool: Brings up a dialog where you can confirm to remove the Autonomous AI Database instance from the pool.
Remove Pool Members from an Elastic Pool
As an elastic pool member you can remove yourself from an elastic pool. As an elastic pool leader you can remove pool members from an elastic pool.
Perform the following prerequisite steps as necessary:
-
Open the Oracle Cloud Infrastructure Console by clicking the
next to Cloud. -
From the Oracle Cloud Infrastructure left navigation menu click Oracle AI Database and then click Autonomous AI Database.
-
On the Autonomous AI Databases page select an Autonomous AI Database from the links under the Display name column.
As a pool member, you can remove your instance from an elastic pool:
-
On the Details page, under Resource allocation, in the Elastic pool field click Leave pool.
This shows the Leave pool confirmation dialog.
-
In the Leave pool confirmation dialog, enter the database name.
-
Click Leave.
When you click Leave, the Lifecycle state changes to Updating. After the Lifecycle state changes to Available the changes apply immediately.
As Pool Leader Remove Members from an Elastic Pool
An elastic pool leader can remove pool members from an elastic pool.
-
On the Autonomous AI Database Details page, select the Elastic pool members tab.
This shows the Elastic pool members tab, with a list showing details for each instance that is an elastic pool member.
-
Click
 at the end of a row for an instance you want to remove and in the drop down list select Remove from pool.
This shows the Remove from pool confirmation dialog.
-
Click Leave to confirm.
When you click Leave, the Lifecycle state changes to Updating. After the Lifecycle state changes to Available the changes apply immediately.
Disable a Dedicated Elastic Pool
Shows the steps to disable a dedicated elastic pool.
Only the pool leader can disable a dedicated elastic pool.
To disable a dedicated elastic pool:
-
Go to the Autonomous AI Database details page from the Oracle Cloud Infrastructure (OCI) console.
Note
Note: You must go the details page of the Autonomous AI Database instance that is the pool leader of the dedicated elastic pool you want to disable. -
On Autonomous AI Database information, locate Resource allocation.
-
Click the Actions icon next to Elastic pool, and click Edit.
-
Once the Manage resource allocation dialog opens, expand Advanced options.
-
Switch Enable dedicated elastic pool off.
-
Click Apply.
The lifecycle state changes to Updating. After the lifecycle state changes to Available,the changes apply immediately.
Once the dedicated elastic pool is disabled, it converts into a traditional elastic pool and you can view its details from the Manage resource allocation dialog, after the database lifecycle state changes to Available.
In the Elastic pool section, Elastic pool shows enabled with Pool role as Leader.
You can also see Pool ECPU count along with Total compute capacity and Available compute capacity
Terminate an Elastic Pool
Shows the steps to terminate an elastic pool. Only the pool leader can terminate an elastic pool.
Note
Note: Terminating an elastic pool is only allowed when there are no pool members in the elastic pool.
-
Open the Oracle Cloud Infrastructure Console by clicking the
next to Cloud. -
From the Oracle Cloud Infrastructure left navigation menu click Oracle AI Database and then click Autonomous AI Database.
-
On the Autonomous AI Databasees page select the Autonomous AI Database that is the pool leader from the links under the Display Name column.
To terminate an elastic pool:
-
On the Autonomous AI Database Details page, click More actions and select Manage resource allocation.
-
In the Elastic pool area, select Terminate pool.
-
Click Apply to terminate the elastic pool.
When you click Apply, the Lifecycle state changes to Updating. After the Lifecycle state changes to Available the changes apply immediately.