Configure the SNMP Connection to a Library

Add each SL150, SL500, SL3000, and SL8500 library you want STA to monitor to the Monitored Libraries table.

For existing connections, you must complete this procedure if there are changes to any of the SNMP configuration settings on a monitored library, such as a change to the library IP address.

If you are configuring multiple library connections at one time, to minimize library disruption, complete this procedure for all libraries before testing the SNMP connections.
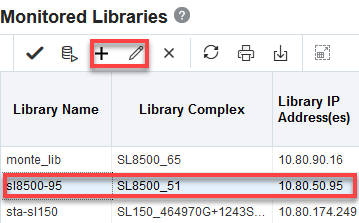
  1. In the STA GUI, expand the Setup & Administration tab, and then the Configuration tab. Select Library Connections.
  2. In the Monitored Libraries table:

    To configure a connection for the first time, click Add Add icon.

    To modify an existing connection, select a library in the table, then click Edit Edit icon.


    Monitored Libraries table with row and Edit icon noted

  3. If you are adding a new entry, select SNMP for the connection type.
  4. Complete the following fields. The values you specify must match the corresponding ones on the library.
    • Library Name—A name to identify the library throughout the STA user interface screens (for example, the library host name).
    • Library Primary IP Address—The IP address of the primary public port on the library.
    • Library Secondary IP Address—Applies only to libraries using dual TCP/IP or redundant electronics (RE). Specify the IP address of the secondary public port on the library. Leave the field blank for libraries that do not have dual TCP/IP or RE.
    • STA IP Address—Select the IP address of the STA server.
    • Automated Daily Data Refresh—Specify the time of day you want STA to collect the latest configuration data from the library. The data is collected automatically every 24 hours at this time. You should choose a time when there is typically lighter library usage. The default is 00:00 (12:00 am). Use 24-hour time format.

      Caution:

      If you leave this field blank, scheduled automatic library data collections are disabled. This will cause your STA library configuration data to become out of sync with the library.

    • Library Time Zone—Select the library's local time zone.
  5. If you are adding a new entry, use the Next button to view connection settings and review all settings.
  6. Click Save. Click OK to dismiss the Library Connection Test message. You will perform the test after adding all libraries.
  7. Repeat for each library monitored by STA.
  8. After adding all the libraries, proceed to Test the Library Connection.