1 Configuring the System's Network
To enable the system to connect to the network, transmit and receive traffic with other systems, you would need to configure the system to have identifiable names, IP addresses, routes, and so on. Depending on the system's available resources, you can further optimize the network configuration to attain high availability and improved performance by implementing added network technologies such as network bonds and multipathing.
Network Configuration Tools
Different tools are available to configure the network. All them typically perform the same functions. You can select any tool or a combination of tools to manage the network.
-
Cockpit is a web-based configuration tool for managing network configuration, including network interfaces, bonds, bridges, virtual VLANs, and the firewall. For more information, see https://docs.oracle.com/en/operating-systems/oracle-linux/cockpit/.
- GNOME based tools
If you selected the default System With GUI installation profile or environment to install Oracle Linux, these tools are automatically included. For more information on installation profiles, see the Oracle Linux release's installation guide.
- The GNOME settings application enables you to perform various system configurations, including networking. To access this application, click the network icon at the upper right of the desktop and select Settings. Alternatively, click Activities on the desktop's menu bar, select Show Applications, then select Settings. From the list on the left panel, select the type of configuration you want to do.
- The Network Connection Editor is a subset of the GNOME settings application which you
can use to directly perform network configurations. To start the editor, type the
nm-connection-editorcommand on a terminal window.
NetworkManagercommand line toolsUse these tools if you didn't select the Server With GUI installation profile to install Oracle Linux.
- To start
NetworkManager's text based user interface (TUI), type thenmtuicommand on a terminal window. Navigate through the interface by using keyboard keys instead of the mouse device. NetworkManager's command line consists of thenmclicommand with different subcommands and options. With a combination of subcommands, options, and arguments, you can complete network configurations in a single command syntax. Other commands, such asipandethtool, complementnmclifor configuring and managing network settings. Optionally, to avoid entering long commands, you can usenmcliin interactive mode.For more information, see the
nmcli(1),ip(8), andethtool(8)manual pages.
- To start
Configuring Network Interfaces
The following information describes how to configure a NIC by using the tools that were described in previous sections.
To configure NICs by using Cockpit, see Oracle Linux: Using the Cockpit Web Console .
About Network Interface Names
Traditionally, early kernel versions assigned names to network interface devices by
assigning a prefix, which is typically based on the device driver, and a number, such as
eth0. With the availability of different types of devices, this naming
schema is no longer efficient. The names don't necessarily correspond to the chassis labels
and the names themselves might be inconsistent across existing network interfaces. The
inconsistency would affect embedded adapters on the system, including add-in adapters. Server
platforms with several network adapters could have problems managing these interfaces.
Oracle Linux implements a consistent naming scheme for all network interfaces through the udev device manager. The scheme offers the following advantages:
-
The names of the devices are predictable.
-
Device names persist across system reboots or after changes are made to the hardware.
-
Defective hardware can easily be identified and thus replaced.
The feature that implements consistent naming on devices is enabled in Oracle Linux by default. Network interface names are based on information that's derived from the system BIOS. Alternatively, they can be based on a device's firmware, system path, or MAC address.
Network interfaces are identified by a name that combines a prefix and a suffix. The prefix depends on the type of network interface:
-
Ethernet network interfaces:
en -
Wireless local area network (LAN) interfaces:
wl -
Wireless wide area network (WAN) interfaces:
ww
The suffix contains any of the following information:
-
An on-board index number
on, and thus,eno0. -
A hot-plug slot index number
sn, and thus,ens1.This naming schema can also include
ffunctionandddevice-idthat are added to the suffix. -
The bus and slot number
pbussn, and thus.enp0s8.This naming schema can also include
ffunctionandddevice-idthat are added to the suffix. -
The MAC address
xMAC-addr, and thus,enx0217b08b.Note that this naming format isn't used by Oracle Linux by default. However, administrators can implement it as an option.
Using the Network Connection Editor GUI
-
If not already installed, install the
nm-connection-editorpackage.sudo dnf install -y nm-connection-editor -
Start the editor:
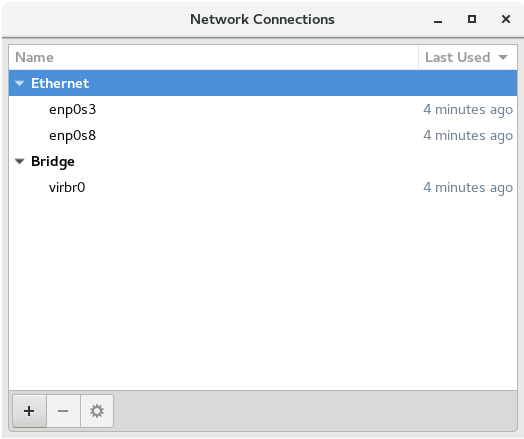
sudo nm-connection-editorThe editor detects the network devices that are on the system and lists them and their current states:
Figure 1-1 Network Connections
-
To add or remove a connection, use the plus (+) or minus (-) buttons at the bottom of the editor window.
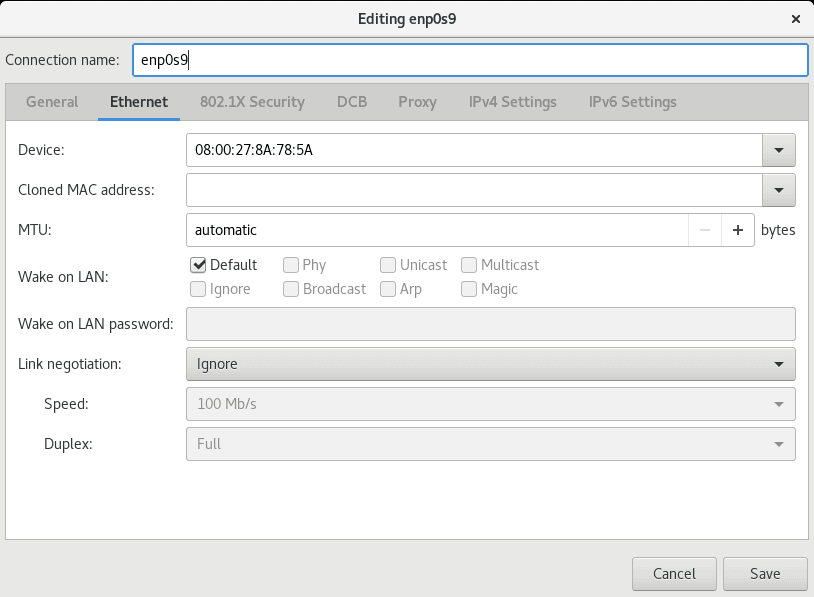
If you add a connection, a window that prompts you for the connection type opens. Select a type, such as Ethernet, from the drop down list, then click Create. The Interface Editor window opens.
Note:
The same window opens if you edit an existing connection.
Figure 1-2 Interface Editor
-
Click each tab as needed and enter the required information about the interface.
-
Click Save after you have completed the configuration.
You must specify all the required information. Otherwise, the settings can't be saved and the editor's background terminal window would display messages that indicate the errors.
Using the Text Based User Interface
-
If not already installed, install the
NetworkManager-tuipackage.sudo dnf install -y NetworkManager-tui -
Open
NetworkManager's text-based user interface.sudo nmtuiFigure 1-3 TUI Main Menu
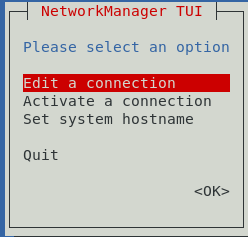
To navigate the tool, use the up and down arrow keys, then press Enter to make a selection
-
To add a connection, select Edit a connection, then click Add.
-
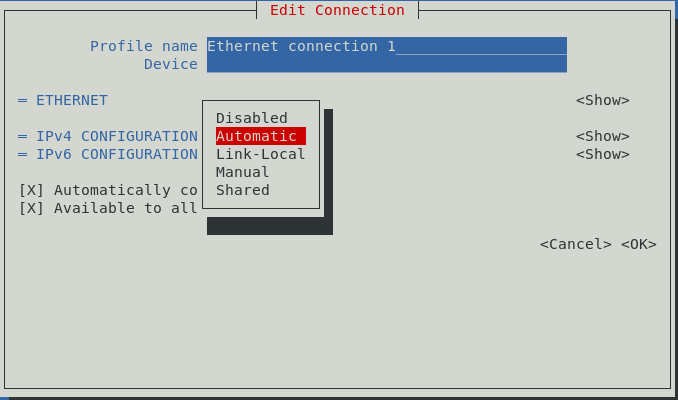
After selecting a connection type, the Edit Connection window opens.
Figure 1-4 Edit Connection
-
As an option, specify a preferred profile name and the name of the device.
-
By default, IPv4 and IPv6 configurations are set to Automatic. To change the setting, select the Automatic field and press Enter. From the drop down list, select the type of IP configuration that you want to implement, such as Manual. Then, select the corresponding Show field.
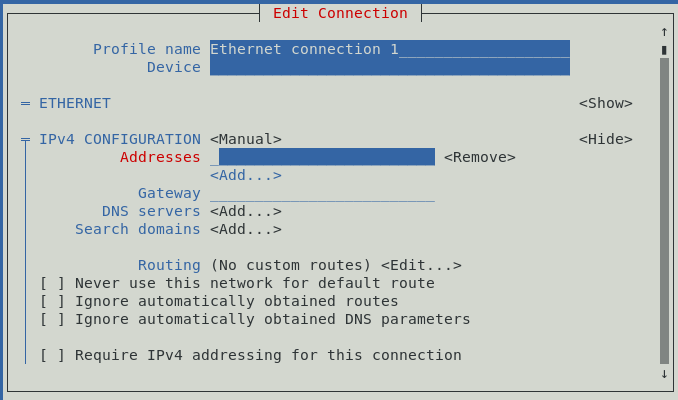
The fields that are displayed depend on the type of IP configuration that's selected. For example, to manually configure an IP address, selecting Show displays an address field, where you would enter an IP addresses for the interface, as the following figure illustrates.
Figure 1-5 Adding IP Addresses
-
Navigate through all the fields on the screen to ensure that the required information is specified.
-
After you have edited the connection, select OK.
Using the Command Line
To illustrate the different uses of the nmcli
command, this procedure describes an example of adding and
configuring a new Ethernet connection for the
enp0s2 device. For more information about the
command, see the nmcli(1) manual page.
Tip:
Before adding the connection, prepare the information you would need for the configuration, such as the following:
-
Connection name, for example,
My Work Connection. The nmcli command works by referring to the connection name rather than the device name. If you don't set a connection name, then the device's name is used as the connection name. -
IP addresses (IPv4 and, if needed, IPv6)
-
Gateway addresses
-
Other relevant data you want to set for the connection
-
(Optional): Display the network devices on the system.
sudo nmcli device statusDEVICE TYPE STATE CONNECTION enp0s1 ethernet connected enp0s1 enp0s2 ethernet disconnected -- lo loopback unmanagedThe command shows whether a device is connected or disconnected, and whether it is managed or unmanaged.
-
(Optional) Display the connection information about the network devices.
sudo nmcli con show [--active]NAME UUID TYPE DEVICE enp0s1 nn-nn-nn-nn-nn ethernet enp0s1 virbr0 nn-nn-nn-nn-nn bridge virbr0 mybond nn-nn-nn-nn-nn bond bond0The con subcommand is the short form of connection, and can be further shortened to c. Specifying the
--activeoption would display only active devices.Note that in the output,
NAMErepresents the connection ID. -
Add a new connection.
sudo nmcli con add {properties} [IP-info] [gateway-info- properties
-
The connection name as specified by the
con-nameargument, the type of connection as specified by thetypeargument, and the interface name as specified by theifnameargument. - IP-info
-
The IPv4 or IPv6 address as specified by either the
ip4orip6argument. The address must be in the formataddress/netmask. The IPv4 address can be in CIDR form, for example,1.2.3.4/24. - gateway-info
-
The gateway IPv4 or IPv6 address as specified by either the
gw4orgw6argument.
For example, to add the connection with the information at the beginning of this procedure, you would type:
sudo nmcli con add type ethernet ifname enp0s2 con-name "My Work Connection" ip4 192.168.5.10/24 gw4 192.168.5.2The output would acknowledge that the connection is successfully completed.
-
Activate the interface.
sudo nmcli con up "My Work Connection" -
(Optional) Display the configuration properties of the new connection.
sudo nmcli [-o] con show "My Work Connectionconnection.id: My Work Connection connection.uuid: nn-nn-nn-nn-nn connection.type: 802-3-ethernet connection.interface-name: enp0s2 ... IP4.ADDRESS[1]: 192.168.5.10 IP4.GATEWAY: 192.168.5.2 ...Specifying the
-ooption displays only properties that have configured values.
After you have created the connection, a corresponding profile is created. For more information on connection profiles, see Using NetworkManager Connection Profiles.
ls -lrt /etc/sysconfig/network-scripts/ifcfg*...
-rw-r--r--. 1 root root 266 Aug 6 11:03 /etc/sysconfig/network-scripts/ifcfg-My_Work_ConnectionConfiguring Network Routing
A system uses its routing table to identify which network interface to use when sending packets to remote systems. For a system with only a single interface, configuring the IP address of a gateway system on the local network suffices to route packets to other networks. For example, see the image Figure 1-5, which shows a field where you can enter the IP address of the default gateway.
On systems that have several IP interfaces, you can define static routes so that traffic for a special host or network is forwarded to that network through the default gateway. You use the same tools to configure routing as you do to configure network interfaces.
Using the Network Connection Editor
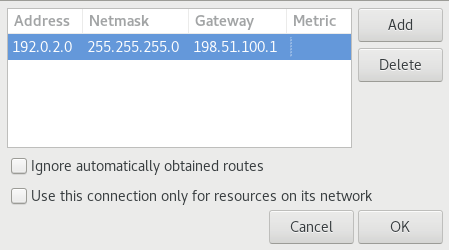
To create a static route to the 192.0.2.0/24 network through the gateway 198.51.100.1, ensure first that the default gateway 198.51.100.1 is reachable on the interface. Then, complete the following steps:.
- Start the editor.
nm-connection-editor - From the list of connections, select the device under the connection name for which you
want to create a static route. For example, under
myconnection, you would select the deviceens3. - Click the settings icon (gear wheel) to edit the connection settings.
- Click the IPv4 Settings tab.
- Click Routes.
- Click Add.
-
Enter the network's address and netmask for which the route is created, and specify the gateway IP address through which the route is established. You can optionally enter a metric value and select the other available options on display.
- Clcik OK and then save.
- Back at the terminal window, restart the connection.
This step causes the connection to temporarily drop.
sudo nmcli connection up myconnection - Optionally, verify that the new route is
active.
ip route... 192.0.2.0/24 via 198.51.100.1 dev myconnection proto static metric 100
Using the Command Line
To configure static routes with the nmcli command, use the following
syntax:
nmcli connection modify connection_name +ipv4.routes "ip[/prefix] options(s) attribute(s)"[next_hop] [metric] [attribute=value] [attribute=value] ..."- +ipv4.routes
- The plus (+) sign indicates that you're creating an IPv4 route. Without the sign, the command changes an existing IPv4 setting.
- connection-name
- Connection name or label for which you're creating a static route.
- ip[/prefix]
- IP address of the static route that you're creating. The IP address can also be in CIDR notation.
- options
- Options include next hop addresses and optional route metrics. These options are
separated by spaces. For more information, see the
nm-settings-nmcli(5)manual pages. - attributes
- Attributes are entered as attribute=value and are also separated by
spaces. Some attributes are
mtu,src,type,cwnd, and so on. For more information, see thenm-settings-nmcli(5)manual pages.
Suppose that you have the following configurations:
- Name of the connection:
myconnection - Default gateway address: 198.51.100.1
- Network to which you want to create a statci route: 192.0.2.0/24
To create the route, ensure first that the default gateway for the route is directly reachable on the interface. Then, do the following:
- Create the static
route.
sudo nmcli connection modify myconnection +ipv4.routes "192.0.2.0/24 198.51.100.1"To create several static routes in a single command, separate the route gateway entries with commas, for example:
sudo nmcli connection modify myconnection +ipv4.routes "192.0.2.0/24 198.51.100.1, 203.0.113.0/24 198.51.100.1" - Verify the new routing
configuration.
nmcli connection show myconnection–- ipv4.routes: { ip = 192.0.2.0/24, nh = 198.51.100.1 } –- - Restart the network connection.
This step causes the connection to temporarily drop.
sudo nmcli connection up myconnection - Optionally, verify that the new route is
active.
ip route... 192.0.2.0/24 via 198.51.100.1 dev example proto static metric 100
Using the Command Line in Interactive Mode
You can also use the nmcli command in interactive mode to configure network
settings, including configuring static routes. When in interactive mode, the
nmcli> prompt appears where you can run commands to configure static
routes for a specific connection profile.
The procedure in this section assumes the following network settings for creating the static route:
- Name of the connection:
myconnection - Default gateway address: 198.51.100.1
- Network to which you want to create a statci route: 192.0.2.0/24
To create the route, ensure first that the default gateway for the route is directly reachable on the interface. Then, do the following:
- Start the command's interactive
mode.
sudo nmcli connection modify myconnectionnmcli> - Create the static
route.
nmcli> set ipv4.routes 192.0.2.0/24 198.51.100.1 - Optionally, display the new
configuration.
nmcli> print... ipv4.routes: { ip = 192.0.2.1/24, nh = 198.51.100.1 } ... - Save the configuration.
nmcli> save persistent - Restart the network connection.
This step causes the connection to temporarily drop.
nmcli> activate myconnection - Exit the interactive mode.
nmcli> quit - Optionally, verify that the new route is
active.
ip route... 192.0.2.0/24 via 198.51.100.1 dev example proto static metric 100
Using NetworkManager Connection Profiles
Each network connection configuration that you create becomes a
NetworkManager connection profile on the system. In Oracle Linux 9, profiles can only be in the key file format.
Because network scripts have been removed in Oracle Linux 9,
the ifcfg format capability that manages these scripts has also
been removed.
NetworkManager connection profile can be stored
in one of the following locations:
/etc/NetworkManager/system-connections/: Default location of persistent profiles that are created by the user. Profiles in this directory can also be edited./run/NetworkManager/system-connections/: Location of temporary profiles that are automatically removed when you reboot the system./usr/lib/NetworkManager/system-connections/: Location of predeployed and permanent connection profiles. If you edit one of these profiles by using theNetworkManagerAPI, then the profile is copied either to the persistent or the temporary directory.
NetworkManager connection
profiles, see:
Creating a keyfile Connection Profile in Offline Mode Using
nmcli
When creating or updating NetworkManager profile connections, we
recommend using its CLI tool in offline mode (nmcli --offline). In
offline mode, nmcli operates without the
NetworkManager service, which offers user enhanced editing control
and the ability to create various connection profiles in keyfile
format. For example, you can create the following type of connection profiles in
keyfile format:
- static Ethernet connection
- dynamic Ethernet connection
- network bond
- network bridge
- VLAN or any kind of enabled connections
To create a keyfile connection profile using nmcli in
offline mode, follow these steps:
-
Use the required
NetworkManagerconfiguration properties to create a profile connection in offline mode.For example, the following syntax creates a keyfile connection profile in offline mode for an Ethernet device with a manually assigned IPv4 address and DNS address.
nmcli --offline connection add type ethernet con-name Example-Connection ipv4.addresses ###.#.#.#/# ipv4.dns ###.#.#.### ipv4.method manual > /etc/NetworkManager/system-connections/outputmconnectionwhere:nmcli --offline= ncmi mode property, which instructsnmclito operate in offline mode.connection add type ethernet= add connection and type properties, which is used to create a connecton profile and specify a connection type value (in this example: Ethernet).con-name= connection name property, which is saved into theidvariable for the generated connection profile.When you manage this connection later, usingnmcli, note the followingidvariable usages:- In cases where the
idvariable is provided, use the connection name. For example:Example-Connection. - In cases where the
idvariable is omitted, use the file name without the.nmconnectionsuffix, for exampleoutput.
Note:
For more information about connection profile properties and their settings, see thenm-settings(5)manual page.- In cases where the
-
Set permissions to the configuration file so that only the
rootuser can read and update it. For example:chmod 600 /etc/NetworkManager/system-connections/outputmconnection chown root:root /etc/NetworkManager/system-connections/outputmconnection -
Start the
NetworkManagerservice:systemctl start NetworkManager.service -
If you set the
autoconnectvariable in the profile tofalse, activate the connection:nmcli connection up Example-Connection - (Optional) To verify the profile configuration, perform these steps:
-
Verify that the
NetworkManagerservice is running, for example:systemctl status NetworkManager ● NetworkManager.service - Network Manager Loaded: loaded (/usr/lib/systemd/system/NetworkManager.service enabled vendor preset: enabled) Active: active (running) because Wed -03 13:08:32 CEST ago -
Verify that
NetworkManagercan read the profile from the configuration file, for example:nmcli -f TYPE,FILENAME,NAME connection TYPE FILENAME NAME ethernet /etc/NetworkManager/system-connections/outputmconnection Example-Connection ethernet /etc/sysconfig/network-scripts/ifcfg-enp0 enp0If the output doesn't display the newly created connection, verify that the
keyfilepermissions and the syntax used are correct. -
To display the connection profile use the
nmcli connection showcommand, for example:nmcli connection show Example-Connection connection.id: Example-Connection connection.uuid: ce8d4422-9603-4d6f-b602-4f71992c49c2 connection.stable-id: -- connection.type: 802-3-ethernet connection.interface-name: -- connection.autoconnect: yes
-
Creating a keyfile Connection Profile Manually
NetworkManager connection profile in a keyfile
format, follow these steps:
Note:
Manually creating or updating the configuration files can result in an unexpected network configuration. Another option would be to usenmcli in offline mode. See
- If you're creating a profile for a hardware interface, such as Ethernet, display the
hardware's MAC
address.
ip address show ens32: ens3: <BROADCAST,MULTICAST,UP,LOWER_UP> mtu 9000 qdisc pfifo_fast state UP group default qlen 1000 link/ether 02:00:17:03:b9:ae brd ff:ff:ff:ff:ff:ff ... - Use any text editor to create a connection profile that contains the network
settings that you want to define for the connection.
For example, if the connection uses DHCP, the profile would contain settings similar to the following example:
[connection] id=myconnection type=ethernet autoconnect=true [ipv4] method=auto [ipv6] method=auto [ethernet] mac-address=02:00:17:03:b9:ae - Save the profile to
/etc/NetworkManager/system-connections/filname.nmconnection.In this current procedure, the profile would be/etc/NetworkManager/system-connections/myconnection.nmconnection.Note:
The defined ID variable, such asmyconnection, doesn't need to be identical with the profile's file name, for examplemyethernet.nmconnection. When you change the profile by using thenmclicommand, you can identify the profile by the defined ID (myconnection) or by the file name, but excluding the file extension name (myethernet). - Restrict the permissions of the
profile.
sudo chown root:root /etc/NetworkManager/system-connections/myconnection.nmconnection sudo chown 600 /etc/NetworkManager/system-connections/myconnection.nmconnection - Reload the connection
profiles.
sudo nmcli connection reload - Verify that
NetworkManagercan read the profile.sudo nmcli -f NAME,UUID,FILENAME connectionNAME UUID FILENAME myconnection uuid /etc/NetworkManager/system-connections/myconnection.nmconnection - If you specified
falsefor the profile'sautoconnectparameter, then activate the connection.sudo nmcli connection up myconnection
Renaming Process Differences Between Connection Profile Formats
udev
service renaming process works differently depending on the format of the connnection
profile. For example,
ifcfgformat interface renaming process involves these steps:- The
/usr/lib/udev/rules.d/60-net.rulesudevrule calls the/lib/udev/rename_devicehelper utility. - The helper utility searches for the
HWADDRparameter in/etc/sysconfig/network-scripts/ifcfg-*files. - If the value set in the variable matches the MAC address of an
interface, the helper utility renames the interface to the name set in
the
DEVICEparameter of the file.
- The
keyfileformat interface renaming process involves these steps:- To rename an interface, create a systemd link file or a udev rule.
- In the
NetworkManagerconnection profile, specify the custom name in theinterface-nameproperty.
Converting Connection Profile Formats From ifcfg to
keyfile
To convert the NetworkManager legacy ifcfg profile
formats to the preferred NetworkManager
keyfile format, follow these steps:
Note:
For more information about thekeyfile profile
format, see the nm-settings-keyfile(5) manual page.
- Ensure that the following prerequisites are met:
- Existing connection profiles in
ifcfgformat that are stored in the/etc/sysconfig/network-scripts/directory. - If the connection profiles contain a
DEVICEvariable that is set to a custom device name, such asproviderorlan, you created asystemdlink file or audevrule for each of the custom device names.
- Existing connection profiles in
-
Using the
nmcli, migrate theifcfgconnection profiles to the preferredkeyfileformats.nmcli connection migrate - (Optional) Verify that all the legacy
ifcfgconnection profiles migrated successfully:nmcli -f TYPE,FILENAME,NAME connection
Running Scripts When Network Events Occur
You can configure the system to respond to network events by providing scripts for NetworkManager-dispatcher to run. Use a script, for example, to mount a remote file system when a device is brought up or send a notification when a device loses connectivity.
NetworkManager.service starts NetworkManager-dispatcher.service, which runs the scripts in /etc/NetworkManager/dispatcher.d/ following these parameters:
- One script runs at a time.
- Scripts run in sequence based on the order in which network events occur.
- After the dispatcher service queues a script, the script always runs, even if a later action makes the script unnecessary.
- NetworkManager terminates scripts if they run for too long.