1 Working With Accessibility Features in Oracle Linux 9
Accessibility features offer users with vision, hearing, and motor impairments ways to more easily use the Oracle Linux desktop. This guide provides information about enabling and configuring the accessibility features that are included in Oracle Linux 9.
Selecting a Desktop Version
Oracle Linux9 offers both the Standard and Classic GNOME desktop. When you install Oracle Linux by using the Server With GUI profile or environment, the Standard GNOME desktop is selected by default. However, you can select another desktop version if preferred.
To view the desktop versions or switch between versions, do the following:
-
Ensure that you're logged out of the Oracle Linux session.
-
Click the login username.
-
At the bottom right corner of the screen, click the cogwheel.
The list of desktop versions is displayed.
-
(Optional) Select a desktop version.
-
Continue logging in to the server.
The desktop selection becomes a persistent setting and applies to all authorized users of the system.
About Assistive Technologies
Assistive technologies promote accessibility for users with specific impairments.
Alternative presentations that are provided for these users include the following:
-
Synthesized speech
-
Magnified content
-
Alternative input methods
-
Additional navigation methods
-
Content transformations
Software features of Oracle Linux enable users with physical impairments to use all of the functionality of the desktop. Various desktop tools also enable you to customize the desktop's appearance and behavior.
Note:
Anaconda installation software for Oracle Linux doesn't provide any accessibility features.
Accessing Assistive Technologies
In Oracle Linux, the assistive technologies are listed on the Accessibility panel of the GNOME desktop's Settings window. Accessing the panel differs slightly between Standard and Classic desktops. However, the feature descriptions and configuration procedures are the same for both. This document assumes that you're using the default (Standard) desktop on the system.
Using the Standard Desktop
Choose one of the following methods:
-
Accessing through the System Tools group icon
The System Tools group icon consists of the 3 icons at the right side of the top bar of the screen. See the icons boxed in red in Figure 1-1.
-
On the right side of the top bar, click System Tools.
-
Click Settings.
-
From the list of options on the left panel, select Accessibility.
-
-
Accessing through the Activities menu option
-
On the top bar, click Activities.
-
On the search field, type accessibility.
-
From the list of options on the left panel, select Accessibility.
-
-
Accessing through the command line
-
Select the Terminal icon at the bottom of the screen.
If the icon isn't visible, click Activities, then select the icon.
-
On the terminal window, type:
gnome-control-center accessibility
-
From the list of options on the left panel, select Accessibility.
-
Using the Classic Desktop
Choose one of the following methods:
-
Accessing through the System Tools group icon
The System Tools group icon consists of the 3 icons at the right side of the top bar of the screen. See the icons boxed in red in Figure 1-1.
-
On the right side of the top bar, click System Tools.
-
Click Settings.
-
From the list of options on the left panel, select Accessibility.
-
-
Accessing through the Applications menu option
-
On the top bar, click Applications, select Other, then select Settings.
-
From the list of options on the left panel, select Accessibility.
-
-
Accessing through the command line
-
On the top bar, click Applications, select Favorites, then select Terminal.
- Type the following
command:
gnome-control-center accessibility
-
From the list of options on the left panel, select Accessibility.
-
Configuring Quick Access
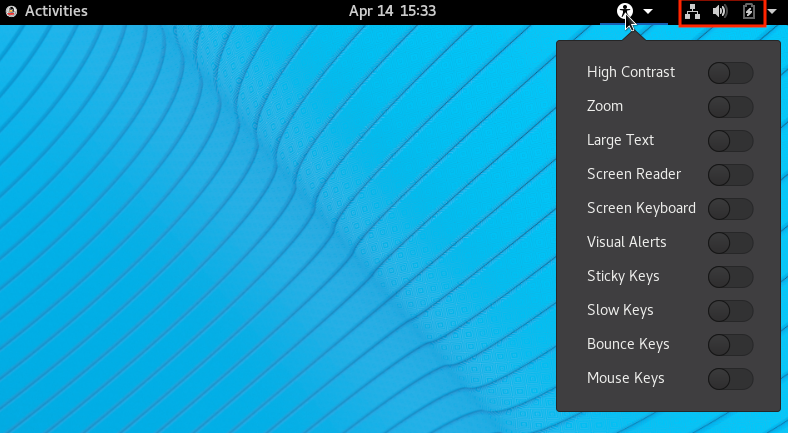
Oracle Linux provides an Accessibility Menu, which enables you to access and configure accessibility features without the need to open the Accessibility panel. This menu is disabled by default. To make the menu available, open the Accessibility panel and set the Always Show Accessibility Menu switch to On. Toggling this switch makes the Accessibility Menu icon become permanently visible on the top bar of the desktop.
Clicking the icon opens a list of accessibility features, as shown in the following figure:
Note:
Enabling selected features in the Accessibility panel also automatically enables quick access, even if the Always Show Accessibility Menu switch is disabled. However, in this case, if you switch off all of the enabled features through quick access, then the quick access icon disappears from the top bar.
Toggling the Always Show Accessibility Menu switch ensures that quick access is available permanently regardless of whether assistive features are enabled or not.
