Installing in Graphics Mode
The graphics installation mode consists of a series of graphical screens which you interact with to configure the installation.
Welcome Screen
The Welcome Screen is the first screen to appear after the system completes the boot process.
Figure 3-1 Welcome Screen

On this screen, select the preferred language to be used during the installation process. You can further select a specific locale, if any, for the selected language. Then select Continue to proceed.
Installation Summary
The Installation Summary screen appears after you have selected the installation language. It functions as the home or main screen.
Figure 3-2 Installation Summary
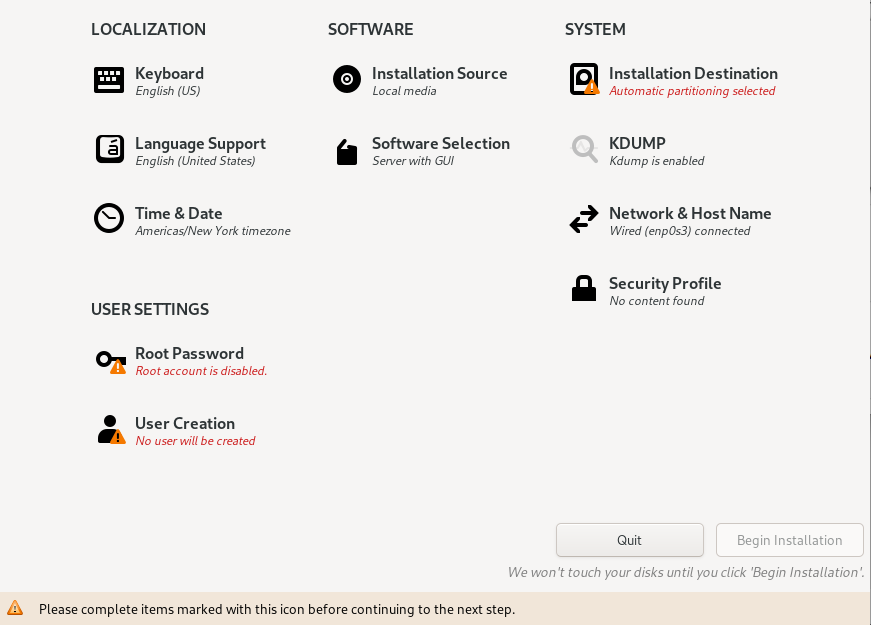
The screen provides four categories of options: LOCALIZATION, SOFTWARE, SYSTEM, and USER SETTINGS. Select an option under any of these categories to open a new screen where you can configure the selected option.
Most options under each category have default values and can be ignored to keep the default values. However, you must visit the options flagged with a warning icon.
After defining directives in a specific screen, select Done to return to the Installation Summary screen. Then you can configure other options. As you visit each configuration screen, pay attention to any warning messages that are displayed at the bottom of the screen.
You can continue to change installation configuration options until the installation begins. The installation doesn't begin until you select Begin Installation at the bottom of the screen. The Begin Installation button remains disabled until all the configuration warning flags have been cleared.
Note:
At the top upper right of the screen is the Keyboard switch. This switch appears in all the option screens to enable you to change to a different keyboard layout at any time during configuration. You must add the required layout to the list of available layouts first, as described in Keyboard Layout.
Localization
Under Localization, you configure the following options:
After configuring any of these options, select Done to return to the Installation Summary screen.
Keyboard Layout
Figure 3-3 Keyboard Layout

On the leftmost pane, you can add other keyboard layouts to the preselected default layout. You can also revise the order of the listed layouts. The layout at the top of the list becomes the default layout.
Languages
Configuring languages consists of specifying other locales of the selected language that you want the system to use. This option is similar to the configuration of the keyboard layout at the beginning of the installation.
Figure 3-4 Installing Extra Languages

From the list of languages on the left side, select other languages for the system. Then, on the right side, select from the available locales for that language.
Date and Time
The Date & Time screen lets you set the following:
-
Time zone for the system
-
Actual time and the format for displaying time
-
Current date
Figure 3-5 Date & Time
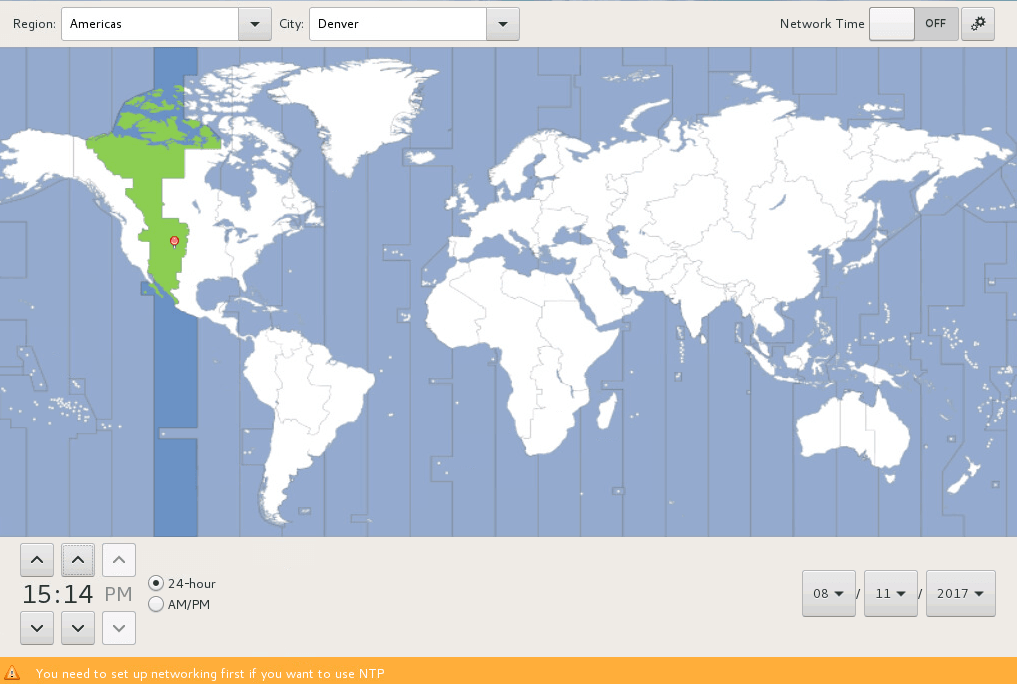
To select the system's time zone, select an area on the map that corresponds to where the system is. Or, you can select from the Region and City drop down lists to specify that location.
To select the system's time zone, select the appropriate location from the Region and City dropdown lists.
To specify time, time format, and date, select the appropriate buttons at the bottom of the screen.
To enable NTP, switch the Network Time switch at
the upper right corner of the screen to ON. Select
Settings to display a dialog box, where you can configure NTP
servers for the system to use.
You can skip configuring NTP until later by using the Chrony suite. See Oracle Linux 8: Setting Up Networking. See also Configure Chrony on Oracle Linux.
Software
Under Software, you configure the following options:
After configuring any of these options, select Done to return to the Installation Summary screen.
Installation Source
The Installation Source window identifies the source image that you use to install Oracle Linux.
Figure 3-6 Installation Source
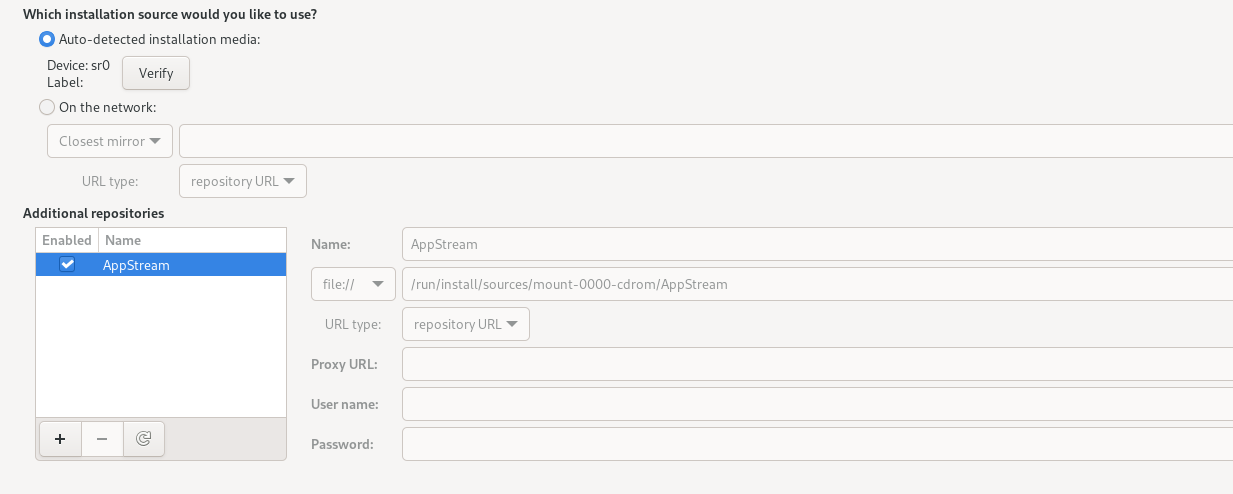
If you use the full ISO image as the source, the install program detects that image. By default, the Auto-detected installation media button is selected and Appstream is listed as an extra installation repository. Because the image contains all the packages required for a system installation, you can use the default configuration to proceed with the installation.
If you use the boot ISO image as the source, the On the network button is selected as the installation mode and the Closest mirror option is selected as the repository source. Optionally, you can specify a local mirror as a repository source, in which case you would need to provide the mirror's path. If no path is specified, the Oracle Linux yum server is used by default. The installer automatically uses the required repositories from the network mirror to install the OS. However, the repositories aren't listed in the window. Because the installation image is configured to automatically use the Oracle Linux yum server if no mirror path is specified, you can use the default configuration to proceed with the installation.
To install extra packages from other sources, use the Additional repositories box to add those sources, and then provide the necessary information about those sources in the text fields next to the box.
Software Selection
Software selection refers to the profile or base environment to be used during the installation.
Figure 3-7 Software Selection
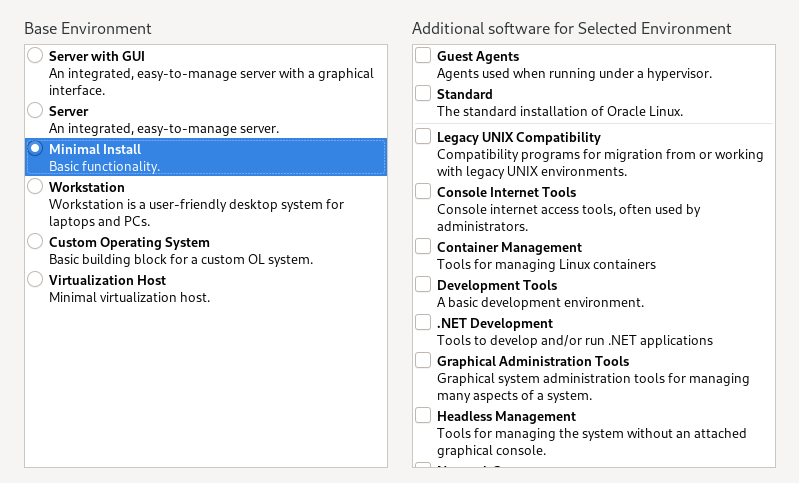
Each Base Environment represents a typical type of usage for the system and installs the required packages and software. The Server with GUI environment is selected by default. Select the base environment that best fits the purpose of the system on which you're installing Oracle Linux.
From the right side, you can add extra software profiles to the selected base environment. These profiles consists of groups of related packages that enable the required functionality.
System
Under System, you configure the following options:
After configuring any of these options, select Done to return to the Installation Summary screen.
Installation Destination
The installation destination is used to configure the disks where Oracle Linux is installed. Even if you accept the default settings, you must still open the Installation Destination screen to clear the option's warning icon.
Figure 3-8 Installation Destination
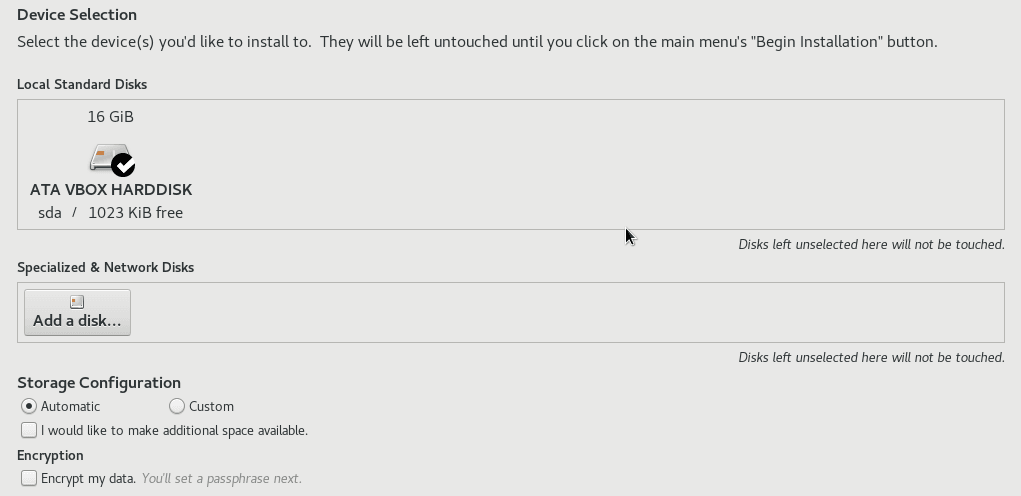
You can configure the installer to use local storage devices in the Local Standard Disks section of the window. A check mark icon on the disk device is displayed for any selected devices.
If you need to add network based or specialized storage such as ISCSI or NVDIMM devices, you can select the Add a disk... button in the Specialized & Network Disks section of the window.
You can configure other options for the target destination in the Storage Configuration section of the window:
-
Selecting the Automatic radio button performs automatic partitioning, using the default partitioning schema. See Default Disk Partition Layout.
-
I would like to make additional space available: Set this checkbox to reclaim space from an existing partitioning layout.
-
Encrypt my data: Set this checkbox to encrypt partitions using Linux Unified Key Setup (LUKS). You're prompted to set a LUKS encryption passphrase when you select the Done button.
-
-
Selecting the Custom radio button lets you use custom partitioning. If you set this option, the Manual Partitioning configuration page is displayed after you select the Done button.
Manual Partitioning
Detected mount points are listed in the left side of the window. Mount points are grouped by any detected OS installations. Options for each mount point are displayed on the right side when you select a mount point on the left side.
If the system contains existing file systems, ensure that enough space is available for the installation. To remove any partitions, select them in the list and select the - button.
If no partitions exist on the disk and you want to create a set of partitions as a starting point, select a partitioning scheme from the left side, and select Click here to create them automatically. The installer automatically creates standard partitions and mount points that you can customize and adjust.
The following options are available when configuring a mount point:
-
Mount point: If a file system is the root file system, enter
/, enter/bootfor the/bootfile system, and so on. No mount point is required for a swap file system. -
Desired Capacity: Set the value to the size of the file system that you want to create. You can use common size units such as KiB or GiB. The default size unit is MiB.
-
Device Type: Set the device type to one of
Standard Partition,LVM, orLVM Thin Provisioning. You can configure RAID options if two or more disks are configured for manual partitioning and you select an LVM device type. You can also configure the LVM Volume Group, if an LVM device type is selected. -
File System: Select the file system type that you want to use for the partition. Note that Oracle Linux also includes the Btrfs file system type, but to configure a Btrfs file system you must use the UEK boot image to load the installer. See Installing a System With a Btrfs root File System for more information.
-
Reformat: Set this checkbox format the partition. If the partition isn't a newly created one, you can unset the checkbox to retain existing data.
-
Label: Optionally label the partition to easily recognize individual partitions in other tooling.
-
Name: You can name a partition, but standard partitions are named automatically when they're created.
KDUMP
In the event of a system crash, Kdump captures information that helps diagnose the cause.
Figure 3-9 Kdump

Kdump is enabled by default and the amount of memory reserved for Kdump is calculated automatically. Select the Manual option to set the amount of reserved memory yourself.
Network and Host Name
Figure 3-10 Network & Host Name
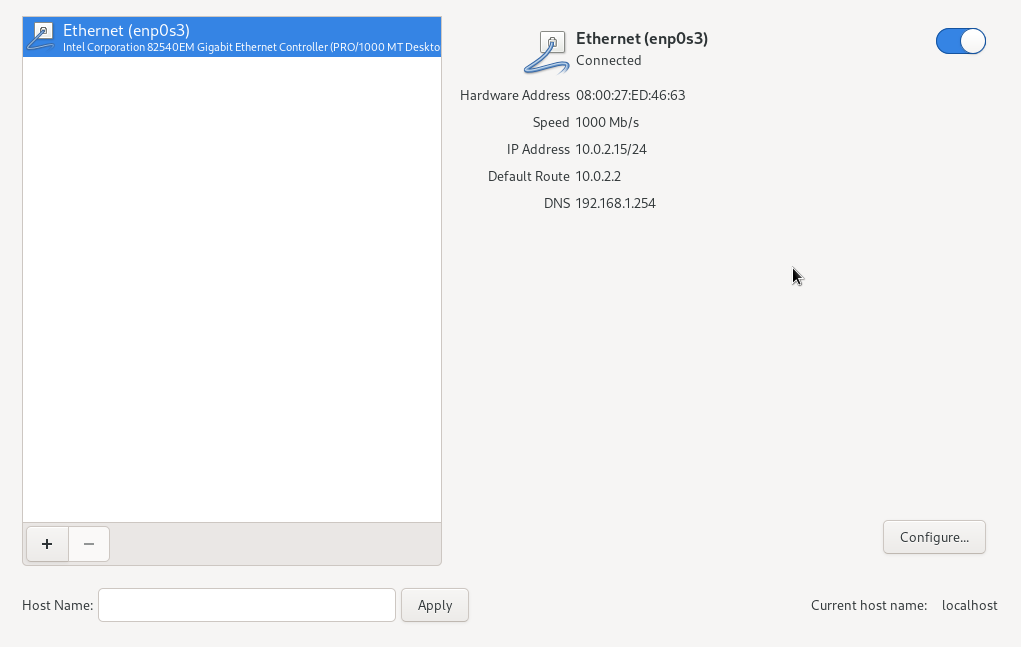
Network connections are disabled during an Oracle Linux 8
installation. To enable the network, select an interface from the list of interfaces
on the left side of the Network & Host Name window, then toggle the
switch at the upper right corner of the screen to ON.
By default, network configuration uses DHCP for IPv4 addresses. IPv6 addresses are configured automatically. The default settings are enough for the system to provide basic network functionality. However, you can customize the network configuration, for example, by providing a custom host name, or including a fully qualified domain name (FQDN). You can further opt to use static addresses instead of using DHCP, configure proxy settings, network bonds, and so on. To perform custom configuration, select Configure and follow the prompts on the other configuration screens.
Security Profile
Because security policy isn't required on all systems, use the Security Policy screen only if you need to enforce a specific security policy as defined by the organization or by government regulations.
Figure 3-11 Security Policy
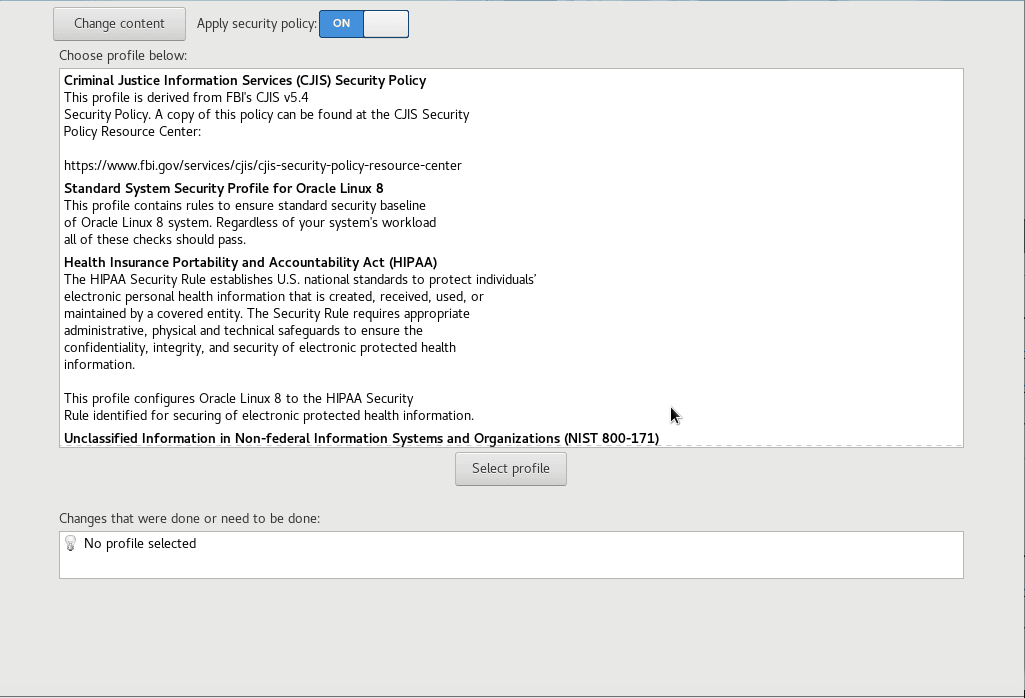
Available policies are listed in the profile window. These security policies follow the
recommendations and guidelines that are defined by the Security Content Automation Protocol
(SCAP) standard. Select the security profile you want to enforce and ensure that the Apply
security policy is switched to On.
If you prefer not apply any security policy, toggle the switch to
Off.
For more information on SCAP policies and profiles, see Oracle Linux 8: Using OpenSCAP for Security Compliance.
User Settings
Under User Settings, you configure the following options:
You must configure at least one of the options. For example, to enable only
the root account, create its password. Then select Done
to return to the Installation Summary screen where you can proceed with the installation. You
can add users to the system later.
Root Password
The Root Password window lets you set the root account password.
Figure 3-12 Setting the root password

Fields are available to set and confirm the root password.
Password strength is monitored and the following rules are applied:
-
Password must be eight characters or longer
-
Password contains numbers, letters (uppercase and lowercase) and symbols
-
Password is case-sensitive
If you have entered a weak password, you must confirm it by pressing the Done button twice.
User Creation
This option lets you configure a user's credentials to enable access to the system. You can optionally configure the user to have administrative privileges.
Figure 3-13 Create User

The following options are available:
-
Full name: Enter the full name of the user account. This field is used to show the user account in the graphical login manager.
-
User name: Enter the username that the user uses to sign in to the system on the command line or by using SSH.
-
Make this user administrator: Set the checkbox if the user requires administrative privileges. The user is added to the
wheelgroup, which is in thesudoersconfiguration by default.An administrator user can use the
sudocommand to perform tasks that are only available torootby using the user password, instead of therootpassword. -
Require a password to use this account: Set this checkbox to require a password to sign in to the system. Always set this checkbox, especially if you configure the user account with administrative privileges.
-
Password: Enter the user password into this field.
-
Confirm password: Enter a matching user password into this field.
Password strength is monitored and the following rules are applied:
-
Password must be eight characters or longer
-
Password contains numbers, letters (uppercase and lowercase) and symbols
-
Password is case-sensitive
Weak passwords are allowed, but require that you press the Done button twice.
After the options are configured, the Advanced button becomes available to let you configure other user account options, such as the home directory location for the user, different values for user ID or group ID, and a list of groups that the account belongs to.
Completing the Installation
From the Installation Summary screen, select Begin Installation. This button becomes available only when warning flags on option icons have been cleared.
The installation takes a while. After it finishes, reboot the system as prompted. At the completion of the system reboot, the opening screen might prompt you to accept the license agreement and provide the option to create extra users. You must at least review and accept the license agreement to enable the Finish Configuration button. Then sign in to the system according to the credentials you previously set in User Settings.
If the prompt to review the license agreement isn't displayed in the opening
screen, you can optionally review the license agreement in
/usr/share/oraclelinux-release/EULA after signing in.
For details of other configuration options, see Postinstallation Configuration.