2 Installing Oracle Linux Manually
WARNING:
Oracle Linux 7 is now in Extended Support. See Oracle Linux Extended Support and Oracle Open Source Support Policies for more information.
Migrate applications and data to Oracle Linux 8 or Oracle Linux 9 as soon as possible.
This chapter describes how to perform a basic Oracle Linux installation by using a CD, DVD, or a USB drive.
Starting the Installation
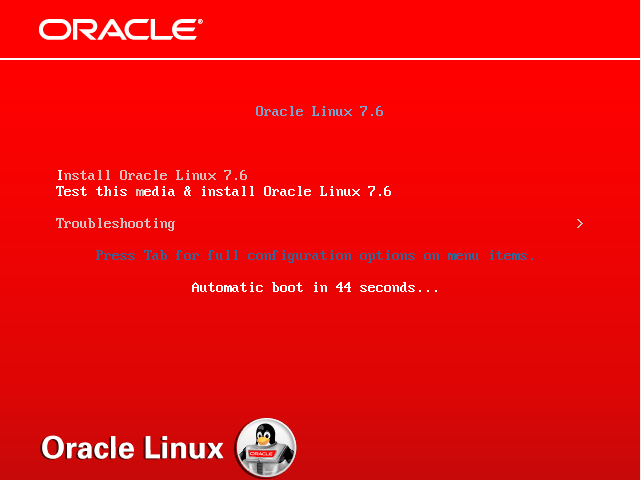
To install Oracle Linux, you need to boot the system from a boot image. You might need to configure the host system's BIOS or hypervisor settings to use the boot device that you have chosen. When the system locates the boot image file, the boot menu appears, as shown in Figure 2-1.
The boot menu contains the following options:
- Install Oracle Linux 7
-
Uses the graphical installation program to install Oracle Linux, provided that the system has sufficient memory and the video card is supported. Otherwise, the text-based installation option is selected, see Text-Based Installations.
- Test this media & install Oracle Linux 7
-
Tests the installation media and then uses the graphical installation program to install Oracle Linux, provided that the system has sufficient memory and the video card is supported. Otherwise, text-based installation is selected.
This is the default option.
- Troubleshooting
-
Provides access to a separate menu which contains options for resolving issues with installing or booting an Oracle Linux 7 system, see Troubleshooting Menu Options.
Use the up and down arrow keys to navigate the boot menu. To install Oracle Linux 7, select one of the options to install Oracle Linux and press Enter. The Welcome to Oracle Linux 7 screen is displayed. Figure 2-2 shows the options on this screen.
Figure 2-2 Welcome to Oracle Linux 7
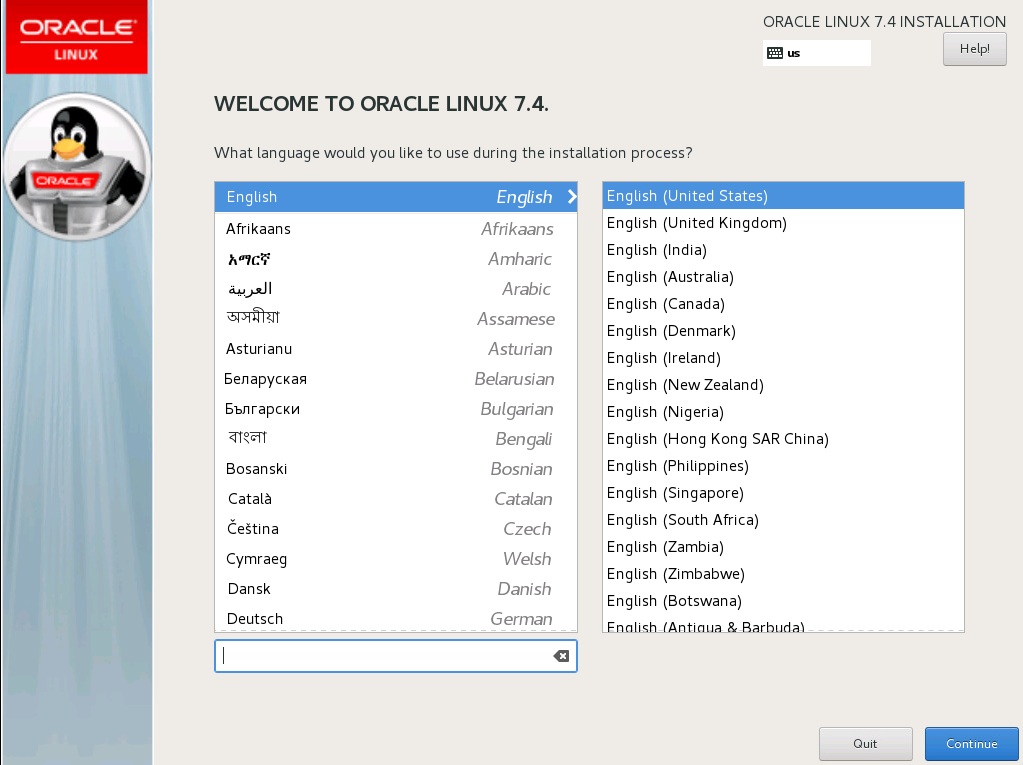
In the left-hand box, use the mouse to select the language to use for the installation, or type the name of the language in the search box. In the right-hand box, select a locale. The language you select becomes the default language for the system. If you need to, you can change the default language after you have installed the software.
Click Continue, the Installation Summary screen is displayed. Figure 2-3 shows the options on this screen.
Figure 2-3 Installation Summary
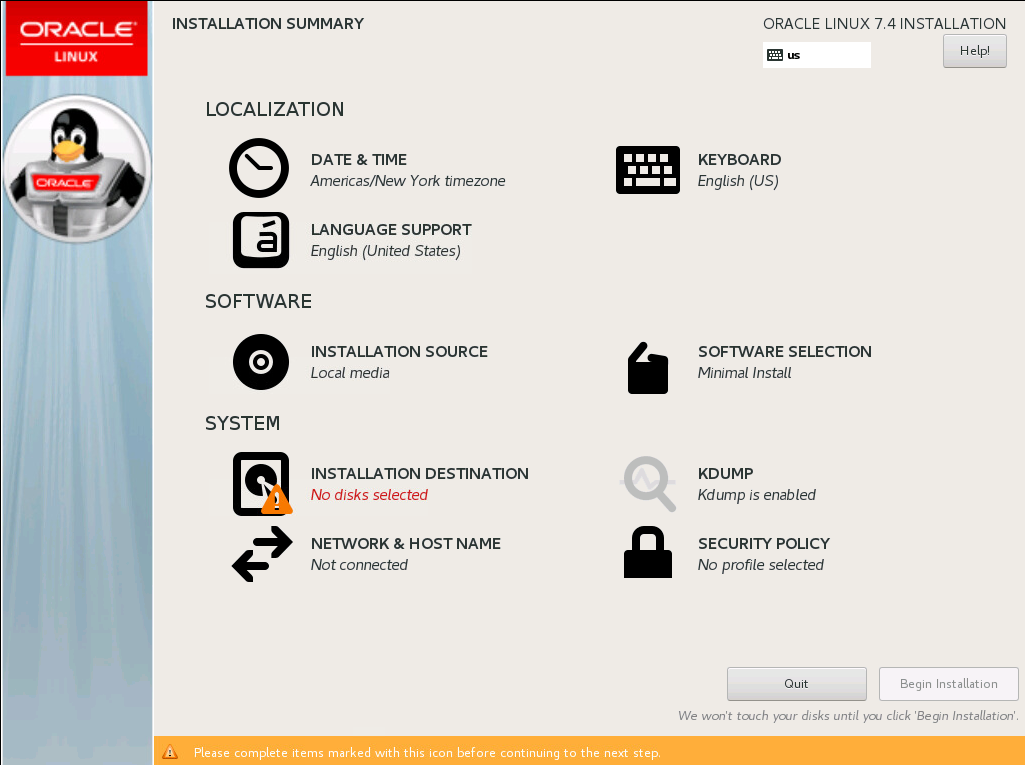
The Installation Summary screen presents an overview of the options selected for the installation and a menu for configuring those options. As a minimum, you must visit the options that are marked with a warning icon. If you want to connect the system to a network, you should also visit the Network Configuration option and ensure that network connections are enabled. You can change the installation configuration options as much as you like, the installation does not begin until you click Begin Installation. As you visit the configuration options, pay attention to any warning messages displayed at the bottom of the screen.
Setting the System Time and Supporting Other Languages
This section describes how to use the options in the Localization section of the Installation Summary screen.
Setting the System Time
To set the correct time for the system, click the Date & Time option on the Installation Summary screen to display the Date & Time screen. Figure 2-4 shows the options on this screen.
Figure 2-4 Date & Time
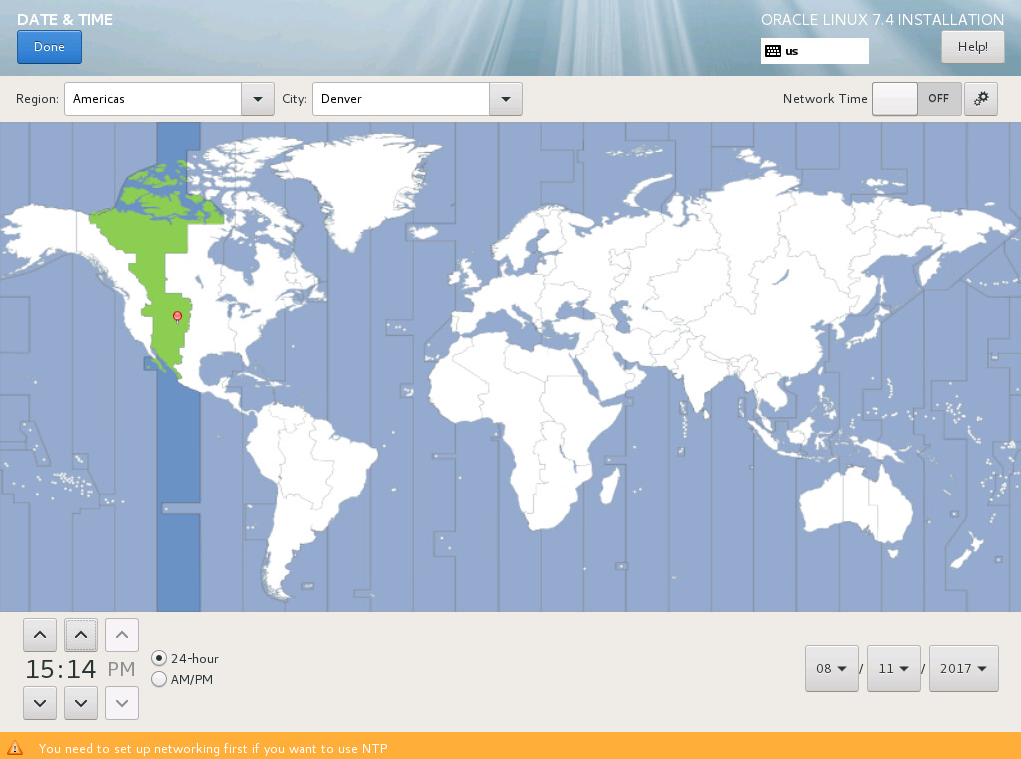
Pick a time zone by selecting a region and city from the drop-down lists, or by clicking a location on the map. Choose a country and city that are in the same time zone as your system. You need to specify a time zone even if you intend to use the Network Time Protocol (NTP) to set the time on the system.
Before you can enable NTP, ensure that the system is connected to a network by selecting the Network & Hostname option on the Installation Summary screen (see Configuring the Host Name and Connecting to a Network). To enable NTP, move the Network Time switch to the ON position and click the Settings button to display a dialog where you can configure the NTP servers that the system should use.
To set the date and time manually, ensure the Network Time switch is in the OFF position, and then adjust the date and time at the bottom of the screen if needed.
Click Done to save your configuration and return to the Installation Summary screen.
Adding Keyboard Layouts
To add support for any additional keyboards that will be used with the system, click the Keyboard option on the Installation Summary screen to display the Keyboard Layout screen. Figure 2-5 shows the options on this screen.
Figure 2-5 Keyboard Layout
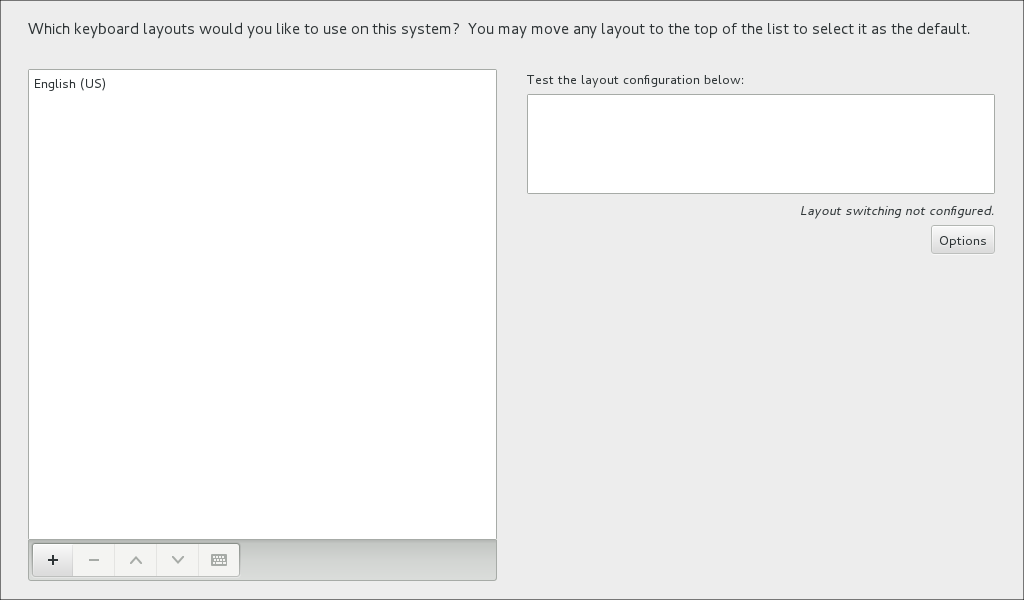
Click the + button to display a dialog where you can select the additional keyboard layouts you want to install on the system. To check a keyboard layout:
-
Select the keyboard in the list and click the Keyboard button at the bottom of the screen to display a picture of the layout.
-
Click the keyboard icon at the top of the screen to change the current keyboard, then click in the box on the right, and type some text.
If you add multiple keyboard layouts, the first keyboard shown in the list of keyboards is the default keyboard. Use the arrow buttons to change the order of the list. You should also click Options and configure the keyboard shortcut for switching between layouts.
Click Done to save your configuration and return to the Installation Summary screen.
Adding Language Support
To add support for any additional locales that will be used with the system, click the Language Support option on the Installation Summary screen to display the Language Support screen. Figure 2-6 shows the options on this screen.
Figure 2-6 Language Support
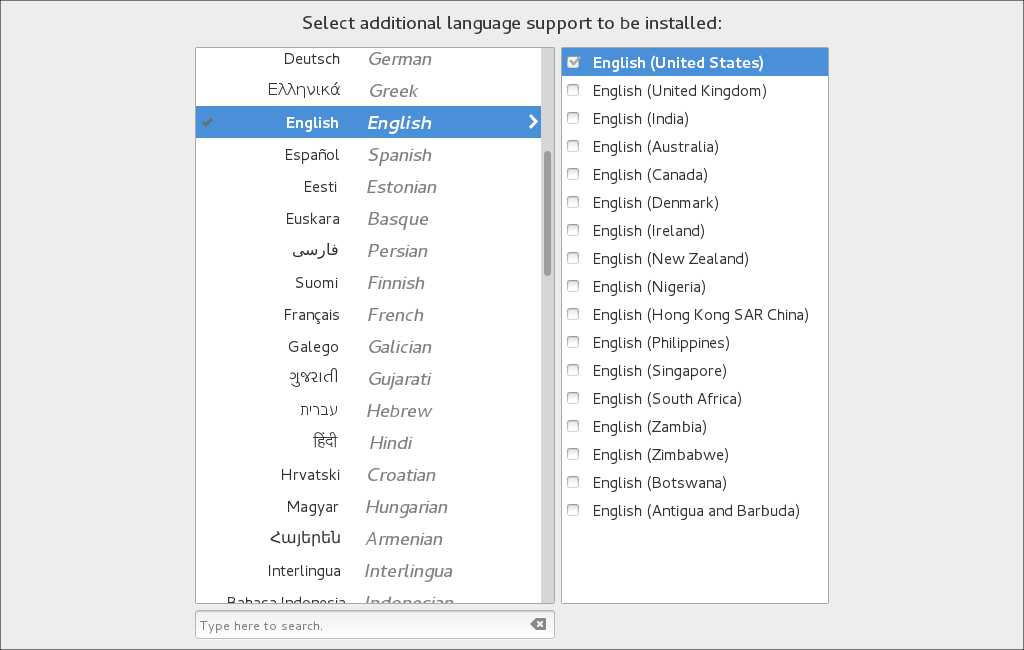
Select a language in the left-hand box, or type in the search box, and then select one or more locales in the right-hand box.
Click Done to save your configuration and return to the Installation Summary screen.
Selecting the Software to Install
This section describes how to use the options in the Software section of the Installation Summary screen.
Selecting the Full Installation Image
When you install Oracle Linux, you need to specify a location that contains the full installation image. To specify a location, click the Installation Source option on the Installation Summary screen to display the Installation Source screen. Figure 2-7 shows the options on this screen.
Figure 2-7 Installation Source
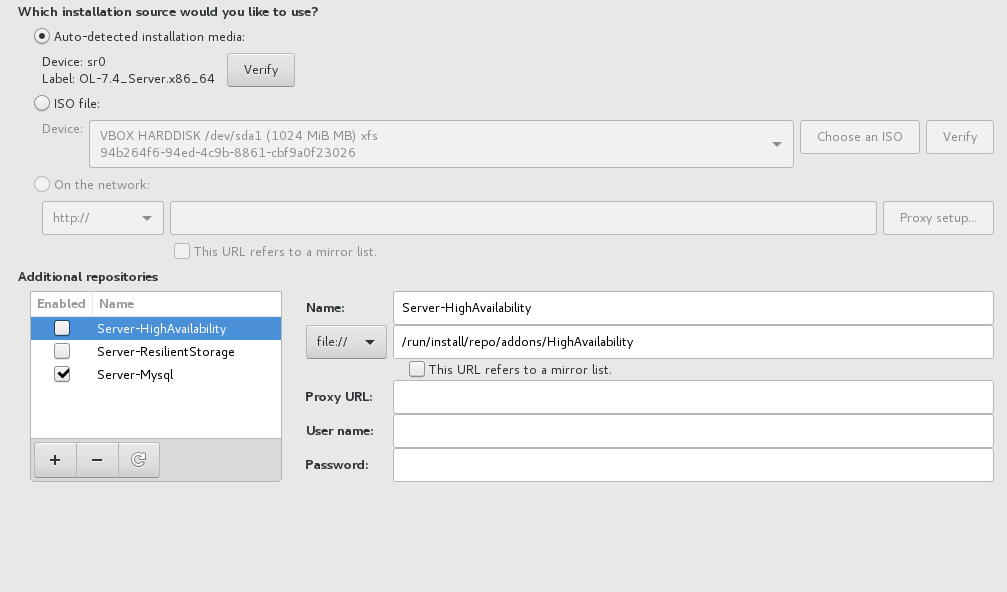
Select the location of the full installation image, as follows:
- Auto-detected installation media
-
This option is only available if the installation program detected a local device that contains the full installation image. If you did not check the installation media when you started the installation, click Verify to check the media.
- ISO file
-
This option is only available if the installation program detected a local hard drive that can be mounted. Select the device in the Drive list, and then click Choose an ISO to select an ISO image. Click Verify to check the media.
- On the network
-
Select the network protocol required to access a network installation server from the list and then enter either :
-
For HTTP or HTTPS, the URL of the installation image.
If needed, click Proxy setup and configure the details for your organization's proxy server that acts as an intermediary for Internet access.
-
For NFS and FTP, the domain name or IP address of the server and the path to the directory that contains the installation image.
For NFS, the path can be the path to an ISO image. Enter any NFS mount options that are required.
To use a network location, ensure that the system is connected to a network (see Configuring the Host Name and Connecting to a Network) otherwise the installation program reports an error.
-
You can also use the + button to specify additional repositories containing software you want to install. The Server-HighAvailability and Server-Resilient Storage repositories listed contains upstream high availability packages and are not supported in Oracle Linux 7.
Click Done to save your configuration and return to the Installation Summary screen.
Selecting the Software to Install
To select the software you want to install on the system, click the Software Selection option on the Installation Summary screen to display the Software Selection screen. Figure 2-8 shows the options on this screen.
Figure 2-8 Software Selection
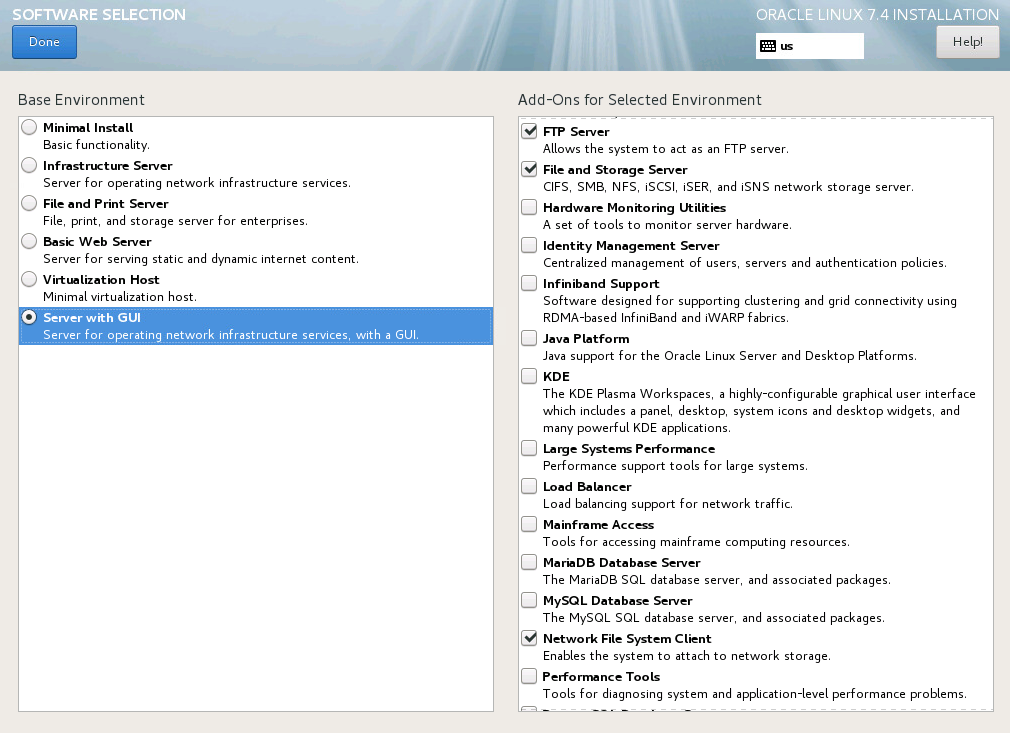
The screen is in two parts, the Base Environment on the left and the Add-Ons for Selected Environment on the right. In the Base Environment part, you select an environment that best matches what the system will be used for. In the Add-Ons part, you select the software you want to add to the selected Base Environment.
The Minimal Install base environment is the default environment. It contains only the minimum set of packages required to run Oracle Linux and does not include many administration tools that you might normally use, such as wget or unzip. This environment is the most secure environment to install and requires the least system resources to run. After the software is installed, you can install any other packages that you require.
The Server with GUI base environment is the only environment that displays a graphical desktop when the system boots. All other base environments boot into a command-line environment.
By default, the Server with GUI base environment installs the Gnome 3 desktop. If you want an alternative desktop, select KDE as an add-on.
There is no base environment or add-on for installing the Oracle Database (RDBMS). After you install Oracle Linux 7, you can use the Oracle RDBMS Server Pre-Install RPM to perform preinstallation configuration tasks for Oracle Database. For more information, go to https://docs.oracle.com/en/database/oracle/oracle-database/18/ladbi/automatically-configuring-oracle-linux-with-oracle-preinstallation-rpm.html#GUID-22846194-58EF-4552-AAC3-6F6D0A1DF794.
Click Done to save your configuration and return to the Installation Summary screen.
Configuring System Storage and Networking
This section describes how to use the options in the System section of the Installation Summary screen.
Choosing Where to Install the Software and Configuring Storage
To choose where to install the software and to configure the storage, click the Installation Destination option on the Installation Summary screen to display the Installation Destination screen. Figure 2-9 shows the options on this screen.
Figure 2-9 Installation Destination
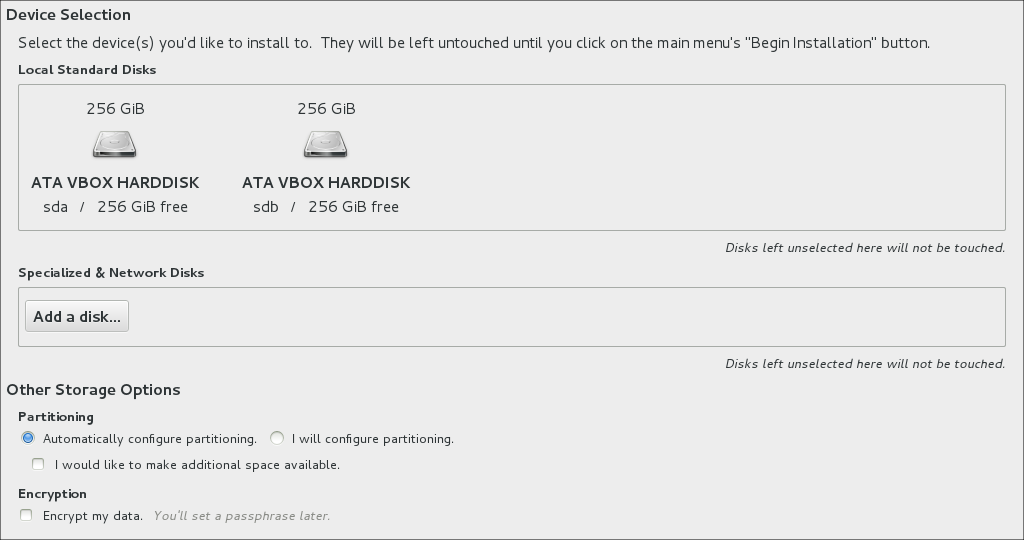
On this screen, you select the local disks and other storage you want to use for the installation, and configure the partitioning and file system types you want to use. The installation program does not make any changes to any of the disks and storage until you click Begin Installation on the Installation Summary screen.
First, choose the devices on which you want to install Oracle Linux:
-
In the Local Standard Disks section, select the local disks you want to use for the installation by clicking on them. A Tick icon is displayed next to the disks you have selected.
-
In the Specialist & Network Disks section, you can select hardware RAID, iSCSI or Fibre Channel over Ethernet (FCoE) storage devices. Click Add Disk to display the options for adding and configuring these device types.
Next, select how you want to partition the selected disks automatically or manually. By default, the Automatically configure partitioning option is selected. Automatic disk partitioning creates the following layout on the selected disks:
-
A standard partition for an XFS file system mounted at
/boot. This partition is sized to 500 MiB by default, or 1 GiB on systems running Oracle Linux 7.3 or later. -
A 200 MiB EFI system partition mounted at
/boot/efi(UEFI-based systems only). -
A partition in the remaining disk space configured as a Logical Volume Manager (LVM) physical volume for an LVM volume group that contains:
-
A logical volume for an XFS file system for the root file system (
/). -
A logical volume for an XFS file system for the
/homefile system (if the selected disks are larger than 50 GiB in total). -
A logical volume for a swap partition.
-
With automatic partitioning, you might not have sufficient space to install the software if the disk is already partitioned. The information at the bottom of the screen tells you how much disk space is needed for the software you have selected. To free some disk space, select I would like to make additional space available and click Done. The Reclaim Disk Space window is displayed, as shown in Figure 2-10. You are also prompted to free disk space if you click Done and there is insufficient space.
Figure 2-10 Reclaim Disk Space
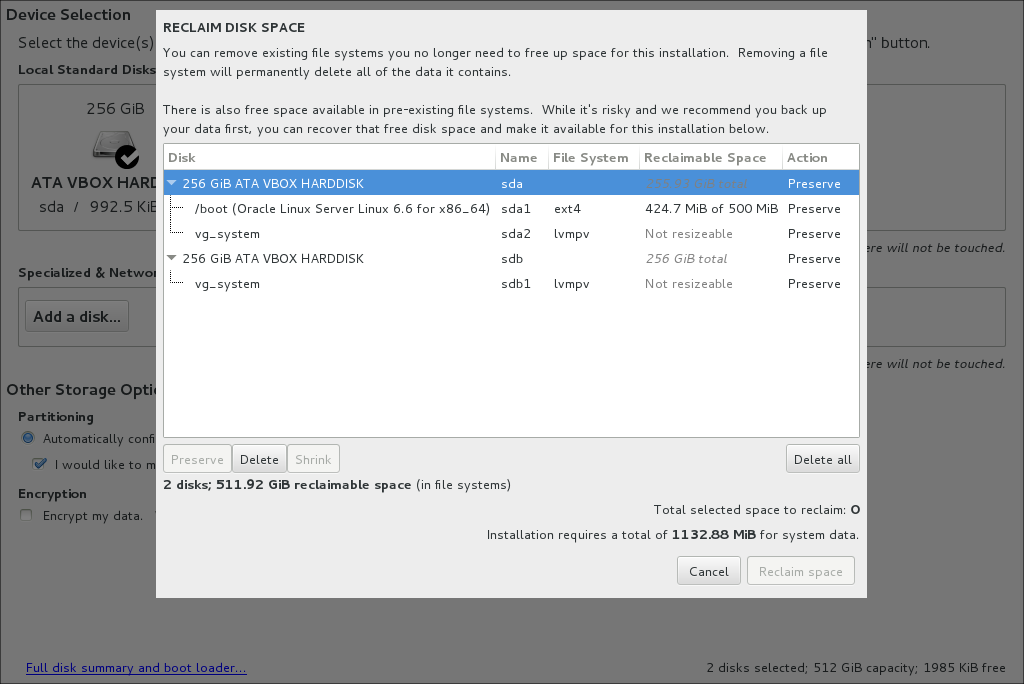
Select the partitions you want to use, then click Delete, Shrink, or Delete all to free disk space, and then click Reclaim Space.
If you want full control over how the disks are partitioned or the file system types used, you must partition the disks manually by selecting I will configure partitioning. The options for partitioning are displayed when you click Done. You can partition disks using standard partitions, btrfs, LVM logical volumes, or LVM thin provisioning. For an example of how to partition disks manually, see Installing a System With a Btrfs root File System
If you select Encrypt my data
on the Installation Destination screen, you are prompted to
enter a passphrase for the encryption when you click
Done. This option encrypts
all the disk partitions, except the partition that contains
/boot, using Linux Unified Key Setup (LUKS).
If a partition is encrypted, you cannot access data on the
partition without entering the passphrase. If you lose this
passphrase, you cannot recover the data on the disk. If you only
want to encrypt particular partitions, you must partition the
disks manually. There are some important issues when encrypting
data:
-
For LVM, selecting Encrypt my data encrypts the LVM physical volume and all the logical volumes that it contains. If you do not select Encrypt my data, you can encrypt the logical volume by selecting the Encrypt check box on the Manual Partitioning screen or encrypt the physical volume by selecting the Encrypt check box on the Configure Volume screen.
-
For
btrfs, encryption can only be applied to the block device that contains the file system, including its subvolumes. For example, enabling encryption for the/homesubvolume of abtrfsroot file system implicitly enables encryption for the root file system itself. You can only select the Encrypt check box on the Configure Volume screen. Becausebtrfsdoes not support encryption at the file-system level, you cannot select the Encrypt check box on the Manual Partitioning screen for abtrfsfile system. -
Do not select the Encrypt check box or a BTRFS, LVM, or LVM Thin Provisioning device type for the
/bootfile system. The/bootfile system must be configured on a standard partition and should be of the type,ext4or XFS.
Oracle Linux uses the Grand Unified Bootloader version 2 (GRUB 2) boot
loader as the default boot loader. The boot loader runs when the
system starts and loads the kernel, without the need for boot
media. By default, GRUB 2 is installed in either the master boot
record (MBR) or the GUID partition table of the device that
contains the root (/) file system. Click
Full disk summary and
bootloader to change the location of GRUB 2 or to
prevent its installation. For UEFI-based systems, the GPT is
always used. For BIOS-based systems (including UEFI-based
systems in legacy BIOS mode), by default the MBR is used if the
disk size is less than 2 TiB, otherwise the GPT is used.
Click Done to save your configuration and return to the Installation Summary screen.
Configuring Kdump
To configure Kdump, click the Kdump option on the Installation Summary screen, the Kdump window is displayed. Figure 2-11 shows the options on this screen.
Figure 2-11 Kdump

In the event of a system crash, Kdump captures information that assists in determining the cause. By default, Kdump is enabled and the amount of memory reserved for Kdump is calculated automatically. Select Manual if you want to set the amount of reserved memory yourself.
Click Done to save your configuration and return to the Installation Summary screen.
Configuring the Host Name and Connecting to a Network
The installation program does not force you to configure the system's network interfaces and, for some types of installation, network connections are disabled by default. To connect the system to a network either during installation or when the system boots, click Network & Hostname option on the Installation Summary screen to display the Network & Hostname screen. Figure 2-12 shows the options on this screen.
Figure 2-12 Network
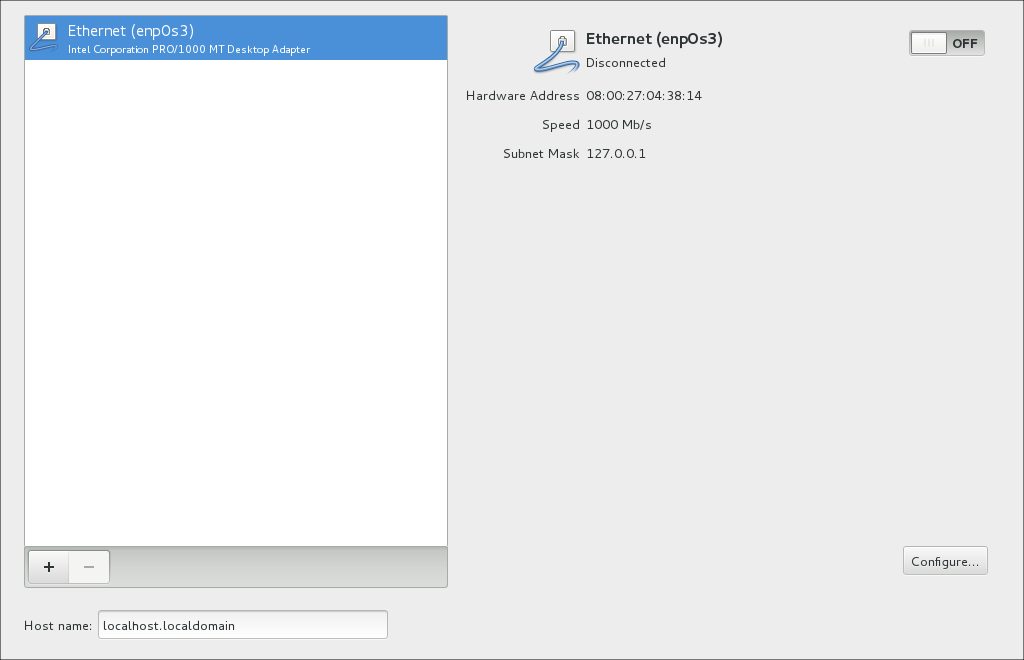
To enable a network interface, select the interface in the list of interfaces and then move the switch to the ON position. By default, the IP settings for a network interface are configured automatically using DHCP for IPv4, and the Automatic method for IPv6. To edit the connection, click Configure to display the connection settings window as shown in Figure 2-13.
Figure 2-13 Network Connection Settings

To enable the connection whenever the network is available, select Automatically connect to this network when it is available on the General tab. Use the settings on the other tabs to configure the connection. For example to set a static IPv4 address, click IPv4 Settings and select Manual for the Method, and then enter values for the IP address, network mask, gateway, and DNS parameters. When you have finished configuring the connection, click Save.
On the Network & Hostname screen, enter the host name of the
system as either as a single name or as a fully-qualified domain
name (FQDN), for example, host01.example.com.
If you use the Dynamic Host Configuration Protocol (DHCP) to
provide network settings, enter a single name and allow DHCP to
assign the domain name.
You can also add special network devices such as an interface bond or team, or a VLAN (virtual local area network) device. Click the + button to access the settings for configuring these devices.
Click Done to save your configuration and return to the Installation Summary screen.
Setting the Security Policy
You can optionally set security policy at installation time by configuring settings in the Security Policy screen.
Note:
Because security policy is not required on all systems, only use the Security Policy screen if you need to enforce a specific security policy, per what is mandated by your organization or government regulations.
By default, no security policies are enforced and no checks are performed during or after an installation, unless you specifically configure settings in this screen at installation time.
As shown in Figure 2-14, there are several pre-defined policies (profiles) that are available in the Security Policy screen. These security policies follow the recommendations and guidelines that are defined by the Security Content Automation Protocol (SCAP) standard. See Oracle® Linux 7: Security Guide for more details about SCAP.
You can also add custom security policies that you download from an HTTP, HTTPS, or FTP server. You use the Change content option in the Security Policy screen to configure custom policies.
Figure 2-14 Security Policy
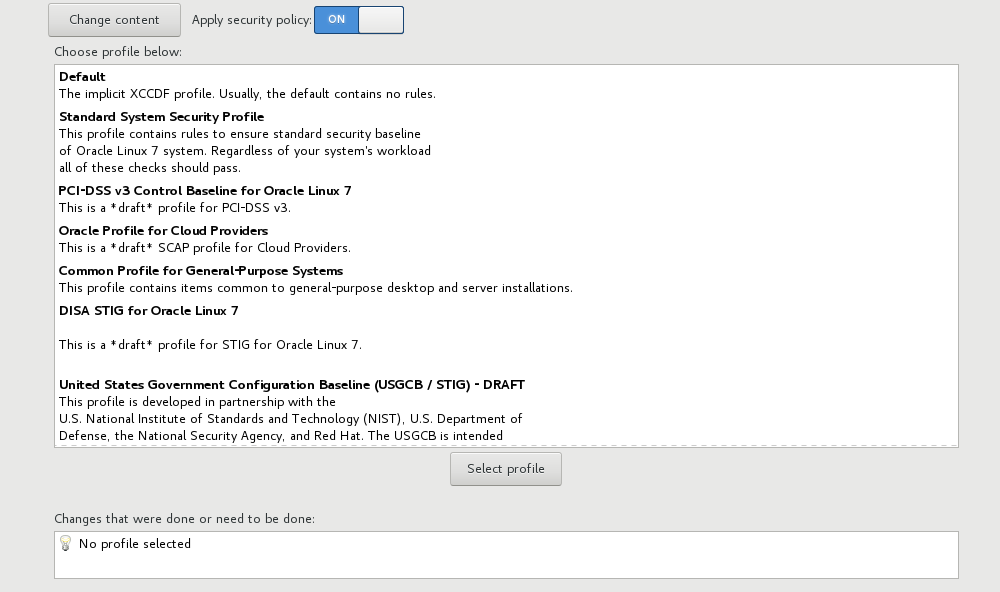
To set security policy in the Security Policy screen, begin by
toggling the Apply security
policy switch to On. This switch is
located at the top of the screen.
Note:
If the Apply security policy
switch is set to Off, you cannot configure
any of the settings in this screen. The switch can be set to
Off if you are not setting security policy
during the installation.
Select a profile from the list of profiles that is displayed in the top window of the screen. Click the Select profile button. A message confirming the selection is displayed in the Changes that were done or need to be done: field that is located in the bottom window of the screen. A checkmark is displayed next to the selected profile on the right of the window.
Click Done to save the changes and return to the Installation Summary screen.
You use the same screen to configure custom security settings. You can download the custom profile from an HTTP, HTTPS, or FTP server. Note that you must have an active network connection so that you can download the custom profile prior to using this option. You also might need to perform certain pre-installation tasks.
To use a custom profile, click the Change content button that is located in the top left corner of the screen. Clicking this button opens another window, where you type the URL to the download location of the custom profile.
Note:
You must use the complete address, including the protocol, for
the location of the custom profile, for example,
http://.
Click Fetch to download the custom security profile. Alternately, click Use SCAP Security Guide to return to the default policy selection window.
Check that the Changes that were done or need to be done: field shows the changes to be made. Then, click Done to save the changes.
During the installation, the security policy that you applied is
installed according to the restrictions and recommendations that
are defined in the specified profile. In addition, the
openscap-scanner package is added to the
packages that are installed. This package provides a tool for
compliance and vulnerability scanning.
When the installation has completed, the system is automatically
scanned to verify compliance, and the results are saved to the
/root/openscap_data directory on the system.
Completing the Installation
Once you have selected all your installation configuration options, click Begin Installation on the Installation Summary screen to start the installation. The Configuration screen is displayed. Figure 2-15 shows the options on this screen.
Figure 2-15 User Settings

The screen contains a menu with two options for configuring users and a status bar that shows the progress of the installation. You can use the menu options while the installation is in progress. You must set the root password to finish the installation. Creating a user is optional, you can do it now or when the installation is complete. It is best to create a user, as you should not log in to the system as the root user.
If you want users to authenticate using a mechanism such as LDAP or Kerberos, you need to configure this when the installation is complete.
Setting the Root Password
Click Root Password to display the Root Password screen. Figure 2-16 shows the options on this screen.
Figure 2-16 Root Password

Enter the root password in the Root Password and Confirm fields. The screen provides a visual indication about the strength of the password. Click Done to return to the Configuration screen. If you set a weak password, you have to click Done twice.
Creating a User
Click User Creation to display the Create User screen. Figure 2-17 shows the options on this screen.
Figure 2-17 Create User

Enter the details of the local user account you want to create. Again there is a visual indication about the strength of the password.
Select Make this user
administrator if you want the user to be able to
administer the system. Selecting this option adds the user to
the wheel user group, which enables them to
run administrative tools using the sudo
command.
If you want more control over how the user is configured, for example to specify the user's home directory or user ID, click Advanced.
Once you have configured the user, click Done to return to the Configuration screen. If you set a weak password, you have to click Done twice.
Rebooting and Initial Setup
Once you have completed the user configuration, click Finish Configuration. When the packages are installed, click Reboot.
If you installed a base environment other than the Server with
GUI environment, the system reboots as a non-graphical system
and displays a login prompt. Once you log in, you can review the
license agreement at
/usr/share/oraclelinux-release/EULA.
If you installed the Server with GUI environment, the system reboots and the Initial Setup screen is displayed. Figure 2-18 shows the options on this screen.
Figure 2-18 Initial Setup

You must select the License Information option and accept the license agreement. The User Creation option is only displayed if you did not create a user during installation. If you create a user here, the options for creating a user are the same as during the installation.
Click Finish Configuration, the Set Up Software Updates window is displayed, as shown in Figure 2-19.
Figure 2-19 ULN Registration
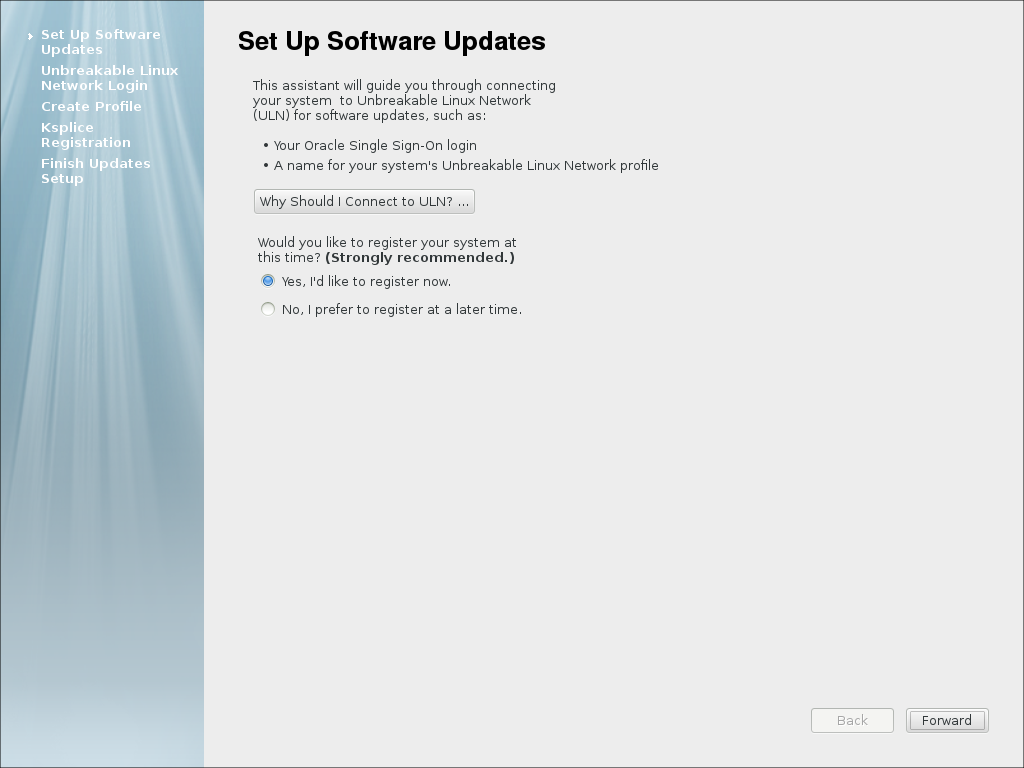
If the system has an active network connection, you use the following screens to register your system with the Unbreakable Linux Network (ULN), and to subscribe the system to software and Ksplice updates. Click Finish. The graphical login screen is displayed.
