Setting Up Load Balancing in NAT Mode

The following procedure describes how to configure Keepalived in NAT mode to implement a basic failover and load balancing configuration on two servers. One server acts as the primary, the other acts as a backup, with the primary server having a higher priority than the backup server. Both servers use VRRP to monitor the current routing state. For more information about VRRP, see Using Keepalived With VRRP.

In this procedure, the example servers each have two network interfaces. The first interface is connected to an external network (192.168.1.0/24). The second interface is connected to an internal network (10.0.0.0/24), on which two web servers are accessible.

The following figure shows that the Keepalived primary server has the following network addresses: 192.168.1.10, 192.168.1.1 (virtual), 10.0.0.10, and 10.0.0.100 (virtual).

The Keepalived backup server has the following network addresses: 192.168.1.11 and 10.0.0.11.

For IP addresses, websrv1 has 10.0.0.71 and websrv2 has 10.0.0.72.

Figure 3-1 Keepalived Configuration for Load Balancing in NAT Mode
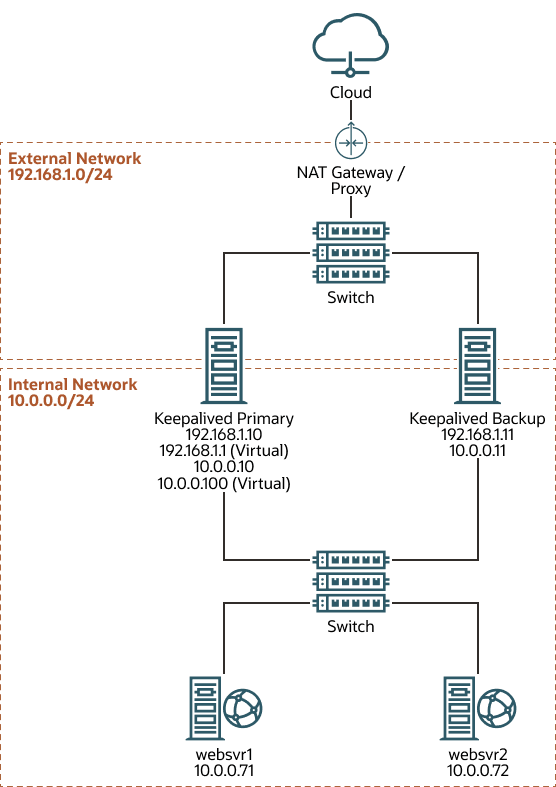

The figure shows that the Keepalived primary server has network addresses 192.168.1.10, 192.168.1.1 (virtual), 10.0.0.10, and 10.0.0.100 (virtual). The Keepalived backup server has the network addresses 192.168.1.11 and 10.0.0.11. For IP addresses, websrv1 has 10.0.0.71 and websrv2 has 10.0.0.72.
  1. Configure the primary server.

    The following is an example of the configuration in the /etc/keepalived/keepalived.conf file on the primary server:

    global_defs {
       notification_email {
         root@example.com
       }
       notification_email_from srv1@example.com
       smtp_server localhost
       smtp_connect_timeout 30
    }
    
    vrrp_sync_group VRRP1 {
    #   Group the external and internal VRRP instances so they fail over together
        group {
            external
            internal
            }
    }
    
    vrrp_instance external {
        state MASTER
        interface enp0s8
        virtual_router_id 91
        priority 200
        advert_int 1
        authentication {
            auth_type PASS
            auth_pass 1215
        }
    #   Define the virtual IP address for the external network interface
        virtual_ipaddress {
            192.168.1.1/24
        }
    }
    
    vrrp_instance internal {
        state MASTER
        interface enp0s9
        virtual_router_id 92
        priority 200
        advert_int 1
        authentication {
            auth_type PASS
            auth_pass 1215
        }
    #   Define the virtual IP address for the internal network interface
        virtual_ipaddress {
            10.0.0.100/24
        }
    }
    
    # Define a virtual HTTP server on the virtual IP address 192.168.1.1
    virtual_server 192.168.1.1 80 {
        delay_loop 10
        protocol TCP
    #   Use round-robin scheduling in this example
        lb_algo rr
    #   Use NAT to hide the back-end servers
        lb_kind NAT
    #   Persistence of client sessions times out after 2 hours
        persistence_timeout 7200
    
        real_server 10.0.0.71 80 {
            weight 1
            TCP_CHECK {
              connect_timeout 5
              connect_port 80
            }
        }
    
        real_server 10.0.0.72 80 {
           weight 1
           TCP_CHECK {
              connect_timeout 5
              connect_port 80
            }
        }
    }

    The configuration includes both a vrrp_sync_group section so that the network interfaces are assigned together on failover, and a virtual_server section to define the real backend servers that Keepalived uses for load balancing. The value of lb_kind is set to use NAT, which means the Keepalived server handles both inbound and outbound network traffic from and to the client on behalf of the backend servers.

  2. Verify that the configuration file is valid.
    sudo keepalived -t
  3. Configure the backup server.

    The configuration of the backup server is the same, except for the values of notification_email_from, state, priority, and possibly interface, if the system hardware configuration is different:

    global_defs {
       notification_email {
         root@example.com
       }
       notification_email_from srv2@example.com
       smtp_server localhost
       smtp_connect_timeout 30
    }
    
    vrrp_sync_group VRRP1 {
    #   Group the external and internal VRRP instances so they fail over together
        group {
            external
            internal
            }
    }
    
    vrrp_instance external {
        state BACKUP
        interface enp0s8
        virtual_router_id 91
        priority 100
        advert_int 1
        authentication {
            auth_type PASS
            auth_pass 1215
        }
    #   Define the virtual IP address for the external network interface
        virtual_ipaddress {
            192.168.1.1/24
        }
    }
    
    vrrp_instance internal {
        state BACKUP
        interface enp0s9
        virtual_router_id 92
        priority 100
        advert_int 1
        authentication {
            auth_type PASS
            auth_pass 1215
        }
    #   Define the virtual IP address for the internal network interface
        virtual_ipaddress {
            10.0.0.100/24
        }
    }
    
    # Define a virtual HTTP server on the virtual IP address 192.168.1.1
    virtual_server 192.168.1.1 80 {
        delay_loop 10
        protocol TCP
    #   Use round-robin scheduling in this example
        lb_algo rr
    #   Use NAT to hide the back-end servers
        lb_kind NAT
    #   Persistence of client sessions times out after 2 hours
        persistence_timeout 7200
     
        real_server 10.0.0.71 80 {
            weight 1
            TCP_CHECK {
              connect_timeout 5
              connect_port 80
            }
        }
    
        real_server 10.0.0.72 80 {
            weight 1
            TCP_CHECK {
              connect_timeout 5
              connect_port 80
            }
        }
    }
  4. Verify that the configuration file is valid.
    sudo keepalived -t
  5. Configure firewall rules on each server.

    Configure the firewall rules on each Keepalived server (primary and backup) that you're configuring as a load balancer. See Configuring Firewall Rules for Keepalived NAT-Mode Load Balancing.

  6. Configure the default route on each server to use the virtual IP address of the load balancer's internal network interface.

    Configure a default route for the virtual IP address of the load balancer's internal network interface on each backend server that you intend to use with the Keepalived load balancer. See Configuring Backend Server Routing for Keepalived NAT-Mode Load Balancing.

After you complete the configuration steps on all servers, you can run the following command on one of the keepalived servers to verify the service is running correctly:
sudo journalctl -u keepalived

Configuring Firewall Rules for Keepalived NAT-Mode Load Balancing

If you configure Keepalived to use NAT mode for load balancing with the servers on the internal network, the Keepalived server handles all inbound and outbound network traffic and hides the existing backend servers by rewriting the source IP address of the real backend server in outgoing packets with the virtual IP address of the external network interface.

The following example shows how to move interface enp0s9 to the internal zone, while interface enp0s8 remains in the public zone.

To configure a Keepalived server to use NAT mode for load balancing:

  1. Check the state of any active firewall zones on the system.
    Run the following command:
    sudo firewall-cmd --get-active-zones

    Output similar to the following is displayed:

    public
      interfaces: enp0s8 enp0s9
  2. Configure firewall interfaces so that they belong to the appropriate zones.

    Configure the firewall so that the interfaces on the external network side are in a zone that's different from the interfaces on the internal network side:

    sudo firewall-cmd --zone=public --remove-interface=enp0s9
    sudo firewall-cmd --zone=internal --add-interface=enp0s9
    sudo firewall-cmd --permanent --zone=public --remove-interface=enp0s9
    sudo firewall-cmd --permanent --zone=internal --add-interface=enp0s9

    Confirm that the changes have been applied:

    sudo firewall-cmd --get-active-zones

    Output similar to the following is displayed:

    internal
      interfaces: enp0s9
    public
      interfaces: enp0s8
  3. Configure NAT mode (masquerading) on the external network interface.

    For example, run:

    sudo firewall-cmd --zone=public --add-masquerade
    sudo firewall-cmd --permanent --zone=public --add-masquerade
    sudo firewall-cmd --reload

    Optionally, you can query each NAT mode to ensure that both of them have been set correctly. The query for public zone would return a yes response, and the query for internal zone would return a no response.

    sudo firewall-cmd --zone=public --query-masquerade
    sudo firewall-cmd --zone=internal --query-masquerade
  4. Configure forwarding rules between internal and external interfaces.

    If not already enabled for the firewall, configure forwarding rules between the external and internal network interfaces, for example:

    sudo firewall-cmd --direct --permanent --add-rule ipv4 filter FORWARD 0 \
      -i enp0s8 -o enp0s9 -m state --state RELATED,ESTABLISHED -j ACCEPT
    sudo firewall-cmd --direct --permanent --add-rule ipv4 filter FORWARD 0 \
      -i enp0s9 -o enp0s8 -j ACCEPT
    sudo firewall-cmd --direct --permanent --add-rule ipv4 filter FORWARD 0 \
      -j REJECT --reject-with icmp-host-prohibited
    sudo firewall-cmd --reload
  5. Enable access to the services or ports that you want Keepalived to handle.

Configuring Backend Server Routing for Keepalived NAT-Mode Load Balancing

On each server that you intend to use with the Keepalived load balancer, ensure that the routing table contains a default route for the virtual IP address of the load balancer's internal network interface. This task shows how to configure the default route for an interface.
  1. Identify the network device that you're configuring.
    Use the nmcli device status command to list all devices.
    nmcli device status

    The device must be connected to the same network that the virtual IP address is configured for.

    You can use the nmcli device show command to show the details for any devices listed. For example, run:
    nmcli device show enp0s8
  2. Use the nmcli command to set the default route on the device to match the virtual IP address that you have configured on the load balancer.

    For example, to configure the default gateway on the enp0s8 device to match the virtual IP address of 10.0.0.100, run:

    nmcli connection modify enp0s8 ipv4.gateway 10.0.0.100
  3. Reload the network interface connection.
    Restart the network connection to pick up the new configuration by running:
    nmcli connection down enp0s8
    nmcli connection up enp0s8
  4. Verify that the device shows the correct default route.

    For example, if the virtual IP address is 10.0.0.100 and you have configured this as the default gateway, use the ip command to examine the routing table:

    sudo ip route show

    Output similar to the following is displayed.

    default via 10.0.0.100 dev enp0s8 
    10.0.0.0/24 dev enp0s8  proto kernel  scope link  src 10.0.0.71